0204.19
Author: Alla
No comments yet
Most people believe that creating an original interior style will require large financial investments. Of course, all this is due to the fact that the cost of original products can be very high. But the truth is that you can easily and without much financial expense make many interior details on your own.
One such device for decorating rooms is a glass shelf. Such products help to add some bright colors to the “gray” rooms.
The glass shelves themselves can be purchased at any specialized store.
How to make glass shelves with your own hands? The easiest way
Most people believe that creating an original interior style will require large financial investments. Of course, all this is due to the fact that the cost of original products can be very high. But the truth is that you can easily and without much financial expense make many interior details on your own.
One such device for decorating rooms is a glass shelf. Such products help to add some bright colors to the “gray” rooms.
The glass shelves themselves can be purchased at any specialized store.
Glass shelves
Most often what happens is that the owners decide to design a glass shelf themselves. However, a lack of knowledge or skills leads to the fact that one of the simplest design options is chosen. It is important to understand here that this does not mean that such a shelf lacks beauty and attractiveness. One of the main factors in choosing a glass shelf is that you can use it in any room of your home. Another important point that it is recommended to pay attention to is the creation of several shelves at once. This is argued by the fact that one design most often does not fit well into the interior, especially if its dimensions are quite small in relation to all other things.
How to use glass shelves in the interior
Before you start choosing this product, you need to determine the interior style of the room in which it will be located. Today there is a huge variety of structures on which you can place items such as books, figurines, photographs, etc.
A simple glass piece will help highlight the style of any room, without distracting from other bright accents in the room.
These shelves can be used in any room. This includes a bathroom, a kitchen, a bedroom, and a living room. After all, such a product is neutral in itself, so it will look great anywhere. And this is one of the advantages of glass shelves. After all, they can become part of any interior, which makes them significantly different from their wooden counterparts.
An interesting solution would be to use several structures simultaneously in one place. Since single products may look a little awkward, especially if the shelf is very small. It is best in this case to attach 5-10 shelves at once. It will look great, especially if there is a lot of free space at their location.
Advantages of glass shelves:
— the first and most important advantage of such products is that, despite their simplicity, they can be perfectly combined with any design solutions;
— the second advantage of the products is the ease of their creation. After all, anyone can do this. It is only important to study the technological process a little. You just need to stock up on the necessary materials and tools;
- attractive appearance. In addition, unlike wooden analogues, it does not clutter up the space. Which is especially important for small rooms.
- not everyone may like the simplicity of such designs. For example, not many people will like the fact that when placing books and other items on such a shelf, the product itself may become invisible;
- fragility of the material. But if you place products in places that are away from constant movement, then this can be ignored.
Glass shelves in the interior
As we have already said, glass shelves have recently been increasingly used in various interiors. Moreover, in some cases, these same shelves look really unusual, and sometimes even strange. Again, it all depends on what style of space we have and whether a particular shelf will look good within it.
As for creating glass shelves with your own hands, the situation is quite interesting. First of all, it makes sense to pay attention to the variety of shelf designs on which you can display various objects, including vases, books, figurines and much more. As for creating such shelves with their own hands, often owners who do not have enough experience to create such solutions decide to implement everything extremely simply, since in this situation there is the least likelihood of making unwanted mistakes. However, simplicity does not mean that a glass shelf will be something too unattractive.
If you look at various photographs of interiors in which there are simple glass shelves, you will notice that such minimalism has a positive effect on the style of the room and does not distract from other details present in the space.
Speaking about the use of glass shelves, it is worth noting the fact that they can be used in almost all places of the home, from the bathroom to the bedroom. This is the same neutral object that will look harmonious anywhere. This is definitely the strong point of glass shelves, since unlike wooden structures, which, unfortunately, look attractive in rare cases, they adapt and become part of any home.
It is worth saying that the most correct solution would be to create several shelves at once in a specific place in the apartment. Practice shows that single shelves look quite ridiculous, especially if the structure itself is small in relation to the entire space. Thus, if you arrange 5 or even 10 glass shelves, it will look great, especially if there is enough free space in a particular place to place various things.
Rules for working with material
First of all, it should be noted that you should work with glass very carefully, thinking through every movement.
First you need to take a glass cutter. Before cutting the material, you need to practice a little so that you don’t make a mistake at the right time.
Next, you need to decide on the dimensions of the future structure and create markings. This is easy to do with a regular marker.
Next, you may need a belt sander. It is necessary for edge processing.
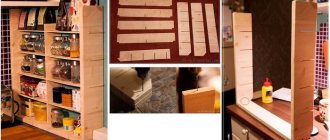
How to secure the product
Important! If you plan to place several structures, then for convenience you need to stick vertical strips.
You will need a simple pencil and a level. With their help, you can determine the best place for fastening. It should be remembered that the product must be fixed exactly horizontally. Otherwise, objects placed on it may fall.
After the location of future fasteners has been planned, you need to drill holes using a drill.
Next, you need to insert dowels into the holes, and then a screw is screwed into it. It should protrude 2 cm from the surface.
A washer should be put on it, and then a bracket is attached to the protruding part of the screw.
And the shelf itself is already installed on it.
How to fix a glass shelf on the wall: two solutions to the problem
There are two so-called fastening elements with which you can fix glass on the wall - these are holders for glass shelves and a special aluminum profile. Both types of fastening cope with the assigned tasks one hundred percent - the difference between them lies in the method of installing the glass.
In addition, the holders are universal, and with their help you can fix glass of almost any thickness, but the profile for glass shelves is designed for a specific size. But despite this, such a mount for glass shelves has one significant advantage - you can insert an LED strip into the profile and illuminate the glass from the inside. But more on this a little later, but for now let’s look at the holders, or rather, their practical application.
Holders for glass shelves photo
Fasteners for glass shelves are installed quite simply - it consists of two main parts: a base that is attached to the wall, and an upper decorative stop. They are separated quite easily - the base is simply pulled out from the upper stop. After the holder is disassembled, the shelf installation plane is marked on the wall using a level, relative to which the base of the holder is fixed using dowels included with the mount. It should be understood that to install one shelf you will need at least two holders - they must be installed on both sides of the shelf at a distance of at least 5cm from the edge. Depending on the length of the shelf and the expected load on it, the number of holders may increase.
DIY glass shelves
Glass shelves can be installed in the living room, bathroom, bedroom and of course in the kitchen - such a shelf will look great in each of these rooms. Making glass shelves is a simple process, but it requires compliance with all the necessary rules.
You will learn how to make glass shelves with your own hands in our article.
What properties does glass have?
Handmade glass shelves are an elegant and inexpensive home decoration. Transparent and light, they are able to visually unload the interior, making it spacious and light. The material suits any design - from modern to classic.
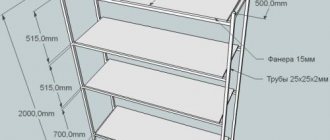
In order for the design to be functional and withstand several kilograms, the product should not be thin. Usually for this purpose it is recommended to take glass of at least 8 mm.
To add more strength to it, the material is hardened. Thus, glass prepared specifically for shelves can withstand several tens of kilograms.
We want to show you how to make a backlit glass shelf with your own hands - you will see that it is not at all difficult. Those who want to realize their vision of home comfort strive to improve interior elements with their own hands - it is for such people that we have prepared a master class with step-by-step instructions.
Manufacturing of glass shelves
Triplex shelves
Gone are the days when a transparent glass shelf had a standard, unremarkable appearance in the shape of a rectangle. Now there are many types of glass shelves. They can be of various shapes: oval, square, triangular and wavy, and also made in different colors and have almost any size. And the glass thickness for a standard type shelf is from 6 to 12 mm, which can withstand a lot of weight, be it a TV or other household appliances.
The glass for the shelves is durable, tempered or triplex. And the edges of glass shelves are polished and ground so that they cannot cause harm or injury.
Glass shelf with brackets
In addition, at the customer’s request, the edges of the glass shelf are rounded or beveled, that is, the side edges are beveled at an angle. They also apply a pattern, which allows you to create a stained glass effect.
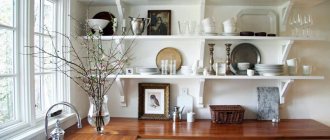
Shelves are made for various purposes. They can be used as an independent item or combined: shelves in racks and niches. Read more about this in the article on our website “Interior design using glass shelves.”
In general, the production of glass shelves and accessories for them is extensive. You can read more about the components for a glass shelf in the article on our website “Accessories for glass shelves”.
Glass shelves of configuration and dimensions can be installed on walls, under a mirror, on the floor, etc. How can you make glass shelves with your own hands in a short time? Let's look at this issue next.
Glass shelves for the kitchen - their features
Various utensils on glass shelves
Glass shelves can be attached almost anywhere in the kitchen. For example, in the work area, glass shelves can be installed above the hob and sink, which is very convenient for housewives. So, everything you need will always be at hand.
Usually a glass shelf is intended for utensils: cutlery, mugs, bowls, jars of spices and other kitchen utensils.
Or, for example, in the kitchen seating area, decorative glass shelves are suitable for storing souvenirs, photo frames, boxes, etc.
Dividing the kitchen into zones using glass shelves made of
Glass shelves are also used to decorate the window in the kitchen. Suppose the view from the window does not please you, but if you close it with a thick curtain, you lose in lighting. Or you can try to hide from the window space using glass shelves.
Glass shelves in the window opening can be decorated with plants in small pots or glass decorative items can be placed. And if these decorative elements are made of multi-colored glass, then the effect of stained glass will appear.
Such shelves are installed in the window opening - from one slope to another. You can read more about this in the article on our website “Attaching a glass shelf to a wall.”
Learn about different types of stained glass and manufacturing methods from the article “Stained Glass and Stained Glass Windows.” There is a whole set of recommendations on how to make stained glass using film technology on our website. But the best option for decorating glass shelves with stained glass is the sandblasting method. Read about it here: https://oknanagoda.com/steklo/osteklenie-steklo/vitraznoe/peskostrujjnyjj-vitrazh.html
High-tech kitchen with glass shelves
If these glass structures are decorated with chrome elements, then they will fit perfectly into the interiors of kitchens with high-tech or modern style.
Glass shelves are best suited for a small kitchen, as they visually make the space more spacious and airy. In addition, such shelves can be made of stained glass or decorated with a sandblasted pattern, which makes their appearance stylish and sophisticated.
Glass shelves look impressive when they have luxurious LED lighting built into them. Most often, the brightest decorative elements are displayed on such structures. Read more about this in the article on our website “Illuminated Glass Shelves”.
For an overview of glass shelves of different types and purposes, see the article “Glass shelves for the wall.” Find out about the specifics of glass shelves for other rooms. Their installation in bathrooms is especially popular. Read about glass shelves for TVs and other equipment here: https://oknanagoda.com/steklo/steklo-polki/glass-shelvestv.html
Illuminated glass shelves
Sometimes, at the request of the customer, a back wall made of mirror is attached to a simple shelf, which makes its appearance more attractive.
Kitchen shelves can be either made of transparent glass or covered with matte or colored film with a thickness of 6-12 mm.
Glass shelves for the kitchen can be of various shapes, colors, and also have different placement options: wall, floor, in a niche, etc. Read more about the different types of glass shelves for decorating rooms in the article on our website “Interior design using glass shelves."
In general, a kitchen shelf with glass looks most original and elegant in a classic or Provence style interior. And often the simplest design looks more original and stylish than complex multifunctional models of modern design.
Glass shelves manufacturing - preparatory work
Tools and materials for creating a glass shelf
First you need to determine the place where future shelves will be located. Please note that they should hang at a safe distance from children's play areas and at the same time be accessible to you. The ideal location for glass shelves is a completely empty wall.
To attach the glass shelf to the wall you will need the following:
- Glass (polished edges),
- glass cutter,
- Belt sander,
- Respirator,
- Electric drill,
- Hammer,
- Construction levels,
- Screwdriver,
- Dowels,
- Fastening elements (bracket, holders),
- Adhesive tape,
- Masking tape,
- paper envelope,
- Ruler,
- Roulette,
- Pencil.
And, in addition, to create a glass shelf, you can buy one ready-made similar option as a sample.
The process of making glass shelves
Preparation
This process also requires preparation, which primarily consists of selecting the necessary materials and tools. However, at the very beginning it is advisable to select the places where the shelves will be located. Obviously, these places should be as safe as possible for all people who plan to be in a particular space. For example, it is worth considering the situation that if the shelf is located low and not far from the threshold, then a person may trip and hit his head. Accordingly, shelves should be hung higher and away from the most visited places in the home.
The following tools and materials are often required:
- glass cutter;
- glass;
- respirator;
- Grinder;
- building level;
- screwdriver;
- fasteners;
- masking tape,
- hammer;
- drill;
- ruler;
- roulette;
- pencil.
Of course, this list is approximate, since depending on the idea and capabilities, the list of the above devices and materials may change slightly.
Experts advise that in some situations you can act extremely wisely and purchase one ready-made glass shelf. Often such products are simple, so one shelf can be taken as an example on the basis of which other shelves will be created. This way, it will be possible to install all the materials necessary for the work. However, such events should be carried out only if the shelf itself is inexpensive, and you plan to make at least several of your own product options yourself.
Works with glass
It is worth keeping in mind that working with glass is an extremely important undertaking, which often poses serious problems even for experienced workers, so every action must be deliberate.
- First of all, you need to arm yourself with a glass cutter. Experts advise not to cut right away; it is best to do a little training, with the help of which at the crucial moment the cutting would go as smoothly as possible. If there is only one glass, then if a mistake is made, a serious problem will occur, since it will no longer be possible to restore glass with a crack or other damage.
- It is worth determining the very necessary dimensions and creating small markings using a marker. If we talk about dimensions, this is an extremely important aspect on which both the success and failure of the work can depend. You need to understand in advance what the shelf is for. If, after cutting the glass, the dimensions are too small, for example, to accommodate books, then the created product becomes practically useless. We have to look for a new use for such a shelf.
- Next you will need a belt sander. Obviously, with the help of this device, not only will each edge of the glass be processed, but it will also emit dust, from which it is best to protect yourself with a respirator. The edge, of course, must be smooth, since at the very beginning the glass has too sharp edges, which can easily be damaged.
Experts advise regularly moistening the glass with water when cutting. This simple solution will prevent glass dust from spreading through the air. In addition, the processed edge itself will not be matte, but transparent.
Mounting points
It is immediately important to note that if you plan to install several shelves at once, then it is advisable to stick vertical strips that will allow you to conveniently place all those elements of the room that you created with your own hands.
- Here we will need to use a pencil, as well as a building level; with their help, we can easily establish the most optimal place for attaching the shelf. It is worth keeping in mind that the shelf itself should be placed exclusively horizontally, since otherwise, the object placed on it may simply fall.
- Next, mark the place where the shelf will be mounted. Using an electric drill, these same holes are created.
- Experienced builders and repairmen note that for such work it is advisable to purchase a large paper envelope and stick it under the future shelf with tape. All the dust that will come from drilling will accumulate in the envelope and will not fall on the floor.
Fasteners and shelf installation
Now we are approaching the ultimate goal of all these activities. An extremely important issue related to the creation of shelves is the installation of fasteners.
- Plastic dowels must be inserted into the created holes. Sometimes this element can be a little difficult to fit into the hole, so you have to hammer it in with a hammer. But this is done extremely carefully, since there is a possibility of damage to the holes.
- Now you need to secure the metal screw, but not completely. It should protrude 2 cm from the wall.
- A washer is placed on the screw. The bracket is screwed onto a screw protruding from the wall.
- Also in the process you will need to use a small building level, with which you can control the location of the bracket. Even minimal deviations will need to be corrected.
Ultimately, the glass element is placed on prepared supports (brackets). Immediately after this, the horizontal level is measured again so that there is no tilt present.
Obviously, there should not be any special problems associated with creating a shelf. The most serious mistake can be a deviation from the basic level. It often happens that one screw is higher than the other, and then an object placed on a shelf can easily fall.
In addition, after this entire process, it becomes clear that installing a shelf is an extremely simple process that can be carried out by almost anyone. If the shelf is small, then ordinary thin glass will do; if this element of the room is planned to have large dimensions, then it is advisable to use glass of greater thickness. This will ensure that the shelf will support the weight of a large object, or several small objects.
The good news is that if any problems arise during the process, they can be corrected fairly easily. First of all, we are talking about glass damage and similar issues. The fasteners themselves are quite difficult to deform or displace, so no special problems are expected.
Do-it-yourself glass shelves - general progress of work
The production of glass shelves and their direct fastening consists of several stages.
Stage I − Glass preparation: cutting and processing of its ends
Cutting glass for shelves
1. Pick up a glass cutter (preferably buy an oil cutter), and practice a little before cutting the glass. There will be no second time when cutting the glass to fit the shelf.
2. The glass is cut. Place it on a flat and hard surface. Please note that the processed edges should not go much beyond its limits.
How to make glass shelves for the bathroom
A stylishly decorated interior requires extraordinary solutions. But if you take all these extraordinary solutions from the store, you can go broke. After all, a truly designer item is very expensive. And I really want, for example, in such intimate places as the bathroom, to be beautiful and cozy. However, you can always take matters into your own hands and build something yourself, for example, elegant glass shelves.
Glass shelves, what you need to know
The first thought that arises in your head upon closer examination of this issue is “glass is fragile, you shouldn’t mess with it.” It was fragile in the last century, but now, thanks to modern technology, this is far from the case. Therefore, it’s worth trying to build yourself a couple of shelves for the bathroom, because this material has many advantages:
- Environmentally friendly material;
- not susceptible to the negative effects of household chemicals;
- easy to clean, does not absorb unpleasant odors;
- durability, the service life of this material is very long;
- moisture resistance;
- a shelf that is properly made and selected for the interior, looks very stylish and aesthetically pleasing;
All this makes this material simply irreplaceable in the design of places such as the bathroom.
Before you start creating a shelf, you should carefully examine the bathroom space, divide it into zones and figure out how to ideally and beautifully fit your future masterpiece. Shelves can be divided into three main categories:
- Wall-mounted.
- Hanging.
- Corner (the most commonly used option for the bathroom).
What exactly you will use will depend on your imagination and skill. Glass still requires a certain skill when working with it.
How to make your own glass shelf
So, the bathtub has been inspected, the location has been chosen, and the decision to make it yourself has been made. The steps to make your masterpiece will be in the following order:
- carefully take measurements from the site where the product will be installed;
Important! If the installation location is a corner, be sure to make allowances, otherwise the finished item may not fit into the corner.
- then, according to the dimensions made, make a template with which you will perform the following work;
The second stage should be approached with the following tools at hand:
- high quality glass cutter;
- a grinder, with which edge cuts will be processed;
- you will also need a ruler;
Having prepared the template and tools, get to work:
- Using the template, cut out the part you need from glass;
Important! If you have no experience, then first practice making a high-quality cut, it should be single.
- Treat the cut areas with high quality, your safety directly depends on this (sharp cuts can cause injury to yourself) and also, if they are processed carelessly, the appearance of the product will be greatly damaged;
Note! When using a sander to process edges, do not forget to moisten them with water.
- Then, using special holders or an aluminum profile, secure the shelf to the wall (you will have to buy them in the store).
To make your work of art look absolutely top notch, decorate it with LED lighting. The combination of glass and LEDs looks very chic.
Simple glass shelf
Glass shelves can be installed almost anywhere: on a wall, a windowsill, or they can fill a corner of a room. With the help of professionals or with your own hands using a special tool, glass is given different shapes: from rectangular or round to more complex shapes. A small simple glass shelf is always useful for placing shampoo, toothbrush, soap in the bathroom, and in the living room you can put photos of loved ones on it, souvenirs reminiscent of memorable dates, interesting places.
Important information
Experts advise that when starting to select a material, design and independently manufacture a glass shelf, you should take into account some important facts:
- When cutting glass, the result may have an error of 1 mm.
- The edges of the product must be polished.
- When choosing mounting hardware, you need to take into account the thickness of the glass used (ranging from 4 to 10 mm).
- If possible, use tempered glass. It is not dangerous, as it is almost 5 times stronger than usual.
What you need to prepare for work
To make your own glass shelves, you need to purchase materials and tools in advance:
- Glass about 7 mm thick. Depending on the interior of the room, you can choose tempered, colored, black, gray, bronze, matte (or satin), transparent glass with printing or with a sandblasted pattern.
- Fastening elements. A popular model of devices is the “pelican”. You need to buy 2 of them per 1 transverse element. This project will use a metal profile.
- Glass cutter.
- Drill.
- A grinder with a grinding wheel attachment.
- Building level.
- File.
- Duct tape.
- Polishing paste.
- Scissors.
- Roulette.
- Ruler.
- Pencil.
- Cardboard for the template.
Work order
You need to start by preparing a template for one or more shelves (if they are of different sizes and shapes). Before making a cardboard model, you need to determine the exact dimensions of the shelf and the configuration of the wall surface. This will ensure optimal fit of the product during installation.
- Draw and cut out the template to full size. Slightly round the corners of the shelf where it meets the wall.
- Clean the glass from dirt. Use regular detergents for this material. Check: the glass should be at room temperature during operation.
- Cover the flat working surface with a cloth (rag) and place the glass on top of it.
- Place the template on the glass. Using a glass cutter, cut a piece of the required size under the ruler.
- Wear cloth gloves before you begin finishing the edges. Clean the contours of the shelf using a file dipped in kerosene (turpentine).
- To sand the edges, use a grinder with a grinding wheel. Then polish the edges with a grinder and a felt wheel using polishing paste.
- Select a location on the wall where the shelf will be installed. It should be smooth. Using a building level, mark the location for the shelf on the wall with a horizontal line. Mark the locations for fasteners.
- To install the fasteners into the wall, drill holes.
- Using an aluminum profile, check the correct marks for the fasteners.
- Insert dowels into the holes.
- Insert the bracket into the drill in place of the drill.
- Install the screws into the dowels. Place washers on the protruding parts of the screws.
- Screw the brackets onto the wall screws.
- Use a level to check that the brackets are installed correctly.
- Attach duct tape to the back edge of each shelf. This will protect the glass from friction against the metal parts of the fasteners.
- Place the glass on the holders. To prevent it from slipping, put special rubber tires on the metal parts.
How to make glass shelves with your own hands
Comments: Comments on the post How to make glass shelves with your own hands are disabled
Shelves, like no other interior element, help optimize space and fit all items as compactly as possible. However, not all shelves are created equal. Glass, for example, in addition to its obvious functionality, have another quality - they instantly “unload” the interior, giving it lightness and style. The catalogs of furniture stores are filled with an abundance of models, but why not save money and try making glass shelves with your own hands, especially since it is not so difficult. We invite you to see this from your own experience.
Advantages of glass shelves
- Creating a feeling of weightlessness in the room. Items located on glass shelves seem to float in space.
- Easy to use. Glass shelves do not require special care.
- The versatility and practicality of these interior items lies in their lightness.
- Durability. If handled correctly they will last quite a long time.
- Colored shelves refresh the atmosphere and make it lighter.
- An excellent option for the bathroom, because glass is completely unaffected by moisture.
Advantages and disadvantages of glass shelves
Despite their prevalence, many people hesitate to install glass shelves on the wall because they think that they are not strong and safe enough. However, it is worth remembering that almost all store displays are made of this material and sometimes hold very heavy and large items. The fact is that to create shelves, the glass used is not the same as that installed in ordinary windows, but glass of increased strength. Moreover, there is tempered glass that is resistant even to strong impacts and is protected from scratches. This is used to make countertops, cabinets and even flooring.
Glass furniture always looks very stylish, compact and modern. It will easily fit into any interior, be it hi-tech, minimalism or the recently popular loft.
Glass shelves compare favorably with similar structures made from other materials:
- they are not at all afraid of moisture, so they can and even should be installed in bathrooms;
- glass is resistant to aggressive chemicals, so it can be cleaned using any household products;
- the material is absolutely hygienic, does not absorb dirt and does not retain dust;
- such shelves are easy and quick to clean;
- glass shelves have an unlimited shelf life and can literally last forever if no one breaks them;
- wood or plastic fades when exposed to direct sunlight, but glass does not change its original appearance, even when constantly exposed to the sun;
- An undeniable advantage is also the aesthetic appeal of glass furniture.
You can also add that if you are planning to make a glass shelf with your own hands, it will cost you much less than a ready-made purchased option.
Advantages and disadvantages of glass shelves
- First of all, the strengths of glass shelves include a certain simplicity and combination with any design projects. This is true, considering that the main material of the shelf is transparent, allowing the colors of the entire space to pass through.
- Another benefit of glass shelves is their overall ease of creation. Anyone can carry out this process, and to do this you just need to delve into the technology of creation. You can create several shelves without outside help, but you should have enough material and tools with you.
- Visual appeal is another plus of glass shelves. Unlike wooden structures, they do not clutter up the space, and this is especially important if the room is small. This advantage allows you to arrange several shelves at once, which are guaranteed to fit perfectly into the available space.
- As for the shortcomings, they also exist. For example, for many, the overall simplicity of such shelves may be a very dubious quality. For example, if you place books or other objects on such a shelf, the glass part of the structure itself will not be visible. Accordingly, such a minimalist component of the shelf has a somewhat specific component.
- The fragility of glass is also a small drawback, which, fortunately, does not appear very often. If the shelf is wooden, then it is almost impossible to break it. The glass shelf is easily damaged. For example, a person can walk through an apartment with a metal kettle and accidentally touch the glass. Obviously, the shelf will become unusable after such a situation. Many owners decide to use wider glass, but the risk of damage is still present. It is best to place shelves in places that are inaccessible to various types of damage. For example, a shelf can be installed behind the TV, in the corner of the room, or in some other places.
At the end of this section, I would like to note that glass shelves are truly specific products, therefore, if we are talking directly about the use of such objects within the home, it is worth analyzing their necessity. Again, as we already said at the beginning of this material, in private houses, where the owners have decided to implement some kind of original design project, completely unusual shelves are used, which are practically in no way similar to homemade ones. At the same time, we should not forget that such shelves have large price tags, which makes these products inaccessible to people with average incomes.
How to make a glass shelf: instructions
If you look at it, there are only two ways to make glass shelves: buy in a store or order all the necessary components, after which all that remains is to assemble them together and screw them into place. But the cost of such an undertaking is almost equivalent to a ready-made store design, so we will tell you how to make a shelf “from scratch.”
For the job, you will need a good glass cutter, as well as a belt sander with 120 grit abrasive sandpaper. It is best to rent these tools, unless, of course, you regularly plan to make glass shelves for everyone you know or for sale.
To begin with, we suggest that you familiarize yourself with a brief instruction on how to use a glass cutter. This is a rather primitive, but very effective tool that even a beginner can master after 15 minutes of practice. The most important thing when working with it is to make confident and clear movements. In addition to a glass cutter (it’s better to get an oil cutter), you will need a long ruler. It’s better to practice on regular glass first, and then start finishing work.
Important: The basic rule when cutting glass is to make one confident and fairly strong movement. Repeated cutting along the same trajectory is unacceptable, since this will not help the matter, and the blade will only scratch the glass again.
To cut glass, you need to mark the cutting line with a marker, place a ruler along it (it serves as a stop and guide for the glass cutter), press it with your hand, and with the other hand with the glass cutter, run along the marking with a confident but smooth pressure. This must be done on a perfectly flat surface covered with rags. When you have made a cut with a glass cutter, break the material at this point. Be sure to follow safety precautions and wear thick fabric gloves to avoid cutting yourself. Unfortunately, the above instructions are not suitable for tempered glass, since due to its extraordinary strength it can only be cut with a special machine in a workshop.
When you have received a workpiece of the required size, you need to process its sharp edges, otherwise you will have to avoid such a shelf to avoid injury. Grinding is the most important stage of work, requiring utmost attention. For this you will need a belt sander. Of course, if you couldn’t get it, you can process the edges manually, but such an activity will take much more time and effort. Carefully walk along the edges of the glass so that they become, if not absolutely round, then at least blunt.
Important: While sanding, regularly wet the glass with cold water. This is necessary to prevent fine glass dust from spreading through the air. If you inhale it, it will settle in the lungs and remain there forever. For this reason, it would be a good idea to wear a good respirator. In addition, water makes the edge completely transparent. Of course, if you prefer a matte finish, you can use a little less water.
Grinding should also be carried out on a flat surface covered with a rag, positioning the glass so that the edge being processed only slightly protrudes beyond the edge.
Mounting methods
To fasten glass shelves, two elements are used: an aluminum profile and special holders. Both of them are not inferior to each other in terms of reliability and functionality; the difference lies only in the installation features. We will look at each type of fastening so that you can choose the most suitable one in your case.
By the way, the holders are absolutely universal, which means that glass of any thickness can be installed in them. This, perhaps, is their only advantage compared to aluminum profiles, which should be selected according to the size of the shelf. However, if you want to make a backlit glass shelf, you should choose the profile, since it is easy to insert an LED strip into it so that it remains invisible and illuminates the glass as if from the inside.
Cutting glass for shelves and its further processing
When creating a glass shelf with your own hands, the initial step is preparing a template. This is necessary so that the shelf fits perfectly into a corner or adjoins the wall surface.
Then you need to prepare tools for cutting glass, for which you will need:
- Glass cutter;
- Sanding machine with sandpaper for 120 units;
- Roulette or ruler.
For better glass cutting, many people use an oil glass cutter. If you don’t have experience with this tool, you can practice on a separate piece of glass.
At the next stage, the edges of the shelf are processed, which can cause cuts. In addition, glass with polished edges will look more aesthetically pleasing. You can process the shelf using a sanding machine, or if you don’t have one, you can do it manually with sandpaper placed on a wooden block.
When carrying out the process associated with processing the edges, the glass surface must be moistened so that the glass dust that appears during this process does not enter the body. In addition to wetting, when working with glass, it is necessary to use respiratory protection - a respirator or a bandage.
How to make a glass shelf with your own hands
Glass shelves, like no other interior element, allow you to optimize your living space, fill it with lightness and light, and place all small and large items as comfortably as possible. Modern furniture stores today are overflowing with models for every taste and budget, but why not save a little by trying to make shelves for your home or apartment with your own hands.
How to make a glass shelf is described in detailed drawings and video instructions on the Internet, but not all of them are clear and compiled by professionals in their field. Having analyzed the information, we offer you the best way to make glass shelves with your own hands with minimal material and time costs.
Advantages of glass as a material;
- high resistance to ultraviolet radiation and chemical effects of household detergents;
- environmentally friendly, hygienic material is resistant to high humidity, easy to care for, easy to disinfect and wash, so it can be used for making shelves in the bathroom;
- glass does not absorb odors at all;
- if used correctly, it will last for decades without losing its original appearance or undergoing deformation;
- triplex products are able to withstand increased mechanical loads, so they can be used as stands for household appliances;
- the material has excellent aesthetic characteristics. Using glass shelves, you can create original, beautiful, functional structures that will transmit light and compare favorably with wooden products in their visual lightness and weightlessness.
Role in the interior
Corner glass shelves on the wall are the most common type of product. Thanks to their transparency, glass shelves look elegant, airy, and help to rationally use the interior space of rooms .
Loading capacity is determined by the power and quality of the bearing surface. The thickness of the glass for a shelf that can support a TV and several flower pots reaches 1 cm. For lighter objects, 5-9 mm will be enough.
Important! Tempered glass can withstand twice the load of regular window glass.
Wall shelves perform various functions:
- serve as an elegant decoration for the room;
- used for storing small items;
- for installation of music and video equipment;
- create a place to place flower pots.
There are a variety of options for placing holding surfaces.
Glass shelves in the bathroom make it convenient to use detergents:
- shampoo bottles;
- hair balm;
- shaving cream;
- liquid soap.
Types of glass shelves: brief description
So, what kind of shelves can you make yourself?
- Kitchen shelves on the wall. Designed for arranging dishes (jars with spices, plates, cups, bowls, cutlery) and storing decorative boxes, photo frames, small souvenirs.
- Hanging shelves. They are mounted to the ceiling with special cables and special devices that allow you to attach the glass unnoticed, without violating the integrity of the interior concept.
- Corner shelves. They allow you to make the most efficient use of all the useful space of the room, turning free corners into convenient storage for small utensils, books, souvenirs, etc.
Design
Glass is a very convenient material for creating objects of any shape. Judging by the photos of glass shelves, modern manufacturers never cease to amaze with their imagination.
There are so many shelves available now: ornate and non-standard shapes and sizes. Transparent glass competes with colored products. The latter, by the way, look very creative.
Glass corner shelves are perfect for the bathroom. A small bathroom can be made more functional with their help.
Typically, glass bathroom shelves are made from tempered glass, making them durable and safe.
In other rooms it is also appropriate to use glass shelves. The main thing is that they are in harmony with the overall interior of the room. Glass shelves on a wall made of transparent glass look most impressive.
Manufacturing instructions
Let's figure out how you can make a glass shelf with your own hands. There are 2 ways: the first is to buy all the components in the store, assemble everything together according to the instructions, and place the structure in a free place. However, in terms of cost, such an idea will cost you the same as buying a ready-made glass shelf. Therefore, we will pay attention to the second method - making your own shelves from scratch. You will need the following tools:
- glass;
- aluminum profile for fastening;
- glass cutter;
- meter tape;
- electric jigsaw, screwdriver, drill;
- belt sander;
- construction level;
- hammer.
It all starts with cutting the glass to the desired size using a glass cutter. Using strong pressure, an incision is made along a line previously drawn with a marker, along which the material will be broken. The sharp edges of the glass are processed with a belt sander, which is passed along the edges of the glass several times until rounded edges are obtained. During the grinding process, it is important to regularly moisten the glass with water; this will make the edge transparent and prevent glass dust from spreading through the air. After cutting the glass, you need to take care of its reliable, safe fastening.
Instructions for making a glass shelf
You can buy a glass shelf at any hardware store, or you can order components online and assemble everything yourself. In this article you will find tips that will allow you to do everything yourself “from scratch”.
You will need a quality glass cutter and a belt sander. The sandpaper grit should be 120 units. You will also need a building level, a ruler, a marker or felt-tip pen, a drill, fastenings for glass shelves, thick gloves, and a respirator. As for the material, it is better to choose glass with a thickness of at least 10 mm.
Preparing the glass
First you need to learn how to work with a glass cutter. It is best to get an oil glass cutter. This is a simple tool that does not require any special talents or skills to operate. All it takes is a little practice. It's better to practice on unnecessary glass. Movements must be confident. You cannot cut twice along the same path. This will not help the matter, but the glass will be damaged.
Before you start working with a glass cutter, you need to draw a line along which you want to cut with a felt-tip pen. You need to install a ruler along the line, which will serve as a stop. Hold the ruler firmly with one hand, and with the other, draw the glass cutter along the line, firmly but smoothly. This should be done on a flat surface protected with a rag.
Attention! This technique will not work with tempered glass. It is so strong that it is cut with a special machine in the workshop. Remember the safety rules.
Once you have the right size piece, you will need to handle the sharp edges, otherwise the shelf will be dangerous. Whether to make the edges round or just slightly blunt is a matter of taste. Sanding requires attention and concentration. It is needed not only for safety. Grinding reduces the risk of cracks and chips. It is better to do it on a flat surface, placing the workpiece so that the part being processed protrudes slightly beyond the edge of the table. If you don't have a belt sander, you can sand the edges by hand, but it will take a lot of time. To prevent dust from flying when grinding, and to ensure that the processed edges are transparent and not dull, you need to slightly moisten the glass with water.
Fastening the shelf correctly
Before starting work, you need to mark the walls. Marking is an important stage of work, do not forget about it:
- Using a spirit level, draw a line on the wall where you would like the new shelf to be hung. If you plan to hang several shelves, then marking will help you arrange everything beautifully and correctly.
- After this, you need to mark the location for fastening, and then drill a hole in the wall using an electric drill.
Advice! Before you start drilling, you can glue a paper envelope to the wall, opening it further. This way, most of the construction dust will fly not onto the floor, but into the envelope.
Next, you need to install special fastening elements for glass shelves to the wall. The actions must be performed in the following sequence:
- You need to insert a plastic dowel into the drilled hole. If it enters with difficulty, you can hammer it in with a hammer.
- The mounting kit for glass shelves should include a metal screw. Find it and replace the drill with it.
- Using a drill, carefully secure the metal bracket into the wall. The screw should protrude from the wall by about a couple of centimeters.
- Now you need to put a washer on the screw.
- After this, you need to attach the bracket to the protruding screw.
- Using a level, measure the position of the bracket.
After carrying out the above work, you can install the shelf. To make sure that you have secured the structure level, use the building level again.
Mounting methods
To secure glass shelves, 2 elements are used: a “joker” aluminum frame profile and special holders. Both holder options are not inferior to each other in functionality and reliability, the main difference lies in the installation features. So, if glass of any thickness can be installed on special holders, then the aluminum “joker” will have to be selected according to the size of the shelf.
The holders are very easy to install. They consist of 2 parts: a decorative stop and a base, which is fixed on the wall surface. Initially, the parts of the holders will have to be separated, after which, using a ruler, marker, level, mark on the wall where the shelves are attached, drill holes for the dowels with a drill (usually included with the holders), and use a hammer to hammer them in until they stop. The screws are threaded into special holes in the base and pressed against the wall with a screwdriver. After this, holders are attached to the base (the number depends on the load on the glass), on which the shelf is installed.
If you cannot use a glass cutter, do not want to cut your fingers, or breathe glass dust, then an experienced glazier will cut out the glass shelves for a small fee. And anyone can figure out the fastening; this does not require any special skills, and there is a lot of useful information on the Internet for completing such a task.
Shelf option with holder
This additional section will help those who want to make their own illuminated glass shelves by securing them with holders. The good thing about holders is that they are universal for any thickness, length and width of the product, in contrast to the profile, for which these indicators must be strictly fixed. With this mounting method it is also possible to create backlighting.
The holders consist of a base and a decorative stop. During installation, the base is pulled out and mounted into the wall. The holder comes complete with dowels, which are screwed into the mounting location, and the base is attached on top of them. For one shelf, as a rule, two fastenings are used at the edges to ensure even load on it. Their number may vary depending on the length of the product. You can safely make one mount on a glass shelf if it is a small structure.
Look in the catalog of the online store "REMOKIT" for glass shelves on the wall that you can easily install with your own hands. You can also purchase components on our website.