Tulles are often attached using loops; curtains are placed on the cornice less often using this method. For heavy materials, fabric loops are more often suitable, since they are stronger, thicker and more powerful, and they can also be placed on the curtain with greater frequency, which will only add to the strength of the structure. For light tulles, you can make loops from threads. However, even such threads should be further strengthened. Curtains are rarely fastened with loops, but for light translucent fabrics this option is sometimes acceptable.
When choosing how and what to make loops on curtains from, you should also take into account weight - if the material is heavy, they simply will not withstand the load, and in this case, you should give preference to metal rings, making a curtain with eyelets.
What threads to use
Depending on what material the curtain is made of, threads are selected. For classic white tulle, it is better to choose a white thread.
If the fabric is multi-colored, iridescent, or has a pattern of a specific color, it should be chosen based on how the finished product will look most natural and whether it will not attract too much attention to itself, since the loops are the first thing It is a method of fastening, not an additional decoration option.
In addition, for making loops it is better to choose strong threads, perhaps even knitting yarn.
It is stronger, denser, and better suited for heavy materials. In addition, if the curtain is long, it usually weighs more than one that only reaches the window sill, so for long curtains it is better to choose this yarn. If the tulle is short, thin and transparent, you can limit yourself to thinner threads, but it is still advisable to fold them in two when working. It should be remembered that very thin threads still run the risk of breaking under the constant load of the fabric, and too often spaced loops will not look very aesthetically pleasing.
LiveInternetLiveInternet
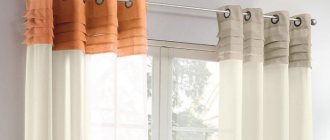
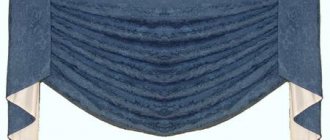
One of the options for attaching curtains to the cornice is loops. Curtains with loops
, like curtains with eyelets, are usually hung on a rod curtain rod. The loops can be blind, or they can also have Velcro, buttons, ties, etc. The advantage of such loops is that these curtains can always be easily removed and hung on the curtain rod without removing the rod. Curtains with hinges can be used in any interior, be it a bedroom or living room, children's room or kitchen. If only the selected color scheme of the curtains matches the overall color scheme of the interior. Today we will learn the principle of sewing curtains on loops with Velcro, and also folds will be placed on the curtain. If you understand the execution of this method, then making curtains with blind loops and without folds will not cause you any problems.
So, for work we need:
- textile,
- sewing machine,
- scissors,
- Velcro tape (soft and hard part).
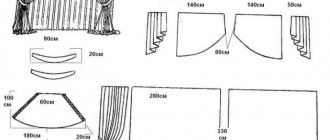
Before we get started, we must decide on the width of our curtains. Knowing the width of the curtain, we can calculate the number of loops. In my case, the width of the fabric for the curtain was 134 cm. The finished length of the curtain was 250 cm. The number of loops was calculated according to the following scheme.
That. in my case 134 cm - 4 cm (processing side cuts) - 45 cm (5*9cm distance between loops) - 30 cm (6*5cm number of loops) - 55 cm (5*10cm and 5 cm allowance for folds). Having calculated how many loops we need, we begin to cut them. In my case, the finished width of the loop will be 5 cm, which means I make the blank 12 cm wide and 26 cm long, the length can be made arbitrary. I sew curtains from voile, for convenience, in order to evenly cut out the blanks for the loops, I pull out the thread and cut it evenly, I taught you this method here before.
We fold our blanks in half along the length and sew a line.
Turn it right side out, iron it and sew along the entire perimeter of the loop.
Before we start placing the loops on the fabric, we need to double fold the side edges. I process the lower cut after the loops are sewn, i.e. in the very last place. We bend the upper cut with a double fold to a width equal to the width of the Velcro tape and iron it.
We begin to place our loops on the fabric, taking into account the folds being laid. Departing from the edge 5 cm. This value is equal to the width of the loop, we place the first loop, the distance between the loops will be equal to 9 cm. Departing from the first loop 9 cm, we place the second loop. Next, we retreat 10 cm from the loop. This is the fold, and another 9 cm is the distance between the loops, etc.
After all the loops are placed on the fabric and the distances are marked, we begin to lay out the folds. We wrap the first 5 cm that we retreated from the edge to the wrong side.
On the second loop we left a distance of 10 cm on the fold, fold it in.
And so on we continue until we put folds on all the loops. Moreover, here it is necessary to take into account the following fact that our curtains will hang on the right and left sides of the window opening and the folds should also be laid depending on which side our curtain will hang.
Now we give 2 lines, sewing the loops to the hem at the top and bottom of the hem.
We cut the soft part of the Velcro tape equal to the width of the loop, in my case it is 5 cm, and attach it to the hem and the base of the loop, trying to fit into the existing lines.
We attach the rigid part of the Velcro tape to the upper free edge of the loop.
Now, measure the length of our curtain and trim the bottom edge with a double hem. As I said above, you don’t need to add folds. I showed you the most difficult example, but you will carry out the execution guided by your interests.
If you liked this article you can share it with your friends. I will be very grateful to you for this. I also want to appeal to those who have interesting ideas related to the topic of my blog, share them in the comments or fill out the contact form here, I will contact you. Do you want to be the first to receive my articles? Subscribe to my blog. You can use site materials only with an active link https://shtory2013.blogspot.com - See more at: https://shtory2013.blogspot.ru/2014/10/shjem-shtorj...kami.html#sthash.b0khbs40.dpuf
Required tools and materials
To make this fastening method, you don’t even need a sewing raspberry - it’s enough to have basic sewing skills.
To make loops, in addition to the selected yarn, you will definitely need a crochet hook, already prepared material and scissors. You will need a lot of yarn, and the hook is selected depending on the thickness of the thread.
The thicker the thread, the larger the hook is needed, at the same time, if the thread is thin, you should not use a thick hook - it will be inconvenient to work with, and the finished loops will look unaesthetic and stretched.
How to attach a curtain to a window?
You can attach curtains with Velcro directly to the window frame, to the wall or to the rail, but the essence of the fastening remains the same; hooks and rings are also not used.
Installation on a plastic window
Velcro fastening to a plastic window does not violate the integrity of the window. Velcro is glued around the perimeter of the window, or only on the top and sides.
On the wall
When attaching to a wall, the hard part of the Velcro is fixed with screws or glue, and the soft part is sewn to the wrong side of the curtain.
On a wooden plank
The adhesive tape is attached to the wooden slats using glue or a stapler. The rail itself is attached to the wall with self-tapping screws.
Advantages of loops on threads
Hanging a curtain with loops is a great way to lengthen the material if it's too short. Moreover, you can adjust the length of the curtain yourself - by making eyelets for short curtains of a certain length, the height of the tulle above the window sill or above the floor is also determined.
In addition, self-made loops are easy to change - after a while, the fastening method can be changed. Moreover, this type of fastening is suitable for cases where it is not possible to use decorative braid, because it does not fit this type of cornice. You can use thread loops for almost any cornice, because you can simply put them on the pipe. In this way, you can get out of a situation where the mechanism of the cornice is broken, and the curtains need to be secured by some other method.
Choice of fabric material and color
For curtains with loops, dense and opaque materials are traditionally used that hold their shape well. The fabric for curtains should be no less dense, this is necessary so that the curtains do not sag due to stretching of the fastening elements under the influence of weight.
Loops serve as the main decorative element for the corresponding curtains. Designers advise choosing colors for them that are not similar to the shade of the curtain itself. Light loops in pastel colors look great on bright and colorful curtains. There is also this option: choose a color that is several tones lighter or darker than the main one. And finally, the third option is to play with the color of large interior elements, for example, furniture upholstery or wallpaper.
Options for thread loops
Before you make the fastening, you should choose an option - there are two most commonly used options for knitting thread loops on curtains. The first method involves attaching each loop separately to the fabric. The second method involves sequentially knitting each loop and periodically attaching them to the material. Each of these options has a number of advantages and disadvantages.
When choosing the first method, knitting the loops is quite simple; it is enough to have basic knitting skills. In addition, with this method of knitting, if one loop is damaged, it is possible to replace it without the participation of the others. The disadvantages include the fact that if there is an error in the calculations, the loops may turn out to be of different lengths, and this will be very visible on the finished product. Moreover, they take more time to produce.
When choosing the second option, they are knitted in series and connected to each other. This entails certain disadvantages, because if one loop is injured, the entire row of loops will unravel and will need to be completely restored. The positive aspects of this method include the fact that they can be knitted quite quickly, and if you count the number of stitches correctly, they will be the same in length.
Making Roman blinds with a lambrequin with your own hands
So, the option has been chosen. All that remains is to purchase fabric and related tools. These include:
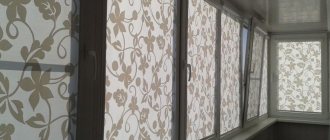
- Suitable Velcro. Textile, requiring sewing or self-adhesive. The last option is suitable for strengthening curtains for a balcony with Velcro, without a cornice. There is no need to install holders or damage the wooden frame or metal-plastic.
- Sewing accessories – scissors, thread, tape measure + sewing machine. If you have no experience, neat hand stitches on the curtains will make the work invisible.
- Actually, the fabric itself. Narrow strips for forming folds, decorative rings, cords, eyes for them.
- Cornice in the form of a processed wooden block. It is covered with the same fabric as for curtains, then neatness will be observed and the wood will not be discordant with the overall appearance. You can attach Velcro for curtains to it in advance.
It is important to choose fittings - tiebacks for lambrequins, a decorative mechanism for opening and closing roller blinds, etc.
Measuring, cutting and fixing Roman blinds for the balcony
The prepared fabric is smoothed with an iron for precise cutting and pieces equal to the width of the window or sash are laid on it, taking into account seam allowances, the width of pockets for folds and weights. For a lambrequin, it is important to determine the number of folds and measure the tape accordingly. Having cut out the blank curtains for the balcony with Velcro, after folding the fabric they are sewn in place.
Now, to make a Roman blind, on the wrong side, mark the places for inserting the slats and form pockets, while simultaneously strengthening the plastic rings for future cords. You need to sew the Velcro to the fabric with the soft part of the tape. The hard one is fixed to the reinforced block with a furniture stapler. There are 4 ears stuffed on the block - 3 for each folding cord, the last one for fixing the entire system.
The cords are passed through the rings, securing each with a knot or loop. All ropes are brought out to the cornice and secured to the 4th eye, forming perpendicular straight lines with the canvas. The beauty and trouble-free operation of the curtain will depend on its level position. All that remains is to fasten the curtain rod with Velcro above the window and the curtains are ready.
Now you need to sew the Velcro to the lambrequin. Cut out loops are fastened to the tape along the upper edge, to which, in turn, a fixation is sewn from the inside. Then the fabric is only folded, creating the necessary gap, and the selected cornice is threaded through the loops. It is installed on mounts or brackets.
WATCH VIDEO INSTRUCTIONS
The work is ready, you can hang the curtains with Velcro, congratulate yourself and admire!
The best posts
- How to make a plasterboard ceiling in the kitchen with your own hands
- Painting drywall - step-by-step instructions
- How to join drywall in corners and the process of building a decorative niche
- Sealing drywall joints - recommendations from professionals
- Epoxy resin, application
- How to seal a doorway with plasterboard - installation diagram
- DIY plasterboard ceiling installation - video tutorials and installation instructions
- How and how to glue a foam plastic ceiling plinth
How to knit
To make the thread stronger, it should all be knitted using the air loop method.
This knitting method helps strengthen the yarn. In order to start knitting, you should secure it to the fabric with a simple knot, and then make one single crochet. Next, it is knitted with air loops and again attached to the material. The location of its strengthening depends on the chosen option. In the first option, a chain of air loops knitted to the required length is secured in the same place where it was attached from the very beginning. After fastening, the remainder is cut off, so one loop is ready. After a certain period of fabric, approximately 5-10 cm, exactly the same loop is knitted. This is done until the end of the material. The finished loops are put on the cornice.
When choosing option 2, you should attach a thread from air loops and not in the place where none was originally attached, but after a few cm. For fastening, use a single crochet. This creates a wide loop. Next, the loops are made the same way across the entire width of the curtain. The cornice pipe is threaded into the finished loops.
Having chosen the fastening option and the material for making the loops, you can begin making this method of attaching the curtain to the cornice.
Solid or with clasp?
All patches can also be divided into two groups according to the type of cut: loops with a fastener and solid ones. The difference between them is obvious: solid ones do not have any gaps, so they must be placed on the cornice from the side, and it is better to remove it first. Unfortunately, this is not always convenient: after all, the cornice may be too massive, tightly fixed or located at a great height.
In this case, you should give preference to models that have loops on the fasteners. They can be knots, buttons, buttons or special Velcro. Visually, they may be no different from solid loops. To do this, you need the fasteners to be on the inside.
Curtains on patas are in trend today. And there is one simple explanation for this: they look unusual and easily make the interior of the room more expressive and harmonious.
Did you like the article? Tell your friends
Making loops with a needle
Loop size chart.
You need to place a thread folded in half into the needle. Mark the top edge of the curtain using dry soap or tailor's chalk. The future locations of the loops must be determined in advance. The more loops you make, the smaller the curtain folds will be. In this case, the canvas will lie smoother, there will be more folds, as well as loops. The loops should be made 1-2 cm below the edge. Hooks and loops should be on the wrong side and should not be visible.
Insert the needle into the fabric so that it does not come out on the right side or comes out minimally. Sew a few small stitches to secure the base. Pull about 1 cm of thread through a loop and secure it again. Sew this blank. To do this, pull the needle and thread into the loop, you will get another loop, pull the thread into it and tighten. Repeat this several times to get a strong loop base that is completely wrapped with thread. You need to strive to ensure that the stitches are located as tightly as possible.
As a result, your loop should resemble a stiff cord.
It should not bend or lose shape.
Related article: How to properly glue a mirror to a bathroom wall
When the first loop is completed, you need to secure the thread and cut it. The following threads must be made in accordance with the markings made in advance. As a result of the work done, you should receive a number of even, identical in shape and size loops along the top edge of the curtain. Use a wide eye needle.