0
82351
For apartments, especially small ones, the real problem is the lack of free space. Therefore, their owners are looking for any ways to save usable space. A lifting mechanism for the bed can be of great help in this, the use of which will free up part of the living space. Let's consider the characteristics of different designs of lifting mechanisms and beds.
Types of lifting mechanisms
Before you make a lifting bed with your own hands, you need to choose the optimal lifting mechanism. The options are as follows:
- Hand looped. The most accessible and simple mechanism, which is used less and less. This is due to the complexity of the transformation, which requires considerable effort, lifting the entire weight of the bed manually. Because of this, the mechanism is not used for children's furniture. At the same time, due to the absence of springs, shock absorbers and other elements, the mechanism is highly durable and durable.
A manual lift is an affordable device with no springs or shock absorbers. - Spring-loaded. It has a relatively low cost and high reliability. For lifting, twisted springs made of high-alloy steel are used, the tension of which can be changed based on the weight of the mattress. Such a mechanism needs regular replacement every three to five years, as the springs are subject to wear and stretching.
The spring system is easy to use. It has a short service life - no more than 5 years. - Gas. The most expensive, but at the same time reliable, durable and comfortable to use mechanism. It operates silently and smoothly, requiring virtually no effort. To operate, the energy of compressed gas is used, which is placed in a cylinder. The shock absorber is selected based on the size and weight of the bed, and if calculated correctly, it can last about ten years.
The device operates quietly and smoothly, and is characterized by long-term operation - up to 10 years with constant raising or lowering.
Note! The load of the bed falls not only on the shock absorbers themselves, but also on the mounting points, and therefore they should be selected and calculated together.
How to make a lifting mechanism for a bed with your own hands
Before you make a bed with a lifting mechanism with your own hands, you need to draw up a drawing. It must reflect all the dimensions of the product, indicating the thickness and distances, the parts and mechanisms used, the places and order of their fastening. To make a high-quality bed with a lifting mechanism with your own hands, the drawing must be made in two projections and contain only carefully calculated parameters.
When preparing the necessary material for the manufacture of a sleeping bed, it is worth taking into account the load created by the mattress on the shock absorbers, mechanical device strips, frame and fixation points.
Selection of tools
The design of a bed with a lifting mechanism involves the use of the following tools:
- pencil, tape measure and ruler necessary for marking;
- a screwdriver, which is used to fasten frame parts;
- a drill, which drills holes in the metal elements of the lifting mechanism;
- drills for metal and wood;
- a key and a drill for confirmations, with the help of which the body is assembled;
- a jigsaw used to cut MDF;
- an iron or an industrial hair dryer, which is used to perform edging with melamine tape;
- clamps used to secure the body during assembly;
- a knife used to cut off excess tape;
- a hacksaw used to cut boards;
- wrenches and sockets;
- hammer.
Necessary materials
For work you will need the following materials:
- self-tapping screws;
- confirmations;
- metal corner;
- furniture corners;
- fiberboard sheet;
- edged board;
- MDF sheet;
- mattress insert frame;
- melamine tape of the required shade;
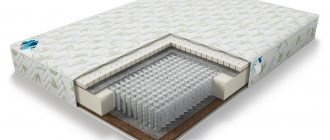
- gas shock absorbers from 800 N;
- furniture legs;
- bolts, washers, nuts;
- metal strip;
- screeds;
- PVA glue;
- metal bushings.
Note! Instead of MDF, you can use chipboard, which is more affordable.
The process of creating a mechanism
Lifting mechanisms for different bed weights can be purchased ready-made, but if you make them yourself, you can be confident in their quality and reliability.
If you are doing this kind of work for the first time, it is better to use ready-made furniture assembly drawings.
The working process is as follows:
- Screw the top strip to the bottom of the base. For fastening, a strip is formed from rolled metal corners.
- Install the lift bases, consisting of a pair of planks, onto the frame elements.
- Attach a pair of bars responsible for adjusting the lifting height and maintaining the grille in the raised position.
- Install the lower bar, which serves as a support and makes the movement of the hinge supports easier.
Making a bed with a lifting mechanism should begin with the preparation of drawings, materials and tools.
Important! At the junction of the strip with the hinges, it should have slight deviations in shape from the plane angle.
To form the deflections of the metal strips necessary for hinge fastening, it is convenient to use a small press. You can find it in locksmith shops.
First, a strong, reliable base for the intended bed is built.
Rules for safe operation
Mechanisms for raising the bed increase the practicality and functionality of the furniture. When operating such structures, several safety rules must be observed:
- Wardrobe beds must be securely fixed to the wall when lifted horizontally. This is especially important with spring mechanisms.
- When raising or lowering the bed, the user must be on the side of the piece of furniture.
- A bed with a spring and manual mechanism in the raised position must be additionally reinforced with a support.
Characteristics of slats for beds, materials of manufacture
Models with gas shock absorbers are considered the safest. The berth is securely held in a horizontal position by fully extending the device's pistons. In this state, the mechanism is not able to compress on its own. Some manufacturers supplement the designs with special fasteners, which will be useful for the most careful users. Such furnishings are unable to drop sharply. Even if one of the units breaks, the furniture will slowly return to its original position thanks to the second element.
Beds equipped with lifting mechanisms are in high demand today. The reason for its popularity is the high functionality and practicality of the furniture - the additional compartment is convenient for storing bedding, linen and other bulky items. But before choosing a suitable product, you need to familiarize yourself with the varieties, types, and design features.
Wardrobe beds must be securely fixed to the wall
The user must stand to the side of the piece of furniture when using the lifting mechanism.
A bed with a spring and manual mechanism in the raised position should be additionally reinforced with a support
Self-assembly of the bed
First of all, it is necessary to prepare and assemble together the MDF parts that make up the frame:
- Mark the MDF sheet in accordance with the drawing.
- Cut the slab into pieces convenient for cutting and secure them to the workbench using clamps. Cut out the specified elements using a jigsaw. If these actions seem too complicated, there are no tools or special skills, then the cutting can be done in a carpentry workshop.
- Clean the ends with a damp cloth. Apply melamine tape, heating with a hairdryer or iron, to all ends except those facing the floor.
- Place the headboard, side drawers, cross board and back wall. Drill a pair of holes for confirmations from the outer surface of the corner joints.
- Install the fastener using a Phillips screwdriver. Cover the confirmations with plastic plugs secured with glue.
- Install the plastic corners inside the four corners using a screwdriver.
- Secure the cross board by connecting it to the sidewalls using steel corners secured with screws. This is necessary to provide the structure with additional rigidity.
- Cut the fiberboard sheet to the required size and secure it as the bottom of the bed. To do this, the frame must be turned on its side. Fastening is carried out with screws along the entire perimeter.
- Drill holes in the middle of the drawers and in the lower corners of the frame. Install legs in them.
Note! Plastic legs will not only make it easier to move the structure, but will also prevent the MDF from coming into contact with moisture during cleaning.
Next, using a wrench and a screwdriver, the inset frame for the mattress is assembled. It can also be purchased already assembled, but this complicates transportation.
If you are planning to assemble a double bed, choose a gas mechanism - it is more durable and durable.
The final stage is the connection of the frame and mechanisms. This process may require outside assistance to ensure the joints are straight and accurate. It is carried out as follows:
- Drill holes for mounting in the metal frame of the insert frame.
- Secure the lifts to the inner sides of the sidewalls using bolts. Fastening is carried out using through holes.
- Attach the upper elements of the lifts to the frame. At this stage, it would be helpful to have the help of a person who will hold the frame-liner.
- Cover the bolt heads on the outside of the frame with plastic plugs matched to the color of the MDF.
- Check for correct installation and reliability of fasteners. This must be done for the entire movable structure.
If you understand the instructions, then even making such a complex piece of furniture as a bed with a lifting mechanism will be a completely feasible task.
Practical tips for replacing springs on an ottoman
We will give step-by-step instructions for a rather complex technological process; this type of ottoman was made 30–40 years ago. But the quality was so high that the furniture still serves well today, and the frame and lifting mechanism do not require any repairs. Only the spring part is physically worn out.
Step 1 . Carefully remove the upholstery. It is attached around the perimeter with small nails or staples. If you plan to reuse it, do not tear the fabric; remove the fasteners carefully and without excessive force.
Carefully remove the upholstery
Step 2 . Roll up the foam rubber; if it is without much shrinkage or visible damage, you can then install it back. But it is advisable to change this material, it is inexpensive, and in terms of strength it is much superior to the old samples. The foam rubber is attached to the frame with brackets around the perimeter, they are difficult to remove, you can only tear them off. Do this carefully, keep your fingers as close as possible to the places of fixation and only in this position make efforts to pull off.
The foam rubber is also removed and put aside
Step 3 . Remove the top batting. It can also be installed back later. The contact areas will shift slightly and minor wear of the material will be hidden.
The batting is removed next.
Step 4 . Carefully inspect the condition of the spring unit. As a rule, the springs sagged or completely cracked in the middle of the mattress, causing a depression to appear on the ottoman. Depending on the condition, the master must make a decision: to change only some elements or the entire spring block.
The springs are carefully inspected to select the correct repair option.
What differences do these solutions have?
- Replacing springs. Some people believe that this way you can save a lot, but this is not entirely true. The responsible technician changes the springs according to his own algorithm. After removing those that have become unusable, he takes out the springs at the edges and places them in the middle, and installs new ones in the vacant places. This is done due to the fact that it is currently difficult to find reliable springs; low-quality steel wire is used for their manufacture; they cannot withstand the design loads. The metal quickly physically gets tired, the springs initially sag greatly, and with further use they break. Taking into account the complexity and duration of a high-quality replacement, the cost of repair increases, sometimes it can exceed the price of a new spring unit.
- Replacement of the entire block. It runs faster, but only if you managed to buy or make exactly the same one.
If the springs are heavily worn, the unit must be completely replaced.
Step 5 . Remove the block; it is secured with nails or large staples to the lower frame. Remove the bottom batting, you can also leave it or replace it with a new one. The bottom batting is required to dampen sounds while sitting or lying on the ottoman. They appear due to the friction of metal springs on a slab of fiberboard or plywood.
Remove the spring block, pull out the staples
Prices for staple extractors (anti-stapler)
"Rapid" staple extractor R-3
Practical advice. If the bottom batting is in very poor condition, then after laying it out on the surface, it must be attached with a stapler. The fact is that during operation of the ottoman, the springs will eventually move small pieces of material and will come into direct contact with the plywood or fiberboard.
Step 6 . Place the new spring block in place. In our case, it is frame-based and has the best performance indicators. The standard width of the block is 66 cm, and the length is 182 cm, these are still old state standards. If you order the production of an element from other companies, then you must indicate the exact dimensions of the old one.
Laying a new block
Step 7 . Fix the springs to the frame. It is better to use pneumatic or electromagnetic tools; they make the process much easier and faster. First, it is recommended to drive in several staples in the corners and check the position of the springs again. If everything is normal, then continue fixing. The step of the staples is approximately twenty centimeters. There is no need to measure anything, maintain this value by eye, and fix each spring.
The block must be secured with staples
Take staples 1.2 mm wide and 10 mm long; they have increased physical strength parameters and reliably hold the structure. Lateral loads can reach significant values; the spring block must have a reliable margin of safety.
Step 8 . Lay out and sew the batting. We already mentioned that you can use the old one. Fold the edges under the frame of the spring block, carefully align all the folds. To sew, you need to use large needles, there are straight and curved ones. For this work there is no difference, it is convenient to work with any. For stitching, use only strong silk threads. Sew along the entire perimeter, the distance between stitches is no more than 3-4 cm.
The batting is laid back, flattened and sewn to the block frame
Step 9 . Replace the foam, level it and nail it to the new planks.
Use a stapler to fix the foam rubber to the ottoman frame
Prices for the model range of pneumatic staplers
Pneumatic staplers
Practical advice. Do not pull the material, it should lie freely, but also without folds.
The thickness of the foam is at least three centimeters. To improve comfort, attach padding polyester to the top. The foam rubber is fixed with staples, the padding polyester is sewn on. If you plan to install new foam rubber, then you need to know what characteristics to choose it for. To repair furniture, you need to buy standard (ST) or increased rigidity (EL) foam rubber. Professionals advise buying the ST3542 brand for an ottoman, the first two digits indicate the density, in this case 35 kg/m3, 42 is the material hardness index (force in kPa, at which the thickness decreases by 40%). This foam rubber has a warranty period of 10 years.
Furniture foam rubber ST3542
If they will not only sleep on the ottoman, but also relax during the day, then it is recommended to use material EL2842 or ST3542. Such materials cost quite a lot, but the price is justified by the high quality.
Step 10 . Stretch the upholstery fabric, work very carefully, the surface should be perfectly flat. Turn the mattress over and straighten the fabric. It is necessary to ensure that all the sharp corners of the foam rubber are smoothed out a little.
Stretch the upholstery fabric
Step 11 . Now you can nail the material. It is recommended to start from the middle and gradually move left and right. Use one hand to constantly stretch the fabric, and with the other, hold the stapler and drive in the staples.
The fabric is secured with staples
If you have all the materials prepared for replacement, then the process of replacing the spring block will take no more than 1.5–2.0 hours. This is much more profitable than taking the furniture to a specialized repair shop. Just for ordering a delivery truck you will have to pay more than the cost of the purchased supplies.
How to repair a bed lift mechanism
If the entire lifting mechanism or its components fail, it is better to completely replace the mechanism. This is done as follows:
- Disassemble the bed and remove the old fasteners.
- If the seats are intact, use them; if damaged, make new ones. To do this, you need to drill holes on the box, of which there can be three or four, depending on the device and the size of the base.
- Secure the lower part of the mechanism to the frame using bolts.
- Attach the corner from the lifting structure to the structure and lower the base inside the frame.
- Drill the required number of holes on the sides of the frame. The location of the bottom bar must be taken into account.
- Make a gap of 7-10 mm between the box and the frame, tighten the bolts on the top bar.
- Connect the system using pistons, which should be attached to the upper and lower parts of the mechanism.
It’s not difficult to make a bed with a lift with your own hands, based on pre-prepared drawings.
Note! To extend the period of operation of the mechanism, it is necessary to correctly calculate the load on it.
Making your own sleeping bed saves significant money and makes it possible to create a unique multifunctional bed.
Making a bed with a lifting mechanism yourself is not the easiest task, requiring accuracy and careful work. However, as a result, you can get a unique high-quality product, ideally suited to the size and interior of the room.
The bed is ready, all that remains is to install the mattress in place and start using the furniture for its intended purpose.
Tips for assembling an ottoman
The technology for assembling an ottoman is much simpler than that of beds or sofas, this is due to the smaller number of parts. At the first stage, you need to assemble the frame and backrests, and only then start attaching the lifting mechanism. This element has its own design features; before starting work, you should carefully read the attached instructions. Most manufacturers make installation holes in the frame, which makes the process much easier. Pay attention to the correct position of the springs; they should not touch the sides of the frame when lifting/lowering.
When assembling the ottoman, it is important to correctly install the lifting mechanism
It is advisable to assemble furniture in the room in which it will always be located; when transporting it to other rooms, there is a possibility of damage to the mechanism. Most furniture is made from cheap laminated chipboard, and it does not have high levels of physical strength. The workplace should be free, place all tools within walking distance. And lastly, start working only after carefully studying the purpose of each element of the ottoman and each hardware. Be sure to check the delivery list for completeness.
DIY ottoman