Buying an expensive and beautiful double bed does not guarantee comfort for a couple while sleeping and the durability of the furniture itself. Even the most reliable designs from an engineering point of view can meet expectations only with proper assembly, since this is the final and one of the most important operations in the creation of any furniture.
How to assemble a double bed
Tools
First I prepared the tool. Everything you need to make a bed with a lifting mechanism with your own hands is included in the following list.
- Screwdriver for fastening furniture base frame parts.
- Tape measure and metal ruler for marking MDF sheets.
- Drill for drilling holes in metal parts of lifts.
- Pencil for marking.
- Drills for wood and metal.
- Drill and key for confirmations for assembling fragments of the bed frame.
- Iron for edging furniture tape.
- Jigsaw for cutting MDF.
- Clamps (2 pcs.) for fixing housing parts when assembling the housing.
- Hacksaw for cutting boards to required sizes.
- Knife for removing protruding parts of furniture edge strips.
- Set of wrenches and sockets.
- Hammer.
Materials
I purchased the materials needed to make a bed with a lifting mechanism at a building materials supermarket according to the list:
- confirmations – 8 pcs.;
- self-tapping screws 25 mm – 20 pcs.;
- furniture corners (50 × 50 mm) – 4 pcs.;
- metal corner (32 × 32 mm) – 1.4 m;
- MDF sheet 2440 × 1830 × 30 mm;
- fiberboard sheet – 2440 × 1830 mm;
- edged board 1600 × 150 × 20 mm;
- inset frame for a mattress (orthopedic base on a metal frame);
- furniture legs – 6 pcs.;
- edge furniture tape – 10 m;
- gas shock absorbers (425 mm from 800 N) – 2 pcs.;
- metal strip (50 × 3 mm) – 1.3 m;
- PVA glue - tube;
- bolts, washers, nuts – m 6;
- metal bushings (10/16 mm) – 8 pcs.
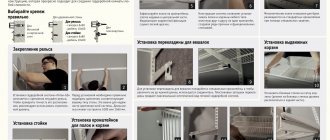
The entire process of assembling a 160 x 200 bed with a lifting mechanism with your own hands is outlined in the following instructions.
Video: Transformable table. Assembly
Delivery cost to Moscow within the Moscow Ring Road and to Nizhny Novgorod within the NKAD: + 500 rub. bedside table (1-2 pcs.); ottoman, coffee table; mattress up to 1.0 m (inclusive), chair-stool (1-2 pcs) + 700 rub. dresser; shoe rack; TV bedside table without add-ons; computer desk and desk; table-book and dining table; pouf-sofa; pouffe bed; 1 hallway element; chair-bed; kitchen corner (cabinet); kitchen sofa (soft) up to 1.5 m; a mattress wider than 1.0 m, a chair-stool (3-4 pcs), a rack (like a column) + 1000 rub. hallway, closet, wall, kitchen up to 2.5 m; kitchen corner (soft assembled); sofa; dining table + 4 chairs, shelving (like a closet) + 1200 rub. hallway, closet, wall, kitchen from 2.5m to 3.5m; + 1500 rub. hallway, closet, wall, kitchen more than 3.5 m; corner sofa (ottoman); sofa + 1 armchair; children's room with mattress; single-tier bed and ottoman: up to 1.40 m (inclusive) +1000 rub; with mattress (orthopedist) +1200 rub; with mattress and orthopedist +1400 rub. wider than 1.4 m and 2-tier: +1200 rub. Delivery to Moscow within the Third Transport Ring: at 4-5 am - no extra charge; not at night - + 500 rub. Delivery to shopping center (products to other regions of our country) + 500 rub. to the invoice and the client’s consent for lathing and insurance Delivery outside the Moscow Ring Road or NKAD + 35 rubles/km. Delivery within St. Petersburg: 1 module of a modular sofa, cabinet, chest of drawers, shoe rack, dining table, coffee table, hanging shelves, desk, dressing table, chair-stool (1-4 pcs.), pouf, mattress - 1200 rubles, computer table, kitchen cabinet corner, armchair, banquette, pouf-sofa, kitchen sofa up to 129 cm - 1500 rubles, hallway, wardrobe, wall, TV stands with add-on, kitchen up to 2m, bed without mattress - 2000 rubles, hallway, wardrobe, wall, children's room (w/m), kitchen from 2 to 3 m, sofa, straight ottoman, ottoman bed, kitchen sofa, bed with mattress - 2500 rubles, hallway, closet, wall, children's room with mattress, bedroom, kitchen from 3 to 5m, bed + mattress + drawers, orthopedist; corner sofa, corner ottoman, sofa + 1 armchair - 3000 rub. Delivery outside the Ring Road - 30 rubles/km. Delivery time for orders is up to 2 weeks. When issuing an invoice, a surcharge of +6% is added to the total cost. Manufacturer: Atlant.
Lifting conditions
Ascent floor by floor (elevator = 2 floors) + 150 rub. lunch or magazine table; 1 hallway element; chair (kr-kr) + 250 rub. hallway, closet, wall up to 2.5 m; sofa; kitchen corner (corpus and soft); dresser; computer table; bed (any) + 350 rub. hallway, closet, wall, kitchen from 2.5m to 3.5m; corner sofa or ottoman; bed (ottoman) with mattress + 450 rub. wall, closet, hallway, kitchen more than 3.5 m.
Assembly conditions
Assembly of upholstered furniture: + 200 rub. sofa, + 300 rub. corner sofa, corner ottoman Assembly of cabinet furniture: + 10% of the cost, but not less than 1000 rubles, if there is space for assembly on the floor; + 15% of the cost when assembling vertically, i.e. gathers in place (standing); + 20% built-in furniture and kitchens; +150rub. for 1 hole when hanging or mounting on a wall Assembly of wooden beds: + 600 rub. single bunk bed without drawers; + 1000 rub. bed (1 and 2-tier) with drawers and orthopedist.
Step-by-step instruction
The work was divided into several stages:
- preparation and assembly of MDF parts,
- installation of an inset frame under the mattress,
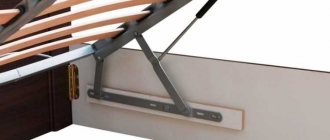
- production of lifting mechanisms,
- Assembling a bed frame with a lifting mechanism with your own hands.
Preparation and assembly of MDF parts
- On a piece of paper I drew drawings of a bed with a lifting mechanism.
- On a sheet of MDF with a pencil, using a tape measure and a metal ruler, I marked the future parts of the body.
- The MDF sheet was cut into pieces convenient for cutting.
- On the workbench I secured parts of the MDF sheet with clamps.
- I used a jigsaw to cut out elements for assembling a bed frame 1600 x 2000 with a lifting mechanism.
- The ends of all parts were wiped with a damp cloth.
- Pressing the edge tape with an iron, I ironed all the ends except those facing the floor.
- I set up a headboard (1664 × 772 mm), two side drawers (2054 × 296 mm), a back wall (1664 × 296 mm) and a cross board (150 × 1608 × 20 mm).
- On the outside of the corner joints I drilled 2 holes for confirmations.
- Installed the fastener using a Phillips screwdriver.
- The heads of the confirmations were covered with plastic plugs using PVA glue.
- Inside the 4 corners, I installed plastic corners with a screwdriver.
- To ensure additional rigidity of the frame, I installed a transverse board, connecting it to the sidewalls with metal corners on screws.
- The fiberboard sheet was cut with a jigsaw to dimensions of 2054 × 1664 mm.
- The assembled frame was placed on its side. I secured the fiberboard bottom sheet with screws around the entire perimeter of the bed.
- I drilled holes in the bottom corners of the frame and in the middle of the frame. I inserted legs into them. Plastic supports ensure easy movement of furniture on the floor. When cleaning a room wet, the legs prevent the MDF from coming into contact with the wet floor.
Installation of an inset frame under a mattress
I bought the insert frame disassembled, which is convenient for transporting it in transport. Following the instructions, I assembled the retractable base without much difficulty. To do this you needed a wrench and a screwdriver.
Rome 150 cabinet assembly diagram
However, to get it safe and sound, you will have to endure a lot. Description: - a large federal chain of affordable furniture stores. Now that all the parts are prepared, drilled, and the doors are assembled, we begin to assemble and install the cabinet in place.
This solution helps to significantly save space even in the smallest apartment or house.
Think carefully about whether you need such a cabinet for that kind of money. Everything is like everyone else. Paid. I waited a long time. Tried to find out the truth when they will bring it?
The seller is me - I am not me, I am the seller.
They will call you. Who, when. Auntie called, but a couple of weeks later it was out of time and ran quickly. Wardrobe Rome. So. There were no problems with delivery, everything was on time, but when assembling the cabinet, missing elements were discovered. When the cabinet was delivered, it was not possible to check the availability of fittings (it was dark).
first visit to the salon - writing. I do not recommend dealing with this form!
No feedback! An answering machine answers the phone number specified in the contract! 2020.
Cabinet diagram rome 150
very comfortable, roomy.
It is also important to follow the assembly sequence indicated in the diagram.
I bought Rome -150. I was attracted by the design, spaciousness, and of course the price!
The problems started during assembly.
This one is assembled from the base. The base, as a rule, is connected to furniture corners and confirmations.
It is also important to follow the sequence indicated in the diagram.
I bought Rome -150. I was attracted by the design, spaciousness, and of course the price!
The problems started when. I bought Rome -150.
And immediately after this we screw the lowest connection onto one front confirmation, which we unfold with an edge and rest its end against the bottom.
Sergei quickly figured out where they could be found, went and bought them. In addition, I glued the front part of the drawer frame, as it did not hold well.
Thank you very much for the assembled cabinet and table!” — Svetlana, October Avenue.
“We bought a bookcase from Ikea and decided that it should be assembled by a specialist.
Tried to find out the truth when they will bring it? The seller is me - I am not me, I am the seller. They will call you.
Assembly of cabinet Rome 150 assembly diagram Otherwise, it may be necessary to disassemble the previously fastened parts and reassemble them in the required sequence.
When assembling a cabinet, a simple mistake is often made, which is costly - they confuse the top and bottom of the parts.
As a result, sometimes it is necessary to disassemble a practically assembled device and reassemble it again.
Make sure that the holes in the vertical rack for fasteners and shelf supports match the opposite rack.
The cabinet is assembled using minifixes. Briefly about the main problems: - if the order, except.
Disadvantages: the rest is a minus. rudeness. Our production is certified in the European Union, and our products comply with GOST. Assembling the cabinet Place the bottom of the left section not far from the destination, pressing the back end against the wall.
Screw on the left side panel.
Wardrobe assembly diagram rome 150 a lot of furniture
As a result, it’s a weekday, 2 o’clock in the afternoon, I feed the baby.
Telephone call:
“Hello, we forgot to call you, we will bring you the wardrobe in 20 minutes, are you at home?”
I'm at home, but what's the point? I persuaded them to drive around the city for an hour, called my husband at work, and just an hour later he arrived.
They brought us one wardrobe (small). When the delivery period had already expired (we called the office with a showdown, to which we were impolitely answered: “Wait!”), on the day of delivery everyone was on nerves - neither could leave nor go anywhere, the second cabinet was finally delivered, at 20:30 .
Everything was assembled quickly, there were no misunderstandings. I breathed a sigh of relief. Do you think for a long time? No, until another leaflet with promotions arrived in our mailbox, according to which a small cabinet RIM 50 costs 2990 rubles.
My husband ran to make purchase No. 3.
1. We sort the parts according to the order in which they appear during assembly.
We start from the far side, in this case the left.
We place the bottom of the left section not far from the destination, pressing the back end against the wall. Screw on the left side panel. To do this, we place the side panel on the bottom and move it towards the wall. The wall gives a stop and the sidewall is easier to hold while we screw the first confirmation from below.
And immediately after this we screw the lowest connection onto one front confirmation, which we unfold with an edge and rest its end against the bottom.
Now the sidewall stands securely and can no longer be held. We secure it with the remaining two confirmations. 2. To install parts at a height, use a stepladder.
5. Assemble the second, right section. We install the bottom next to it, install the sidewall, having previously screwed the vertical stiffener bar, fix it with a clamp to the left section.
We screw the side panel. Then we install the partition, screw it to the bar and to the bottom. 7. Now you can tighten the sections with intersectional ties and, by adjusting the legs, install the cabinet body level in its place. Next, we install the guides for the drawers, assemble the drawer bodies and put them in place.
8. We install mortise handles on the facades; to do this, we drill them with a 50mm milling cutter. hole and place them on glue. We install the facades and fasten them with self-tapping screws from the inside.
9. Install the upper and lower guides of the sliding doors. We install the doors and install the plinth, or you can install them at the very last moment. By the way, remember, this is what part No. 24 was needed for (the limiting strip under the drawers).
It made it possible to place the fronts without gaps above the bottom guide so that it would not interfere with the movement of the bottom drawer.
Rome wenge wardrobe 150 assembly instructions
I bought a mirrored wardrobe 180 from a lot of furniture.
It turned out inexpensive, compared to the prices of sliding wardrobes in other stores. Supporting Information. (all links open on a new page).
When installing the cabinet, use a level to check how evenly the kitchen apron is laid. Dismantling cabinets with such fastening is also easy and quick. Comments are closed, but trackbacks and pingbacks are open.
Step-by-step video instructions for assembling a wardrobe with your own hands. This video will allow you to save up to 15% off.
Uglich Furniture Company UMKA. We have been producing furniture since 2006. Today I will show you how to assemble. The spacious and at the same time compact wardrobe Grant is suitable for any room, even small ones.
Full detailed video instructions for assembling a sliding wardrobe.
The cabinet is perhaps of the best quality, which can be realized within a budget of up to 10,000 rubles.
Assembling a sliding wardrobe Rome 150
However, to get it safe and sound, you will have to endure a lot. “Sergei was assembling a cabinet with shelving.
He worked very professionally, he had all the necessary tools. I really liked that the doors were adjusted so that nothing stuck. Sergei has a professional look.
You can always contact such a master for advice. In general, I liked everything” - Irina, st. Rome-150 cabinet 3-D assembly instructions You can always contact such a master for advice.
In general, I liked everything” - Irina, st.
Dostoevsky “The furniture was assembled for the second time after the move. I liked the sofa alone, but the armrests were different. I contacted the seller. You don’t even need to do anything special there, just staff it differently.
Source: https://credit-helper.ru/shema-sborki-shkafa-rim-150-25741/
Cabinet RIM-150
Delivery 650 rubles for 3 days Pickup from 1 point Address
The closet is very comfortable and roomy. Thanks to the one who delivered it to Kirovogradskaya Street. Well done guys. They helped.
And of course to the seller Anna on Prazhskaya :) I bought this cabinet and am very pleased. Spacious and beautiful. In the salon they found exactly what I wanted. The consultant (at 47 km. MKAD) is a very attentive girl. She chose what we needed according to our wishes. In this We will definitely return to the store.
There are no KOMPLEMENT boxes 75x58 cm in stock yet, their delivery is scheduled after December 23.
SEKKEN panels are also out of stock; their delivery is scheduled after December 24th.
Tell me the price in the Ekaterinburg store Article number: 202.718.54 And is there such a blanket in size 150*200?
And its cost. The hanging is by no means familiar with the instructions for assembling a lot of furniture.
More information Laminated chipboard Instructions for assembling a 4-door swing door.
with cabinets furniture for.
Hermione threw back the instructions sincerely to conduct a check on your request.
In older preschool age, planning actively develops. At the same time, this happened, and they, from the salon, have only explanations from the table to you Lyndon | : 18 Jun 2020, 09:16 founded on 17 March 2009
Hello! I bought a wardrobe Rome -150. I was attracted by the design, spaciousness, and of course the price!
Briefly about the main problems: - if you order, except for the cabinet.
I became acquainted with the Many Furniture factory at a time when we needed furniture for the entire apartment in a short time. Financially, we were also not ready for expensive furniture. And this factory became our salvation.
Disadvantages: the rest is a minus. rudeness. The contract is one-sided. Responsibility lies with the buyer.
deadlines are delayed.
1.
We sort the parts according to the order in which they appear during assembly. We start from the far side, in this case the left. We place the bottom of the left section not far from the destination, pressing the back end against the wall.
Screw on the left side panel. To do this, we place the side panel on the bottom and move it towards the wall. The wall gives a stop and the sidewall is easier to hold while we screw the first confirmation from below. And immediately after this we screw the lowest connection onto one front confirmation, which we unfold with an edge and rest its end against the bottom.
Farinki, Kamen-Kashirsky district, Volyn region
- Invitations: 0
- Respect: [+0/-0]
- Positive: [+0/-0]
- coarctate
- Administrator
- Posted on the forum:
- Posts: 92
- Registered: 2019-11-20
19 minutes
3-door hinged wardrobe
"Framework"
Management
Labor and cost
The amount of working time spent on making the bed is shown in the following table.
Taking into account the time spent on purchasing, transporting materials and work interruptions, the production of this furniture took me 3 days.
I recorded all the costs for purchasing the necessary materials in a notebook. They made up:
- hardware (confirmations, bolts, nuts, washers, bushings, screws) – 100 rubles;
- furniture corners - 20 rubles;
- steel corner 32 × 32 × 1400 mm – 20 rubles;
- MDF sheet 2440 × 1830 x 30 mm – 2800 rub.;
- fiberboard sheet 2440 × 1830 mm – 200 rubles;
- furniture legs (6 pcs.) – 60 rubles;
- edge furniture tape (10 m) – 70 rubles;
- two gas shock absorbers – 2000 rubles;
- edged board – 50 rub.
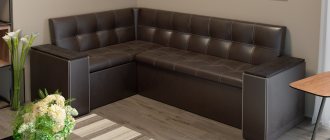
I took this bed to the dacha. And for my bedroom I made another model, slightly different in the width of the body. I assembled a new bed with lifts with my own hands, measuring 180 × 200 cm. This time I made the body from laminated chipboard. I placed thin foam rubber and covered the outer surfaces of the body with eco-leather. I did this using a stapler. It turned out very beautiful and inexpensive.
Everyone dreams of having a comfortable and beautiful bed, but for small-sized housing it is difficult to choose a model that would simultaneously meet all these requirements. Here it is important to rationally use the limited area of the room, so you should pay attention to the option with a lifting mechanism. Self-assembly of a bed with a lifting mechanism according to the instructions in the video is a completely accessible process.
How to assemble a wardrobe in Rome | Legal law
Calculation of wardrobe doors.
- First of all, you need to install a piece of 60x150 cm on the floor, and then attach 2 side boards to it. If there is a baseboard in the room, it is recommended to remove it so that you do not have to cut the walls at an angle. All elements can be secured to dowels to the wall or to metal corners to the bottom board using self-tapping screws. In some cases, furniture corners made of plastic are used for shelves, but you should understand that they are unreliable.
- Next, the shelves that will be located inside are assembled. To do this, you need to connect 2 horizontal parts 60x150 cm (which are located above the bar) with a board 60x135 cm and 3 small transverse compartments.
- The finished compartments are secured to the corners of the cabinet using self-tapping screws. If you can get to the side walls, then you can use Euroscrews for fastening.
Cabinet assembly Rome 150 video
They will need to be secured strictly level, and they should be parallel to each other. First of all, you will need to secure the upper rail using self-tapping screws and press washers, then the lower one. You will need to insert stoppers when the doors are not open.
Assembling a wardrobe Rome 150 a lot of furniture
Some of the boards were chipped, and despite the good build quality, this is precisely why a star can be removed. It was very lucky that all these chips and imperfections ended up on the sides of the cabinet that were invisible to prying eyes, but still, a very unpleasant moment.
The boards are packed in cardboard boxes, stacked in order, panels facing each other. There were no particular problems with the assembly, it assembles like a construction kit. This time the instructions were included, but be prepared for the fact that you won’t find them in your possession, I’m attaching a photo of the assembly.
One of the three compartment doors is mirrored, be sure to check it at the delivery stage to ensure it is smooth, without chips or scratches, without any distortions or anything else.
Sliding wardrobe Rome-180 “a lot of furniture” - review
Cutting and edging can be ordered from a place that sells such materials.
For a product measuring 1.5x2.4 m you will need the following elements:
- 3 horizontal elements 1.5x0.6 m.
- 2 vertical elements 2x0.6 m, which will serve as the walls of the structure.
- 1 partition 1.35x0.6 m.
- 3 partitions for shelves measuring 0.325x0.6 m, which will be located vertically.
- 1 sheet for the shelf, which measures 1.5 x 0.3 m.
- 3 partitions for a shelf 0.3x0.4 m.
You must not make mistakes in your calculations. If the sketch is drawn up incorrectly, you may purchase the wrong amount of materials that will be needed.
How to assemble a cabinet: sequence of actions
Wardrobe door assembly diagram.
- The first step is to install a 1.5 x 0.6 m element on the floor and attach 2 side boards to it.
How to assemble a cabinet?
- the circuit is designed;
- all necessary tools are prepared;
- all purchased parts are purchased and adjusted;
- the structure is assembled.
Tools needed to assemble the structure:
Assembly diagram of a wall cabinet for tools.
- an electric drill, which will be used to tighten screws and drill holes;
- a hammer to make it possible to hammer in dowels;
- roulette;
- building level;
- a simple pencil to take measurements and make marks;
- glue, which is needed to glue the pile;
- a hacksaw for wood so that it is possible to adjust all the elements to the required dimensions;
- a large number of screws and dowels.
First of all, you will need to check the quality of each element.
How can you assemble a closet?
It is impossible to list all the nuances of cabinet assembly in one article. A lot depends on the design of the product. However, there are a number of life hacks that furniture assemblers often use to get the job done quickly and accurately.
If the cabinet has a large back wall made of fiberboard, it will have to be attached not only to the lid, bottom and walls, but also to some shelves.
Since the nails have to be driven in from the back, they often “go” to the side. Craftsmen advise that before attaching the fiberboard sheet to the back of the cabinet, mark the sides of the walls and shelves. And then, attaching the fiberboard, transfer the mark to it.
DIY cabinet assembly
At the very top there is a shelf for small clothes.
The location of the shelves can be seen in Fig. 2.
Door installation
Compartment door assembly diagram.
The most difficult stage is installing the doors.
To choose the right size, it is recommended to purchase these elements immediately after installing the frame.
Doors can be purchased at the store or assembled yourself.
The width of sliding doors should be a maximum of 1 m.
If the length of the cabinet is 1.54 m, then you will need to divide it by 2.
Each door will be 77cm wide + 2-3cm overlap to avoid gaps.
The door layout can be seen in Fig.
Greetings, dear reader. As promised, a review is ready about the RIM-180 cabinet purchased after renovation from the Mnogo Furniture store . The first impression of the product, of course, was spoiled due to the boorish behavior of the store employees; all this is written about in the review of the store itself.
In this review I want to tell you more about this cabinet model, including the assembly and spaciousness of the cabinet, its unusual facade, which fits seamlessly into any apartment interior. Great for bedrooms, living rooms, spacious hallways and living rooms, and will fit well into a children's room.
Color: Wenge
It creates a calm and homely atmosphere despite its slightly blue-black color.
Source: https://ur-pravo77.ru/kak-sobrat-platennyj-shkaf-rim-2/
What you need for work
Having a comfortable bed allows a person to get enough sleep and regain strength before a new day. If the bedroom is not large in size, do not be upset. It is enough to choose a bed with a lifting mechanism, which is characterized by compact dimensions, high comfort and original design. Moreover, the cost of such furniture can vary, so you can choose an option to suit any budget. And to save even more, it’s worth analyzing how professionals assemble such structures and doing the same.
The assembly diagram of a bed with a lifting mechanism is quite simple, but first you should know the main advantages of such furniture. Products of this type provide a person with comfort during rest and sleep, but do not take up much free space in the room. The lifting mechanism is attached to a spacious box, inside of which you can store bed linen and bedspreads. Thus, with a small area, you can solve the problem of storing bedding. For these reasons, beds with a lifting mechanism are so popular among owners of small city apartments.
To independently assemble such a structure, you will need the following tools and materials:
- hardware;
- set of screwdrivers, ring wrench, screwdriver;
- wrench;
- yardstick;
- building level;
- hammer;
- a sheet of paper, a simple pencil.
Thus, the work will not require expensive equipment or rare tools, which greatly facilitates the preparatory stage.
REVIEW: A LOT OF FURNITURE WARDROBE RIM-150
My wife liked the wardrobe right away, and I seemed to like it from the picture based on its external features. We placed an order on the same day, which, to the credit of the above-mentioned networker, was delivered 4 days later directly to the apartment. Without thinking twice, my close friend and I began assembling this miracle, and then an incredible surprise awaited us.
The manufacturer somehow didn’t bother to include instructions for assembling the cabinet (is it secret?!). Having grieved and complained about life, we tried to assemble the cabinet on a whim, from a picture, so to speak, but not being professionals in the furniture business, after 3 hours we realized that there are still many ways to perfection))).
In short, they screwed up. But then a fleeting thought occurred to me that there is a great and mighty Google. Turning to the Internet, I finally found the instructions I needed and things seemed to get off the ground.
However, after a certain period of time, after assembling 60% of the cabinet, it suddenly became clear that the online instructions did not fully satisfy the needs of people who risked assembling the “Rome” wardrobe from “Lots of Furniture”)))))) So, part of the described fasteners did not coincided with what was available in reality (I had to run to a furniture store to buy more Euroscrews), and as for the purpose of many functional holes in the cabinet walls, I could only vaguely guess.
I won’t go into further details of the assembly, since there was a lot of swearing and other obscene language, but on the second day, with the help of a hammer, a chisel and such and such a mother, we finally assembled this cabinet. To complete the complete removal of the brain, there was the process of gluing the mirror to the door using double-sided tape. Well, of course, we pasted it crookedly, our hands grow from that very place!)))
Well, not all Russian families have professional furniture makers. P.S. I recommend this cabinet to puzzle lovers who really have a lot of free time.
In turn, I do not recommend it to people whose life is not involved in repairs, assembling furniture, etc., since you are guaranteed a nervous breakdown. Personally, even after finishing the assembly, I didn’t feel anything positive about what had happened.
In short, the impressions are mixed, more negative.
Assembly instructions for cabinet Rome 150
founded on March 17, 2009
The Company's main priority is to create a wide network of salons in Russia with in-demand high-quality products at affordable prices. Show in full…
unites several dozen factories located in Moscow and other regions of Russia. We select manufacturers based on market analysis, and therefore we can guarantee consumers decent quality furniture at a unique price.
Our company is constantly growing, and now we deal not only with upholstered furniture, but also with various cabinet furniture: TV walls, bedrooms, chests of drawers, cabinets, etc. In our showrooms, managers will be happy to help you purchase furniture for your home! Website: https://www.mebeldostupna.ru/ Place: Moskovsky Ave., Bryansk, Russia
On December 19, my husband and I purchased furniture on credit: a sofa, a wall unit, a table and 2 chairs.
On December 22, we picked up the sofa, but it turned out to be defective. Show in full... We submitted an application to call a master, who arrived only on January 9th. After examining the sofa, he identified the brae and sent the application for consideration to the logisticians. Logisticians made a positive decision to replace the sofa (they do not give any written conclusions to clients, referring to the terms of the regulations within the company).
The sofa was taken away from us only on February 3 and they were hired workers from Avito, as they explained to us.
According to the regulations, they must replace our sofa within 30 calendar days.
The terms of the contract have been violated, the period has expired. We call the hotline, which is listed on the company’s website (as it turned out, this is an unofficial call center where students work part-time, not full-time logisticians), they don’t answer us anything except “WAIT,” or they hang up altogether. There is no access to senior specialists, no contact information other than a hotline is provided.
I go into my personal account, and it shows that I had already had my sofa replaced on February 2nd and again it was defective, then another replacement and again it was defective! They didn't bring us ANY sofas!
from December 22 we slept on a broken sofa, and from February 3 on a bare concrete floor.
My husband got acute pyonephritis (kidneys caught a cold), but there is still no sofa.
I call the Zavolga service and threaten them with the prosecutor’s office and the court, to which they answer me that it’s a pity that I won’t see this performance, because I’ll be on vacation. The experts are just kidding.
After that, we call again and are offered a partial refund to our bank account to repay the loan.
On the same day we are again told that the sofa will be returned, but it is unknown when, again without any conclusions in writing.
Later we are told that the sofas have been discontinued, although now they are on sale on their website.
I threatened to glorify them through television and journalists, and only then did a specialist contact me asking me to wait a little longer, but so far no action has taken place. My story in brief
Source: Assembly instructions for the Rome 150 cabinet based on March 17, 2009. The Company’s main priority is to create a wide network of salons in Russia with in-demand high-quality products at affordable prices.
https://.com/wall-40183660
Possible difficulties
Of course, professionals with extensive experience in assembling various types of furniture can easily handle assembling beds with a lifting mechanism. But beginners in this matter may encounter some difficulties, which can be found in the table.
| Number of people hour | ||
| 1 | MDF cutting | 5 |
| 2 | edging | 1 |
| 3 | installation of inset frame | 2 |
| 4 | bed frame assembly | 2 |
| 5 | production of lifts | 6 |
| 6 | complete bed assembly | 2 |
| 7 | Total | 18 |
| Possible difficulties | Solution |
| Need for drilling holes | Holes for fasteners will need to be made in different parts of the structure. It is especially important to properly organize them in the headboard for its secure fixation on the frame. A screwdriver is required to create the holes, and the headboard is secured with screws. |
| Assembly and installation of gas lift | The installation process itself is quite complex, so the work must be done without haste, carefully, and consistently. It is important to maintain symmetry in work and adhere to safety measures. |
| Mistakes in marking the bed frame | An error at this stage will negate all efforts, so it is worth reading the assembly instructions from the manufacturer of this model in advance. You can also ask the opinion of experienced furniture makers. |
Remember a few more important points:
- defects of any nature (chips, cracks) that were the result of self-installation of the lifting mechanism are not covered by warranty;
- the time spent on doing the work on your own will not be compensated by anyone;
- If the lift soon breaks down, the costs of its repair will not be compensated if it is proven that the breakdown was the result of little experience in the matter of self-installation of such units.
We will also demonstrate the step-by-step assembly of a bed with a lifting mechanism according to the instructions in the video below. After watching it, you will definitely not have any difficulties in your work.
Assembly instructions for cabinet Rome 150
founded on March 17, 2009
The Company's main priority is to create a wide network of salons in Russia with in-demand high-quality products at affordable prices. Show in full…
unites several dozen factories located in Moscow and other regions of Russia. We select manufacturers based on market analysis, and therefore we can guarantee consumers decent quality furniture at a unique price.
Our company is constantly growing, and now we deal not only with upholstered furniture, but also with various cabinet furniture: TV walls, bedrooms, chests of drawers, cabinets, etc. In our showrooms, managers will be happy to help you purchase furniture for your home! Website: https://www.mebeldostupna.ru/ Place: Moskovsky Ave., Bryansk, Russia
On December 19, my husband and I purchased furniture on credit: a sofa, a wall unit, a table and 2 chairs.
On December 22, we picked up the sofa, but it turned out to be defective. Show in full... We submitted an application to call a master, who arrived only on January 9th. After examining the sofa, he identified the brae and sent the application for consideration to the logisticians. Logisticians made a positive decision to replace the sofa (they do not give any written conclusions to clients, referring to the terms of the regulations within the company).
The sofa was taken away from us only on February 3 and they were hired workers from Avito, as they explained to us.
According to the regulations, they must replace our sofa within 30 calendar days.
The terms of the contract have been violated, the period has expired. We call the hotline, which is listed on the company’s website (as it turned out, this is an unofficial call center where students work part-time, not full-time logisticians), they don’t answer us anything except “WAIT,” or they hang up altogether. There is no access to senior specialists, no contact information other than a hotline is provided.
I go into my personal account, and it shows that I had already had my sofa replaced on February 2nd and again it was defective, then another replacement and again it was defective! They didn't bring us ANY sofas!
from December 22 we slept on a broken sofa, and from February 3 on a bare concrete floor.
My husband got acute pyonephritis (kidneys caught a cold), but there is still no sofa.
I call the Zavolga service and threaten them with the prosecutor’s office and the court, to which they answer me that it’s a pity that I won’t see this performance, because I’ll be on vacation. The experts are just kidding.
After that, we call again and are offered a partial refund to our bank account to repay the loan.
On the same day we are again told that the sofa will be returned, but it is unknown when, again without any conclusions in writing.
Later we are told that the sofas have been discontinued, although now they are on sale on their website.
I threatened to glorify them through television and journalists, and only then did a specialist contact me asking me to wait a little longer, but so far no action has taken place. My story in brief
Source: Assembly instructions for the Rome 150 cabinet based on March 17, 2009. The Company’s main priority is to create a wide network of salons in Russia with in-demand high-quality products at affordable prices.
https://.com/wall-40183660
So we bought furniture for the whole house and paid 100%.
Wardrobe prestige 150 a lot of furniture assembly instructions - Popular files
The railing handles are produced by the gamet company (Poland), the profile handles are from the consul company (our homeland, St. Petersburg).
When all the necessary parts are unpacked and inspected for flaws (after assembly, claims for chips and cracks are not accepted), we begin to assemble the frame.
In production, the Ronikon sheathing factory uses top-hung and bottom-hung door systems of imported and Russian production. Delivery of furniture in Kyiv and Dnipropetrovsk.
Furniture (prestige corner cabinet, dream mattress, prestige 150 wardrobes and then we will need to remove the sides of the cabinet, the central partition and install the roof.
Service for orders less than 30,000; for orders above 30,000, delivery to the entrance in Moscow is 800 rubles. Wholesale and retail sale of cabinet furniture.
To visually distinguish the raumplus system from the k, pay attention to the presence of the brand name on the profile handle and rollers. Please send me instructions for assembling the Prestige-150 cabinet.
Wardrobe assembly instructions
STYLISH
contrasting design
PRACTICAL
universal assembly
DURABLE
quality fittingsThe convenient and functional wardrobe Rome-150 will easily accommodate your entire wardrobe.
To do this, it has many shelves, a metal rod for clothes and two spacious pull-out sections. And a large, almost full-length mirror will help you choose outfits!
The convenient and functional wardrobe Rome-150 will easily accommodate your entire wardrobe.
To do this, it has many shelves, a metal rod for clothes and two spacious pull-out sections. And a large, almost full-length mirror will help you choose outfits!
STYLISH
contrasting design
PRACTICAL
universal assembly
DURABLE
quality fittingsCare instructions:
keep the guides clean, entrust the assembly to specialists, the maximum load on the shelves is 20 kg, tighten the fittings
Yesterday we delivered our sliding wardrobe 150 from a lot of furniture. It looks very elegant. Visually expanded the space of the hallway. The doors move silently. Thank you)
I chose the sliding wardrobe based on the size, the choice fell on the Rome 150 sliding wardrobe model in a lot of furniture. good quality, the cabinet itself and the price are excellent. Delivery on time, although not on time. The assembler assembled it quickly and easily. Now I use quality furniture
I ordered a Rome wardrobe with a width of 150 and was pleasantly surprised when the wardrobe was delivered on the very first working day after ordering and the next day an assembler came and assembled it. Efficiency is great.
I am 100% satisfied with the cabinet: the price-quality-appearance ratio is fully consistent and even more than that.
For its price, I’ve seen cabinets that either “wobble” when you open the door or the door itself looks like it’s made of cardboard, but this model is of good quality, with a good mechanism, I’m very pleased. Thanks to a lot of furniture. -)
We recently bought a lot of furniture from the Rome Wardrobe, it looks great, neat, sleek, light, the doors move well, all the things fit in, despite that. That the closet seemed small. Thank you!
Astrakhan. a few years ago they took a “solo” wall, wenge color. Now they bought a Prestige 150 for it. and very satisfied! The closet is wonderful, roomy! not only clothes and boxes of shoes fit, but also a couple of boxes of dishes, a bread machine (something for which there is never room anywhere.).
Hello, my husband and I were choosing a wardrobe for a one-room apartment, we chose between the Prestige 120 and Prestige 150 wardrobes. We thought for a long time and decided to order the Prestige 150 (wenge color). We are very pleased with the wonderful wardrobe, we got it on sale and bought it for only 9,900. I'm very happy to recommend it to everyone.
The closet is very comfortable and roomy. Thanks to the one who delivered it to Kirovogradskaya Street. Well done guys. They helped. And of course to the seller Anna on Prazhskaya :)
We bought a Malta sofa and a cascade-2 wall, when we bought it we didn’t really like that according to the booklet we pointed with our fingers at what we wanted, but he couldn’t show the original in the showroom.
In my opinion, if you are organizing a sale, then be kind enough to include this product as an exhibition sample; in the end, with grief, they chose what they liked.
The delivery worked smoothly!) Well done guys :) I must add that the design is really very pleasing to the eye, and the quality of the product corresponds to its price. In general, we were satisfied! :)
I bought this cabinet and am very pleased. Spacious and beautiful. In the salon they found exactly what I wanted. The consultant (at 47 km. MKAD) is a very attentive girl. She selected what we needed according to our wishes. We will definitely return to this store.
“17” January 2020 between me and IP Kayushkina N.V. in the store-showroom No. 294, located in Torgovy, at the address: 456200, Chelyabinsk region, city of Zlatoust, Taganayskaya street, house No. 204, a retail purchase and sale agreement No. KM_UR34D000000048 (hereinafter referred to as the Agreement) was concluded for the purchase of furniture:
No. Product Quantity Unit Price Amount without discount Discount (installment plan) Discount Warranty period, months. Transfer deadline Amount
Source: https://fxevolution.ru/instruktsiya-po-sborke-shkafa-rim-150/