When decorating a kitchen, small gaps appear between the countertop and the wall at the joints, which spoil the appearance of the room. They are hidden with the help of skirting boards, thanks to which a smooth transition is formed in this space. Such products are sold in the form of structures consisting of two parts - the inner part and the strip. You will learn more about how to attach a baseboard to a kitchen countertop in our article.
How to attach a baseboard to a kitchen countertop
Why do you need a plinth on the tabletop?
It is the countertop that serves as a kind of springboard where processing, cleaning, and slicing of products takes place. And even if you use a board, there is no insurance against small pieces of food getting into places that are hard to reach for cleaning.
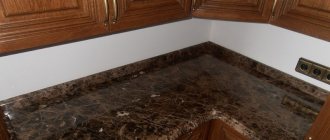
The baseboard protects the space between the furniture and the wall from small elements and debris getting there. The plinth covers the space between the furniture and the wall. This could be a corner or any other shape. This improves the aesthetic appearance of the kitchen. How to attach a corner to a tabletop and what types there are, we will consider further.
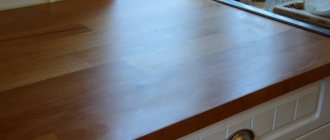
With the right baseboard, the aesthetic appearance of the kitchen improves noticeably.
Purpose of the plinth
There is another name for plinth - it's molding . The product is designed to perform a number of functions, for example, it closes a joint, protects the wall from moisture or debris, and also complements the kitchen design, because a countertop without molding does not look so aesthetically pleasing. Let's consider each of the functions performed separately.
Accessories for kitchen furniture
Disguise
The resulting gap between the wall surface and the tabletop looks unsightly, so it must be covered with a decorative plinth. In addition, during installation, the ends of the tabletop may be damaged or minor defects may appear on the wall at the junction. All this can be easily eliminated by installing molding.
Skirting for kitchen countertops
Moisture protection
In the process of preparing various dishes or washing dishes, splashes of water or small particles of debris always remain on the countertop, which can get into unprotected joints. Over time, debris will accumulate there, creating an unpleasant odor, and if water gets on the back surface of the kitchen furniture, it can cause mold to appear. To prevent all these troubles, installation of skirting boards is required.
Skirting boards cover joints from moisture penetration
Creating an Attractive Look
It is difficult to argue with the fact that the installed plinth performs various functions, including decorative ones. Thanks to the correctly selected molding, the kitchen set takes on a complete look. Therefore, decorative products need to be selected not only by size, but also by external qualities. In construction stores you can see a large number of products from different manufacturers, so there should not be any problems with choosing a skirting board.
Skirting board for table top
Note! When choosing, you must take into account the quality of the product, because the service life of the skirting boards will depend on it. Secondary criteria include the material of manufacture and the type of molding construction.
Types of countertops for kitchen cabinets
Features and types of kitchen skirting boards
Masking the joint between the headset and the wall is not the only task of the plinth. And despite the importance of aesthetics, protection from moisture and damage to furniture also needs to be taken into account.
The baseboard also protects furniture from excess moisture. When purchasing a new kitchen, the kit includes wall furniture plinths, joints and plugs. But there are often cases when a headset is assembled into separate elements. In this case, the manufacturer will not supply the furniture with skirting boards, which automatically makes the selection of this element your responsibility. The variety of materials and shapes is enormous.
As a rule, baseboards are included with new kitchens. We invite you to consider three main ways to select profiles:
- The most common phenomenon is the selection of kitchen plinths based on the characteristics of the working surface. If you order profiles and joints based on numbers or decor names, please note that the shade may differ from one manufacturer to another.
- Identity of materials. This means that the baseboard is made by the manufacturer from the same material as the kitchen unit. For example: if the tabletop is made of wood, a profile is cut from the main board for ideal compatibility and visual creation of a monolith.
- Third method. This method is more designer, because the selection of skirting boards is carried out on the basis of its maximum similarity with the color of the handles and the type of material.
You can select a plinth for a tabletop according to several principles.
When choosing a profile, first of all take into account its physical properties. Each material is individual.
Plastic
Active demand for plastic products is due to durability, practicality and affordability. The manufacturer achieves aesthetics and texture for plastic skirting boards by lamination. Color is formed by adding pigment. Hence the huge number of shades and options for simulating natural materials: wood, metal, stone and others.
Plastic skirting boards are in great demand. Invoice options:
- smooth;
- gloss;
- matte and shagreen.
Plastic skirting boards can have all sorts of textures. Plastic is also valued for its ease of installation, because it bends and cuts quite simply. The main bonus is moisture resistance. In fact, water cannot harm plastic in any way. Profiles made from this material are easy to wipe clean.
Installation of plastic plinth is quite simple.
Aluminum
Thanks to the process of adonization (coating the surface of the slats with a special film), a good protective layer is formed: durable and moisture-resistant. Such profiles last much longer than the headset itself.
These skirting boards are durable and moisture resistant. PVC skirting boards have a drawback - they are “afraid” of exposure to high temperatures, which is not typical for aluminum. In addition, it is an electrical insulating material. The cost is slightly higher than that for plastic products.
One of the disadvantages is that they do not tolerate too high temperatures.
Metal-plastic
Metal-plastic products combine the advantages of previous profiles. Despite the advantages that aluminum and PVC models have, metal-plastic actually has no disadvantages. Among the possible ones: lack of flexibility (impairs the ability to hide wall irregularities with a tight fit) and some installation problems.
One of the main disadvantages of such skirting boards is that they are difficult to bend.
Installing a baseboard for a countertop
As soon as the choice of kitchen baseboards is completed, you can begin their installation. Of course, such work requires careful preparation, one of the main points of which is the search for the necessary tools and materials.
Preparing tools
To install kitchen moldings, you need to prepare the following tools:
- hacksaw for metal;
- transparent silicone in a tube;
- carpenter's knife;
- set of self-tapping screws;
- screwdriver;
- tape measure, ruler or other measuring device.
Preparing tools for work
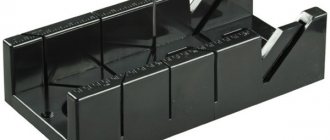
Prices for the popular range of miter saws
Miter saw
Along with skirting boards, stores sell decorative corners that can be used to hide the joints. There are end, external and internal corners. All of them are attached to the surface of the baseboard using silicone. If the corners are purchased separately from the molding, then you need to choose them in such a way that the products match perfectly in color.
Decorative corners for skirting boards
Instructions
The process of installing skirting boards in the kitchen is simple if everything is done according to the recommendations and rules. Below are step-by-step instructions, following which will greatly facilitate the work.
Step 1 . Measure the length of the tabletop and cut the required pieces of baseboard. To do this, you need to use a metal saw to make the cuts as even as possible.
Cut the skirting board to the required length
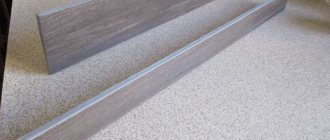
Step 2 . Divide the plinth into two parts - internal and external. You need to start working with the base of the molding, that is, with its inner part.
Dividing the baseboard into two parts
Step 3. Screw the base of the baseboard to the tabletop using a screwdriver. Instead of self-tapping screws, some craftsmen use glue, but in this case it will be impossible to carefully remove the installed baseboard. The optimal distance between screws is 15 cm.
Step 4. Once the base is screwed on all sides, proceed to install the decorative part of the baseboard. First you need to install the latch on one side, and then proceed to install the joining angle.
The joining angle is set
Step 5. When installing the joining angle, you need to remember that the front part of the plinth must extend under it by at least 5 mm. The corner itself is fixed with glue.
Glue is used to fix the corner
Step 6 . Using a tape measure, measure the desired length of the second baseboard, leaving a small gap so that part of the face latch is under the corner. If necessary, cut off the excess part of the baseboard.
The length of the second plinth is measured
Step 7 . Insert the upper part of the plinth under the decorative corner and press it against the base until a characteristic click appears. This means that the plinth is securely fixed.
The upper part of the plinth is inserted
Step 8. The edges of the plinth are closed with special plugs, which are sold complete with decorative corners. They will hide the cut area of the baseboard, thereby improving the overall appearance. The plugs are easy to install, you just need to press them.
Special decorative plug
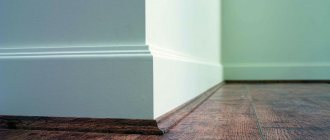
Step 9 . This is what the finished plinth looks like. If all installation steps were correct, then the mounted molding will preserve this type of kitchen for a long time. To eliminate the possibility of water getting into the seams formed between the wall and the edge of the table top, this area must be treated with a sealant.
Installed kitchen plinth
Types of skirting boards by design
It is not only the type of material that allows you to classify skirting boards and influences their choice. There are differences in design. There are only such varieties: universal and cast profile. The characteristics of each type are important when choosing. And it’s fair to consider both options to get an objective picture.
The profile of the skirting boards can be cast and universal.
Universal
A design feature of universal skirting boards is the presence of silicone seals. The inserts are replaceable, and their appearance is decorative. The plinth is easier to change due to the type of joint. The protruding edge holders can be confusing. The length of the profile sections is on average 35 cm. It is quite convenient to install.
Universal skirting boards have a silicone seal.
Cast
The type of construction assumes an increased level of rigidity and massiveness. The absence of a silicone profile implies attachment to the seal. Among the visible advantages: long service life and presentable appearance. Their dimensions are almost 10 times larger than the previous version of the design.
Cast plinth is more durable and massive.
Classification of skirting boards
Often, the kitchen set already includes a baseboard that matches the color scheme of the furniture. But if the set is made to order, then manufacturers offer customers several types of skirting boards to choose from. But such products do not always fit the main furniture or meet the customer’s requirements. In such cases, it is necessary to purchase the strips separately. Before purchasing, it is advisable to familiarize yourself with all types of skirting boards, because they are classified by shape, material of manufacture and design.
There are different types of skirting boards
By shape
There are many different forms in which such products are produced. The most popular of them include:
- triangular skirting boards;
- sketches;
- with rounded sides;
- flat or straight;
- square.
The shape and size of the skirting boards can also be different
It is necessary to choose the shape of the molding taking into account the gap between the edge of the table top and the wall. You should also choose a product taking into account the design idea.
By design features
Based on their design features, kitchen skirting boards are classified into cast and universal. Cast moldings have a rigid and more massive design. Such products are attached directly to the seal, since they are not equipped with a silicone profile. Cast skirting boards have a presentable appearance, but due to their increased rigidity they do not last very long.
Various types of skirting boards
The base of the universal plinth is a silicone seal to which special profiles are attached. Skirting boards can be produced in different colors, so if a product of the same color is already installed in the kitchen, then, if desired, replaceable inserts can be replaced by choosing a more suitable shade.
By material
Kitchen baseboards are made from different materials, each of which has its own pros and cons. We are talking about the cost of products, their service life and care features. Below are the most popular materials used in the production of moldings.
Table. Classification of skirting boards according to the material of manufacture.
| Type of plinth, photo | Description |
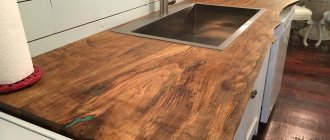
| Wood | Such skirting boards are mainly installed on countertops, which are also made of wood or chipboard. The material is relatively inexpensive, but it is quite difficult to match wooden skirting boards to the tabletop in order to obtain the desired combination. |
| Aluminum | A popular type of skirting boards. Such products are durable, they are not afraid of heating devices, and the surface is easy to clean. For the manufacture of skirting boards, polished and embossed material is used, covered with decorative finishing. Products may have different shapes and appearance. |
| Plastic | Polyvinyl chloride is used to make plastic moldings. The material is quite easy to modify, so manufacturers offer plastic skirting boards in different colors and shapes. Wood, marble or artificial stones can be used to decorate such products. |
| Stone | The material is more expensive, so skirting boards made of artificial stone are quite rare. Such products are installed vertically, pressing tightly against the wall surface. The baseboards are attached with glue. Their disadvantages include high cost and vulnerability to high temperatures. |
| Metal-plastic | Used to decorate countertops made from almost any material. Metal-plastic skirting boards can have a matte or glossy surface. It is not recommended to install such products near hobs. |
On a note! When choosing a kitchen plinth, you must take into account the size of the tabletop, or more precisely, its thickness. The standard tabletop has a thickness of 28 mm, but thicker and wider products are available.
Prices for different types of skirting boards for tabletops
Skirting board for table top
What are the differences and which type should you choose?
Composite section
The category is considered the most popular, including products made from aluminum, stainless steel and plastic. The profile is based on 2 parts: the back and front parts. In the first case, the role of the component is fixation (base). The decorative function is performed by the front side. There is also an option to introduce a third panel - decorative tape. It can imitate metal and countertop material.
Such skirting boards have two parts in the profile - front and back. Grooves are provided for tightly holding and fixing the decorative tape. Plastic parts are used as mounting elements.
Complete with:
- plugs (ensuring aesthetics);
- internal corner;
- outer.
Can be equipped with plugs and corners.
Calculate the number of installation kits in advance so as not to go to the store twice.
Solid section
Found in skirting boards such as borders. This class of products includes a wide variable range of products made to order. For example, artificial stone, granite, wood, ceramics, etc. Not very common, but included in the same group of skirting boards, are made of stainless steel.
The materials for making solid plinths can be almost anything. Disadvantages are manifested in high cost and the absence of a silicone seal. Processing and installation can also be considered disadvantages.
Disadvantages include high cost and complex installation.
Furniture and interior items
21 votes
+
Vote for!
—
Vote against!
A plinth cannot be called just a plank that can cover the gaps between the bathtub and the wall or the countertop and the side. Whenever installing kitchen furniture in places where the edge of the table comes into contact with the walls, there is a need to install such a plinth to maximize sealing of the joint and create a smooth transition from the walls to the table. And the appearance and cleanliness of the kitchen will depend on its correct installation. That’s why today we will discuss how to attach a plinth to a tabletop and a wall.
The need to install the baseboard to the countertop
The times of free-standing modules in the kitchen, and even with gaps between them, in which food residues constantly accumulated, have long since sunk into oblivion. Today, all the elements of a kitchen set are connected together thanks to such a miracle of design as the countertop. The problem of gaps between the kitchen furniture modules was immediately solved.
However, no matter how you move the furniture towards the wall, there will still be a gap, which will become a favorite place for dirt and crumbs. No monolithic slab can prevent this! And if the wall is curved (concave or convex), then the gap will generally be quite large. This is where you will need a kitchen plinth, which consists of a strip and a guide that is attached to the countertop, and on which the plinth is subsequently “put on.”
Such a guide has a special groove in its design, into which the baseboard will fit, snapping onto the “lock” in it. This guide will be attached to the tabletop; the baseboard is usually installed on top of the tabletop. At its ends there are seals that are easy to cut and equipped with special elements - plugs and corners, which do not allow dirt and crumbs to accumulate in this secluded place.
An important purpose of a kitchen plinth for a countertop is to protect modules from water flowing from the countertop over its edge, to insulate facades and kitchen drawers from dampness, and to seal joints. Such a side, due to its design, is capable of leveling out the unevenness of the wall; it can be attached to the most curved walls.
There are situations when it is not possible to connect household appliances to a far away outlet. In such cases, the baseboard, which has an empty cavity inside, comes to the rescue. Such a strip in its cavity perfectly hides electrical wires, as shown in the video about installing a plinth on a tabletop, thereby ensuring the safety of people and allowing easy access to the wires if necessary. This could be a cable from a connected microwave or other household appliance.
Since the plinth is a transitional element between the wall and the table, it is important to choose the right color so that the plank complements both compositionally. To avoid differences, it is recommended to order this strip together with the tabletop. In addition, the dimensions of the baseboard itself depend on the thickness of the tabletop.
Choosing a plinth for a tabletop
As a rule, kitchen furniture manufacturers include a baseboard in the set that is most suitable from their point of view. But when purchasing custom-made furniture, you will be offered several options for available fittings, including baseboards for installation on the countertop. If for some reason they are not included in the kit, or the strips do not suit you, then purchasing such a side will not be a problem.
Material
The first thing you need to pay attention to when choosing a plinth to attach to the tabletop is the material from which the table is made. A wooden plinth is ideal for a countertop made of chipboard or natural wood. For a countertop made of natural or artificial stone, it is best to buy a marble or metal-plastic plinth. For a stainless steel table, the optimal solution would be to install an aluminum or stainless steel baseboard.
Aluminum and plastic are used to make skirting boards; such strips are considered universal and suitable for almost any type of countertop. For example, when buying a plinth for a wooden tabletop, the biggest difficulty is choosing the color and texture of the wood, which are very different even within the same species. Plastic skirting boards do not create such problems, since there is a wide choice of colors, including imitation of all natural materials. It can be matched to the tone of the wall, countertop, or made neutral, without giving preference to either one or the other and leaving it solely with the function of protection.
Aluminum skirting boards are considered very practical to use: they are easy to keep clean, they have a long useful life, as they are resistant to high humidity and aggressive environments. Aluminum plinth can be mounted safely near cooking surfaces - high temperatures will not have any effect on it. This plinth will come in handy if you plan to hide electrical wiring under it. The price of aluminum skirting boards is comparable to the cost of plastic strips, although a little more expensive.
Form
When choosing the size and shape of the plinth, it is recommended to focus on the width of the gap between the table and the wall. The modern furniture industry produces voluminous and flat skirting boards, rectangular and triangular in shape. The most solutions can be provided by a product made of natural wood, processed with flanges or rounded. The metal-plastic structure is usually flat, but can have a different surface texture - glossy or matte, which provides additional opportunities for decorative design.
A simplified version of a kitchen plinth is considered to be a regular strip, which is intended for mounting on a countertop. Installing a traditional skirting board will take longer than installing this Euro skirting board. This strip is quite easily glued to the wall and tabletop with the sticky side. For situations where the walls are uneven and this shortcoming cannot be eliminated, flexible models are suitable.
To achieve a good combination of table and plinth, it is recommended to order them from the same manufacturer at the same time. When choosing a plinth, pay attention to the thickness of the tabletop. The standard thickness is 28 millimeters, but customers have recently preferred to choose more durable options that have a thickness of 38 millimeters—elite premium class countertops. When choosing a skirting board, remember that the universal strips must have transparent edge holders, otherwise they may stand out from the overall picture.
Preparatory work before installation
As a rule, companies that sell furniture offer their services related to the complete installation of furniture, including fastening of skirting boards. The same applies to companies that sell accessories. But why spend extra money, because installing a plinth on a tabletop with your own hands is not so difficult.
Before attaching the baseboard to the tabletop, calculate in advance the exact length of the entire required strip. Attaching the plinth may turn out to be incorrect, and then you will have to buy the missing amount. You are unlikely to be able to find a similar width of that shaped cutter later. Therefore, when going to the store, always expect to take extra material.
When purchasing a plinth in a store, you will receive instructions for its installation. Check the complete set on site; it should include the following parts: decorative profile and base of the plinth, right and left plugs, connecting corners, fasteners.
Installation of skirting boards with self-tapping screws
Fastening the baseboard with nails is almost never practiced if you bought a plastic kitchen edge. You can easily damage the baseboard with a screw or nail; the strip will crack and break. Installing a plinth for a table top with self-tapping screws is important when choosing structures made from a different material.
The procedure for installing a kitchen plinth on self-tapping screws is as follows:
- Measure the dimensions of the table top and select the baseboard according to the size, mark where the plank will be attached to the wall. It is very important to correctly calculate the number of elements: central, connecting, right and left.
- Attach the kitchen baseboard base. It is customary to use self-tapping screws as fastening; they should be fastened strictly horizontally without slopes.
- Install the decorative profile.
- Install end caps, connectors and, if necessary, angle iron.
- Additionally, treat the junction of the baseboard and table with sealant to ensure complete insulation. Do the same in places where plugs and connecting elements are installed.
You can use the acquired skills related to installing the baseboard to the tabletop again when you want to change the baseboard. This is the main advantage of using a plinth: the strip is easy to install, easy to remove by unscrewing the screws, and easy to replace in case of a radical change in the style of the kitchen or loss of its presentable appearance.
Fastening the baseboard with glue
Attaching a plastic skirting board to a table is a fairly simple job. Unlike floor skirting boards, kitchen skirting boards can be quickly installed without the need to use special tools and screws. It is enough to buy a reliable sealant that allows you to tightly attach the baseboard to the tabletop. This is the most popular, convenient and easiest way. Prepare glue and sealant for this - silicone or ordinary, a tape measure, a hacksaw, a marker or a pencil.
Step-by-step instructions on how to attach the baseboard to the tabletop:
- Before attaching the baseboard to the tabletop, take accurate measurements of it in its already assembled state. Determine the number of auxiliary elements - plugs and corners.
- Prepare the joint surface: level, clean from dust, degrease.
- Divide the strip strip into 2 parts: a decorative overlay-latch and a plastic base. Measure the desired piece of the base of the plank to size and cut it using a hacksaw.
- Apply glue to the surfaces that are adjacent to the wall and countertop.
- Glue the baseboard in place. Check the holding time with the instructions for the sealant.
- Install the inner corner and repeat steps 1 – 4 around the perimeter of the installation.
- Measure the desired length of the decorative panel. To install it, take into account the size of the joining angle; as a rule, it should extend 5 millimeters under the edge of the angle.
- Cut the latch to this size and slide the panel under the installed corner, press lightly and click into place.
- Repeat steps 6 - 8 around the perimeter of the baseboard installation and install end caps along the edges of the baseboard - on the right and left.
If you use silicone sealant, you will not be able to remove the baseboard if necessary. If you plan to dismantle it in the future, remove the baseboard for washing, or move the tabletop away from the walls, then it is not recommended to use silicone.
But if you need to regularly remove the plinth and you have not yet found your own way to attach the plinth to the tabletop, then you can attach the plank to the wall using special central and corner connecting elements. Only they will be fixed, and the plinth will be directly inserted into them and held in this way. And you don’t have to tear off the silicone layer and unscrew the screws.
How to attach a plinth to a tabletop
Among the main methods of fastening, there are 2 main ones: screws and glue. Here everything depends on the presence/absence of special holes for self-tapping screws, the characteristics of the material, its ductility, flexibility and other aspects. Let's consider both methods in detail.
You can attach the plinth using self-tapping screws or glue.
Fastening with self-tapping screws
This method is considered more reliable, so it is often chosen. Technical implementation is also not difficult.
This fastening method is considered the most reliable. Algorithm for fastening with self-tapping screws:
- The decorative panel must be separated from the base.
- Set the number of accompanying materials required for installation (plugs, corners).
- Lay out the structure (in fragments). This will help determine whether there are enough materials for the work and will indicate whether there is a need to adjust some of them to length.
- Not all baseboards have silicone seals. If they are missing, you need to degrease the surface of the countertop and apply a small layer of silicone.
- Installation work is carried out from the corner, along the surface of the tabletop. The step of fixing the base of the plinth with self-tapping screws should not exceed 30 cm, but it should not be less than 20.
- For reliable installation and optimal fixation, self-tapping screws are selected galvanized, or, if not available, brass. They are not afraid of metal corrosion.
- To ensure that the screws hold tightly, dowels are first driven into the wall into pre-prepared holes.
- The front strip is installed immediately after fixing the base. The ends of the plinth are covered with plugs for aesthetics.
The plugs may not always fit tightly. In this case, plant them with rubber glue or silicone.
It is better to fix the plugs with silicone or rubber glue.
Glue mount
Borders can be glued to the surface using liquid nails. If there is a need to glue skirting boards made of artificial stone, then you need to choose acrylic-based, two-component substances. To ensure that the joints remain invisible, the color of the glue is selected individually.
As a rule, liquid nails are used for gluing. The algorithm for carrying out the work does not differ from fastening with self-tapping screws, with the exception of:
- the need to degrease the surface for reliable fixation of the glue;
- the need to wipe off the remaining glue immediately until it dries (excess);
- there is no need to prepare connectors or drill anything.
On uneven surfaces you need to use more glue. In places where the surface is uneven, you need to use a thicker layer of glue. It's easier and faster to work with glue. But the screws still fix it stronger and more reliably.
Subsequent care of the baseboard
Correct installation of the plinth is not the only factor influencing the condition of the product and the length of its service life. It is also important to learn how to properly care for baseboards. First of all, it is not recommended to use any detergents to wipe the baseboard. Dust should be wiped off with water only. Otherwise, dirt may be absorbed into the surface of the baseboard, especially if it is made of wood or chipboard.
You need to properly care for the baseboard
Note! You can also remove dust using a vacuum cleaner - this is the most effective and safest way to clean the surface of baseboards. But before cleaning, you need to put special attachments made of rubber on the vacuum cleaner.
Vinyl and plastic cleaner
Prices for vinyl and plastic cleaner
Vinyl and plastic cleaner
If large stains appear on the baseboard that cannot be removed with plain water, you can use an abrasive agent. But before this, you need to test the selected product by using it to wash a section of the kitchen baseboard in an inconspicuous place, for example, behind the microwave. This is the only way to ensure that the powder or other cleaning agent is harmless. If everything is normal and the surface of the plinth is not damaged, then the product can be used to treat other areas of the plinth.
Kitchen baseboard
Even if the care of the skirting boards after their installation was of high quality, the products may still deteriorate slightly over time (their appearance deteriorates). In this case, restoration of the moldings is required. Restoration of wooden products involves applying one or several layers of varnish, and restoration of stone skirting boards involves grinding the surface . The sealant may also need to be replaced, but the old material must be removed first.
Rules of care
The main function of the baseboard as a barrier is to prevent liquid or solid household waste, which has the ability to decompose under the influence of the kitchen microclimate, from getting into hard-to-reach places. Therefore, if gaps appear between the tabletop and the baseboard, they need to be eliminated. Transparent silicone is suitable for this.
It is important to ensure that no gaps form between the baseboard and the wall. Otherwise, there are no special care rules (except for the obvious - avoid contact with hot objects if the profile is PVC).
No. 2. The most important basics for choosing kitchen baseboards
Most kitchen sets include a matching kitchen baseboard. However, not everyone may like the “default” option, and then you will have to choose the molding to your liking. The question of choice will also be faced by those who made the kitchen to order. In order for the kitchen plinth to look as harmonious as possible, when determining its color, material and texture, the following rules are followed:
- selection of skirting boards of the same material and/or color as the worktop. So, for example, stone countertops are perfectly complemented by stone baseboards, wooden ones – by wooden ones, but combinations of different materials are also possible. Plastic skirting boards can follow the pattern of any material, therefore they can be considered universal;
- selection of baseboards for kitchen fittings, sinks, railings or other parts. If the handles on the facades are made of bronze, then the plinth of the same color will look harmonious.
When a plinth is selected along with a kitchen set, you can immediately test several samples of baguette, attaching them to the kitchen modules and assess compatibility.
Installation, installation, replacement of kitchen plinth
There is nothing complicated about attaching the plinth. But the cleanliness of the kitchen and its appearance depend on the quality of its installation. Before you start installing, you need to check the package contents. Usually included in the kit:
- base part of the plinth;
- decorative part;
- plugs that are mounted at the ends;
- angular and straight connectors;
- fastener
Once you are sure that everything is in place, you can proceed to installation. The work is carried out in the following sequence:
Work order (size, wall, fasten, joint)
- first, the required length is measured and a piece of plinth of the required length is cut;
- the plinth is divided and the base part is laid along the wall;
- Having drilled the base with a hammer drill, holes are made for fastening in the wall;
- dowels (preferably plastic) are driven into them, the base is firmly fixed with locking screws;
- a decorative part is attached to the base, it simply snaps into the fasteners;
- after the plinth is installed on one side, it is installed in the same way on the second;
- plugs are installed at the ends; for corner tabletops, connectors are installed at the corners;
- the joint between the baseboard and the tabletop is sealed with silicone, which is added to the fastenings of the plugs and corner connectors;
- Excess sealant should be removed with a soft cloth.
It is possible to attach the plinth not to the wall, but to the tabletop; self-tapping screws are better suited for this option.
If part of the baseboard has been damaged, then it is not at all necessary to replace it along its entire length; it is enough to carefully remove the damaged part and insert a new piece, placing it on the sealant. But if the damaged part is small, then it is better to select a piece of metal-plastic of the desired color and insert it in place of the damaged one. You can find out which countertop for the kitchen is better to choose in this material.
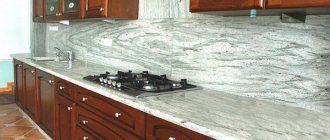
A bright countertop will make an accent in the kitchen.
Joining countertops at an angle without a segment
The joint of the tabletops should be tight, with a minimum gap between the ends of the tabletops. This is difficult to achieve if the end of the tabletop has an oval and rounded front edge.
A simple option is to use a special corner connecting element. It costs about 170-190 rubles and quickly solves such a connection.
A more aesthetic option, with the claim to create a single surface of the tabletop, is an option called “euro saw”. It is suitable for chipboard countertops with any front edge.