Do you want to make a beautiful lambrequin, but don’t know which shape to choose? Make swags with your own hands. You can take ready-made patterns or make your own according to size. The pleated semicircle is a classic that never goes out of style. Curtain salons offer such products, but it is not always possible to choose the right model, and sometimes custom-made ones are too expensive. If you are interested in how to make swags with your own hands, read on.
Types of products and their main parameters
This lambrequin element is a semicircle with folds. The swag consists of a middle, two shoulders and has depth. The shoulder is located along the cornice, and depth refers to the distance by which the fabric falls from the top line down.
Swags are of the following types:
- symmetrical;
- asymmetrical;
- with a vertical shoulder;
- mechanical;
- with sagging;
- turning into de jabot.
You can try to make a simple symmetrical swag even without a pattern, but a mechanical fold is obtained using curtain (mounting) tape.
Product sizing
For the lambrequin to look neat, it must match the size of the window opening.
In this case, you need to take into account the following details:
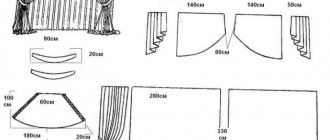
- The width of the lambrequin should be 20-25 cm longer than the rod on each side. In this case, the product will have a finished look and will provide additional protection from sunlight.
- If you need to make a folded lambrequin, then its width should be equal to the length of the cornice, increased by a factor of 1.3 to 2.
- The height of the product depends on the choice of model and your own preference. By classical standards, the lambrequin should cover 1/3 of the window and the wall above it. But if the ceilings are high, then, naturally, it is not necessary to close the partition.
Accurate calculation of the pattern will save you from various alterations.
Sequencing
Whatever version of the product you choose, usually sewing a swag with your own hands consists of the following steps:
- Selecting a suitable model and drawing up a diagram.
- Taking measurements and calculating the size of the swag and the amount of material.
- Constructing a pattern or scaling a finished template.
- Positioning the part on the fabric (this is always done diagonally) and cutting.
- Creating folds.
- Sewing seams, finishing edges, hemming curtain tape or Velcro for attaching to the cornice.
The work at each stage may differ slightly, but in general the scheme always remains approximately the same.
The simplest method
The first thing you need to learn is that the swag pattern is made exactly at an angle of 45 degrees. Cutting a swag like this is not difficult, and the resulting fabric, when folded in the correct way, will allow you to get wonderful folds that will also decorate the window. If the fabric is covered with patterns or designs, then it is unlikely to be cut at a certain angle - it will not be possible to maintain the harmony of the pattern. Here it is customary to use a slightly different technique; you need to look at the main threads. Well, don’t forget about the proportions - collecting swag disproportionate means ruining it in the bud.
In order for the proportions to be correct, you need to adhere to certain rules:
If you want to make the curtain pronounced, then you should cut the swag for the lambrequin along an oblique line, then the look will be much more impressive.
Making the right swag means delving into a long and multifaceted process. One such type looks bad, but sewing it so that this option is combined with curtains and lambrequins is a more difficult task. And the lambrequin itself also needs to be made correctly, otherwise it will not fit into the composition with the curtains. This also means that a lambrequin for certain types of swag must have the exact number of folds along the length. Therefore, it will take a lot of effort to combine this into a single composition.
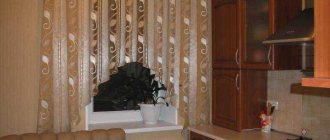
Swag and curtains in the living room
Improving your skills
Patterns for an asymmetrical swag, like any other one, never come out quickly for beginners. Quickly make cuttings, immediately guess the number and depth of folds - this comes with years and hundreds of completed models. But if you spend time, then having learned how to make swags and lambrequins, sewing curtains is no longer a difficult and impossible task for you. You can even safely get a job at a design agency - they value those who implement ideas on their own right on the spot.
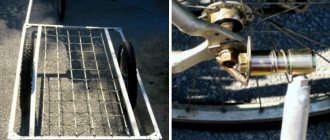
Related article: Do-it-yourself window grilles: how to make and install at home
If at first glance this seems like overwhelming work to you, then we hasten to please you - there is a special technique for sewing lighter versions of curtains, which are called mechanical swag. The secret is that there is no need to lay each fold manually; it is done using a special mounting tape. So we’ll figure out how to cut a mechanical type swag using such a curtain tape.
Size calculation
To make swags with your own hands (patterns using a ready-made template or making them yourself), you need to correctly determine all the parameters of the product. Calculations can be made using equations or a scale drawing.
If you are planning to have a lambrequin (swag), you need to know:
- cornice length;
- half the length of the lower sag (the arc of the hanging edge);
- depth, that is, the distance by which it “hangs” from the top line.
All this just needs to be measured using a window or a scale diagram.
If the lambrequin consists of several swags, you will have to make some calculations. Suppose the length of the cornice is 3.6 m, and you want to place 4 swags that overlap the adjacent one by 1/3. This is the minimum intersection value. If done without them, you need to divide 3.6 m by 4. In the case of overlapping parts, three overlaps of 1/3 each arise, that is, in fact, this is the size of one swag, so the length of the cornice is divided by 3. The size of the element is equal to 1 .2 m.
For symmetrical swags, a pattern is drawn for half the product, which is applied to the fabric folded in half.
For asymmetrical, a single blank is made, but the dimensions of each part, if there are several of them, must be calculated in advance.
LiveInternetLiveInternet
Quote from Nelya_Gerbekova's message
Read in full In your quotation book or community!
The principle of constructing a pattern for an asymmetrical crossover
This post was published by me in the summer of 2010. Many readers ask questions about the construction of such a swag or ask for clarification of some points. After editing, the post, of course, is very different from the previous one. Here I posted the answers to almost all the questions of my readers. Previously, it was called “Asymmetrical swag with sag” (the information there is more than sparse) Therefore, I appeal to those readers who quoted (950 times) If you are still interested in the principle of constructing swags using the Lvisa method, add the post I edited to the quotation book. Based on my personal experience, I would like to again offer you a method of constructing and methods of processing the bottom of an asymmetrical crossover. I use this method to construct any types of swag.
Read the post: For those who are not yet familiar with Oksana Klaus (Lviza) This principle of constructing a crossover was proposed by our compatriot from Germany Oksana Klaus (Lviza) https://lviza373.mylivepage.ru/ and here -club.osinka.ru/topic -1272
All photos were edited by me using Paint for a better perception of the topic. Photos from the Internet.
Constructing a pattern for an asymmetrical crossover
Using a cord, we determine the shape of the future transfer. (what the finished swag will look like) Width, height, shoulders. Mark the middle. Using needles or a felt-tip pen, we mark all the points necessary to construct the transition
We transfer all measurements onto paper
PS To make it clearer, I am nelyasha
I drew the principle of constructing a crossover on a computer and am publishing it on the Internet for the first time, so I ask my readers not to copy, but to quote this post.
Take the base for the pattern (paper or film) and draw a vertical line. This is the center of the swag.
We draw a horizontal line. We plot on it the values of the upper sag ad and db
Length of the swag pattern h +160% of h For example: h=40 then the length of the pattern is 40+40*160%=104cm. From the center line we set aside all the values of the future swag.
We divide the value do = 104 into 5 equal parts. Then we divide 1/5 equally and draw horizontal lines. From point O we draw a smooth line until it intersects with points C and K. The length of the line is correspondingly equal to the length of the lower sag. We draw the lines ak, bc. You have a pure asymmetrical crossover pattern without allowances for processing. I add allowances for processing on the fabric (8-10 cm) along the shoulder line.
How to cut swags?
The first thing to do is iron and straighten the fabric. We straighten the fabric by pulling the thread to obtain a rectangle. Next, remember geometry from the school curriculum! We divide the right angle into exactly two parts, i.e. draw a bisector. Remember! You cannot make a mistake here, since the slightest shift of the bisector will be reflected in your swag in the form of creases. This applies to all types of swags.
Unfortunately, I don’t remember the author of these photographs, otherwise I would definitely have written. Thank you! These photos very clearly show the process of straightening the edge of the fabric by pulling the weft thread.
We lay the swag pattern on the fabric along the bias, strictly aligning the middle of the pattern with the diagonal line. The middle of the swag can be shifted away from the bisector at the same distance, i.e. they must be parallel.
I make patterns from polyethylene film (all the lines on the fabric are visible under the film). Do not fold the fabric or patterns in half, cut only unfolded!
In the drawing, the red line marks the bisector of the angle. The middle of the swag is shifted parallel to the bisector of the right angle.
The pattern is cut out with allowances (bottom 1 cm) Shoulders 8-10 cm. (After laying the folds, the extra tails will then be cut off)
This is Elena Kravchenko's (Taylor) working moment. I really liked her method of assembling the swag. Instead of a mounting board, she uses soft linoleum with 10 cm grid markings, which is very convenient when working.
How to process the bottom of the swag?
Many craftsmen first process the bottom, and then lay down the folds. I do the opposite. First I lay down, and then I process the bottom cut of the swag.
Methods for processing oblique cuts in curtain decorative elements
MK from Irina Krasyukova. Processing the bottom of the swag without bias tape
This is the work of Elena Kravchenko (Taylor) The bottom is treated with a different fabric
Official website of Elena Kravchenko: https://teilor-best.mylivepage.ru/
How to collect swag.doc (643.50 KB - )
Well, I think I’ve told you everything. I wish you good luck in your endeavors, if anything is unclear, write to us and we’ll figure it out!
Series of messages “CURTAINS: patterns and master classes”:
Part 1 - Original lambrequin fan Part 2 - Lambrequin with puffs from Elena Kravchenko Part 3 - Lambrequin swag with a perpendicular shoulder Part 4 - The principle of constructing an asymmetrical overhang pattern Part 5 - 15 videos useful information about curtains about salon curtains Exclusive Part 6 - For those who are not yet familiar with Oksana Klaus (Lviza) ... Part 45 - Easy and simple!!! Decorating the drapery of a lambrequin using kugels Part 46 - Curtains for children with a border. Master class Part 47 - The principle of cutting a soft pleated lambrequin
Scheme
It’s worth making it a rule to make sketches of future lambrequins. This helps to choose the best arrangement of elements and their proportions in accordance with the size of the window, cornice, curtains. It is better to carry out the diagram on a scale, for example, 1:10. In this case, a three-meter lambrequin on paper will be equal to 30 cm.
If you adhere to this rule, it will not be difficult for you to find out any size of the lambrequin component. To do this, you just need to measure it with a ruler or count the number of cells of graph paper and multiply by the scale value.
You can carry out all constructions on a computer in a graphic editor or a specialized program NanoCad, which allows you to obtain drawings, patterns of curtains and their components with sizing.
DIY lambrequin: lambrequin patterns
If you are not confident in your own abilities, use ready-made lambrequin patterns, which are presented below. But do not forget that you need to transfer them to the fabric taking into account your swag size.
To show your imagination and creativity, develop a sketch of a lambrequin yourself and then bring it to life. The diagram must be extremely accurate, it is advisable to use a scale of 1:10. For example, a five-meter lambrequin on paper will be equal to 50 cm. This will greatly facilitate the process of taking measurements. If you are fluent in a graphic editor, create a pattern directly on your computer.
How to make a swag without a pattern
Do you want to make a round lambrequin? It’s easy to make swags with your own hands. For beginners, we can offer this option:
- Fold a square of light fabric (organza, veil) diagonally and mark the fold in the middle.
- Take a strip on which you mark the width of the swag, the middle and the shoulders. Hang the fabric at a forty-five degree angle. To see the center, hang a weight.
- Carefully form and pin the first fold. Make a “roller” approximately 10-15 cm in size.
- Make all other folds, maintaining symmetry and the same distance between them.
- Trim away any excess fabric and pin the top edge frequently along the pleat pinning line.
- Finish the bottom with bias tape or another method.
- Sew Velcro or curtain tape on top.
Getting even folds the first time may not be so easy, but it's worth practicing.
Step-by-step master classes
Let's look in detail at how to make lambrequins with your own hands with patterns for beginners.
Simple lambrequin
Even a beginner can handle this model.
To do this, just follow a few steps:
- Measure the length of the window opening (for example, 220 cm) and calculate the length and width of the cut.
- Cut out a strip of fabric of the required size, from 30 to 60 cm long and 3 m wide. Add 3 cm to the width of the finished fabric to finish the edge.
- Finish the panels along the edges and bottom of the product using a hem foot or do it by hand.
- Sew the fabric to the curtain tape: bend the top of the fabric to a width equal to the width of the tape plus 1 cm, and press the hem with an iron. We sew the tape on one side of the central strip of the tie, first bending it 1 cm along the edges of the lambrequin. Then we sew the tape on the other side of the tie.
At the last stage, we tighten the canvas with a cord and decorate the home interior with new clothes.
Soft
Choose an airy fabric: silk, organza or voile. The model consists of the following elements: a sagging loop (swag) and side elements (tie).
- We make a drawing. We divide the length of the product into 3 parts: tie (¼ of the cut width) + swag (½ of the cut width) + tie (¼ of the cut width). The height of the lambrequin on the side is 2 times longer than the central part. Smoothly draw the bottom line of the canvas.
- We cut the fabric and form folds.
- We process the bottom with bias tape, and attach curtain tape on top. Don't forget to leave 3 cm at the edges of the fabric for processing.
How to make a pattern
If you don’t want to cut off a lot of excess fabric, you should use another method to sew swags with your own hands. Patterns will help you cut out the finished part and form folds from it.
The following constructions are performed:
- Mark a point and draw a right angle from it.
- Set aside a distance to the right equal to half the middle of the swag, adding 3 cm for processing.
- Measure down the depth of the product, multiplied by a factor that is 2 for hard, difficult to drape fabrics and 2.5 for soft, easy to drape.
- From the starting point, draw a circular arc with the radius of the vertical segment obtained in the previous step.
- From the bottom point, set aside a distance along an arc equal to half the bottom sag with an addition of 3 cm for processing. Close the contour with the resulting mark.
This is how a blank is made, for example, for a mechanical symmetrical swag.
Asymmetrical swags
The asymmetrical swag pattern is constructed as a whole, since it cannot be folded in half. Before cutting the fabric, you need to find an angle of 45° to the grain thread, draw a straight line and cut out the part, taking this line as the middle:
- Construct a perpendicular to the diagonal, extending the line in both directions. Place marks A and B on it (the middle part of the swag), they are located at equal distances from the central line (mark the intersection of the lines with mark D). Add 7-10 cm in each direction to segment AB to process folds (points A1 and B1).
- From line A1B1, measure angles of 60° at the extreme points, draw side cuts of the swag. Since the arms will be of different lengths (arbitrary), the desired values need to be set aside on the new lines. In this case, the length of the larger arm must be multiplied by 2.5, and the smaller one by 2. Place points B and D.
- From segment A1B1 along the central diagonal straight line, set aside an arbitrarily found sagging depth, multiplied by a factor of 2, and place point D1.
- Draw a smooth arc, a length equal to the measured sag of the cord with an allowance of 5-10 cm, through points B, D1 and D, trying to make a greater bend under the larger shoulder. Measure the sag in the same way as for an equilateral swag.
You may also be interested in: How to hem curtains with your own hands - instructions with video
To assemble and sew the product, you need to secure the central part to the rail, lay the folds on the smaller and larger shoulders, sweep them and trim them. On the bottom line, make a mark in a beautiful arc, aligning it to your taste. Unravel the basting, cut the bottom along the intended line and process. Collect swag.
Open the transfer
A perekid is an asymmetrical swag in which the central part is not fixed to the cornice, but descends along an arc. The construction takes place using another measure found using a new hanging cord.
The length of the sag in the middle can be designated as BC, and the extreme points of the swag can be designated A and D. Arcs AD and BC are measured with 2 cords, hanging them to taste. Sections AD and BC must be measured along the cornice or measuring rod between the ends of the cords attached to it. The middle of the segment AD (mark 0) should be marked on the bar, and at the intersection of the vertical, lowered down from the zero mark, marks (O and O1) are placed on the cords.
Draw a center line on fabric or paper. Through point O1 (above), draw a perpendicular to it and continue it in both directions from the center. Align the mark on the upper cord with this point and set aside the lengths of the corresponding segments (BO1 and O1C) to the right and left. Place marks B and C, add another 7-10 cm for processing, mark as B1 and C1.
Along the center line, lay down segment OO1, measured on the stand and multiplied by 3. Place the corresponding point O. From it up, measure ¼ of the length of the swag along the cornice (segment AD) and draw 1 perpendicular (for example, to the right). At 0.5 distance from 1 perpendicular to point O, place a mark and make a perpendicular line in the other direction from the one already drawn. Take the bottom cord, align the mark on it with point O. Place ends A and D on the pattern so that they intersect with the corresponding perpendiculars in a smooth arc. Assemble the cut crossover element as an asymmetrical swag, securing it to the bar at points B and C with sagging.
Having mastered simple variants of swags, you can learn to combine them in different combinations. The use of other elements will make the textile decoration of windows even richer and more beautiful.
Use a ready-made template
If you are new to this business, in order to properly sew a swag with your own hands, it is better to take ready-made patterns. Now computer technology has greatly simplified search and work.
You can print the version you like in the desired scale on a printer. There are two ways:
- Make a pattern in parts on landscape sheets of home printing equipment.
- Order from a company that provides large-format image production services.
In the first case, you will do everything without leaving home, but you will have to glue the sheets with tape. In the second option, you won’t have to connect anything, but you will have to spend extra money.
How to cut swag with your own hands
So, you have chosen a template or built it yourself, cut it out of paper. Now the most important thing is to correctly position the parts on the fabric.
This is done diagonally. As a rule, the pattern should indicate the direction of the grain thread with an arrow. So do this:
- Fold the fabric diagonally into a scarf shape.
- Attach the pattern to the fold line.
- Pin it in place with pins.
- Trace the edges with chalk or soap, do not forget about allowances in the right places.
- Cut out the workpiece.
Work is done. Now you know how to cut a swag with your own hands. You can begin forming folds and sewing.
pattern of an equilateral swag
pattern of an equilateral swag
7. Having completed the drawing, we get a pattern. It provides all the necessary allowances for drapery and leveling of the lower sag. Cut out a pattern from fabric. as shown in the drawing, the line AB should run obliquely (at an angle of 45 degrees to the shared thread:
8. We place the cut fabric pattern on a measuring stand or on a special bar, trying not to stretch the middle of the swag :
9. The formation of the first fold begins from the starting point of the right shoulder of the part, lowering the so-called “roller” of the fold down from the cornice line by 10-15 cm. This value depends on the depth of the model:
10. In the same way, observing the depth of the fold (approximately 8-10 cm), it is laid at the starting point of the left shoulder: