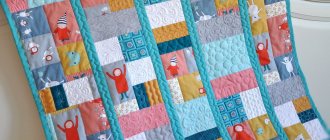
A cute blanket made from scraps of different fabrics is one of the brightest representatives of products made in the patchwork style. Despite the fact that this unusual word was not known in the Soviet Union, such beautiful things decorated almost every home. The reason for this was the “general shortage”, which forced housewives to rationally use any remaining piece of material. As a result of their efforts, a unique thing was born, which became not only an unusual blanket and, at the same time, a picnic blanket, but also one of the most memorable elements of the interior. Almost any housewife who has a sewing machine in the house can create a patchwork quilt with her own hands.
Features of the patchwork technique
Making a patchwork quilt with your own hands is a job that cannot be called very simple. It requires accuracy, attentiveness, precision and perseverance from the craftswoman. It will also take a lot of time to create it. However, all doubts are outweighed by the enormous advantage of making it yourself - significant savings, because store-bought models are several times more expensive.
Patchwork Quilt - Sandwich
Sewing things from pieces of fabric is called differently - patchwork technique, patchwork (“mosaic work”, “patch”), textile mosaic. Such blankets or bedspreads usually consist of 3 layers:
- front, assembled from multi-colored fragments of material;
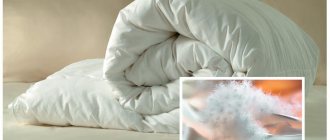
- middle, which is a layer of some kind of filler (cotton wool, batting, padding polyester, interlining with foam rubber, holofiber);
- purl - lining, usually made from a single piece of material.
When all layers are stitched (quilted) through, the work “becomes” quilting (“stitching”, “stitching”).
Combinations of colors and textures
A do-it-yourself patchwork quilt will have an impeccable appearance only if the work was carried out according to the rules of compatibility of pattern, color and texture. Some negligence and slight clumsiness in products made from pieces of material is still allowed, but for beginners it is better to follow several recommendations:
- A pattern assembled from scraps should not be chaotic; logic must be present in it. To avoid the appearance of a lumpy pancake, it is better to sew the front layer of the blanket from prepared modules - blocks or strips consisting of elements assembled in a strict order. It is easier to correctly assemble them into a whole canvas, but to avoid possible inconsistencies.
- The thickness of all pieces of fabric must be the same, otherwise the future product will not look its best. A blanket assembled from scraps should give the impression of a single (albeit colorful) canvas, and not a “motley collection” of various scraps of material.
- Choosing a style for beginning craftswomen is a very important point. It is better for them to stick to simple geometric shapes - squares or rectangles. A large number of patterned segments should be avoided, since the unity of the composition will almost inevitably be destroyed.
- The design of the room “dictates” its own rules: the blanket cannot look like an alien spot in it. The correct combination of colors and arrangement of shades is another requirement: contrasting segments or shades of the same color located in one block look good next to each other.
If you ignore even one of these tips, you can get an unusual and bright patchwork bedding, but no one can give a 100% guarantee that it will “take root” in the room intended for it. A possible “twist of fate” for such a thing is its reference to the dacha.
Quilt and bedspread sewing techniques for beginners
- The easiest way to sew a blanket is from square scraps.
Cute patchwork quilt
- A seamstress who wants to put in minimal effort may be tempted to make a quilt from just a few pieces of fabric. But pay attention to the photo below: this blanket hardly looks neat and attractive.
How not to sew a quilt
Therefore, our first rule will be this:
The size of the squares for a patchwork quilt must be selected individually, depending on how large the pattern is on the fabric.
The patchwork quilt in the photo below is also created from similar fabrics, but due to the fact that the size of the squares is correctly calculated, it looks much more attractive.
Patchwork blanket made from fabric scraps
- Standard bedding sizes are shown in the following photo.
Determining the size of the quilt
- As a rule, only the upper side of the blanket is sewn from scraps, and the lower side is made from one piece of fabric - this will take less effort and the blanket will be more wear-resistant.
- To sew flaps together using a sewing machine, we suggest using a regular edge stitch. A linen seam is, of course, stronger, but in a quilt there are many joints where four pieces are connected at once, and in these places there will be too many layers of fabric.
Edge stitch on a sewing machine
Patchwork: types of needlework
To make your first patchwork quilt with your own hands so that the craving for this art does not disappear due to many mistakes, it is better to choose simpler methods of creation, as well as elementary patterns.
- Traditional look. It is one of the simplest options, so it is ideal for a debut product. In this case, modules are pre-made from several flaps - blocks, which contain elements of the same and simple geometric shape - squares, triangles, rectangles. Then they are combined into a single fabric. A single piece of fabric (lining) and insulation are sewn to the reverse side.
- Watercolor. The front part of a blanket sewn using this technique also consists of squares, but here they use a special approach to choosing colors and combining shades. The flaps are selected so as to obtain a smooth transition from light tones to dark shades, or from cold colors to warm ones. Matching the textures of materials is a mandatory requirement here.
- Quilting is a quilted fabric. In this case, take two canvases, between which some kind of insulation is placed. Then the combined fabrics are quilted through and through with machine stitching. It can be different: both straight and patterned. This type of technique makes it possible to create attractive things, which is why it is very popular.
- “Crazy” crazy patchwork implies complete chaos. This demanding technique is an almost unattainable dream for beginners just starting to get acquainted with this type of needlework. The method for producing products is complex, as they use scraps of the most unexpected shapes and sizes, different types of decorative stitches, appliqués, beads, lace and ribbons. Any regular geometric shapes are avoided in this case.
- Japanese patchwork. This oriental technique is distinguished by the fact that preference is given to high-quality and expensive silk fabrics. Here, various geometric shapes are used to make patches - rhombuses, rectangles, squares, patterns from them, floral patterns, landscapes. Appliqués, embroidery, fringes or tassels are almost mandatory elements of this Japanese art form.
For beginners in patchwork needlework, square or rectangular pieces of fabric are suitable. Working with triangles will become a little more difficult and more time-consuming. To avoid mistakes, it is better to focus on isosceles figures that are not too small.
Patchwork design solution: pillow ideas
A patchwork pillow is a thought. To create this style, ideas using bright and eye-catching colors are suitable. Thanks to its fashionable sewing technique, this type of patchwork will be an excellent decoration for the room.
Types of pillows:
- Classic pillow. Ideas for lovers of this style can be varied and in demand. Standing out for its traditional style, this type easily fits into any interior. The main condition for such a design solution is a successful combination of the patchwork pillow with the tone of the furniture. Moreover, classic ideas can combine the use of contrasting fabrics or remnants of curtain fabrics. To create such a pillow, preference is given to rectangular stripes and square patches.
- Knitted pillow. Using such ideas for patchwork, you can not only successfully highlight a recreation area, but also improve the interior of the room. For example, comfort and a cozy atmosphere can be achieved with the help of a round tube pillow. Foam rubber, hooks and yarn are prepared in advance. The main thing is to knit the selected openwork pattern, the edges of which should be enclosed in a small square frame at the end. All that remains is to sew the opposite sides of the embroidery and you get a pipe. Using circular knitting, you can make the sides of the pillow. And foam rubber is used to stuff it.
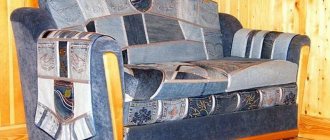
- Denim pillow. Using patchwork sewing for such a patchwork idea, you can create an original design solution. Moreover, there will be no problem with selecting fabric, because thanks to this technique, old jeans will find their new use. There is nothing complicated about the denim patchwork technique. It completely replicates the classic style.
- Crazy patchwork. This is the most striking style of decorative sewing. A master class of this type is presented using many bright patches of different colors and sizes, as well as laces and braid (they will help hide and decorate the seams).
To sew a patchwork pillow, it is better to use fabric of bright colors.
Unlike the classics, there are no alternately connected strips of fabric. The remaining pieces of fabric must be sewn one by one to the central uneven patch, aligning the edges if necessary.
Choosing a blanket material
It is equally important to choose the right fabric. To a greater extent, this applies to the elegant front side. For the patchwork layer you can take:
- atlas;
- calico;
- linen;
- drape;
- satin;
- chintz;
- knitwear
Other silk and cotton fabrics are also suitable, but models made of slippery silk are not the best choice for beginning craftswomen. Denim fragments combined with dense types of natural materials look no less interesting. Sets of blanks for patchwork can be bought in stores, but there is a more practical, traditional option - using what is stored “in the bins” and is waiting for its second life.
In addition to the already mentioned insulation materials, natural types are used - wool or cotton. The latter material is a good option for summer blankets. However, the most popular filler is still padding polyester. For the reverse side, almost any plain thick (or not so thick) fabric is suitable. For the edging of a patchwork quilt, you will need plain (contrasting) strips of fabric (ribbons), their width is 8-10 cm. The length of the entire “blank for edging” is greater than the perimeter of the product.
What else will you need for work?
You can’t do without traditional sewing attributes, so you need to prepare or purchase threads, of two types. The usual ones will be needed for basting, others - No. 45, 50. Their color depends only on the desires of the author, it can be combined with the future product, or be contrasting. You will also need:
- pins, needles;
- chalk;
- scissors;
- centimeter;
- scotch;
- iron;
- colored pencils (felt-tip pens);
- segment templates (two) - plastic or cut out of cardboard (thick paper);
- sewing machine.
How to quilt a patchwork quilt or bedspread on a machine?
It all depends on the capabilities of your sewing machine and how thick the padding polyester layer you have chosen. We advise you not to take risks and use two thinner layers of padding polyester instead of one thick layer.
How to quilt a patchwork quilt on a machine
We sew two thin layers of padding polyester to the top and bottom of the blanket, and then connect them together. Then we manually make stitches in several places to better secure the padding polyester.
Patchwork: cutting rules
Geometric accuracy is what is needed when sewing mosaic pieces from pieces, so only perfect cutting will give a chance to avoid potential incompatibility of parts. In order not to stumble upon “reefs and pitfalls”, it is better to follow the rules that will help you “dodge” many problems:
- New fabric must be washed, dried and thoroughly steamed. Such actions provide a chance not to encounter troubles - unexpected deformation, change in color or size of the finished and washed blanket.
- If the fabric is not new, but has been actively used before, then the cut pieces are first soaked from a spray bottle with a solution of starch in water. After this treatment, the workpieces are ironed.
- To transfer the pattern onto the material, use special chalk for sewing. A good and free alternative is a remnant of cosmetic soap (white or, conversely, bright if the material is light).
- The fabric is cut only along the grain thread running along the fabric (parallel to the edge). If you neglect this requirement, then with a high degree of probability the parts of the blanket will become deformed. All non-knitted materials practically do not stretch along the grain thread (or do so very reluctantly).
To cut fabric, you need 2 patterns - the first template without allowances, the second with them. They are applied and then outlined with chalk one by one: it is more convenient to start with the larger element, since it is easier to absolutely accurately place the small one in it.
How to sew a blanket from scraps?
The first step is to think about the appearance, which should be in harmony with the place of its future “habitat”, and search for the best color combinations if there are a lot of accumulated scraps of fabric at home.
Patchwork toil
Sewing work is impossible without perfectly executed product drawings, therefore:
- First, make a sketch of the front side of the blanket on a checkered notebook sheet. The simplest option, which promises a successful debut, is a rectangle drawn into fairly large identical squares. Here it is important to calculate the dimensions of geometric shapes, focusing on the length and width of the blanket. All segments are painted with colored pencils to get a general idea of what the finished bedding will look like.
- Proceed to making flaps for the front side. Washed and ironed fabrics are laid out on a flat surface, then transferred, outlined, and then patterns are cut out. Each element is carefully ironed again.
- The blanks are sewn into strips: this is the simplest option, minimizing the number of potential errors. Then these long blocks are connected: the seams are aligned, a preliminary basting is made, the result is checked and stitched by machine.
The last operation of this stage is thorough ironing; during this, do not forget to smooth out the seam allowances on the wrong side.
“Face”, lining, insulation
Having finished decorating the “face” of the blanket, move on to its “rear” and filler. First, both materials are cut out - fabric and padding polyester. Their dimensions must be slightly larger (3-5 cm) than that of the patchwork part.
- The fabric for the lining is laid out on a flat surface with the wrong side up. For reliability, it is fixed with tape. The padding polyester is laid on it and then leveled. Both blanks are pinned, basted, then joined with a stitch.
- After this, the front side is applied to the semi-finished product, leveled well, and all layers are secured with pins. Then the materials are smoothed with hands from the center to the edges, quilted (for example, with a zigzag stitch) along all seams. This work always starts from the middle. Then they lay a line around the perimeter. Excess filler and lining are cut off so that their sides coincide with the front patchwork part. The edges of the quilt, if possible, are processed with an overlocker (or the same life-saving “zigzag”).
- The strips for the edging are sewn together, the seams are smoothed in different directions. Then the workpiece is folded in half (face up) and ironed again. They begin to baste the strip from the wrong side of the blanket: work starts from the middle of any edge. The fabric at the corners is bent at an angle of 45°. Be sure to ensure that the seams of the strip do not touch the corners of the blanket. Attach the border with a half-centimeter stitch, then fold it over to the front side and attach its other edge.
There is another way to sew on the piping. The folded and ironed strip is attached (“edge to edge”) to the front side of the blanket so as to hide the stitching on it. Then the piping is folded onto the lining layer, and the product is hemmed by hand - with a neat hidden seam.
New Year Gift Ideas
Decorative pillows can be made in patchwork style. To get neat drawings, you need to make templates. The simplest patterns are squares. Make a square out of cardboard. Applying it to the material, cut out as many squares as needed for the product. Don't forget to allow seam allowances.
The easiest way is to make blocks of 4 squares, then sew them together. At the end of the work, the seams can be decorated with braid, buttons, decorative seams, for example, “goat”.
The squares can be placed in any order, achieving a beautiful pattern.
A square within a square looks beautiful. The technique is not complicated, even beginners can do it. To make sewing even more fun, make patterns for more advanced techniques.
Blanket made from denim scraps
If the owners have accumulated a fairly large number of trousers that are still strong, and cannot throw them away, then this option can be considered a win-win. The product can be not only a summer blanket, but also an unusual bedspread.
Since even worn denim remains quite strong, most often a blanket is sewn from large squares or rectangles. However, areas that are even slightly worn or yellowed are not suitable for sewing.
Materials, tools
In addition to the usual sewing kit, you need to prepare:
- several (preferably many) jeans;
- lining fabric;
- filler (wool, padding polyester);
- wire cutters;
- constant iron.
Jeans can be of different textures, colors and shades: the more differences, the more original the patchwork quilt will be. The lining fabric must be soft, pleasant and warm. Wool is an ideal material for filler/insulation, but its price is the reason for the low popularity of this natural material in this “role”.
Stages of working with jeans
The process is already more or less familiar, but there are some differences from making a classic model, so you should go through all the stages of “jeans” work. The main feature of such a blanket is the fringe on the front (denim) part. It is obtained thanks to a seam that “looks” outward.
- Old jeans are washed, ironed, ripped, then all accessories are removed from the clothing and again armed with an iron - all suitable parts of the trousers are steamed again. 352 squares with a side of 12 cm are cut out of denim material. Exactly the same number of elements are made from the lining fabric, then from the filling.
- Each finished piece of denim is applied inside out to squares of lining and synthetic padding material. The two resulting blanks are connected so that the denim side is on the outside, then a machine seam is laid. Its width is 1.5 cm.
- To the first pair of denim-lining-painting polyester squares, the remaining parts are attached in the same way (with the right side of the jeans facing outward), obtaining the first strip. Then they move on to making the remaining blanks. Then the long elements are connected into a canvas.
- The final operation is making fringe - creating multiple notches along all seams. This important work is performed with wire cutters, but carefully, since the seams between the patches cannot be damaged.
The almost finished product is edged with the selected colored fabric, or the same denim fringe is made around the edges. A simpler option is to make a classic patchwork quilt, but this model looks much more interesting.
Do-it-yourself patchwork quilt is a topic that simply requires that the novice craftswoman at least once see the whole process for herself. And with this, all kinds of lessons - video tutorials - provide invaluable assistance. For example, here you can watch one of our popular videos dedicated to a cute product made from scraps:
Pillow made using the Dresden plate technique (MK)
If you want to create patchwork sofa cushions with your own hands, not from regular geometric shapes, but something more original, you can try the “Dresden Plate” patchwork technique. At this master class, accompanied by photos, you can better understand the essence of the technique.
To begin with, select fabric of different colors. They use from 5 to 8 types and think through the combination in advance. And they begin to perform step-by-step steps:
1. Start making templates that will be used for cutting. They are made in full accordance with the dimensions of the finished pillow. The patterns are a circle and petals.
2. At the next stage, they begin to cut out the parts for the patchwork pad. When making blanks from fabric, do not forget to leave allowances. Usually they are 1-1.5 cm. To facilitate the work and obtain identical patterns, you can make templates taking into account allowances.
Related article: Army album - memory of service and the best DIY gift
3. The prepared petals begin to be sewn together. It is necessary to fold the front sides of one and the second part and sew a stitch. You need to start from the center. To stitch more accurately, you can attach a template to each petal without any allowance and trace it with chalk. In this way we get the line along which the line should go.
4. After all the petals are connected, a circle is sewn into the center, you will get a flower, which is called the “Dresden Plate” patchwork. Next, this flower is sewn onto the base of a square pillow.
5. At the next stage, they begin decorative finishing. To begin with, four strips 3 cm wide are sewn to the base along the perimeter. After all the lines have been laid, the workpiece must be ironed.
6. Then sew the outer border in the same way as the previous strips. Only the width of the border is slightly wider, about 10 cm. In the corners of the resulting square with a border, four decorative squares with sides of 10 cm are sewn.
At the final stage, the backing fabric is sewn on and the pillow is stuffed with padding polyester. This pillow can decorate any sofa.
As you can see, there are no particular difficulties in creating a pillow using the patchwork technique, even for beginners. You just need to be patient and show a little imagination.
Crazy style patchwork - what is it? (2 videos)
Simple and original pillow options (58 photos)
The best posts
- Decorative suitcase – gift wrapping or creative DIY item |+58 photos
- DIY wedding decor: master class on creating invitations and other ideas
- Do-it-yourself original lamps from various bottles (3 MK)
- 6 ideas for decorating your phone - how to stand out from the crowd (42 photos)
- Homemade products are the best gifts for loved ones (+42 photos)
- How to make a decorative cage with your own hands (2 master classes)
- Making a wall clock from cardboard: decoupage and quilling (master class)
- Creating a unique collage from photographs: design options