Floor condition assessment
When thinking about how inexpensive it is, you have to remember that you can't just install new decking without checking the condition of the subfloor. If it leaves a lot to be desired, the new linoleum or laminate flooring won't last long.
- Elements of a wooden floor can creak, sag, bend, gaps may appear between them, and over time, old boards can “swell.” Problems with wood floors can be related to the floor itself, to the joists, or to the subfloor they are attached to. This is something you need to figure out when estimating the amount of work ahead.
- The top layer can be laid on a screed, which may begin to crumble or crack or rub.
The scope and technology of repair work will depend on the scale of floor defects in your home.
Repairing an old wooden floor in a house: options and features
In a private house, there may be the same problems with a wooden floor - creaking, dips. If repairs are needed for the floor of the second floor, and it was done along the beams, you can only level it and paint or varnish it again. With or without reassembling the boards, it’s your choice. But there are usually no other problems other than unevenness and cracks.
How it should be arranged
If you are repairing an old wooden floor in a house on the first floor, then everything is more complicated. We also need to look at whether the steam, hydro, and heat insulation is done correctly.
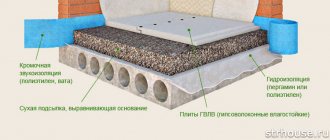
Installation of the floor on the first floor of the house - with insulation and vapor barrier
The correct design satisfies the following conditions: it is protected from moisture penetration from the room, but does not interfere with the removal of moisture from the insulation. Therefore, steam-waterproofing is installed on the side of the room. It does not allow steam or liquid water to pass through. But no matter how you protect it, some moisture will still get inside. And it must be removed. It will be brought out from the basement/subfloor. Therefore, on this side we need a material that does not interfere with the passage of water and vapor. You can generally only fix the insulation. For this:
- hit with slats;
- tighten with wire in the form of a snake;
- metal mesh.
But this option when using mineral wool as insulation is not very good. To remove moisture, the subfloor must be ventilated. This means that there are drafts there. And they, along with moisture, carry away heat. Lots of warmth. The insulation itself also erodes. But it (the insulation) remains dry. The situation can be improved by sewing a windproof membrane underneath. But it must be vapor-permeable. So that the moisture that gets inside the insulation is removed.
What could it be
If, when checking the floor structure, you find that the boards, joists, beams, and insulation are wet, then something was done incorrectly. In this case, there is usually a problem with the wood. There is nothing to say about insulation. If it is mineral wool, it practically does not perform its functions in such conditions. After a couple of years (or even a few months) it turns into dust. Not because the material is bad, but because it was used in conditions for which it was not intended.
If the picture is something like this, the structure will need to be replaced
If this is the case, and there is a lot of moisture, the wood is rotten, repairing the old floor is only a complete replacement of the structure with correction of errors. The most common mistake is using waterproofing material on the basement side. In this case, moisture may even accumulate on the film. It flows down to the lowest places, the film sags. It is necessary to disassemble the floor from below and leave it without insulation for the boards to dry for several weeks. Then assess the condition of the wood. If everything is fine, restore the insulation, but without errors.
If the underground floor is earthen, moisture will rise from the ground. To prevent it from “wetting” the insulation from below, cover the subfloor with a thick film (at least 350 g/m2). Lift the film onto the foundation and secure it there with planks. Place a layer of sand on the film and smooth it out. The film will prevent the penetration of moisture from the ground, the sand will adsorb what gets in or what falls in the form of moisture condensed from the insulation. In some regions, sand is expensive; you can use bark, forest soil, dry leaves, even sifted soil, but only that which absorbs moisture normally. In any case, the backfill should be free of knots, branches, and stones. They may damage the film.
Redecorating
This type of repair includes the following sequence of actions:
- Floorboards are cleaned of old coating. The modern method is scraping or grinding using a typewriter. At the same time, the nail heads are pre-deepened by 5 mm.
- Cracked and rotten boards are replaced with new ones. During the replacement process, it doesn’t hurt to look into the subway and check the condition of the lags.
- Poorly secured floorboards are additionally attached to the logs using self-tapping screws.
- Narrow cracks are filled with wood putty, and large ones are closed with wedge-shaped balls on glue or putty. The projections are removed using a planer and the plastered areas are finished with a sander.
- Debris and dust are cleared away and you can apply a coating (paint, varnish) or linoleum, laminate, etc. to the refinished floor.
Repainting the floor with screed is a simple replacement of the top layer.
The repair process can be seen in the video, and the types of floors can be seen in numerous photographs.
Where to begin? Inspection of old coating
Over time, any floor covering can deteriorate. Possible defects of various bases are as follows:
- Cracks, detachments, craters, changes in height, etc. may appear on the concrete.
- An old wooden floor periodically requires complete or partial replacement of the floorboards due to the appearance of creaks or unevenness.
- Laminate boards may become scratched, chipped, or swell.
- Linoleum is often pressed or torn, for example, from carelessly moving furniture.
- The integrity of the tiles is damaged due to the fall of any solid object or peels off due to high humidity.
- Carpet gets burned very often.
All this, of course, is very unpleasant, but not critical. The modern construction market has a variety of materials and means for repairs. You just need to correctly decide on the sequence of work.
Dismantling
For construction on logs:
- The skirting boards have been removed and access to the flooring is blocked.
- The boards may still be useful and should be removed carefully. Each floorboard is carefully lifted, starting from the wall, after which the nail is removed with a nail puller. Grooved boards are especially difficult to disassemble as there is a risk of the joint breaking.
- The panel house has reinforced concrete floors to which logs are attached. They should be removed carefully so they don't have to do extra work to seal the holes.
If it turns out that the state of delay allows them to be used further, it is enough to change the flooring. You can use boards, plywood sheets or OSB for this.
To cover the screed:
- The parquet has been removed.
- The condition of the screed has been checked. If the defects are minor, they can be repaired using a fresh cement mixture or a composition for restoring concrete surfaces (depending on the composition of the screed).
- If the screed is severely cracked, has become loose, or has peeled off from the base, it should be removed using a hammer drill.
After removing the screed, care must be taken not to damage the concrete slab.
Subfloor repair
Cement mortar or a special thixotropic repair composition for concrete contains defects in the concrete floor. The entire surface is treated with a deep penetration primer.
Now you need to decide on the floor design. You can choose one of the following options:
- “Wet” screed using a cement-sand mixture. An inexpensive method of preparing the base, its disadvantage is long drying for 1–1.5 months.
- using special mixtures for leveling. Allows you to get an ideal surface, dries in just a few days. The cost of self-leveling mixtures is quite high, so it is advisable to use this method for a base with slight differences.
- “Dry” screed with expanded clay backfill and GFL.
- Log system The good thing about this method is that you can put heat and sound insulation between the logs. In this case, the logs give the floor additional strength, and the presence of an air gap provides thermal insulation and ventilation.
Floor device on logs
If you decide to install a new one, the procedure will be as follows.
- The logs are laid based on the width of the roll insulation. They are attached to the base or mounted on metal screw studs, aligning them exactly horizontally. They should be at a distance of 40-50 cm from each other.
- The insulation is being installed. It should be placed between the joists around the perimeter of the room. The vapor barrier is laid on top of the insulation.
- It is important to correctly lay the boards or sheets of plywood so that they fit snugly against each other, and there is a 5 mm gap between them and the walls. The sheets must lie on at least three posts, and the joints must be in the middle of the joist. They are laid in a checkerboard pattern, which makes the floor heavier.
- Small gaps between the boards are filled with putty, after which the surface must be sanded.
- The floor covering is laid on the repaired floor, and the base is fixed.
Repair cost
Many people prefer to entrust the repair of floors in their apartment to specialists. The cost of the work is calculated individually, taking into account the type of repair, the condition of the floor, and the selected floor covering. If we talk about prices for finishing floors, the prices will be as follows:
- Linoleum is the cheapest option; its installation will cost from 100 rubles / m2. This flooring material can be laid on any base and in any room, except the bathroom, where tiles are more suitable.
Even the most durable and reliable floor sooner or later needs repair. The degree of its wear depends on whether the restoration is major or cosmetic. In any case, repairing the floor in an apartment with your own hands should not be intimidating. A competent approach will definitely give a positive result.
As you know, the coatings are different. This can be tiles, laminate or linoleum laid on a concrete screed, parquet board or laid on logs.
Gender selection
Construction stores sell materials made from wood, carpet, linoleum, tiles and parquet.
Wooden floors
Installed on the surface of the joists. A special insulating material can be installed between the joists and the floor. Properties of wooden floors:
- Suitable for different rooms. It is not recommended to install it in the kitchen, as wood will quickly absorb the smell, and the kitchen is a place where there are a lot of odors. It's difficult to get it out later.
- Not suitable for the bathroom, as water ingress leads to rotting.
Laminate floors
Laminate consists of a wood-polymer composite. Externally it resembles a material made of natural wood. Stores offer a variety of laminate appearance options. You can select original patterns, as well as place any beautiful image on it.
Laminate flooring must be laid on a flat surface. They use plywood or JSB sheets, which are mounted on a concrete base. The laminate is placed on this.
Tile floors
The tiles are strong and durable, making them suitable for making your floors last for a long time. Experts advise using tiles in rooms where people often walk. Such rooms most often include: kitchens, bathrooms and hallways.
What else to read: Frame base for a wooden floor: selection and installation
Various types of images and patterns are placed on the tiles, as well as on the laminate. The stores offer a wide range of goods with various external design options.
Material cork
Environmentally friendly material. Suitable for rooms where people walk barefoot. Cork is characterized by its elasticity, which allows you to remove the load on the human spine.
Improve the floor with specialized varnishes. They protect against dirt and moisture, increase strength and durability.
Linoleum floors
Linoleum is a cheap product in this category. Experts highlight the following properties of this coating:
- Strength.
- Easy to install on concrete base.
- Moisture tolerance.
Floors made from this material are installed in different rooms. Should not be used in the bathroom due to moisture. It must be laid on a perfectly flat surface, which is achieved using plywood.
Repair of wooden coverings
The repair of each material has its own nuances and little tricks, which it would not hurt to learn more about.
Your actions
The photo shows the correct installation of the base on the logs.
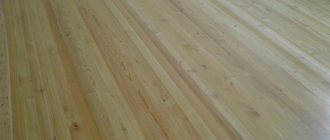
- The floor surface must be cleaned of old varnish or paint. A grinding machine is well suited for this and will thoroughly clean the surface.
- If the repair of the wooden floor in the apartment is not completed completely, it is necessary to remove rotten and damaged boards.
- Next we check the nails. Pivot and raised fasteners have been replaced or removed. In their place, they drive new nails or use screws. They will hold the boards much more securely.
- Small cracks, no more than 0.5 cm, are covered with a special putty for wood. Nail pits and where screws go in also become chafed.
- Pre-installed chips or slats are driven into large slots, after plastering them with the same putty. When everything is ready, the gap is overwritten.
- When the putty is completely dry, all irregularities are sanded with sandpaper or a machine.
- Before repairing a wooden floor in an apartment, remove all dust and debris from sanding.
- The final stage can be considered varnish or paint.
Record! It should be noted that renovation of floors in an apartment differs in many ways from restoration in a private house. The fact is that in the latter case the coating is applied, as a rule, to logs lying on the ground. Whereas in apartments the floors are mounted on a concrete base. Often it is necessary to replace not only the floorboards, but also part of the joists.
Some nuances
- The top cover and logs need to be inspected first, then the rims and beams are checked
. A good flashlight will be helpful as the inspection should be carried out both inside and outside the floorboards. - It is convenient to check built-in beams using an awl or a knitting needle
. They pierce the beam, revealing rotten areas. A worn rod should be replaced, despite the lengthy process (in some cases a jack is required). - If you need to repair a concrete floor in an apartment, the entire coating is completely removed, down to the base
. Debris and dust are removed, then the screed is made. You can use either a mixture of sand and cement or a self-leveling mixture. - Next, a waterproofing layer, insulation and logs are laid on the foundation
. There are screws attached to the ends of the floor boards. It is not recommended to use nails due to their ability to grow over time.
For those who do not know how to repair floors in an apartment, here are some useful tips.
- If you find one or more faulty boards, remove them. Carefully inspect the logs, they may be damaged. If the wood requires replacement, you will have to remove entire fragments of the coating from it for a while.
- Clear the concrete of stones and debris and, if necessary, fill all holes with cement mixture.
- I saw a new gap in the size of the old one. Carefully place it on the base.
- Now the boards that require replacement are measured according to the previous elements, they are impregnated with an antiseptic and installed in their rightful place. Particular attention should be paid to not soaking the ends. Otherwise, the board may quickly rot. It is better to use screws instead of nails; they hold the material more tightly and do not creep out over time.
- All cracks are sealed, dried and sanded, then varnished in several layers. At this point, the renovation of wooden floors in the apartment can be considered complete.
How to get rid of squeaking
Almost every flooring owner has encountered this problem.
Few people know how to repair floors in an apartment to achieve silence.
- First, listen carefully to which parts creak the most.
- It would be nice if someone else could help you by listening to the footsteps coming from the basement. Mark the calculated areas.
- Drive wooden wedges between the board and the beam.
- You need to know when to stop, otherwise, by overdoing it, you risk the parquet board being raised above the base. If it is impossible to get into the metro, repairs are made from above.
- Holes for the screws are drilled into the floorboards, then they are screwed into the joists at a slight angle, changing the angle as necessary.
Restoring appearance
It so happened that there is no need to replace the boards. The floor just needs to be given an updated look.
Then you can do the renovation of the floors in your apartment with your own hands very quickly.
- Remove all furniture completely or move it to one end of the room. In the latter case, you will have to restore the floors in two stages and then move them to the repaired part of the room.
- The best tool can be considered a grinding machine; it will process the surface in just an hour. But not everyone has the opportunity to purchase it, since the price of the device is quite high. (see also article)
- In this case, there is a more painstaking option - sandpaper. For the most problematic areas, a coarse-grained analogue is used, for final finishing - a fine-grained one.
- There is one little trick: to give the floor a lighter and more uniform shade, and to degrease the surface, you should wash it with a stiff washcloth and detergent. Once dry, you will see a positive effect.
- After final inspection and minor defects have been eliminated, you can paint the aircraft.
- It is advisable to varnish the floor in two or three layers and dry. Read carefully what the instructions for applying a can of varnish or paint recommend. Some formulations dry quickly, and some are quite long. If you are walking on an unprepared floor, you will have to varnish or repaint it.
Laminate repair
Laminate is a wear-resistant material, but over time, some defect may appear on it: a scratch, a chip, a gap, or swelling.
Moving furniture without using a special backing or dropping a heavy object on the floor will inevitably lead to scratches. If the flaw is very deep, then the only correct solution is to replace the damaged board.
To repair a scratch on a laminate you need:
- Wax crayon . You must first clean the flaw with a vacuum cleaner, and then paint over it with wax chalk, remove the excess with a dry cloth and polish the repair area.
- Special putty . Before starting work, you should take a sample of the damaged board and go with it to the store, where sales consultants will probably be able to select a repair kit that is as similar in color as possible. The paste is applied with a spatula, and excess is removed with a clean cloth. The restored area should be left alone for several hours until completely dry.
If a chip, scratch or water damage cannot be removed with repair kits, then it’s time to move on to more drastic actions - completely replacing the board.
Dismantling the boards should begin from the wall closest to the damaged area. After the replacement is completed, you just need to put the laminate flooring back together and install the baseboard.
You can watch instructions for replacing a damaged board in this video:
You can get rid of gaps between laminate boards as follows:
- filling the gap with a special composition, the basis of which is wood filler;
- partially or completely prepare the surface and re-lay the panels.
Laminate flooring can only be repaired without disassembly if there is a very small gap.
Blistering is the most common problem with this coating. The main reason for what happened: the installation was carried out without leaving a gap, as a result of which there was no room left for the boards to expand. Repair work for this problem is quite simple - the board adjacent to the wall must be dismantled and cut longitudinally. If the bloating does not go away after these steps, you can try to correct the situation by installing heavy objects and leaving them for 24 hours.
Concrete floor repair
For those who have laid a floor without logs, there are some tips and tricks on the underlayment. Many people wonder how to repair the floor in an apartment if the tiles, linoleum or laminate have become unusable?
Operating procedure
- First of all, you need to remove the damaged areas. Linoleum is cut with a sharp mounting knife. Moreover, this piece will serve as a perfect template for a new one. Just trace it into a scrap of whole material, then cut it and you have an updated patch.
- If you have laid tiles on the floor and several pieces have fallen or are about to do so, you will need to remove them.
- Then clean the vacated areas from the remnants of the old mixture and dust. A chisel and a hammer will come to the rescue to gently discard everything unnecessary. Be careful not to damage adjacent, well-held tiles.
- In cases with any concrete-based coatings, before laying new sections, it is necessary to restore the concrete base. To do this, the already cleaned surface is made from a cement-sand mixture and allowed to dry.
- Now you can lay down so-called patches. Use either a special glue designed for this material or a cement mortar.
Make a screed
If the entire floor requires renovation or rearrangement, you will have to redo the foundation for it. This must be done as drops in height, bumps and valleys will quickly render the new covering material unusable.
Fairly soft linoleum or other PVC-based coatings were especially hard hit.
Repeating the landscape, the material will tear and also come off in areas of heavy drops.
Record! It doesn’t matter whether you live on the ground floor or above, the floors in the apartments are made of concrete slabs. And they rarely have a perfectly flat surface. Therefore, it must be carefully prepared.
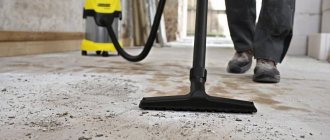
- We remove all old coating, as well as the substrate, if any, and all construction debris.
- If there is a possibility of moisture getting on the floor, it is advisable to apply a waterproofing film to the old screed. It overlaps each other and is reinforced with damper tape along the walls.
- In cases where a waterproofing layer is not provided, the concrete base should be moistened, then a mixture of cement and sand should be poured onto it, then carefully leveled.
- When working, use a level and beacons, they will help make the surface perfectly smooth.
A little about very old houses
In houses where there is no reinforced concrete floor slab, there is one way to replace a wooden floor with a concrete screed: build a subfloor from plywood or chipboard. Some people recommend repairing the existing wood floor or adding additional covering.
However, in practice, such work takes a lot of time, money, and requires replacing damaged areas, removing old paint and other coatings to assess the condition of the boards.
Therefore proceed as follows:
- all flooring boards are removed;
- in houses with ceilings on beams or a metal profile, construction waste is poured between the floor and ceiling of the lower floor for sound insulation. All this needs to be removed;
- the state of the lag is assessed. If bad, they are deleted. If good, the logs are cleaned, treated with anti-mold and antibacterial agents and secured in such a way as to ensure the evenness of the plywood or chipboard flooring.
Preparation of the base for the screed begins with filling expanded clay into the interfloor ceiling on beams or I-beams. This layer will have low mass and have good sound insulation. Backfilling is carried out to the upper level of the lag. After this, they lay plywood or chipboard and operate in the same way as in an apartment.
Screed base
Reasons for replacing floors
The reasons that prompt the decision to replace the old floor in the apartment premises can be counted on one hand, but if they are significant, repairs will have to be done. Many apartments and houses have wooden coverings, the service life of which is not very long. It is advisable to change gender in certain situations, which we will now consider:
- Many cracks appeared along the entire length of the boards. This indicates that the material is severely cracked, and although it still appears secure, the board will begin to fall apart in the near future. To do this, it is not necessary to have a dozen cracks on the surface of the board - this number is enough to replace the entire floor. Cracking of floorboards occurs mainly due to improper climate conditions, which are maintained indoors for a long time, and because of this, the board gradually dries out.
- The floor in the apartment should be replaced if parts of the wood begin to fall off. This fact indicates that the floor is in the stage of decay, it is rotting and falling apart.
Creaking floorboards are the smallest problem that can be solved locally. This fact does not mean that the boards have become unusable due to age - the floorboards can rub against each other due to the weakening of fasteners that can be secured. In any case, it is advisable to ensure that the floor is in good condition. You need to tear off a few boards at the squeak site and check the log. If they are rotten, then the floor still needs to be changed.
Removing old flooring
Dismantling the old covering is the first step in replacing a wooden floor with a concrete one in an apartment. For this, standard tools are used: sledgehammer, crowbar, crowbar.
- Linoleum floor coverings are removed.
- Using a tool, the coating is disassembled.
- In areas where pipes and other communications enter, you should be especially careful.
After removing the old boards, access to the base opens. In apartments, logs are laid on reinforced concrete slabs, often they are not even secured. The space between them is filled with the remains of construction waste for sound insulation.
https://www.youtube.com/video/ntTvegDpIjQ
After construction debris and dirt have been removed, the joists are assessed. If the wood is in good condition, you can create a base for pouring screed over plywood or chipboard, which will be placed on the existing substrate. But this will cause the floor level to rise, so it is worth deciding what is better: to make a new coating on the joists, without insulation, or to remove the joists and form a layer of concrete over the floor slabs.
In practice, most apartment owners act according to the second option. The logs are dismantled. After this, you need to carefully evaluate the condition of the pipes - cold and hot water, sewerage. If there is damage or signs of poor condition, the interfloor section should be replaced immediately. Later, after the concrete floor has been created, repairs will cause much more problems and time.
Removing a wooden floor
Replacing the floor in an apartment
To remove old wood flooring, you will need a hammer and hammer. These tools break down unsuitable boards. All old structures are removed down to the floor slab. Now you need to decide what new flooring will be installed to replace the old one. It is logical that the floor should be replaced with a similar one. An exception may be floors in the kitchen, bathroom and toilet, where a tiled surface can be an adequate option, the basis for which is better to make it more durable.
- The first logs are laid on a clean floor. The step between them is selected based on the thickness of the floorboards and on average is about 0.7 m. All logs must be clearly oriented horizontally. Slats are used to align the elements.
- Once the joists form a single flat plane, U-shaped brackets are used to secure them to the ceiling. The principle of fastening is the same as when fastening plasterboard profiles, only in the opposite direction.
- At the end, decking made of OSB sheets or slabs is laid. If the distance between the logs is 0.4 m, then OSB panels with a minimum thickness of 15–18 mm should be used. If the logs are located at a distance of 0.5 m from each other, then the OSB panels should have a thickness of 18–22 mm, and at a distance of 60 cm - at least 25 mm.
- Replacing a wooden floor is easier, but the work will be more painstaking. Each board must be customized according to size. In addition, connecting boards outside the joists is not allowed.
- However, OSB boards are more practical. If the floor is made from them, no further treatment is required. You can lay parquet, laminate or linoleum on them without additional work.
Record! In order for the floors to be ventilated along the contour of the room, it is necessary to leave a gap of about 5 mm, which will be closed at the end by a plinth.
If this option is not suitable for any reason, you can drill a hole in the floor in inconspicuous places on opposite corners.
How to disassemble a wooden floor
To assess the condition of an old wooden floor in a house or apartment, you need to disassemble at least part of it. Preferably in the most problematic place. The first thing to do is remove the baseboards. Then find the fastener and pull it out. When the beams and the floor area are exposed, it will be possible to carry out a preliminary inspection.
To repair an old wooden floor, at the first stage you will need a nail puller, pliers, a hammer, and a small crowbar.
If we are renovating a wooden floor in an old house, these are ordinary floorboards. In the sense that they have the shape of a rectangle in cross-section without any tenons and grooves. They were most likely nailed directly into the face (that is, from top to bottom or at an angle) to the joists. Usually, nail heads can be found even under a layer of paint. When removing floor boards, the problem is how to remove them without damaging the wood. First you need to remove the paint from the fasteners, and then try to remove the nails. You can do this:
- Slide a crowbar or crowbar under the board where the fasteners are installed, and lift it up a little.+++
- Place the board in place. The nails will remain sticking out.
- Place a piece of fiberboard under the nail puller, rest your heel on it and remove the nail.
This method will work if the wood is dense and not rotten. If several boards in a row crumble “during the process” of dismantling, the coating should still be replaced. This means you can continue without precautions.
Removing boards without damage is not so easy
The wooden floor can also be made from tongue and groove boards. This is the board that has a tongue and groove cut out on its side edges. They make the coating monolithic. If the fastener was placed in a groove or tenon, then you simply cannot get to it. We need to find the last board. It is located against one of the walls. They attach it to the surface, since it won’t work any other way. We take out the fasteners from this board, take it out and find a hidden fastener on the side of the next one. These can be special plates, screws or nails. Depending on the type, you decide how to remove it.
