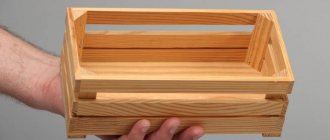
The table itself is an extremely functional invention, in demand in the kitchen, in the workshop, and in the office.
A wooden table combines functionalism, environmental friendliness and aesthetics. You can make such a piece of furniture with your own hands.
Material
If you intend to assemble a table yourself, the first thing you should pay attention to is the material of manufacture. Very rarely, a whole piece of wood is used as a material at hand; much more often, wooden boards are used. The advantages of this material: they can be cut to the required sizes on any construction site; It’s also easy to transport them to the assembly site if you have a personal car.
The only downsides that can be mentioned are possible difficulties that may arise during installation, and also the fact that you should pay attention to the correct processing of the material - otherwise the boards may come apart and will not last long.
Sexual
This material is used for flooring, for cladding buildings and premises and, according to the topic of this article, for the manufacture of interior items. The advantages of this material are as follows:
- Most floorboards have a groove, as this is how they are held together.
This allows you to fasten the boards into a tabletop without any problems, while the joints will be identical and look aesthetically beautiful; - Most of the edged boards have already been processed, so after assembling the table you don’t have to resort to additional painting or varnishing the product;
- even if the floorboard is an ordinary edged one, it still fits together with other boards better than the rest.
But floorboards also have disadvantages .
For example, for a board that has been varnished, a buyer can pay a larger amount than for an ordinary board with subsequent self-coating. The floorboard has a limited size, that is, its size will dictate the size of the countertop, or you will have to adjust the length yourself. Important . It is impossible to make legs from a floorboard, only a tabletop. This means that you will have to select a different material for the legs.
Unedged
This board has jagged edges with bark as it is made by cutting a tree trunk lengthwise. Such boards are cheaper, and with their help you can achieve original design solutions. But at the same time, they require additional processing, and joining them is quite difficult.
Oak
They are distinguished by unique strength, density and resistance to many biological and physical influences. Very expensive , but in terms of service life, this material completely pays for itself.
The largest wooden Buddha statue
18-meter tall wooden Buddha statue.
At the Lama Temple in Beijing you can find the world's largest Buddha statue, carved from a single tree trunk. An 18-meter tall statue of Maitreya, which was hand-carved during the reign of Emperor Qianlong of the Qin Dynasty, stands in the main hall. Although the Cultural Revolution in the 1960s caused massive and irreparable damage to thousands of architectural and cultural properties throughout China, this statue and temple miraculously survived the disaster.
Drawing
A drawing is necessary, because thanks to it the table will fit exactly into the room. The drawing will also allow you to calculate the volume of material required. But first things first. What problems will the drawing allow you to solve?
- Dimensions . If this is a kitchen table, and the kitchen is of non-standard sizes, the table, accordingly, will differ from the standards.
- Model . Despite the fact that in general terms a table consists of four legs and a table top, there are a huge number of options for how to make it. There are a lot of table models, types of table tops and legs.
- Calculation of consumables . Having basic mathematical skills, you can calculate the volume of required material from the finished drawing. So that after purchasing the board it does not turn out that there are a lot of scraps left, or that there is not enough material.
Advice .
You can download a ready-made drawing from the Internet and modify it to suit your needs.
Manufacturing procedure
Blueprints
Before you start work, you need to make drawings of a table from boards with your own hands. To do this, you first need to decide on its size and scope of application.
For example, if you are making a table top for a workbench from boards with your own hands, then the structure must first of all be durable. If you are designing a dining table, you should consider the place where it will be located, as well as the number of people who plan to place it.
Example table drawing
It must be said that the drawing does not have to be done with high precision, to scale. It could even be a hand-drawn sketch. The main thing is that it displays all the details of the structure and contains their dimensions in millimeters.
If there are no special requirements for the size of the product and its design, you can use ready-made drawings. For example, those listed on our website.
Materials
Before making a table according to the proposed drawings, you need to prepare the following materials:
| Materials | Quantity, pcs. |
| 1680x100x25 mm | 4 |
| 850x100x25 mm | 2 |
| 750x100x50 mm | 4 |
| 1530x100x25 mm | 2 |
| 950x100x25 mm (a wider board for the table can also be used if the canvas is planned to be made without gaps) | 17 |
In addition, you will need the following consumables:
- self-tapping screws;
- glue;
- putty;
- sandpaper;
- varnish
Pre-assembly of the countertop
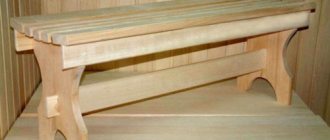
Work should begin with the manufacture of a tabletop, which is the main element of this furniture. It must be said that in the case of making a small table, it is easiest to make the upper part of the structure from solid wood, since in this case you only need to attach the legs to it.
Example of a table with a solid top
However, in our case, a solid board tabletop is not suitable, since the structure is large. Therefore, you will need small planks that will be located across the frame.
Frame drawing
So, a do-it-yourself tabletop made of boards is made in this order:
- First of all, the frame is made. You should start by assembling the frame, which is formed by two long boards 1680x100x25 mm and two short ones - 850x100x25 mm. You need to connect them together with self-tapping screws;
- To prevent the wood from cracking, you must first drill holes;
- then, for the rigidity of the structure, you should install intermediate strips with your own hands in increments of 250 mm;
- to increase strength, metal corners must be attached to the internal corners with self-tapping screws;
Layout of side boards
- additional two planks 1530x100x25 mm should be attached to the sides of the frame, securing them with self-tapping screws;
- After this, you can attach the transverse planks to the frame. First of all, the outer board for the table with a protrusion of 25 mm is attached, then all the others are installed with a gap of 5 mm;
- the upper part of the holes for the screws must be drilled out in order to “sink” the caps.
It must be said that it is not necessary to install the tabletop planks with a gap. If desired, you can make a continuous canvas. However, in this case, before gluing the boards for the tabletop, they must be carefully adjusted so that the seams are thin and invisible.
Advice! The tabletop made from unedged boards looks original. This table can be placed on a terrace, in a wooden gazebo or in a house decorated in a rustic style.
The photo shows an example of a countertop made of unedged solid wood.
Installing the feet
When the tabletop is ready, you need to attach the legs to it with self-tapping screws. To do this, the structure must first be turned over.
It must be said that this stage is very important, since the product must stand level and not wobble. Therefore, the legs must be carefully adjusted. Its stability must be checked on a flat surface.
Advice! If you know in advance where the homemade table will stand, then the legs can be adjusted to fit it. After all, the floor does not always have a perfectly flat surface.
Final assembly and finishing
Once the preliminary assembly is completed and all parts are adjusted, the following steps must be performed:
- First of all, the product must be disassembled;
- then the product is reassembled, and all parts are glued with wood glue;
- after final assembly, when the glue has hardened, you need to putty the screw heads;
- Next, the surface of the structure must be sanded and covered with varnish for wooden products.
Here, perhaps, is all the information on making a plank table yourself. The price of all the materials spent on it, of course, is much less than the cost of the finished product. In addition, home craftsmen will certainly enjoy the process of making it.
Tools
To complete the work, you may need the following tools, which should be prepared in advance:
- hammer;
- chisel;
- hacksaw;
- drill;
- plane;
- nail puller;
- saw.
Advice . If further work with the tool is not planned, then you don’t have to buy it, but rent it.
Totems at the Royal Ontario Museum
Totems at the Royal Ontario Museum
The Nisga'a and Haida totem poles at the Royal Ontario Museum are four large poles that were carved from single Western Red Cedar trees by the Nisga'a and Haida peoples of British Columbia. Each of these pillars tells a story of a particular family, describing its origins, achievements and life experiences. It is noteworthy that the largest of the four totem poles, “Sagawin”, rises a whopping 24.5 meters.
How to do it?
Once the material has been selected, a drawing and all the necessary tools have been prepared, you can begin assembly . When drawing up the drawing of the table, all its constituent elements, as well as fastenings, were highlighted. First of all, all the necessary elements are cut out and turned in accordance with the dimensions indicated in the drawings. Then, after checking and measuring after production, you can proceed to assembling the parts.
Important . Tools may cause damage. Follow safety precautions.
The assembly procedure is quite simple; general steps can be identified regardless of what model of table you plan to assemble. The assembly steps are as follows:
1. Assembling the legs . The table legs, cut according to the drawing, are fastened with beams using self-tapping screws or nails. For greater reliability, the fastening points should be treated with glue and then tightened with self-tapping screws.
2. The tabletop . To do this, strips are marked on the tabletop that fasten the legs, then using self-tapping screws, nails, screws or fasteners, the tabletop is attached to the structure of the legs.
3. Installation of horizontal screed . Many table models require a tie between the table legs to prevent them from moving apart.
Frame preparation
We cut the timber to the required length according to a pre-prepared drawing.
To fasten the parts together in the bars, we make grooves at the intersection points. The lap joint is one of the simplest and strongest types of joints. You can make a groove using a circular saw or hacksaw, chisel and rasp.
Finishing
After the product is assembled, it must be processed. Treatment is necessary so that the product is resistant to the external environment and lasts many times longer than without treatment.
Processing a product means sanding it and then opening it with varnish . Most often, sanding and varnishing are done several times for greater reliability.