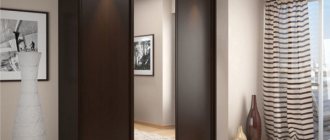
A mirror on the closet door greatly simplifies the process of selecting the optimal clothes; all the results of fittings can be seen immediately and the final decision can be made. Some types of modern furniture cabinets have a large mirror on the front door, but not all. In addition, most old designs did not provide this element. It is not advisable to buy a new cabinet just because of the mirror; it is much more profitable to reconstruct it and glue it to the front door. Let's look at ways to solve the problem and give practical advice.
How to glue a mirror to a cabinet door
Method number 1. Large vinyl sticker
Vinyl decorative stickers for wardrobes, as a rule, are produced on a single-color German Oracal film, which greatly simplifies color matching. Outwardly, they look like a stylish pattern applied with paint. At the same time, you will be able to care for the cabinet in the usual way. Unless you resort to strong friction. And most importantly, when you get tired of one design on the door of a closet, you can literally remove the sticker in a minute without any traces and apply a new one.
This method is universal and can be used for doors made of any materials. You can safely apply stickers to glass and mirrors of sliding wardrobes. They hold up well and look very impressive. At the same time, you get rid of the obsessive reflection, and fingerprints that constantly appear on the glass surface will no longer be too noticeable.
The procedure for applying a large sticker on the wardrobe door:
- Preparation .
Clean the surface from dust, fingerprints and other contaminants; - Smoothing.
Place the sticker on a flat surface and smooth it with a squeegee (smoothing spatula), which our store always sends in the kit; - Fitting.
Attach the drawing to the door and mark the position of the corners with a pencil or erasable felt-tip pen. For accuracy, we recommend sticking the sticker with a backing onto masking tape and seeing from a distance how the drawing will look. - Removing the substrate and applying
. Since the sticker is large, remove the backing directly from the canvas attached to the tape from top to bottom in small pieces. Immediately apply the freed pattern to the surface and smooth it carefully with a squeegee without unnecessary pressure. And so on to the very bottom. At the same time, remove the transparent mounting film from top to bottom. The work should be done slowly and carefully. Carefully smooth out everything, even the smallest bubbles. It is most convenient to apply non-adhesive adhesives to closet doors with two people. If bubbles still remain, pierce them with a needle closer to the edge and remove the air with a squeegee. - Examination.
After removing the backing and mounting film, take the time to carefully look at how each element is stuck. Even for a small flower, all edges should be level on the surface.
This video will show you how to apply large vinyl stickers on surfaces:
Helpful tip: when applying a sticker to a mirror or glass of a wardrobe, spray the surface with water. The sticker will be easier to smooth out.
How to restore a mirror with scratches and chips
Using a solution of water and alcohol, thoroughly rinse the damaged surface of the mirror and dry with napkins. Now carefully fill the scratch with sealant and let it dry. Remove excess from the surface and place the mirror in the frame.
As you can see, restoring a mirror at home is not a labor-intensive task and does not require much expense or time.
Small damages are easier to repair at home using improvised means.
But it should be noted that there are cases so serious that restoring a mirror costs more than buying a new mirror.
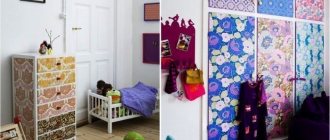
Method No. 2: Decorating wardrobe doors with corner patterns
If you don't want to cover the entire surface of the door, we recommend using vinyl decals with elegant angular patterns. Here you will get additional benefits:
Corner patterns are smaller, so the sticker will cost less;
Small elements are much easier and faster to apply;
By decorating the corners, you will allow the mirror to serve as a mirror.
When applying a small vinyl decal, we recommend removing the backing
. Place it on a flat surface with the pattern down, pick up one of the corners and carefully remove it at an acute angle. If any element sticks to the backing, return the area to its place, iron it again with a squeegee and try to remove further. The sticker should remain on the transparent film with the adhesive layer facing up.
When applying
the sticker,
take the upper corners of the mounting film and stick it, smoothing it from top to bottom along the marking lines. It’s good if you have a second person helping you to support the sticker from below so that it doesn’t stick prematurely.
Method No. 3 Wardrobe decor with full-color posters
Wardrobe doors with photo printing are not a cheap pleasure. Color posters based on vinyl film are much more affordable and often look much better. This is achieved through high quality printing. You can paste a poster on one of the doors or make a composition on all panels of the wardrobe.
Drawings on color posters can be very diverse: from abstract figures to your own photographs of memorable places. They should be applied like regular vinyl stickers.
Method No. 4 Sliding wardrobe with stained glass windows - economical option
Only very wealthy people have the opportunity to decorate wardrobe doors with stained glass windows. We offer a decoration method that will allow you to experience all the delights of stained glass decoration without significant costs.
The technology is extremely simple. A translucent stained glass film with an adhesive surface is applied to the mirrored door of a sliding wardrobe. The film transmits light, which returns to us through reflection. The result is a glowing effect similar to reflection from colored glass. Applying stained glass to a wardrobe mirror is as easy as a regular vinyl sticker. Check out the decorative effect.
Available to order
Decorating a mirror
If the frame of the mirror is wooden and has lost its shine, you can update it by applying varnish of the required color. Or change the look of the mirror by decorating it with jewelry, shells, bamboo sticks or broken dishes. It all depends on the owner’s imagination.
Restoring mirrors is a rather painstaking task, the result of which should be the preservation of the original surface, especially if the mirror is antique.
Depending on the damage to the amalgam, different methods and materials for restoration will be used.
For minor damage, silicone sealant is used, and large areas are restored using foil and glue.
Method No. 5 Matting glass and mirrors using paste or aerosol
Drawings on the mirrors and glass of the wardrobe, applied using the matting method, look very noble and elegant. Matting is a technology that allows you to give a smooth glass surface roughness and opacity. To do this, a special chemical composition is applied.
Matting is usually done to order and is quite expensive. We want to tell you how to make this spectacular decor for a wardrobe with your own hands.
You will need:
- Disposable (adhesive) or reusable stencil for wardrobes;
- Paste or aerosol for matting;
- Spatula for applying paste.
The procedure for performing frosting work on glass and mirror doors:
- Clean the surface from dust and greasy marks using alcohol or glass cleaner.
- Attach the stencil to it. Disposable adhesives are applied using the vinyl sticker method. Reusable ones are secured with temporary spray adhesive. Make sure that the contours of the drawing are securely fixed.
- A thin layer of paste is applied to the exposed areas with a spatula or a special matting aerosol is sprayed. After the time specified on the packaging for the composition has elapsed, the undried excess paste is removed with a spatula, and the stencil is removed.
In this simple way, you can apply even complex designs with small details to wardrobe doors.
Video about matting a mirror using a stencil using paste and aerosol
We hope that the proposed 5 methods will help you easily choose exactly how to decorate your closet doors without extra costs.
Stained glass films from the Crystal Frost series are perfect for decorating wardrobe mirrors, glass doors and partitions, and shower stalls. An exquisite translucent pattern will make the glass surface attractive and open up space zoning possibilities. Several surface patterns are available to order
March 7, 2020 Specialization: master in the construction of plasterboard structures, finishing work and laying floor coverings. Installation of door and window units, finishing of facades, installation of electrical, plumbing and heating - I can give detailed advice on all types of work.
Gluing mirrors to furniture elements is a simple but responsible process. If you make mistakes and do everything wrong, then over time the mirror will begin to move from its place or even fall and break. In this review, we will figure out how to carry out the work reliably and efficiently; you will learn several methods and be able to choose the one that best suits your situation.
Materials and tools required for mirror restoration
For major damage:
- glue for metal and glass;
- brush;
- soft fabric;
- glass cleaner;
- gasoline or alcohol-containing product;
- foil;
- brush;
- scissors;
- sponge.
But you can repair minor damage with your own hands.
Polishing, as a separate method of mirror restoration, is also performed in case of clouding of the reflective surface.
In modern interiors, mirrors often play an important role.
For small scratches and chips:
But over time and improper care, the appearance loses its reflective ability.
If abrasion or a shallow scratch appears, the mirror can be ground, and the top layer is removed from the reflective plane using coarse abrasives.
Mirrors not only have a utilitarian meaning, but also serve to decorate the interior and visually enlarge the space.
Types of fastening methods
First of all, let's figure out what methods you can use to secure mirrors. All of them have proven their reliability, but the technology for carrying out the work differs and is used for certain situations.
Mounting double-sided tape
The simplest solution that has the following advantages:
- Double-sided tape allows you to glue elements very quickly
. It holds mirrors, glass, and other sheet materials equally securely. To understand the technology, you will need a couple of minutes, and the work uses a simple set of devices, which is found in almost every house and apartment;
- The cost of this option is low
, but if quality is important to you, we recommend purchasing materials not from the budget segment, but at least from the middle price segment. When choosing a specific solution, remember that the material must have a soft spacer; ordinary stationery tape will not work, since it is not designed for high loads; - Buying tape is not difficult.
It is sold in hardware stores, as well as in retail outlets that deal in automotive parts. The second option is even preferable, since automotive double-sided tapes are characterized by increased strength and durability;
It is best to select double-sided tape with a thickness of 0.8 to 2 mm; it will smooth out minor irregularities and provide high adhesion strength to the surface. Of the manufacturers, 3M products have proven themselves best; this is the option recommended by professionals.
- It is best to glue elements at a temperature from 10 to 25 degrees
, it is this range that ensures strong fixation. Most often, the room has an optimal microclimate, so there are no problems with this aspect, but if the room is very hot, then it is better to wait until the temperature drops so that the adhesive layer on the tape does not move and the mirror does not move; - It is easy to calculate the required amount of material
. Before gluing the elements, calculate the amount of tape required for the job. To do this, you must know the total weight of the mirror; 60 sq.cm is used per 1 kilogram of mass. double-sided tape; - Possibility of dismantling elements
. If the mirror is glued crookedly, then you can remove it and redo the work. To do this, use a guitar string or a thin polystyrene tape, which is used to cut the foam part of the double-sided tape. After this, all remnants of the old material are removed and the new one is glued.
The disadvantages include the following:
- Double sided tape is not suitable for heavy mirrors
. If the size of the element is large and the weight is significant, then it is better to choose another method of fastening. This option is optimal for small mirrors; - It is important to purchase quality material
. There are many low-quality tapes on sale that do not provide the required level of strength.
Special compounds and liquid nails
The most popular option, which allows you to glue mirrors to any surface:
- Chipboard and laminated chipboard;
- Tiles in the bathroom or kitchen;
- Wooden and veneered bases;
- Plaster, concrete and plastered surface.
Since we are figuring out how to stick mirrors on furniture, we will analyze this option in more detail. Let's start with the pros:
- Low cost
. The price of the compositions is low, and they are sold in all construction stores; - Wide variety of options
. Various solutions are used - from special compounds to liquid nails and silicone for glass. It is best to use silicone, since liquid nails contain ammonia, which over time can damage the mirror amalgam and spots will appear on the surface;
- High reliability
. If the elements are fastened using technology, the fixation strength will be ideal. Below the work process is discussed in detail so that you can do the gluing yourself.
Of the minuses, it is worth noting the following:
- Impossibility of dismantling
. Once the composition has hardened, it will no longer be possible to separate the mirror from the cabinet door or panel in the hallway. You will have to change the entire element, and this is a big expense; - The importance of carrying out the work correctly
. If the technology is broken, then there is a danger that the mirror will simply fall off over time. In addition, if the wrong composition is used, the mirror may deteriorate over time.
Mechanical fastening method
In this case, special fasteners are used, which are designed for installing mirrors on furniture. There are several main options:
- Metal bracket
. The simplest and cheapest solution, which consists of metal elements bent so that they include a mirror of a certain thickness. To prevent cracks from forming on the surface during fastening due to excessive force, silicone gaskets are placed under the lower part;
- Through holders - allow you to attach mirrors to any surface
. On the outside, the installation site is covered by a decorative part, and inside there is a self-tapping screw or dowel, depending on where the installation is taking place. This option is more complicated in that you need to drill glass, which is not an easy task, and besides, you will need a special drill;
- Furniture fasteners with decorative overlays. Most often it is made in the form of clamps that hold the mirror at the top and bottom, and from the outside the installation site is covered with a decorative plug of any color and shape. With this option you can hang a mirror anywhere;
The advantages of this solution are:
- This is a safe installation option
. There is no need to worry that the mirror will slip over time; - You can dismantle the element
. If the mirror is damaged, replacing it is not difficult; the fasteners come off quickly and easily; - Lots of options
. Finding the best one is not difficult.
There are also some disadvantages:
- Difficult to install
. Attachment requires a screwdriver to drill holes and tighten screws. If you make a mistake with the drilling location, you will not be able to seal the hole; the top film of the coating will be damaged; - Not a very attractive look
. Placeholders don't always fit into the design, and this is the main problem.
How to glue a mirror to a cabinet door yourself
We will look at how to glue an element to silicone, since this is the simplest and most reliable option. This method is suitable for any structure, the main thing is to carry out the work correctly and use high-quality materials.
Materials for work
First of all, collect everything you need:
- Special silicone for glass and mirrors
. It is sold in hardware stores and is distinguished by the fact that it does not contain substances that damage the amalgam of mirrors. In addition, compositions of this group have high adhesion to smooth surfaces;
If you find liquid nails that are marked “for mirrors,” then you can use those too.
- Composition for degreasing surfaces
. The easiest way to remove traces of grease and other substances from furniture and the back of mirrors is to use white spirit or another universal solvent. You can also use special automotive degreasing compounds; they are more expensive, but have almost no odor;
- Mirror of the right size. Take measurements in advance and order the element ready-made; the ends will be processed, which is very important for safety.
Tool
The mirror is secured using the following devices:
- Gun for applying sealant
. With its help, the work will be done quickly and efficiently and the consumption of the composition will be minimal. The cheapest option is suitable, since the load on the tool during operation will be low;
- Measuring tool
. To accurately determine the location of the mirror, use a construction tape or ruler. And for marking it is best to use a construction pencil or felt-tip pen; - Rags for degreasing surfaces
. Any clean cloth will do; - Screwdriver or screwdriver
. If the mirror is placed on the door in the cabinet, then it is better to remove it, since it should lie horizontally; - Heavy objects
. To press the glass to the surface of the furniture, weights are placed on it. You can use improvised elements or even ordinary jars filled with water.
Fastening process: step-by-step instructions
Let's figure out how to attach a mirror with your own hands:
| Illustration | Description |
| The workplace is being prepared . It is best to make a flooring on which to lay a door or other piece of furniture on which the mirror will be glued; it can be placed nearby if there is enough space. | |
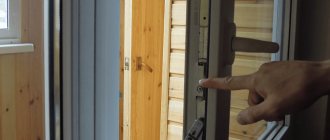
| Wardrobe door being prepared , the following actions are performed:
| |
| The mirror is being prepared . To do this, the element is turned face down and thoroughly wiped with the same rag soaked in solvent.
|
There comes a time when the usual surroundings become boring. I want to change something, update the old interior, add some detail or make a good repair. The best way to update a room, make it brighter, and perhaps even increase the space, is to attach a mirror to the closet. You have purchased new furniture, you need to glue a mirror to the cabinet door, and you don’t know how to do it correctly, let’s look at individual mounting methods.
The best way to update a room, make it brighter, and perhaps even increase the space, is to attach a mirror to the closet.
We apply “Liquid nails” or silicone to the mirror surface in parallel lines at equal intervals.
How to glue a mirror to a cabinet? How to do this job correctly? There are several ways to glue a mirror.
| Method name | Features of the method |
| Mounting double-sided tape. | This material must be chosen correctly. The adhesive tape should be high-grade - 3M, foamed, its thickness should be 0.8-2 mm (to even out unevenness). It is possible to work with it at temperatures from +10 to +25°C. Indicators higher or lower will not provide adequate grip. The tape consumption is 60 cm² per 1 kg of mass. |
| Using “liquid nails”, special glue or colorless construction silicone. | There are some nuances: it is better not to glue the mirror to “liquid nails” or other products that have a characteristic odor. The substance contained in them can lead to damage to the amalgam. It is better to purchase special adhesives for mirrors - “Titan” (the most reliable product), “Abro”, “Soudal”, “Bostik 2750”. A very high-quality and handy method is gluing a mirror to silicone. This is the best option. |
| Mechanical method. | Using U-shaped metal tabs, plastic stops or special screws. |
You have purchased new furniture, you need to glue a mirror to the cabinet door, and you don’t know how to do it correctly, let’s look at individual mounting methods.
The best option is to glue the mirror onto colorless silicone for construction.
Attention! Which gluing option to choose is up to you to decide. The main thing is not to rush, do all the work scrupulously, approach the matter responsibly, then the mirror will be attached firmly enough and will last a long time.
How to glue a mirror to a cabinet?
Remove the protective stickers from the tape.
I really need advice
We bought a long-awaited shoe cabinet. and during assembly, I tightened the screw and the mirror (second from the bottom) cracked from top to bottom, almost in the center. It’s impossible to change the mirror, it’s glued tightly(((I can’t order it yet(((The maximum that can be done is to move it to the very bottom. Maybe someone has ideas on how to decorate the crack. Please help. I’m so upset that my thoughts don't come to mind((((
I also had this problem, I ended up replacing the front because there was a door from the cabinet. But the options were: paste it with rhinestones in the form of a pattern, or paint over it with stained glass. Maybe something will do
OOOOOOO. great idea with rhinestones))))) Thank you)))
I'm glad you liked the idea, we'll look forward to its implementation)))
Too bad the locker! I would move the door down and decorate it - what a great idea with rhinestones. My daughter-in-law covered all the mirrors in the bedroom with wallpaper - she says - the mirror in the bedroom is not according to Feng Shui
I'll probably do that. Yesterday I collected the remaining three boxes with tears in my eyes.
It seems to me that if you move it down and draw a tree with stained glass, 3 shelves, then you can just lay a tree trunk along the crack. In general, play it in a similar style, and it will look as if it should be so.
I was thinking about stained glass. I was also thinking about matting it with some kind of pattern. I can’t find anything yet. The interior in the corridor looks like a medieval castle, i.e. stones and wood, weapons hanging on the walls.
Thanks for the help)))
You can also use a glue gun to apply some pattern that matches the style of the hallway and paint it with acrylic paint from a spray can that matches the color of the interior, carefully remove the excess with a napkin. Don’t worry, everything will work out.
Interesting idea))) Thank you, I'll take note)))
Mine also burst, but I tore it off and glued a new one)
It doesn’t come off for me((((
buy mirror self-adhesive and apply a pattern along the entire height of the cabinet - the effect of a mirror on a mirror, it looks beautiful!
Great idea. Tomorrow I’ll go look for self-adhesive)))) and maybe I can somehow combine it with rhinestones
What if this facade (which has burst) is decoupaged with some large pattern? Since there are 5 cabinets, you can decoupage two of them and place them next to each other, placing elements of the same decoupage pattern throughout the cabinet and it will look as if it was intended. The main thing is to choose a suitable drawing.
I love decoupage. But. The fact is that the apartment is small and the hallway is no exception, and we bought a specially mirrored cabinet so that it would be two in one. and a mirror and a cabinet. won't be able to close
Source: stranamasterov.ru
Required Tools
The following tools will be useful: sandpaper, mounting gun, pencil, ruler or tape measure. If you are going to screw the mirror onto the mount, then you will need a drill, a screwdriver, screwdrivers, regular drills, a diamond drill (to make a hole in the mirror), and a special mount for mirrors.
Which gluing option to choose is up to you to decide.
If you decide not to use “liquid nails”, but to attach them to the legs, then you need to make sure that they are manufactured accurately in height and, if necessary, install spacers.
Methods for restoring a mirror surface
Depending on the damage to the amalgam, different methods and materials for restoration will be used. For minor damage, silicone sealant is used, and large areas are restored using foil and glue.
If the mirror is badly broken, then, of course, it is better to dispose of it.
A simple mirror restoration can be done at home; this will eliminate minor scratches, or at least make them less visible.
It all depends on the owner’s imagination.
Fastening process: step-by-step instructions
So, you stocked up on all the materials and tools and purchased a mirror of the required size. It is preferable if its back side is protected with a special film, which, if the mirror breaks, will prevent fragments from falling off. Now let's get to work.
You can use fine sandpaper for better adhesion of the glue.
Before fixing the mirror, you need to place a soft layer, and then press the mirror with paws.
First, remove the cabinet door. To make it easier to work with, you need to place it in a horizontal position. Using a pencil, draw marking lines on the surface. Use a degreaser to clean the door, then the mirror. You can use fine sandpaper for better adhesion of the glue. Use a brush to remove all the dust.
Use a degreaser to clean the door, then the mirror.
If the mirror has ready-made holes, you can use special screws instead of the tabs.
We apply “Liquid nails” or silicone to the mirror surface in parallel lines at equal intervals. Between them, for auxiliary fastening, we glue strips of double-sided tape. The best option is to glue the mirror onto colorless silicone for construction. There is no need to use only adhesive tape, since a mirror glued in this way may fall after some time, especially when the room is very warm or you are doing work in the summer.
First, remove the cabinet door.
To prevent the glass from cracking, the mirror surface must be wetted all the time or a side made of plasticine must be made and water poured into it.
Remove the protective stickers from the tape. We fix the long edge of the mirror on the marking line. Slowly, we lower the mirror surface, trying to prevent displacement. It is better if an assistant works with you. He will make sure that the mirror lies flat, without going beyond the applied markings. That's it, the mirror is glued. Now you need to wait for the glue to dry. Optimally, a day is allotted for this. The door can be secured in place.
So, you stocked up on all the materials and tools and purchased a mirror of the required size.
The mirror should lie on cardboard or fabric.
If you decide not to use “liquid nails”, but to attach them to the legs, then you need to make sure that they are manufactured accurately in height and, if necessary, install spacers. They should be close to the mirror, but without tension. You also remove the door from the cabinet, lay it horizontally, mark where the holes for fastening the tabs should be, screw them, and bend them. Before fixing the mirror, you need to place a soft layer, and then press the mirror with paws.
The following tools will be useful: sandpaper, mounting gun, pencil, ruler or tape measure.
Gluing a mirror to a cabinet door is not that difficult; all the work must be done very carefully.
If the mirror has ready-made holes, you can use special screws instead of the tabs. In case there are no holes, they are drilled with a diamond drill in the corners. To prevent the glass from cracking, the mirror surface must be wetted all the time or a side made of plasticine must be made and water poured into it. The mirror should lie on cardboard or fabric. Plastic washers must be inserted under the screw heads.
Before you begin, you need to prepare your materials.
As a result, the interior of the room will be greatly transformed.
Gluing a mirror to a cabinet door is not that difficult; all the work must be done very carefully. As a result, the interior of the room will be greatly transformed. It is not necessary for the mirror to be rectangular or square. It can be of any original shape. It is important that it fits the overall situation.
The main thing is not to rush, do all the work scrupulously, approach the matter responsibly, then the mirror will be attached firmly enough and will last a long time.
It is not necessary for the mirror to be rectangular or square.
It is important that it fits the overall situation.
Safety regulations
Since it is quite difficult to peel off a mirror, and the procedure itself is not safe, it is important to follow the following safety rules:
- clothing should completely cover the entire body, and the elastic bands on the sleeves and legs should fit snugly to the body;
- Be sure to use glasses (it is better if it is a full-size face shield);
- all work is carried out in an open space, preferably not indoors;
- when working, it is necessary to exclude the presence of children;
- After work, wet cleaning is carried out several times;
- Hands are washed with soap more than 2-3 times to completely wash off all glass microparticles.
Although dismantling a mirror is considered a simple process, it is dangerous, because the mirror can burst at any moment, flying into pieces.
Note! Automotive hand cleaning paste is the best solution for washing your hands if your mirror is cracked or has visible defects.
VIDEO: How to glue a mirror. Mirror swing door for furniture.
Mirrors are very fragile objects. They are susceptible to surface damage and break if handled carelessly. If a broken mirror in a closet or car cannot be restored, then scratches can be easily dealt with at home. The principle of masking flaws is to fill a chip in the mirror and then polish the surface. To make it smooth, soft fabrics are used, and toothpaste, mustard powder, cerium oxide, nail polish, silicone sealant, epoxy glue or GOI paste are used as scratch fillers.
At home, you won’t be able to completely get rid of chips and scratches on the outside and inside of the mirrored walls of a cabinet or the surface of a dressing table, but it is possible to disguise them. The same goes for side rear view mirrors in a car.
The main thing when working on a scratch is not to split the product itself. If possible, it is advisable to contact specialists who will restore the mirror using a professional grinding machine. If you still decide to restore the surface yourself, then you can use several methods to deal with scratches and chips.
Toothpaste
You can remove a scratch from a mirror using toothpaste and a soft flannel cloth. The product is applied to the surface and gently rubbed in a circular motion.
After the paste dries, polish the surface to a perfect shine. All minor scratches will become invisible.
Mustard powder
You will need dry mustard powder and 9% vinegar.
Procedure:
- The products are mixed in equal quantities.
- The resulting paste is applied to the chips.
- The excess is removed.
- Then polish the mirror with a soft cloth until shiny.
Cerium oxide
Cerium oxide can visually remove visible chips and scratches. This is a chemical that chemists call "jewel's blush" because of its ability to optically smooth the surface. The powder is mixed with a small amount of water to form a paste and applied to the surface.
Then polish the entire application area with a damp cloth. If necessary, carry out the procedure again.
Clear nail polish
Deeper scratches and chips must first be filled with something, then polished. A clear nail polish is suitable for this.
First, apply a layer of liquid to the chip. Then wipe off the excess and wait until it dries. After this, bring the surface to a shine using a soft cloth.
Transparent silicone sealant
Transparent silicone sealant also copes with masking imperfections in mirrors in cabinets or cars.
Sequence of work:
- The chipped area is degreased with alcohol or glass cleaner and dried well.
- Fill the cavities with silicone sealant and wait 24 hours for complete drying.
- The excess is cut off with a knife, which must be held at an angle of 45 degrees to the work surface so as not to damage it.
- The surface is sanded with a flannel rag or a sanding machine, if available.
When polishing, do not press too hard on the mirror, otherwise it may crack.
Foil
If a scratch is left on the amalgam on the back of the mirror, you can mask it with foil.
Procedure:
- Carefully remove the mirror from the frame or cabinet door.
- Place on a flat surface (table or floor) face down.
- The prepared piece of foil, which is slightly larger than the size of the damage, is smoothed out and tightly glued with tape to the surface.
Paste GOI
A good option for masking damage and making glass surfaces smooth is GOI paste.
Sequence of work:
- The paste must be crushed into powder, collected on a cotton swab and applied in a thick layer to the damaged area.
- Rub the product into the surface for a minute and a half, then wipe it with a dry, clean cloth.
- Repeat the procedure, increasing the polishing time to 15 minutes.
Do not vigorously rub the paste into the mirror or use a drill with a polishing attachment. The paste may fade and the area treated will differ from the rest of the surface.
Epoxy glue and GOI paste
For deep chips, use epoxy glue together with GOI paste.
Algorithm of actions:
- The crack is degreased and filled with glue. In this case, it is necessary to ensure that no air bubbles remain.
- Excess glue is removed with a knife or flat stick. It should dry for about four days.
- After complete drying, the treatment area is polished using GOI paste.
How to restore a mirror at home
A mirror is an integral household item in human life.
It is impossible to imagine the interior of an apartment or a handbag without it. But over time and improper care, the appearance loses its reflective ability. Chips, scratches, and amalgam peeling often appear on the inner surface of the mirror. It is impossible to imagine the interior of an apartment or a handbag without it.
Often in antique mirrors the glass itself is already so cloudy that it simply does not make sense to repair, preserve, or polish it.
Although all the ingredients for restoring a mirror surface are freely sold in pharmacies and stores, you will not be able to create a smooth mirror surface on your own the first (or even the fifth) time.
If the mirror is badly broken, then, of course, it is better to dispose of it. Because it is simply impossible to restore a broken mirror at home - this is a labor-intensive and hazardous technological process using mercury. But you can repair minor damage with your own hands.
A mirror is an integral household item in human life.
The original table accessory is ready; it will last for many years and will be a worthy part of any interior.
If the frame of the mirror is wooden and has lost its shine, you can update it by applying varnish of the required color.
Wardrobe mirror stickers - where to buy
If you don’t have enough imagination, but have a desire, use ready-made ideas by looking at the stickers provided on our website. The catalog on our website contains the widest selection of vinyl stickers and stencils that will transform your room! And quite affordable prices will allow you to update your interior as often as you want.
But on the other hand, stickers can serve you for a very long time; they are very wear-resistant. They can be washed and even rubbed, and they will not fade when exposed to sunlight.
Benefits of DIY restoration
What are the advantages of restoring a mirror with your own hands?
- Not every city and town has a restorer who knows how to restore damaged amalgam.
- Repairing a mirror coating is labor-intensive and requires investment, so mirror restoration will probably not be cheap.
- Time is wasted in searching for a restorer, delivering the item to him and back home, and on the way the mirror may break due to improper transportation. Therefore, it is easier to repair minor damage at home using improvised means.
Chips, scratches, and amalgam peeling often appear on the inner surface of the mirror.
Restoring a mirror with your own hands is quite accessible to a home craftsman.
Or change the look of the mirror by decorating it with jewelry, shells, bamboo sticks or broken dishes.
How to decorate a closet in a modern way
Another way to decorate wardrobe doors is with corner patterns. If you want something elegant and subtle, then these stickers will help you realize your desires.
This gives you some advantages:
- small stickers are faster and more convenient to apply (and subsequently remove);
- due to its smaller size, such a sticker will cost very little;
- Without covering the entire space of the cabinet door, you can use them as an ordinary mirror.