Understand the basics
How does a balcony differ from a loggia?
First of all, let's clearly separate these concepts. Both are glazed, so most people call the resulting space a balcony, although this is incorrect. And some people mistakenly believe that if you install windows on the balcony, it automatically turns into a loggia.
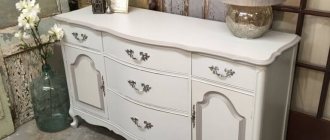
Balconies on the left, loggias on the right
The key difference between the two designs is that the balcony has no walls and protrudes beyond the facade, while the loggia has side walls and, on the contrary, is recessed deep into the building. In other words, outside air affects the balcony from three sides, but the loggia only from one or two, if the apartment is corner.
What result should you expect?
You can insulate both, but the final effect will vary greatly. A well-insulated loggia is no different from a room. If there is a heat source, it becomes a full-fledged living space for year-round use.
Due to the absence of solid walls, the thermal resistance of an insulated balcony is much worse - it is comfortable to stay there until late autumn at most. A sufficient level could be achieved with an additional layer of thermal insulation, but this is irrational due to the small area of the room. After insulation there will be almost no free space left.
What about glazing?
Since 25% of heat loss occurs through windows, it makes sense to insulate a loggia or balcony only if you have energy-saving windows. If wooden frames with one glass are installed, you will first have to replace them with modern ones.
Double-chamber double-glazed windows with higher thermal resistance weigh a lot, and they can only be installed on loggias. Balcony floors have weak load-bearing capacity, and it will most likely not be possible to install such windows there.
Balcony heating
The most insulated balcony in winter will still remain cool, and sitting there on frosty days will be uncomfortable. If you install an electric heater there, it will become significantly warmer, but the energy consumption will also be noticeable. It is installed at the entrance from the balcony, but not next to the windows.
Central heating is out of the question; according to building codes, moving radiators onto the balcony is prohibited.
An acceptable solution remains - installing a heated floor on an electric cable or water system. The presence of a thermostat will make the use of heating even more convenient.
Warm floors will provide an additional source of heat in the house, especially if the loggia is connected to the living space.
To organize heating, you need to purchase an electric heating cable. A cement screed 3-5 cm thick is made onto the reinforced concrete, and a cable is mounted on it, securing it with polyurethane foam. The cable is filled with cement mortar, and the finishing floor is laid on top.
In cold regions, an additional layer of thermal insulation and waterproofing is installed under the cable.
Think over the design
Before starting work, you need to decide on the type of insulation, choose the option for wall finishing and finishing flooring, and also decide how the room will be heated. All this will determine the design and the algorithm for its installation.
Insulation
Since the insulation of a balcony or loggia is done from the inside, it is important to use a vapor-tight material to avoid the formation of condensation and the appearance of fungus.
instrumentgid.ru
Extruded polystyrene foam (EPS) is best suited for this. When installed with sealing of joints, it allows you to turn the room into something like a thermos, which will retain heat well by cutting off the outside cold. At the same time, with EPS you can achieve sufficient thermal insulation, taking away a minimum of precious space from the room.
Some people consider polystyrene foam to be toxic. This is not entirely true. The material is indeed flammable and releases harmful substances when heated above 60 °C, but this does not make it dangerous, since EPS is always covered with finishing.
Wall decoration
After good insulation, any type of finishing can be applied to the loggia or balcony. Depending on the chosen coating, the technology for thermal insulation works is slightly different.
- Wooden lining, PVC or MDF panels - to attach to the wall you will need to first make a sheathing.
- Decorative plaster or putty followed by painting - this type of finish can be applied directly to the insulation.
- Wallpaper - the easiest way to glue it is on drywall attached to a wooden sheathing.
Flooring
The floor of an insulated loggia is no different from the floor of a room, so all existing finishing coatings can be used there. However, for each type you will need one or another version of the subfloor.
- Laminate, linoleum, carpet are laid on sheets of plywood, chipboard (chipboard), CSP (cement particle board) or OSB (oriented strand board) fixed over wooden joists.
- Tiles and porcelain tiles are laid on a concrete screed.
Balcony floor slabs have low load-bearing capacity, so only floors on wooden joists are allowed on them. On more durable loggia bases, in addition to this, you can also pour a screed under the tiles.
In both cases, if desired, you can equip an electric floor heating system. The only difference is that a film infrared floor is used for the construction on the joists, and a heating cable or heating mats are used for the screeds.
Heating
It is important to understand that insulating a balcony or loggia will only prevent the walls from freezing and slightly increase the temperature compared to the street temperature. To maintain a comfortable microclimate in winter, you cannot do without a heating source.
There are three main ways to heat a room:
- Electric underfloor heating is the most expensive and difficult to install option, but at the same time the most effective and convenient.
- Convector - a heater installed near an external wall can be turned on only on the coldest days or only when there are people in the room.
- Central heating radiator - according to the law of the Housing Code of the Russian Federation, Article 25. Types of reconstruction and redevelopment of premises in an apartment building It is prohibited to move the device to a loggia or balcony, but if the partition is removed or the door is constantly open, the battery will cope with heating even from the room.
Types of materials for insulation
Today, there are a huge number of options for how to insulate a balcony from the inside. The choice of one option or another may depend on many factors:
- The amount you are willing to spend on insulation.
- Climate.
- Type of construction.
- Your personal preferences.
- Resistance of the material to frost, wind, moisture.
One way or another, before you start insulating the loggia, it is important to study in detail all the popular materials. This is the only way you can choose the option that suits you perfectly. We invite you to familiarize yourself with the most common insulation materials.
Expanded clay
It is made of clay, therefore it is considered an environmentally friendly and safe material. Expanded clay is small and light porous granules. Such weight and structure of the material can be achieved thanks to a special clay firing technology. The raw materials are first heated to approximately 1000 degrees, as a result of which voids are formed inside, providing heat and sound insulation. Expanded clay is used to insulate walls, floors, ceilings or even the foundation of a country house.
Advantages:
- affordable price;
- long service life;
- compliance with all fire safety standards;
- resistance to mold and mildew;
- the ability to take the required form;
- light weight.
Flaws:
- increased degree of moisture permeability;
- rather complicated installation of the material;
- Expanded clay is used primarily for floor insulation and is not suitable for other surfaces.
Mineral wool
The most common insulation for walls and floors. Outwardly, it resembles a thick canvas, which consists of many molecules chaotically intertwined. The raw materials for mineral wool are glass, rocks or slag. In order for the fibers to be reliably connected to each other, they are impregnated with special mixtures based on oils and alcohol. Mineral wool itself is divided into several other types:
- glass wool (consists of glass, stove and limestone);
- stone wool (made from basalt rocks);
- slag wool (made from blast furnace slag).
Advantages:
- low level of thermal conductivity;
- compliance with all fire safety standards;
- is not affected (deformed) by sudden temperature changes, heating and cooling;
- resistance to chemical and mechanical damage;
- vapor permeability;
- easy to install.
Flaws:
- moisture permeability (which can be reduced using special water-repellent agents);
- heavy weight.
Styrofoam
Perhaps the lightest thermal insulation material. It is a foamed mass that is more than 90% filled with air. It is thanks to this technology that it is possible to achieve good results and efficiently insulate the balcony. The popularity of polystyrene foam as insulation is also due to the large selection of materials. It is divided into the following categories:
- sheet;
- foam in balls;
- extruded polystyrene foam (which we will talk about a little later);
- liquid foam;
- foam formwork.
Advantages:
- low cost compared to other insulation materials;
- light weight of the material;
- good thermal insulation properties, allowing the use of a thinner layer of insulation;
- versatility (suitable for insulating floors, ceilings and walls);
- long service life (up to 30 years);
- resistance to the appearance of harmful microorganisms;
- easy to install.
Flaws:
- release of toxic substances during combustion;
- poor vapor barrier;
- release of harmful substances even at high temperatures (applies to cheaper options);
- absorbs moisture;
- not resistant to sunlight;
- unstable to mechanical and chemical damage.
Extruded polystyrene foam
Today, many people prefer to insulate their balcony with polystyrene foam. This material is a subtype of polystyrene foam and is also characterized by its low weight and good thermal insulation properties. Comparing polystyrene foam and expanded polystyrene, it can be noted that the materials have both common features and some differences. For example, the texture of the latter is not granular, but more even.
Advantages:
- low degree of vapor permeability;
- material strength;
- lack of water absorption, which allows the use of polystyrene foam without preliminary waterproofing;
- low degree of thermal conductivity;
- compliance with all fire safety requirements (non-flammability);
- resistance to high and low temperatures;
- environmental friendliness;
- ease of installation;
- resistance to mechanical damage.
Flaws:
- poor vapor barrier;
- high cost of material;
- instability to sunlight (corrected by special treatment of the material);
- additional costs for arranging the frame or purchasing glue.
Polyurethane foam
The basis for polyurethane foam is a subtype of plastic that has a foamed structure. Like some previous insulation materials, this material consists of 90% of a gaseous substance with which all its cells are filled. The use of various technologies has helped to create several types of polyurethane:
- Elastic (in other words, foam rubber), which fills sofas and armchairs, and is also used to make washcloths, shoe linings, etc.
- Hard – actively used for heat and sound insulation of a house.
Advantages:
- mounted on any material (concrete, metal, glass, wood, brick, etc.);
- light weight that does not weigh down the surface;
- can significantly strengthen the surface;
- resistance to sudden temperature changes, extreme heat and frost;
- compliance with all fire safety requirements;
- Thanks to the one-piece design, no seams or joints appear on the surface.
Flaws:
- not resistant to sunlight;
- Although the material does not burn, it begins to smolder strongly in an open fire. Therefore, you should not install polyurethane foam in rooms with a high risk of overheating or fire.
Penofol
It is one of the most innovative insulation materials for balconies. This material consists of several layers:
- Self-extinguishing polyethylene foam.
- Aluminum foil.
Unlike previous insulation materials, penofol is not able to absorb heat. Thanks to the foil, it works on a different principle, namely, it reflects thermal radiation. The material, in turn, is divided into several types:
- Type “A” - the foil is located on one side of the insulation.
- Type “B” – with foil on both sides.
- Type “C” – with a special self-adhesive insert.
Advantages:
- versatility. The material is used to insulate the walls of the floor and ceiling of the balcony. In addition, it is great for both interior and exterior decoration;
- low level of vapor permeability;
- provides high-quality sound insulation;
- light weight and thin structure;
- ease of installation;
- environmental friendliness;
- compliance with all fire safety standards.
Flaws:
- due to its high softness, penofol is not used when insulating walls under plaster;
- some types of penofol require fastening with special glue;
- will not be able to protect against severe frosts and is installed mainly as additional insulation.
Prepare surfaces
Take things out, remove shelves, hangers and other items. Clean the walls of old paint and plaster. If there are areas of fungus, remove it and thoroughly treat the areas with a special antiseptic, and then dry all surfaces thoroughly.
YouTube channel “We build for ourselves”
To prevent blowing, seal all cracks around the perimeter of the fence slab, as well as in areas adjacent to the side walls, floor and ceiling. Remove old plaster from the joints and fill them with foam.
The point is to cut off any flows of cold air from the street and make the room as airtight as possible.
The most common mistakes when insulating a balcony
There are several points that many people make mistakes when insulating a balcony on their own:
- Rush. Often, insulating a balcony is done in a hurry. Typically, this involves filling the cracks with putty, installing warm windows and plugging in the radiator. At the same time, the heat from the apartment continues to escape through the balcony, which is very surprising to its owner.
- Use of low-quality materials. Therefore, how to insulate the inside of a balcony is an important question that needs to be asked before starting work. A balcony is a fairly large space, so bad windows or improperly laid flooring can create a serious leakage of warm air.
A warm and comfortable balcony can become your favorite place to relax.
In order for the balcony and the entire apartment to be maximally protected from the cold, a certain procedure should be followed. This way you will save time, effort and get high quality insulation. If you want to learn how to insulate a balcony with your own hands, step-by-step photos will help you with this.
Install sockets and lighting
If you plan to use the insulated space as a work office or recreation area, you must install the electrical wiring in advance. To do this, install sockets, lighting and switches in the right places.
YouTube channel “We build for ourselves”
It is better to run the cables along the internal wall adjacent to the room. It is not insulated, so all the wiring will be easy to hide inside the frame or layer of plaster. Sockets and lighting can be connected from the nearest outlet in the room. But to power the heated floor, it is advisable to run a separate cable from the distribution panel.
An approximate action plan for insulating a loggia based on our own experience
The first day
We remove all foreign objects. We drill and tap the walls in those places where we plan to lay electrical cables, install electrical sockets and light switches. If there are any metal elements that cannot be dismantled without the loggia losing its strength, clean them of rust and cover them with any anti-corrosion polyurethane paint.
After this, carefully treat all walls, ceilings, and floors with an anti-fungus and mold product. If you don’t do this, you risk creating conditions for constant colds or even fungal pneumonia in a couple of years. Most treatment solutions are very toxic, so wear a respirator and wash the brush thoroughly (or buy a new one). Allow 24 hours for the solution to soak into the walls.
Second day
We coat all surfaces with primer (you can immediately begin further work, it dries quickly). We cover the walls with one layer of foil thermal insulation (foamed polyethylene foam coated with aluminum). To prevent it from falling off, we attach it with double-sided tape. At the same time, we carefully connect all the pieces of foil insulation edge to edge with metallized tape. We do not leave empty spaces; the coating must be continuous.
We line the right and left walls of the loggia, the ceiling and the front part (also known as the parapet). If you have little skill in construction work, start with any of the walls, with the exception of the ceiling.
Next, we apply a second layer of insulation in the form of sheets of extruded polystyrene foam. To keep them in the wall, we use plastic umbrella nails (about five per sheet, plus at the joints to guarantee against delamination). The main wall of the building was not additionally insulated; later, like everything else, it was covered with plasterboard.
Please note that umbrella nails must have plastic cores rather than regular metal nails (you will need to pre-drill the wall to drive them into the wall). Do not throw away the scraps, but put them in a bag separately, we will need them later.
When everything is ready, carefully fill all the joints of polystyrene foam sheets, random voids, and places with driven nails with polyurethane foam.
Day three
We lay sheets of extruded polystyrene foam on the floor. To save money, you can use saved trimmings and pieces - the main thing is that they are laid in a dense layer. There is no need to attach the created shield to the floor; gravity will do it for us.
We fill the resulting structure with a sand-cement mixture (CPS) so that it covers the insulation layer by 2-3 cm. Please note that you can take the cheapest option, which literally delaminates before your eyes when mixed - this does not matter in this case stage.
Now we will need a break of at least two days for everything to harden.
Day four
If you live in a cold climate, you can cover the walls and ceiling with another layer of foil. Personally, I did this with the parapet.
It should be noted that the front wall can additionally be lined with mineral wool: after all, the more heterogeneous layers we have, the better the protection from the cold.
Most recommendations advise to stuff wooden slats and attach sheets of lining, PVC or drywall to them. (An example of finishing a balcony with PVC panels.) However, you don’t have to lose so much space - wooden plates as thick as a parquet floor plate are enough - the main thing is that there is a gap for air, which will play the role of an additional insulator. In my case, it was decided to use drywall, which was treated with a primer for greater protection from moisture.
We cover the walls with plasterboard.
Before installation, stretch the electrical cable to future sockets and lighting (in order not to forget to do this, you can attach coils of wire to double-sided tape in those places where it should “dive” under the casing). We lay foam rubber along the windows, since there is always a possibility of freezing and deformation of these areas.
Day five
Make sure there is space to install the window sill.
Brackets for installing a window sill.
Consider its thickness in advance and, if necessary, install stops (this is especially true if the family has small children or adults who like to lean their entire weight on it).
Day six
We install the window sill - in my case it was a regular plastic version, which was installed with glue.
The heads of the self-tapping screws used for fastening drywall and the joints are carefully puttied so that the final surface is as smooth as possible.
If the wallpaper is very light (in our case this was the case with white ceiling tiles), we additionally apply a layer of light putty.
The ceiling was covered with white plastic tiles.
Fill the floor with self-leveling mixture. Here it is advisable not to skimp and purchase a high-quality option so that the floor becomes even and smooth.
Since the final layer will be only 1-2 cm high, after 24 hours you can begin further work.
Day seven
We lay the underlay and laminate on the loggia floor. The article “Which substrate for laminate to choose?” will help you choose the right substrate.
Preparation for laying laminate flooring on the loggia.
The last stage was the installation of sockets, switches and lamps in the places where they were planned. In addition, plants and bookshelves were moved here.
For two years now we have been enjoying the additional warm area of the loggia, for which we, like everyone else, used to simply pay rent (you can see this by looking at the receipt).
The result of our work on insulating the loggia.
Learn the technology of working with EPS
Expanded polystyrene is sold in the form of slabs measuring 60 × 120 cm and thicknesses from 20 to 150 mm. The sheets have an L‑shaped lock along the contour, which simplifies installation and prevents blowing through the joints.
You can attach EPS to walls in different ways. The most common is foam adhesive in cans, which is applied around the perimeter of the sheet and in the middle. Another option is to fix it in the corners and in the center with umbrella dowels with a plastic or metal core. Also, polystyrene foam is attached over the entire sheet area using adhesive mixtures for insulation.
To form a single thermal insulation contour, all junctions must be sealed. It is important to leave 10-15 mm gaps at the walls in the corners, under the ceiling and at the floor, so that you can fill them with polyurethane foam later. It is recommended to coat the joints in the locks between the plates with foam adhesive or seal them with foil tape.
YouTube channel DendenTV
The required thickness of insulation can be achieved either with one sheet or with a combination of two. In this case, the second option is even preferable, since the fragments of polystyrene foam are tightly adjacent to each other and form a single layer, and by shifting the joints between the plates, maximum protection against blowing can be achieved.
After completion of the work, you should end up with an inextricable structure, where each EPS sheet fits tightly to the adjacent one, and all joints between them in the corners, under the ceiling and near the floor are sealed with polyurethane foam.
Ceiling insulation
If you are planning to insulate a balcony with your own hands, then it is best to start from the ceiling and move further from top to bottom. Of course, if the ceiling of your loggia is the floor of your neighbors, then the process of protecting the room from frost and wind is much simpler. However, if the roof is independent, then a little effort should be made to insulate it.
To best protect your balcony from cold and wind, we recommend performing the work in the following sequence:
- Spraying or special film for sound insulation.
- Waterproofing the ceiling on the balcony. In this case, the most popular materials are polyvinyl chloride or polyester.
- A special membrane that protects from wind. It freely allows steam to pass through, which is released from the insulation, but helps to completely isolate the ceiling from wind and drops that can enter the room along with it.
- Anti-condensation material that protects the insulation from the formation of water droplets.
- Frame (metal or wood of your choice). The sheathing is an optional element. The insulation can be installed using special glue. The main thing is to make sure that the mixture does not contain toluene. For greater reliability when fastening sheets, use dowels.
- Insulation for balcony ceiling. We recommend that you use polystyrene foam, polystyrene foam or mineral wool. They provide good protection from the cold and are easy to install, which is especially important when insulating a balcony ceiling.
- Vapor barrier for insulation. It does not allow water vapor to pass inside, which significantly increases the thermal insulation properties of the material.
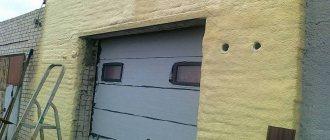
Insulate the parapet
The fence slab borders the street and is exposed to cold air the most, so the thickness of the thermal insulation here is maximum - 80 mm. It is better to use not one 80 mm sheet, but a “pie” of slabs: 50 + 30 mm.
YouTube channel “We build for ourselves”
If dimensions allow, the wooden sheathing is mounted on top of the second layer of EPS, securing the bars with anchors or dowels directly through the insulation. When the width of the window sill is limited, the sheathing is attached to 50 mm polystyrene foam, and the second layer of insulation is laid between the frame bars.
If plaster is chosen as a finish, you can do without constructing a frame. In this case, the mixture is applied directly to the surface of the EPS. For better adhesion, the sheets must be treated with a grater or scratched with a regular hacksaw.
Insulation methods
The most effective and correct method from a physical point of view is external insulation. Installing an insulator outside cuts off the effects of low temperatures on the outer surface of the walls and allows them to retain thermal energy. However, when it comes to the balcony, the situation changes significantly:
- external installation of a heat insulator is complex and dangerous and requires the participation of industrial climbers;
- the glazed balcony has few surfaces that allow the installation of insulation;
- the floor and ceiling slab become areas of active leakage of thermal energy, which can only be stopped by insulating these surfaces with neighbors below and above.
External insulation forms a cocoon of heat insulator, which prevents the leakage of thermal energy into the surrounding space.
With this method, the heat-saving properties of walls and other fences are fully used, enhanced by the insulating material. Installing insulation from the inside has serious disadvantages. An insulation layer is formed that cuts off external walls and fences from contact with warm internal air. Only the heat insulator retains heat; all external fences now become only a physical barrier to wind, precipitation or outside intrusion. If the thermal insulation layer is not thick enough, instead of a positive effect, you can get the opposite effect - cold surfaces will actively absorb heat, reducing the temperature in the apartment. There is another disadvantage of internal insulation. The air in the apartment is saturated with water vapor. Under normal conditions, it is absorbed into the walls, passes through them and is gradually released outside. With external insulation, the removal of moisture does not stop, but installing a heat insulator from the inside stops this process, forcing water particles to settle on the surface of the insulation. In addition, steam actively condenses on cold surfaces and settles on metal elements, causing corrosion and premature failure. The solution to this problem is quite accessible - you need to organize high-quality supply and exhaust ventilation, which will provide the necessary air exchange and remove excess water vapor. In addition, you must use only moisture-proof material, or make an additional vapor barrier.
It is necessary to understand that insulation from the inside is a necessary measure. However, it has some advantages:
- you can work independently, at a time convenient for you;
- installation is carried out in favorable conditions, does not depend on the weather, time of day, temperature, etc.;
- all surfaces are in direct access, there is no danger when installing the heat insulator.
The need to install a rigid layer of sheathing exists in both cases, both for the external and internal versions. But the conditions for finishing from the inside are much more convenient and safer than during external work at height and under the influence of weather or climatic factors, which is also an advantage of internal insulation of the balcony.
Insulate the walls
YouTube channel “We build for ourselves”
For walls, a 50 mm layer of EPS is sufficient. The work is carried out according to the same principle. If necessary, the sheets are cut to the required size with a sharp knife. To join the pieces together, an L-shaped lock is formed at their ends using the same knife.
It is better to insulate in two layers (30 + 20 mm), and attach the frame on top of the EPS. But if the window is installed without additions and the space is limited by the width of the frame, the second layer of polystyrene foam can also be laid between the frame bars.
YouTube channel "XPS TechnoNIKOL"
If you are going to plaster the walls in the future, then lathing is not needed. It is enough to secure the sheets and roughen their surface with a grater or hacksaw.
Wall insulation
The optimal materials for wall insulation are penoplex and polystyrene foam (extruded or granulated polystyrene foam). They are installed in two ways:
- placed between the sheathing strips, which simultaneously serve for installation of the sheathing;
- are tightly installed on the wall surface using contact adhesive.
The first option requires preliminary installation of the sheathing, but installing the heat insulator and installing the sheathing is simpler and does not take much time. The second method allows you to immediately glue foam or polystyrene foam to the walls using compounds for laying tiles. However, finishing such insulation is more difficult - it will require attaching a fiberglass mesh to the surface and continuous plastering of the entire surface. The process is more labor-intensive and messy, but the result is very attractive and allows you to apply different types of finishing - from textured painting to decorative plaster.
The final choice is determined by the preferences and capabilities of the owner, and the availability of skills to work with a particular material. The main task is to exclude the appearance of cold bridges - areas with a lack of insulation, which will become places where condensation appears and the destruction of all adjacent materials.
Insulate the ceiling
The ceiling borders the neighbor's apartment, not the street. Therefore, the same layer of EPS as on the walls is sufficient here - 50 mm. Laying is done according to a familiar principle. Fastening of your choice: glue-foam, dowel-umbrella, adhesive mixture. Expanded polystyrene is a very light material and is securely attached to the ceiling solely with glue.
YouTube channel “We build for ourselves”
When installing, pay attention to the height of the windows. If the frame is installed right up to the ceiling without additional profiles, then due to the thick layer of insulation, the window sashes may not open. Take into account the thickness of the sheathing and finishing so that after installation there is a gap of at least 5–7 mm to the sash.
Insulation of the ceiling or roof of a balcony
Work should begin with the design of the ceiling slab or balcony roof if the apartment is located on the top floor.
The optimal type of heat insulator would be polystyrene foam or polystyrene foam, which are light in weight and have sufficient rigidity. Let's consider the procedure: 1. The ceiling slab is marked for installation of the sheathing. The installation step of the planks is equal to the width of the insulation boards; the arrangement of the planks is usually transverse. 2. Direct drywall hangers are installed. They are easy to install and allow you to adjust the position of the sheathing strips so that they form a horizontal plane.
3. Sheathing strips are attached to direct hangers. Unlike all other options, wooden blocks are optimal for insulating the ceiling. Screws fit into them more easily, they will not overload the ceiling slab or create cold bridges. The location of the planks is chosen so that their tops protrude slightly above the heat insulation slabs, pressed tightly against the ceiling slab. First, the outer planks are installed, then the control cords are pulled and the remaining bars are installed along them.
4. Install insulation boards. They are tightly inserted between the lathing strips until they touch the ceiling. All cracks or gaps are immediately filled with polyurethane foam.
5. After the installation of the heat insulator is completed, decorative sheathing is installed, which is attached to the protruding strips of the sheathing. The best option is to use plastic panels that are visually attractive, lightweight, neat and easy to install. If necessary, ceiling lights can be installed on the panels.
Insulate the floor
To insulate the floor, you will need EPS with a thickness of at least 50 mm, or better yet, 80 mm in two layers. Extruded polystyrene foam has a high density and can withstand loads of up to 30 tons per square meter, so it can serve as a floor base.
YouTube channel "XPS TechnoNIKOL"
After installation on the EPS, it is enough to lay down plywood, chipboard, DSP or OSB - and on top you can lay a finishing floor covering like laminate or linoleum. When installing a heated film floor, you must first lay penofol or other heat-reflecting substrate.
YouTube channel “Vladimir Odorov”
For laying tiles or porcelain tiles, a reinforced cement screed is poured directly onto the EPS, into which, if desired, cable underfloor heating or thermomats can be installed. If the heating elements are small in thickness, they can be easily placed in a layer of adhesive when laying tiles.
The floor on a balcony or loggia is always lower than in the room, so many people prefer to bring them to the same level and remove the step. This is done using logs made of wooden beams 50 × 50 mm or 40 × 40 mm.
YouTube channel “We build for ourselves”
First, transverse logs are laid in increments of 40–60 cm and secured to the slab with anchors. Then the gaps between them are filled with insulation and foamed, and longitudinal logs with a similar pitch are attached on top and leveled. Next, a second layer of insulation filled with foam and plywood or other sheet material is laid.
How to insulate a balcony with your own hands step by step photo
1. Cleared the balcony of everything unnecessary. Before the technician arrived, we cleaned our balcony of rubbish and debris, a window was already installed and heating radiators were installed.
2. Patching “holes” in stained glass windows using TechnoNIKOL Technoplex insulation boards. This did not affect the appearance of the house in any way, and for us the problem of eternal drafts was solved. The slabs were laid in two layers, all cracks were filled with polyurethane foam.
After taking measurements, cutting the slabs is done using a jigsaw and a hacksaw for metal.
3. Exiting electrical wiring to the balcony. In my workshop it was planned to install three sockets for sewing machines and a laptop; the wires were pulled from the nearest socket in the kitchen.
4. Insulation of the floor using beams and TechnoNIKOL Rocklight insulation (mineral wool). According to our master, he likes to work with this type of insulation most of all. Since when placed between the beams, it expands on its own and does not leave any gaps, which means it does not require the use of polyurethane foam.
Although basalt wool and glass wool are two different things, I still played it safe and carefully closed the door to the balcony while he was laying the floors. And then I vacuumed all the walls for an hour. Our master, of course, laughed for a long time when he saw me walking around in a medical mask and gloves. For me, any mention of glass wool is a fear from childhood, when we ran around a construction site and accidentally touched glass wool, any of us received a burn, after which it itched and burned for a long time.
First, a frame or so-called formwork for the future floor and walls is assembled from wooden blocks. The slats are fastened together with metal corners using dowels and a screwdriver.
If the frame is laid on concrete, then first, using an impact drill, holes are drilled on the concrete floor at the fastening points. Then dowels are inserted into the wooden logs, applied to the fastening points and the screws are driven in with a hammer.
Mineral wool mats can be laid directly on a concrete screed, in a wooden frame between the joists. It does not shrink at all, so it is used even on high-traffic surfaces.
To give the floor additional thermal insulation properties, you can build a second lathing frame on top of the first layer of basalt wool insulation and lay another layer of TechnoNIKOL Rocklight in the same way. In this case, the wooden blocks are attached with a screwdriver to the screws.
Next, an isolar layer is used - this is a metallized substrate that reflects heat and protects from moisture; it is widely used to create a warm balcony (loggia). After laying all the layers of building materials, we reached the same floor level as the room without thresholds or steps.
Important (!) - the metallized substrate is laid with the reflective surface facing up.
5. Insulation of the ceiling using TechnoNIKOL Technoplex insulation. We had two wires installed in our ceiling for the ceiling lights. Therefore, before proceeding with the installation of the ceiling, electrical wiring was installed under the wooden beams. I really like this method - it looks neat, without unnecessary wires. Electricians from Bangkok have a lot to learn from Bashkir masters)
6. Insulation of walls using TechnoNIKOL Technoplex insulation.
The main difference between nanographite insulation and basalt wool is that it is not elastic. Therefore, when installing it in the sheathing, gaps remain, which then need to be filled with polyurethane foam.
After all the joints have been processed, a metallized Isolar substrate is applied on top of the insulation. It is attached to the sheathing using a stapler and special adhesive tape (connecting tape) - isospan.
After covering the entire surface with a metallized substrate, sheets of plasterboard are attached to the wooden sheathing using self-tapping screws and a screwdriver.
Finish
At the very end, the ceiling, walls and floor are finished. If plaster is chosen, then a reinforcing mesh is glued onto the sanded EPS surface, and then two layers of plaster and paint are applied.
YouTube channel “Vladimir Odorov”
When covering with clapboard, plastic or MDF panels, molded materials are attached to a wooden frame on the walls and ceiling.
YouTube channel “Loggias. bye"
For wallpapering, the easiest way is to cover the walls with moisture-resistant plasterboard. Use the sheathing as a frame, seal the joints between the sheets with putty and, having primed the surfaces, stick the wallpaper.
Lay the flooring
The final stage of finishing is installation of the finishing floor. Laminate or linoleum is laid on the previously prepared base. If you plan to have a warm floor, then it is installed first. Next, the baseboards are installed.
YouTube channel “We build for ourselves”
The exception is tiles. Due to wet processes during installation, it is better to install it at the stage of floor insulation and before starting to work with the walls.
Installation of double-glazed windows
The first stage from which the insulation of any room begins is the installation of modern double-glazed windows. If you have old wooden frames, then a very large amount of heat escapes through them, no matter how you insulate them. But when installing double-glazed windows on a balcony, there is one nuance that distinguishes it from other rooms - a parapet. On many old balconies it is not strong enough to support the weight of heavy metal-plastic windows. In this case, it will have to be further strengthened.
The dilapidated parapet on the old balcony needs to be strengthened with additional reinforcement
Before insulating a balcony with your own hands, you need to decide on the material of the window structures - these can be frames made of PVC, aluminum or wood.
Stages of work on insulating a balcony
Properties of different types of windows
Wooden frames are the cheapest, but not the best option in terms of window properties. Wooden frames do not retain heat well and are not airtight. They should only be used if there is no severe cold in your latitudes.
Aluminum windows are more expensive, however, they retain heat better. In addition, they are the most reliable and durable, excellent resistance to corrosion and other negative influences.
The frame for the window frames must be securely fastened
PVC frames are the best option in terms of price and quality ratio. Polyvinyl chloride is not afraid of dampness and temperature changes. It is not as stress-resistant as aluminum, but it provides the highest level of thermal conductivity.
How to insulate a balcony to keep it warm in winter? The following types of windows are well suited for this purpose:
Metal-plastic windows with double-glazed windows are the best option for insulating a balcony