Is it possible to insulate a balcony with penoplex?
As for the general issue of insulation, this can be done under one condition. The loggia must first be glazed, otherwise the entire process of laying thermal insulation does not make sense. If we talk specifically about penoplex, then this is a modern type of insulation. It has replaced the popular foam plastic and is gradually displacing it from the construction market. The popularity of penoplex is explained by its improved characteristics. First of all, the material is more resistant to mechanical stress.
Penoplex is considered a good material for thermal insulation of a loggia.
We can say with confidence that thermal insulation boards are ideal for balconies. Typically, the loggia is insulated with penoplex under lining, drywall, plaster or other finishing material. The slabs can be laid on the floor or sheathed on the ceiling. Penoplex is attached to the walls both inside and outside the balcony. Here you can choose according to your wishes. However, slabs of a certain density are used for each element of the building. The material is resistant to large temperature fluctuations and is equally suitable for use in southern and northern regions.
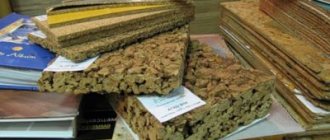
Important! Penoplex is a trademark, not the name of the material. In fact, the insulation is made from extruded polystyrene foam boards.
Thermal resistance standards
It has already been written above what indicators make up the standards for thermal resistance. It should be remembered that thermal conductivity is how well a material conducts heat, and thermal resistance is how well it retains heat. Therefore, when choosing wall materials and insulation, you should choose those that have a high coefficient of thermal resistance.
The thermal resistance coefficient of the wall is calculated using the formula:
R (thermal resistance of the wall) = thickness in meters / thermal conductivity coefficient of the material in W/(m·ºС).
This coefficient does not have to be calculated independently, since there are ready-made tables that indicate the required thermal resistance for the region. The greatest requirements are for cities such as Anadyr, Yakutsk, Urengoy and Tynda. The smallest ones are for Sochi and Tuapse. In Moscow, the coefficient should be at the level of 3.0 W/(m·ºС), in the northern capital – 2.9 W/(m·ºС).
Requirements for thermal resistance apply not only to the walls of the building, but also to the ceilings and windows. You can make calculations using the same formula, but you can find the data on the Internet or at a construction company.
Taking into account all the data, we will obtain a formula for calculating the thickness of insulation for an internal wall. It looks like this:
Rreg – regional indicator of thermal resistance (ready data or independent calculation);
δ – thickness of the heat insulator;
k is the thermal conductivity coefficient of the insulation W/m2·ºС.
Now let's take a closer look at the thermal resistance coefficients for a load-bearing wall and the parameters that affect thermal insulation.
Pros and cons of insulating a loggia with penoplex
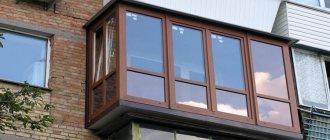
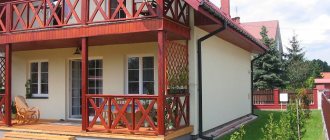
The main advantage of insulation is the fact that the balcony can be used as a living space. If we consider individual points, they are closely related to the negative and positive qualities of the material itself.
After insulation, the balcony can be used as a living room
Pros:
- Penoplex is an improved type of foam. Instead of compressed white balls, polystyrene foam has a cellular structure. The size of each cell does not exceed 0.2 mm, and they are sealed. Hence, increased strength indicators and lower thermal conductivity.
- Like polystyrene foam, insulation is easy to install. However, penoplex does not have the property of crumbling and breaking easily when folded.
- The low moisture absorption rate makes it possible to use penoplex to insulate damp balconies located on the north side of the building and shaded by trees.
- The material can withstand an operating temperature range from - 50 °C to + 75 °C. If you insulate the loggia parapet with penoplex in the north or south, the material will last the same long time, maintaining its properties.
- Lightweight slabs do not exert much pressure on the balcony slab and are considered fireproof.
One of the disadvantages is the instability of polystyrene foam to sunlight. However, the thermal insulation on the balcony is hidden under the finishing, which protects it from destruction by ultraviolet radiation. Fire safety is also conditional. Penoplex does not support combustion, but smolders when exposed to an open source of fire, releasing acrid, choking smoke.
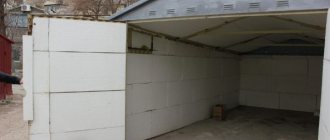
How to prepare a balcony for insulation with penoplex
The insulation process always begins with preparing the loggia. It is important to understand that thermal insulation must be installed on all elements of the balcony: floor, walls and ceiling. If one of the areas is not insulated, there will be no benefit from the process itself. For this reason, it is necessary to prepare all elements of the loggia structure at the same time.
To freely carry out work, the balcony is cleared of unnecessary things
The preparatory process consists of the following steps:
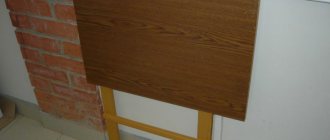
- There is not enough space on the balcony. It will not be possible to insulate each section of it by rearranging things. Everything unnecessary is taken out, leaving free space.
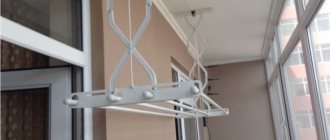
- Lighting fixtures, hooks, hangers, and other elements are removed from the walls and ceiling.
- All old finishing is removed. If the walls have durable cement plaster, then you can leave it. The finishing coating is removed from the floor to the balcony slab.
- If the loggia is not yet glazed, install energy-saving double-glazed windows with two or three glasses.
- Wiring is laid on the walls, sockets and a switch are installed. All wires are placed in a corrugated pipe or special channels.
- The loggia is completely cleaned of dust. To prevent the formation of fungus in the form of black spots in the future, the step-by-step instructions for insulating a balcony with penoplex with your own hands includes a mandatory preparation item. All brick and concrete structures are treated with a primer with antifungal components.
To install penoplex, you will need a simple set of tools.
While the balcony dries after treatment with a primer, prepare materials and tools. First of all, you will need insulation boards, waterproofing, polyurethane foam, glue, self-tapping screws, and umbrella dowels. Depending on the method of insulating the floor, you need timber for the logs with a cross-section of 50×50 mm or cement for arranging the screed.
The simplest tool is prepared: a knife for cutting slabs, a level, a tape measure. If the balcony floor is wooden, you will need a saw, plane, hammer, and ax.
Advice! It is optimal to use foiled polyethylene foam as waterproofing and additional insulation. It can be attached to a wooden base using staplers.
What type of penoplex is needed to insulate a loggia?
Thermal insulation boards vary in size and thickness, but these are not the most important parameters. Penoplex under different labels differs in physical and mechanical properties. It is based on these parameters that the appropriate material is first selected.
Penoplex slabs under different markings differ in physical and mechanical properties
Expanded polystyrene with the marking 31C is considered the softest. This type of penoplex is used to insulate a loggia under plaster or other finishing coating. Moreover, the slabs will go not only to the walls, but also to the ceiling. There is no pressure in these areas of the loggia, but the floor needs stronger material. Here they use penoplex with marking 35. The density of the material is enough to withstand the pressure of the furniture installed on the balcony.
What thickness of penoplex is needed to insulate a balcony?
Penoplex slabs are produced in thicknesses from 20 to 100 mm. The thinnest material comes with smooth edges. The manufacturer equips expanded polystyrene with a thickness of more than 20 mm with a locking connection for ease of installation. The thicker the slab, the warmer the balcony will be. However, it must be taken into account that insulation from the inside takes up free space.
The thickness of penoplex, depending on the brand, varies from 20 to 100 mm
Material 50 mm thick is suitable for walls and ceilings. If this is not enough, then the walls of the loggia can be additionally insulated from the street side. The thickness of the thermal insulation for the floor is selected individually. Taking into account all the above layers and the finishing coating, the floor plane of the loggia should not be higher than the threshold. It is optimal when the floor of the balcony and the adjacent room are on the same level.
Summary
Unfortunately, when designing the arrangement of a loggia or balcony, you often have to make compromises. For example, giving up the dream of “French” glazing from floor to ceiling in order to get a warm room within a moderate budget. The only thing you shouldn’t skimp on is the quality and thickness of the insulation. The use of extruded polystyrene foam is more expensive than polystyrene foam and mineral wool, but it pays off within a period of about 5 - 7 years. In addition, working with penoplex yourself is much easier than with mineral wool.
How to properly insulate a balcony with penoplex
There are two ways of insulation: from the inside and from the outside. The best option is considered to be a combined method, but it is reasonable to use it for northern regions with cold climates. In any case, the interior work is done first.
How to properly insulate a balcony with penoplex from the inside
Preliminary preparation of the loggia is not sufficient to begin insulation work. The surface of the walls, floor and ceiling is inspected. If cracks are detected, putty is applied. If the balcony slab is severely damaged, fill in a leveling screed.
Before insulation begins, all cracks and potholes are puttied.
The simplest and most fashionable solution is to insulate the balcony with penoplex and cover it with PVC panels or other finishing material. You can use plaster as a finishing touch, but such work is more difficult and requires experience.
Wall cladding begins at the corner of the glazed facade and moves towards the blank wall of the building. First, waterproofing is installed. The next layer is optimally to fix the foamed polyethylene with the foil side on the wall.
It is optimal to place foil-foamed polyethylene under the penoplex
After taking measurements, cut the slabs of the required size with a knife or hacksaw. Foam glue is applied to the fragments one by one on one side and pressed tightly against the wall. Each tile is drilled through, making a hole in the wall for a plastic dowel-umbrella. Fasteners provide additional fixation.
After insulating all sections of the loggia walls, the remaining cracks are filled with foam. It is best to seal the joints of the plates with foil tape. In the future, if plaster is chosen as the final finish, the walls are primed, puttied using reinforced mesh, and beacons are installed. When the lining is not satisfactory, and there is no experience in applying plaster, insulating the loggia with penoplex and plasterboard is an excellent alternative. To attach gypsum boards to the walls, a lathing made of slats or profiles is installed. The thermal insulation is covered with a vapor barrier.
The technology of ceiling insulation is similar to the method of wall insulation
A further scheme for insulating a balcony with penoplex involves working on the ceiling. The insulation is attached exactly as it was done on the walls, but there are small nuances. They are related to the height of the ceiling and the selected finishing material.
Sheathing with plasterboard or clapboard requires the creation of sheathing. The pie thickens significantly. If the ceiling of the loggia is low to the upper lintel of the doorway, the finishing cladding will protrude beyond its boundaries and will interfere. To reduce the thickness of the pie, the sheathing elements are attached not on top of the foam, but directly to the balcony slab. Thermal insulation is placed between the guides so that it fits tightly without gaps. Next comes the standard procedure: laying a vapor barrier, installing the sheathing.
The loggia floor is insulated with or without joists under a screed
There are two main ways to insulate a loggia floor:
- According to the lags. The technology is based on arranging a wooden floor. First, the balcony slab is covered with waterproofing, and leveled timber logs are secured with anchors. Penoplex is mounted on glue between the elements. The cracks are filled with polyurethane foam. Boards or particle boards are laid on the logs.
- Under the screed. In this method, the balcony is first insulated with penoplex foam using adhesive foam, that is, the slabs are glued to the balcony slab without using logs. Waterproofing needs to be done. A “warm floor” system can be laid on top of the penoplex. In this situation, a concrete screed with a thickness of at least 7 cm is poured. If the floor is simply not heated, the screed is poured with a thickness of at least 4 cm.
Advice! If desired, insulation of the floor on the loggia can be done without screeds or joists. To do this, glue the thermal insulation with foam. Plywood or particle boards are laid on top, laminate, linoleum or other finishing coating is laid.
In the video, the insulation of the loggia with penoplex:
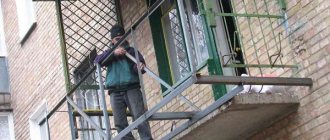
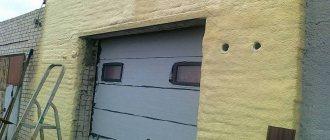
How to insulate a balcony with penoplex from the outside
The difficulty of external insulation lies in carrying out work at heights. Additional devices will be required that are available only to specialized teams. Only the walls of the loggia are insulated from the outside. Penoplex is attached in a similar way: glue is glued with foam, fixed with dowels-umbrellas.
Due to the complexity of work at height, it is better to trust external insulation of a loggia to specialists
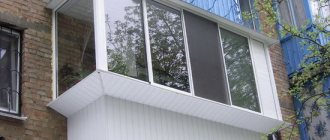
There are two options for cladding: plaster or siding. In the first option, the “bark beetle” is considered popular. Decorative plaster is applied directly to the thermal insulation. After drying, paint with facade paint.
Siding involves the arrangement of a ventilated facade. Lathing is attached to the walls. Penoplex is covered with a windproof membrane. Siding panels are fixed to the sheathing elements.
What are thermal insulation boards attached to?
The choice of method for attaching EPS mats depends on the coating itself on which installation is taking place, as well as the operating conditions of the balcony. For fixing to concrete, stone and brick walls use:
- Mastics. For gluing to a bitumen-polymer composition, a special gun is required. The mastic is applied to the edges and center of the slab, then pressed to the surface. Within an hour, the penoplex can still be moved.
- Cement mixtures. The dry powder is diluted with water according to the instructions on the package and infused for 2 hours. After this, apply the mixture onto the panel with a notched trowel and press it against the base for several minutes.
- Glue. Special adhesive compositions may contain cement in their formula. The adhesive is applied to the EPS board in spots, stripes or in a continuous layer. After this, the penoplex is pressed to the surface. The adhesive method requires additional fixation with dowels.
- Adhesive foam. A special polyurethane foam binder ensures good adhesion of the balcony wall to the penoplex. The foam is distributed along the edge and center of the slab. Press the product onto the base for 20 minutes.
- Liquid Nails. This fixative is used in small areas, since over a large area the cost of glue increases significantly. The product is applied pointwise: along the perimeter and in the middle. Penoplex is pressed to the surface for one minute.
- Disc dowels. Mechanical fasteners are used simultaneously with glue. The hole for the dowel creates a passage for cold air, so the cap should not rise above the surface of the slab.
- Self-tapping screws. This type of fixation is used if there is a wooden base. Before tightening the screw, place a washer under the head.
To attach penoplex boards to the loggia wall, it is not recommended to use polyurethane foam, since it does not hold EPS.