Selecting panels for further use
In order to avoid possible mistakes that may be made when purchasing plastic panels, you should familiarize yourself with their characteristic features and varieties before visiting stores, since their huge variety can turn your head. The first step is to purchase certified material, since low-grade products have a fairly low level of strength and are suddenly subject to burnout.
The advantages of plastic panels include a number of the following qualities:
- Easy to attach.
- Fire safety.
- Long period of operation.
- Increased resistance to the negative effects of moisture.
- Hygiene.
- Resistance to various microorganisms.
The disadvantage of this material is its low shock tolerance, which is why great care must be taken during transportation and installation work.
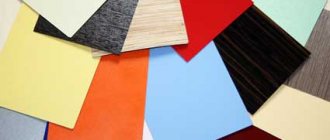
Depending on the type of coating, they can be matte or glossy. Based on the application technology, images are divided into printed and film varieties. Their standard dimensions are:
- length – 2.7-3 m;
- width – 20-35 cm;
- thickness – 8-10 mm.
The strength of plastic panels depends not only on their thickness, but also on the number of stiffeners that are located inside them. To determine the strength level of the material, you need to press its surface with your finger. The appearance of a dent indicates that its service life is short.
In addition, you should avoid purchasing material that:
- deformed or has damaged stiffeners;
- with scratches on the surface;
- differs in tone color;
- has a fuzzy or blurry pattern on the outside;
- varies in size.
Glue mounting
If the walls are fairly smooth, then work can be carried out without using a frame. Liquid nails are used as fasteners.
When choosing an adhesive, you need to pay attention to its composition. It must not contain solvent. Otherwise, the lining will simply collapse.
Preparation
When decorating walls with PVC panels with your own hands is done using the adhesive option, then the preparation of the walls is approached most carefully. It will not be enough to simply remove excess - you need to completely clean the surface. And in some cases, create a new layer of putty. And be sure to apply an antibacterial primer.
On a note! Currently, there are types of putty that include antifungal substances.
Pasting
The whole process must happen quickly enough, and all movements must be verified. The fact is that it will be almost impossible to correct the shortcomings. That is why this method requires some skills.
Installing plastic panels with glue
So:
- The primer layer should dry well. After all, finishing with plastic cannot be done on a wet wall. Nothing will stick.
- The glue is prepared according to the instructions. When canned formulations are used, they are thoroughly mixed beforehand.
- For work, use a special gun, roller or brush. The area of application of the adhesive composition should not exceed two structural elements.
- The corner element is installed first. The lining is inserted behind it and pressed against the wall. This needs to be done without extra effort, and even more so without precise pressure. It is very easy to damage the cellular structure of the material.
- So, sequentially, they cover the entire area with plastic with their own hands. At the end, the finishing moldings are fixed.
- Now comes the turn of decorative elements.
Wall panels can also be finished using adhesive tape. This method is not yet sealed, so you should not trust it. And the point is precisely in the tape used. Its quality does not always meet the required parameters.
Of course, each master can offer his own variations, which certainly deserve respect. But, when real experience is insignificant or completely absent, then it is better to go along the proven path, even if it takes a little longer. After the first success, it will become extremely clear: how to cover the walls with plastic.
Preliminary calculations of the amount of material needed
In order to avoid purchasing surplus and repeated visits to the store, the first thing you should do is determine the optimal number of linings needed for finishing. The material can be mounted in a vertical or horizontal position depending on personal wishes.
In the first case, calculations are carried out as follows: the elongation of the room along the perimeter is measured, from which the width of the openings is subtracted, and the resulting indicators are divided by the width of one plastic panel. To the resulting number you should add 2-3 products as spare ones.
When performing a horizontal installation, the area of the room is measured with the openings of windows and doors taken away. The resulting number must be divided by the area of 1 panel. In this case, at least 10% of spare products should be purchased, since the amount of scraps increases. In addition, it is necessary to count the number of slats that will be used for arranging the sheathing and as fasteners. First of all, the height of the walls must be divided by the pitch of the frame. Basically, this figure reaches 50 cm, after which it needs to be multiplied by the perimeter of the room. The resulting value indicates the length of the slats in linear meters. By measuring the height of the corners and multiplying the resulting number by their number, the full footage of the corner profiles will be obtained. To this indicator you should also add the perimeter of the openings of windows and doors.
Advantages and disadvantages of wall paneling
Before you start choosing finishing materials, you need to find out all the pros and cons of specific options. In the case of wall panels, the advantages will be:
- wide selection of panels in the budget segment;
- durability and strength of most options;
- ease of installation and replacement of damaged fragments with new ones;
- ease of care without the use of special products;
- heat and sound insulation properties (especially in combination with additional insulating materials);
- Possibility of installation without preliminary leveling of the surface;
- the ability to hide various wires, pipes, etc. behind panels.
Of the disadvantages of panels for wall decoration, repair specialists note only one - their ability to reduce the footage of the room by several centimeters. The fact is that in addition to the thickness of the material itself, it is necessary to take into account the depth of the sheathing for its fastening, especially in cases where the walls initially have significant unevenness. For a balcony or loggia, corridor or storage room, this nuance can be a decisive factor when choosing a finish.
Methods for installing plastic panels
There are 3 methods for fixing slats on walls:
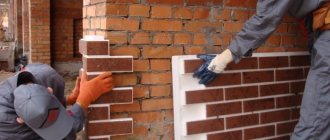
- Place on glue. This method is intended for fastening on perfectly flat and smooth surfaces. The composition used is a special glue for PVC or universal “Moment-montage”, as well as liquid nails. The use of this method allows not only to reduce costs during installation, but also to facilitate it, eliminating the need to build a frame. The disadvantage of fastening the panels with glue is the impossibility of replacing damaged lamellas, as well as the difficulty of dismantling them during repair work.
- Self-tapping screws. When fixing using these fasteners, it is not necessary to have a perfectly flat surface. To carry out installation, an over-the-top screw is required, which allows you to significantly increase the speed of work. The disadvantage of using it is that self-tapping screws are best screwed into wood sheathing, which requires additional time to cut the timber and treat with an antiseptic.
- Staples or clamps. The most optimal options. Staples and clamps are quickly and easily attached to the frame and securely connect the slats to the surface of the walls. The installation of the sheathing is carried out from metal profiles, the assembly of which does not take much time and does not require much effort. In case of damage, any element can be replaced without any difficulty with a similar new one. Dismantling of the material is also done quite quickly.
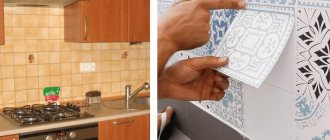
How to glue PVC panels to walls: practical recommendations
You can watch the video on how to glue decorative PVC panels with mosaics. Before installing the plastic part, you need to prepare the base. At the same time, the old coating is removed, cracks are removed, and the surface is leveled. Differences can be no more than 5 mm. Dirt and grease from the surface of the walls must be cleaned, as this may interfere with the adhesion of the adhesive.
Below are options for decorating walls with PVC panels.
A high-quality adhesive composition is characterized by transparency after drying, quick setting, strong fixation and resistance to sudden temperature changes. Hot melt adhesive cannot be used to fasten plastic.
Gluing sheet elements consists of the following steps:
- cleaning the back side of the plate;
- drying the product before applying glue;
- the glue is distributed in a pointwise manner;
- installation of plates to the wall.
When using liquid nails, the plates must be tapped. For high-quality adhesion, the glue must be aired. At the end of installation, ceiling or floor plinths are attached. To do this, use self-tapping screws.
Installation of plates
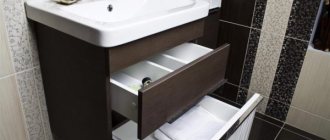
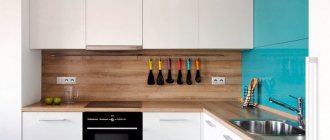
It is recommended to use plastic panels for finishing the kitchen. In this case, the assembly is performed with small gaps. The slats should fit under the wall cabinets and press tightly. The lower edges are fixed using skirting boards.
Helpful information! To make installation around the sockets, you need to cut holes in the appropriate places. When carrying out work, you must turn off the electricity.
Preparing walls for finishing
Before installing plastic panels, it is necessary to clean the surface of old material, seal all cracks and level out visible defects, and also treat the walls with a product that prevents the occurrence of “fungus.” The application of this composition eliminates the possibility of dust accumulation and mold, which negatively affects the room microclimate. When installing the lining on the sheathing, it is not necessary to level the surface.
Types of wall panels
Types of finishing
Depending on the shape, the following types of panels are distinguished:
• slatted typesetting – are oblong planks made of wood, chipboard, PVC, fiberboard or MDF. These panels for interior wall decoration have a length from 240 to 370 centimeters, a width from 12.5 to 30 centimeters and a thickness from 0.8 to 1.2 centimeters. To connect to each other, the panels have grooves and tenons. Installation of cladding in horizontal and vertical orientation is allowed;
• tiled typesetting – are squares with side lengths from 30 to 98 centimeters. Such wall panels are great for creating mosaics, because each of them has its own color and texture. Covering materials are MDF, fiberboard, PVC and chipboard. To connect the plates, grooves and inserts are used;
• sheet – they have proven themselves better than others when finishing large walls. The dimensions of their sides can vary from 122 to 244 centimeters with a thickness of 0.3 to 0.6 centimeters. Unlike other materials, sheet wall panels are made only from wood or resin-impregnated fiberboard.
Slatted panels of various widths
Methods of fastening the plates vary. Thus, slatted panels for wall finishing are fixed on the sheathing, while tile panels are fixed with clamps or an adhesive. Glue is also used to fasten sheet panels, and the seams between the covering elements are masked with moldings. How to install PVC on the ceiling yourself? watch the video and read here.
Classic paneling solutions
When finishing with plastic panels with your own hands, you need to take into account not only the type of coating elements, but also the material of their manufacture.
Wooden products are considered reliable; they are made from wood species such as alder, maple, oak or cedar.
Sometimes the finish has a wax coating, thanks to which it can be used in rooms with high humidity levels. Since wooden wall panels are environmentally friendly, they are recommended for use in residential areas.
Products made from fiberboard, a material consisting of woody plant fibers, are popular. They are also safe for human health, resistant to high humidity, but become unusable when in direct contact with water. In turn, cladding panels made from chipboard for interior wall decoration are similar in appearance and quality to wood. This is explained by the fact that chipboard is pressed waste from wood production. The disadvantage of this material is its poor tolerance to sudden changes in temperature and humidity conditions.
Panels made from MDF are highly resistant to almost any environmental factors. Fiberboards are obtained by using the dry pressing method, so they are not afraid of moisture and mechanical stress. It is recommended to decorate walls with MDF panels, such as those in rooms where conventional materials are short-lived or ineffective.
All types of panels mentioned are recommended for use in residential premises. With proper care, their service life will be more than 10 years. Wooden wall panels for wall decoration have a particularly long service life: if they are made of high-quality wood, they will retain their original appearance for several decades.
Panels made from new materials
Panels made from gypsum vinyl are known for their reliability and durability. The material they are made of is a modification of drywall, and is similar in properties. Plastic wall panels for interior decoration, which are not demanding in terms of operating conditions and are easy to maintain, have also demonstrated their best performance.
New products on the building materials market are glass panels and 3D panels. The former are intended for applying photographic drawings to the surface of walls, the latter have an unusual texture with an exaggerated relief. 3D panels are made from all of the materials listed above, as well as from aluminum.
Plastic panels are allowed to decorate walls in residential, commercial and public buildings. This coating is often used in schools and kindergartens because it is considered environmentally friendly. In turn, glass panels are as safe as plastic and can withstand significant mechanical loads, but they are less common because they are more expensive. The same applies to the increasingly popular 3D panels.
3D panels create an unusual effect
The process of attaching plastic panels
The following describes step by step how to properly attach plastic panels in order to avoid any shortcomings that could negatively affect the service life of the material.
Wall marking
When installing the frame, it is necessary to use a building level, which will make it possible to eliminate the possibility of distortions. In order not to measure each slats, you need to make markings on the walls. The lower part of the frame should be 1-2 cm above the floor covering. At this height, you should draw a point on the wall surface with a pencil, after which, using a level, you need to draw a horizontal strip along the entire perimeter of the room. A similar line must be drawn along the border of the finishing material or under the ceiling if the sheathing is not at full height. Next, you need to measure upward 0.4-0.5 m from the strip marked below, install the beacon and continue this procedure to the top line. Through the beacons you need to draw strictly parallel lines along the length of all the walls, which are the final stages of marking.
The panels must be fixed to the frame perpendicularly, which is why the horizontal sheathing is finished vertically and in the opposite direction. In the case of drawing a vertical structure, the first strip must be drawn in the corner from the ceiling to the floor using a plumb line. Next, the second corner is marked, after which other lines are drawn with an interval of 0.5 m.
Fastening the frame
When constructing lathing from wood materials, all its components must first be opened with an antiseptic. Using a hammer drill, holes for dowels are drilled along the drawn strips at a distance of 0.5 m. Next, you need to attach the slats, align them horizontally and fix them on the wall surface. In areas of unevenness, wood wedges should be placed under the frame. The wires running along the wall must be hidden under the finishing, which requires taking measurements, drilling holes in the surface and securing them with clamps so that there is no peeking out from behind the plane of the frame.
Fixing plastic panels
Installation of the first lamella should be carried out from the corner of the room farthest from the entrance, which is considered the most noticeable. Next, measurements are taken, and if necessary, the lining is cut to length using a hacksaw. One side of the lamella is installed in the molding on the side, which leans against the corner and is secured to the frame from the back side.
The second panel must be inserted into the fastening groove of the previous one, pressing the joints tightly and fixing them to the wooden elements of the sheathing. To increase the tightness of the joints, the edges should be lightly coated with silicone before installation. All further panels are attached in the same way.
For switches for lighting elements and sockets for electrical appliances, appropriate holes should also be cut in the lamellas as work progresses.
Upon completion of installation, these areas must be covered with plastic boxes. The edge panel mainly needs to be cut in width, so the first step is to apply it to the wall surface, mark strips corresponding to the dimensions of the opening using a pencil, along which the lamella is then cut with a hacksaw.
Fastening moldings
Upon completion of the installation of all panels, the walls should have a monolithic and even appearance, with no gaps on the surface of the seams and in other areas. To hide them, all existing joints and corners are closed using plastic moldings. The design of these products makes it possible to neatly fit onto the edges of the slats on both edges, giving them an attractive appearance.
Lastly, along the length of the ceiling, decorative moldings are installed, and floor skirting boards are fastened to the floor.
Installation of panels on the frame
Although the choice is difficult to make, the installation is much more difficult. Before installing wall panels in the kitchen, it is important to decide on the method of fixation. The first of them is frame technology. Its advantages have been described above. However, the downside is the fact that a whole system of fastening wall panels in the form of metal or wood lathing is required on the wall. And this means additional time, money and effort.
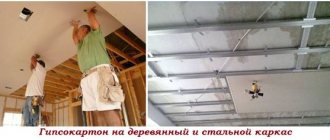
If the choice fell on wood, then the work will require 20x30 mm slats. The materials are treated in advance with antiseptics and moisture protection agents. If you use metal, you will need a steel profile CD and UD. It is characterized by durability, protection from high moisture and is not afraid of temperature changes.
The technology for installing wall panels requires the following tools:
- Metal saw;
- Pencil;
- Building level;
- Hammer;
- Screwdriver;
- Hammer;
- Plastic dowels;
- Self-tapping screws for metal and wood;
- Protective equipment: glasses, gloves.
When everything is ready, you need to purchase the material and apply the markings. Do-it-yourself installation of wall panels, step-by-step instructions:
- Guides are fixed along the entire perimeter of the walls, limiting the size of the frame.
- If necessary, vertical hangers are mounted to the wall. What are they needed for? Thanks to them, the frame jumpers will be perfectly aligned, and the structure will become more rigid.
- Jumpers are fixed between the profiles. Depending on how the wall panels will be positioned, the lintels are installed in a horizontal or vertical position. The fastening step is 40–50 cm. It is to these that you need to install the panels on the wall next.
- In the end, all that remains is to align the jumpers and fix them with self-tapping screws on plumb lines. The sheathing is ready.
- Sheets or slats will be fixed using self-tapping screws, nails, and staples. You can make hidden fasteners for wall panels using clamps.
- This work is simple: the panel is installed in its place between two parallel laths of the sheathing and screwed to the lath. If necessary, the panel is cut. Plastic panels are good in this regard, as they are easy to cut.
At this point the work is completed. Frame technology has many advantages. But you need to take into account that the total area of the room will decrease slightly. This is important when it comes to small bathrooms, where every centimeter counts. What to do in this case?
Features of installing PVC panels on the ceiling
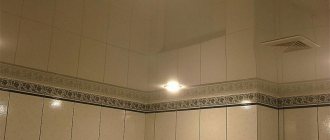
Before attaching plastic panels to the ceiling, you should determine the distance between the slats and it. This distance directly depends on the type of lighting installed. When installing built-in lamps, the gap should be at least 100-150 mm, behind which passing wires can be completely hidden. Before installing plastic panels, you should draw the locations of the lighting fixtures on them using a pencil and cut out the corresponding holes. Next you need to insert the lamp bases.
After this, you can proceed directly to the installation of the plastic panels themselves, the installation of which on the ceiling is carried out in the same way as on the walls. If the surface is flat, then the sheathing does not need to be erected. Before attaching the plastic panels to the ceiling, you also need to install ceiling skirting boards on three walls. To install the lamellas evenly, you must use a building level.
Note! When installing plastic panels in a room with an increased level of moisture, you should fill the gaps in the ceiling with silicone sealant, which will allow you to achieve full waterproofness.
How else can you fix PVC panels on the walls?
Although the method described above for decorating walls with plastic panels is not very complicated, it is not suitable for everyone. For example, the walls are perfectly smooth after plastering with beacons or leveling the walls with plasterboard. It is clear that lathing is not needed. It will only take up space. In this case, they violate technology - they glue plastic panels onto silicone or polyurethane foam.
In this case, the starting profiles will still have to be installed, but they will need to be secured to the appropriate dowels. After that, foam (zigzag) or silicone is applied to the back side of the panel (in islands in increments of 10-15 cm), the bar is inserted into the profiles, pressed, and fixed in one or two places with appropriate fasteners. They continue in the same spirit.
The advantage of the method is that it is very fast, the disadvantage is that it only works on smooth (or almost) walls. But the most important thing is that it is simply impossible to remove the finish without destroying the plastic panels.
Useful recommendations for installing plastic panels
During use, installation work and when caring for PVC lining, many owners may also find the following tips useful:
- When attaching lamellas without constructing sheathing, glue is used, which must be applied in even lines in the form of a grid directly to the surface of the walls, avoiding leaving empty spaces.
- When cutting and drilling holes, the panels should be positioned with the front side up. For cutting you need to use a hand saw, a hacksaw or a construction knife. When using them, it is imperative to ensure eye protection by wearing special glasses.
- When driving nails, you should avoid the possibility of the hammer hitting the surface of the panels themselves, as this will cause dents.
- Cleaning PVC slats is required using a soap composition. Under no circumstances should abrasives, hard sponges or solvent-based mixtures be used to clean the panels.
Having understood how to attach plastic panels to the wall and having carried out exactly all the steps described above with your own hands, you will be able to qualitatively decorate the room and transform it beyond recognition, but in order for the material to last for many years and not lose its appearance, it must be handled with care and maintained in proper form , occasionally performing wet cleaning.
Material selection
Naturally, you want to quickly cover the walls with plastic panels, but you need to select them first. And this should be approached with the utmost care. After all, the final result depends on the correct choice. The following rules are taken into account:
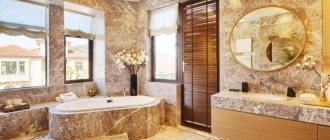
- For bathrooms and shower rooms, as well as for all types of wet rooms, panels that are moisture resistant and have no relief are suitable.
- For corridors and balconies (loggias), it is better to choose products that are resistant to mechanical damage.
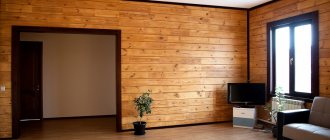
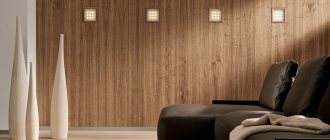
- Wall decoration with wall panels in living rooms is carried out with PVC coatings, which have different reliefs and patterns. They also imitate natural materials.
Plastic lining has good moisture resistance, so it is often used for finishing bathrooms.
When purchasing, you need to pay attention to the following indicators:
- Appearance of the packaging. It must be intact, without damage. It is important to choose material from the same batch.
- Number of cells. The bigger, the better. You can also navigate by weight. Light products are a sign of deficiency.
- Lock. To do this, check the two selected panels for connection - it must be reliable.
- Price. Products that are too cheap are most likely a fake.
Additionally, we suggest watching a video that explains how to select and attach wall panels.