Types of finishes
Of course, everything depends on the financial capabilities of the owners, on the amount they plan to spend on finishing the ceilings. You can choose more budget options, but implement them in such a way that the design looks stylish and solid.
If it is possible to purchase expensive materials, it is better to design the room, guided by current modern trends. However, it is necessary to carefully study all the properties and technology of using materials if the repair is carried out independently. Having dealt with all the nuances, you can clearly decide on the finishing of the ceiling in a private house.
Today there are several popular options. Some of them:
- painting;
- plaster mosaic;
- wooden structures;
- wallpaper;
- ceramic or foam tiles;
- whitewash;
- plaster and stucco;
- tension or suspended structures;
- drywall.
Finishing work in an apartment differs significantly from those carried out in a private house. Here you should consider not only the aesthetic characteristics of the structure, but also take care of its thermal insulation. When all these manipulations are done, you can start decorating the ceiling. It is advisable to carry out all work in the warm season. This is due to the fact that during prolonged autumn rains, as well as in winter, an unfinished structure can become unusable from moisture and frost.
If the owners have decided that a suspension system will be used as finishing, the ceiling does not need to be further leveled. All wiring will be covered with a finishing structure.
Covering the concrete ceiling of a private house
In private houses, ceilings are almost always higher than in most apartments, and this reduces the urgency of the problem of reducing the height of rooms after cladding. Thus, any covering can be mounted on the concrete ceiling of a private house, regardless of the minimum distance from it to the load-bearing base.
Suspended plasterboard ceiling
GCR ceiling covering is a common cladding method that allows you to increase the functionality and aesthetics of concrete ceilings on your own. Drywall is easy to use, environmentally friendly, and can be used to cover both flat surfaces and bases of complex shapes. GKL is mounted on the ceiling only on a frame - made of steel profiles or wooden corners.
Advantages of covering the ceiling with plasterboard:
- No significant contamination of the facility during operation;
- The possibility of simultaneously installing noise and heat insulation of the load-bearing floor;
- Installation of gypsum boards is faster than plastering and is easier to perform;
- Possibility of creating a decorative base of any configuration;
- The gypsum plasterboard finish is strong, durable and suitable for repeated painting.
Disadvantages of gypsum board cladding:
- Even moisture-resistant drywall is afraid of water when exposed;
- The coating needs finishing.
Ceiling cladding with plastic panels
Finishing the ceiling this way will take less time, and the set of necessary materials will be cheaper.
Plastic panels are made of PVC and are strips of various colors, the profile of the sides of which is made of the tongue-and-groove type - for a gapless connection.
This cladding, smooth on the outside and cellular on the inside, is produced in various widths, which allows you to choose a material depending on the dimensions of the room. Plastic panels are mounted on guides made of wooden blocks or thin-walled profiles, which are attached to the ceiling with self-tapping screws and located parallel to each other at a certain pitch.
As a result of the cladding, a continuous decorative coating is formed that hides the rough ceiling and does not require additional decoration.
Advantages of covering with plastic panels:
- Simplicity of execution and the possibility of making it yourself;
- Availability across the entire price range;
- Moisture and biostability;
- Resistance to changes in room temperature;
- Possibility of associated sound and heat insulation;
- Ease of daily care;
- Wide choice of colors;
- The coating does not require finishing.
Disadvantages of plastic ceiling cladding:
- Flammability;
- The color scheme fades over time;
- The material is easily recognizable in any decorative design.
Required Tools
Before you begin finishing work, you should pay special attention to ensuring that all the necessary equipment is at hand. If some tools are missing, you need to purchase them in advance so that you don’t get distracted by little things during the work process. For finishing you will need the following equipment:
- screwdriver;
- building level;
- Bulgarian;
- rulers;
- a set of spatulas that differ in size and thickness;
- drill;
- trowels;
- a simple pencil;
- screwdrivers.
When preparing for finishing, it is advisable to make a supply of screwdrivers, rulers and pencils, because these small items are constantly lost during repair work, and precious time is wasted searching for them.
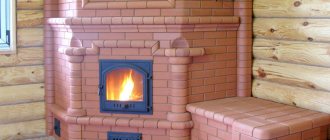
Painting and whitewashing are the simplest and most commonly used options. Such work does not require any special skills or significant costs. Before carrying out manipulations, the ceiling structure should be carefully leveled. Lime often leaves a lot of dirt, so before you start whitewashing, you must first cover all objects. For these purposes, you can use oilcloth or paper. In a similar way, you can finish the ceiling in the boiler room of a private house.
If painting is preferred, you should carefully choose the shade. The best option is white, because the owners will not get tired of it after a while, and you can easily choose a wall design option for it. In addition, light shades visually increase the space.
When rich and deep colors are more preferable, you should focus on your taste and other design elements. It is important to note that dark paint is not recommended for use on low ceilings, as it will visually lower them. If this does not scare the owners, you can safely experiment
Ceiling installation when the attic is cold
When the building is one-story, and only the roof is on top, the installation of the ceiling in a private house is carried out as follows.
Step one - filing the ceiling
. For this you need a shield made of boards. The material for it is ordinary edged or tongue-and-groove boards with a thickness of 25 millimeters or more. They are fastened “in space” using long nails, leaving minimal gaps. The tongue and groove boards are hemmed with a groove from the wall, from which the installation of the cold ceiling starts.
When deciding what to make a ceiling from in a private house, you can opt for lining it in another way - plywood or OSB, at least 15 millimeters thick (read: “Ceiling with plywood”). But it should be taken into account that in terms of one “square” this option is much more expensive and the possibility of the structure sagging under its own weight and the weight of the insulation increases.
As an alternative, in private houses of old construction, the board panel can be placed not below the beams, but laid on top of them. Thus, the height of the rooms will not be reduced, and the living space will not be reduced. If necessary, you can make a crate. You should not worry about the appearance of the rough ceiling, since finishing the ceiling in a private house will cover the surface, and the beams, painted in the desired color, will decorate the interior of the room.
Step two - vapor barrier of the ceiling
. First of all, you should take care of the vapor barrier. On the one hand, this layer should prevent the heat-insulating material from becoming damp, and on the other hand, due to radiation, it should reduce heat loss. This can be achieved using aluminum foil. Also used as a vapor barrier is foil insulation based on foamed polyethylene - this relatively recently appeared vapor barrier material for the ceiling creates an obstacle to heat loss due to both radiation and convection. When a chimney is laid in the ceiling, there must be a distance of at least 30 centimeters between the chimney and combustible material.
Step three - insulation of the floor
. The installation of a ceiling in a private house with a cold attic involves the use of insulation materials, the choice of which is huge (read: “How to insulate the attic of a private house”).
The most popular among them are:
- Mineral wool
. This material (see photo) is non-flammable and has excellent thermal insulation properties, but over time they begin to deteriorate. The fact is that even completely dry mineral wool begins to cake after a certain period. If the vapor barrier is not done well, this insulation picks up moisture and ceases to perform its intended function. It is impossible not to mention such a disadvantage of mineral wool as the presence of volatile small fibers that irritate the respiratory system. Therefore, they need to be isolated from living quarters especially carefully. The cost of mineral wool is affordable. When insulating the ceiling with mineral wool in a private house, it must be handled with care and not compacted, since the thicker the layer, the better the thermal insulation. - Basalt wool
. The ceiling in a country house is often insulated with this type of mineral wool. But there is a difference between these two materials. Basalt wool retains its shape better and practically does not cake, but, unfortunately, it can pick up moisture.
Styrofoam
. This thermal insulation material is flammable. Controversy continues regarding their release of styrene. Although foam plastic intended for insulation must meet environmental standards, in reality this indicator depends on the manufacturer. As for the thermal insulation properties, this material is excellent, since there is practically no heat loss due to air convection inside the foam layer (read: “How to insulate a ceiling from the inside in a private house”). This insulation does not change its shape and size - even after 10 years, the volume of foam sheets between the beams will not change from the moment they were laid. The material is considered non-hygroscopic and moisture-proof. There is an opinion that its use allows you to avoid making a vapor barrier at all. But thermal insulation using foam plastic is expensive and unaffordable for many consumers.
Gypsum and plaster
You can install gypsum panels yourself. Often the products are white, but with the help of special paint they can be made in any shade. The painting procedure must be carried out after installation.
Decorative plaster with different finishes (both smooth and textured) will look quite presentable on the ceiling of a private house. The only aspect that should be taken into account in the absence of experience in carrying out such work is learning how to apply plaster and its use in everyday life. You should not rush in such work; it is better to practice applying the material to an inconspicuous place, and then evaluate the result.
Textured plaster must be applied in a fairly thick layer (1 cm). After drying, another 1-2 layers are applied alternately. The result is a deep and rich color.
To make the ceilings more original, you can use mosaics. The latter can be purchased at construction stores. It is presented in the form of fragments, from which it is possible to assemble both a whole picture and an abstract drawing. This type of finish is fixed to the ceiling with tile adhesive. Various materials can be used to make sets - small stones, ceramics or glass.
If you plan to finish the ceilings in the bathroom or kitchen in this way, you need to use waterproof glue that is resistant to moisture. In this case, there is a guarantee that the mosaic will not fall off soon.
Finish options
Depending on the type of construction, various options for finishing ceilings in a private house are used. The range of finishing materials is huge, and therefore the main methods should be analyzed. They are linked to the interior of the entire house, the organization of lighting, and the need for zoning the room.
Basic work
Most often, ceiling finishing is achieved by carefully leveling the surface and then applying a finishing coating that provides an attractive appearance and a certain design style. The most common methods are:
- Whitewash for plaster ceilings. First, the surface is leveled by puttying, priming and plastering. The process itself involves applying chalk or lime mortar. You can use a white background or tint with various pigments. The main advantages are the possibility of finishing it yourself, the low cost of the method and environmental friendliness. The ceiling is breathable. Lime whitewash has bactericidal properties. The disadvantages of whitewashing are the need to perfectly level the ceiling, fragility (the need to update the whitewash after 3-4 years), low moisture resistance, rapid contamination and problems with cleaning.
- Painting. This is the second most common method of finishing the ceiling. The most commonly used is water-based paint. It has all the main advantages of whitewashing, and at the same time has a certain moisture resistance. The painted ceiling can be wet cleaned using detergents. Other disadvantages of whitewashing are transferred to painting. In addition, the ceiling loses its “breathing effect”.
- Decorative plaster. The most popular is considered to be textured type plaster (it can be called structural, plaster, etc.). It contains a special filler with grains of various fractions. Using a textured solution, relief patterns are created. This finishing increases the decorative value of the ceiling and makes it possible to imitate stucco in a classic style. Disadvantages - increased cost and the impossibility of applying it yourself without special skills.
- Wallpaper. Pasting the ceiling is no different from covering the walls, except for the inconvenience of the location. Using wallpaper, you can provide its original colors (for example, imitation of natural materials). Wallpaper can mask small cracks, but in general it requires careful leveling of the surface. Washable materials can be easily cleaned with normal cleaning products.
- Tile. The ceiling can be covered with lightweight polystyrene foam tiles. Their main advantage is the provision of additional thermal insulation. The main disadvantage is flammability, with the release of harmful substances during fire. A rather expensive method, but without this drawback, is gluing glass or mirror tiles.
- Cork coverings. This applies to modern ways of arranging a room. This covering is made from sheets made from natural cork. It has a special attractiveness, increased water resistance and thermal insulation properties, but has a high cost.
- Liquid wallpaper. Essentially, this is a coating that combines the properties of wallpaper and plaster. It is made from a mixture based on cellulose fibers. The material is applied similarly to decorative plaster, and after hardening it takes the form of wallpaper. Liquid wallpaper creates a beautiful design, but is expensive.
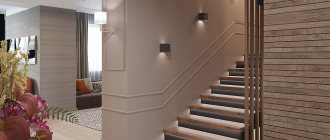
- Stucco molding. It is most often made of plaster. Foam plastic figures are often used as imitation, which after painting are difficult to distinguish from real stucco.
We recommend: Painting the ceiling with water-based paint. How to paint correctly without streaks and stains?
In general, finishing ceilings without additional load-bearing elements is most popular, provided there is a sufficiently flat ceiling surface. Its important advantage is its small impact on the height of the room.
Suspension systems
Suspended or frame ceilings are needed to mask large irregularities and create original multi-level structures with a special lighting system. The following arrangement options stand out:
- Panel ceilings. They are made of plastic panels that are mounted on an aluminum profile frame. The variety of textures makes it possible to design the ceiling in different styles. The panels are absolutely moisture resistant and have a reasonable cost.
- Sheet material. A ceiling with an almost perfectly flat surface can be equipped using sheet materials. The most commonly used is plasterboard (gypsum plasterboard). It is attached to a metal or wooden sheathing, and the seams are sealed with polyurethane foam or putty. After priming the surface, such a ceiling is ready for the finishing coat.
- Cassette ceilings. This is a special system in which rectangular cells for cassettes are formed using profiles and hangers. The most common sizes of such elements are 60x60 and 60x120 cm. They can be metal, polymer, glass, wood, mirror, or mineral materials. The main advantage is the absence of rigid fastening. The cassettes are easily removed, which makes it possible to wash or replace them.
- Slatted ceilings. They look quite beautiful and have practical value, especially for rooms with high humidity. Aluminum slatted plates are used. A silver or golden hue and chrome plating add a special decorative effect.
- Wooden coverings. Wood has always been popular in the design of private homes. The fashion has not passed even today. Such methods of finishing ceilings with wooden elements are noted.
- Lining. These wooden slatted panels have long gained wide popularity. They create a natural style and a special unity with nature indoors. To protect against moisture, it is recommended to impregnate the lining with an antiseptic and varnish it.
- Continuous covering - made of boards.
We recommend: DIY ceiling repair options. What materials can be used?
Suspended ceilings often become a necessary measure to hide construction defects. They require the installation of a supporting frame, which reduces the height of the room, however, decorative possibilities make it possible to compensate for this disadvantage.
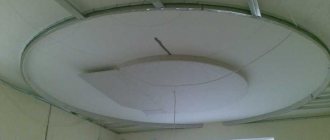
Tensile structures
Stretch ceilings are designed to perform the functions of suspension systems in terms of masking irregularities, without creating additional loads on the ceiling. Their design includes a frame mounted on the wall and a canvas stretched under the ceiling at a distance of 10-12 cm from it.
There are 2 main types of them - fabric and film ceilings. In the first case, a textile fabric woven from polyester fibers is used. In the second case, PVC film is used. The canvas is fixed at its ends in the frame and stretched tightly, forming a flat surface. When stretching the PVC film, it is heated using a heat gun.
Tension and suspension systems
The installation of floors in the private sector significantly complicates the task of choosing finishing materials. First, owners need to decide how to cover wiring, ventilation holes and other communications. In this case, the best option would be suspended plasterboard structures or suspended ceilings.
Drywall is fixed on a frame base, which is made of a metal profile. Then the frame is sheathed with sheet material. After finishing, the coating is painted or wallpapered. You can equip a lighting system - neat lamps will fit well into the interior of the room.
If we talk about tension systems, there is a wide range with which you can implement the most daring design solutions. The variety of shades and textures is simply impressive. Glossy systems shine in sufficient light, while matte systems have a more discreet appearance. If you use various decorative elements, any of the described finishing options will look elegant.
Many people today prefer matte products. This is due to the fact that they are much easier to care for. If the height of the room allows, the ceiling design can be made multi-level.
It is undesirable to overload a room with low ceilings with various bulky parts. They will make the atmosphere of the room uncomfortable and oppressive.
There is a ceiling finishing option called combined. This is due to the fact that during the installation process two types of materials are used - tension element and drywall. The latter first covers the entire surface of the ceiling, and then concrete boxes equipped with various decorative and lighting elements are fixed on it. The tension system is mainly located in the center of the box.
Of course, this is painstaking work, but the result will certainly please the owners. This way you can create your own exclusive design thanks to a combination of colors, textures and materials.
Wooden ceiling cladding
Depending on the characteristics of the beam structure, there are various options for finishing the ceiling in a wooden house. If the rough lining of the floor is made above the beams, then they can be interestingly used in the interior. In this case, painting or pasting with film, polyurethane tiles or wallpaper is suitable.
The optimal cladding for a wooden ceiling is considered to be wood materials - lining, MDF plywood, OSB. The hemmed surface is opened with varnish, painted or impregnated with oil. Since plasterboard does not interfere with the natural circulation of air in the material, it is also used for cladding a wooden house.
Lining
The advantages of ceiling lining made from lining include the following:
- high heat and sound insulation properties;
- concealment of foundation and communications defects;
- does not require leveling and preparation of the base surface;
- impressive service life provided that the coating is regularly maintained (painting, protective impregnation);
- quick and easy installation;
- attractiveness and plenty of scope in terms of design options.
The disadvantages of lining are its low resistance to high humidity, susceptibility to rot and damage by mold, easy flammability, and deformation when humidity and temperature change.
Important! For finishing a private house, lining made of pine, larch, oak, and linden is suitable.
Traditional option - wallpaper
Everyone knows the classic way to decorate indoor surfaces - wallpapering. This method is the simplest type of finishing. The main condition is that the surface must be perfectly flat. It is important to use good glue.
Experts do not advise choosing material that is too heavy or has a complex pattern. It is better to give preference to plain or abstract prints. It is permissible to combine several types of material to highlight individual areas of the room. In addition, photo wallpapers look good, especially when it comes to a children's room.
The use of liquid wallpaper is in demand today - it is stylish and beautiful. It is very important to carry out the preparatory measures correctly: the surface must be thoroughly treated with a primer and then dried.
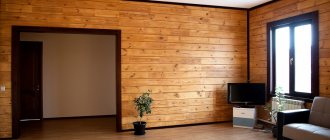
Wooden structures
If we talk about a wooden house, then it is quite appropriate to make the covering of the ceiling surface also from wood. Panels made of slats, plywood or lining are suitable for these purposes. If desired, you can make a whole hanging structure. This idea is especially relevant if you want to decorate your home in a rustic style.
The simplest way is to use lining. The latter is presented in the form of wooden planks of varying widths and thicknesses. It is often made from oak, hornbeam or aspen. The convenience of lining is that it can hide existing surface defects, without any preparatory measures being required. Installation of such structures is quite quick and simple. This is how you can sheathe the ceiling on the veranda in a private house.
For floors between floors, as well as in the attic, beams and panels are used as a base. If the surface is panel, use plaster or other types of decoration.
When installing a structure consisting of slats, the latter must be sanded on the front side and then varnished. You can use slats of the “block-house” model, which do not require special preparation. They make it possible to implement various solutions in the interior and retain heat well. A significant disadvantage of such products is their high cost.
Experts advise giving preference to certain types of wood - aspen, poplar or elm. Wooden structures must be coated with a fire-resistant compound and stain.
Painting will help make a wooden system truly original. You can create a real masterpiece of art overhead or decorate small areas as decoration. Both options can radically change and transform the space.
Tension fabric
The use of suspended ceilings in the construction of a private house is one of the most common options. No wonder. The tension fabric is very easy to install and is relatively inexpensive.
However, designers love them for another quality: huge variability. You can design a stretch ceiling of any color and with any number of levels. This allows you to apply the most daring design solutions and use a variety of room design options.
In addition, the tension fabric is completely sealed, which eliminates leakage. This is especially true in that part of a private house where the ceilings are adjacent to the roof - even if the roof leaks, the interior of the room will not be damaged.
They also differ in increased noise insulation due to their tightness. In addition, their care is not particularly complicated: just choose a non-abrasive product and occasionally wipe the surface with it.
Another advantage is their versatility - they can be used in any room, except, perhaps, baths and saunas.
And most importantly. Using a stretch ceiling allows you to reliably hide communications and pipes - this is especially important in a private house.
As for the shortcomings, there were some too. Such ceilings are not very durable, so some care must be taken in their operation. However, the ceiling is not the floor, which means there should not be frequent physical contact with it.
Another problem is the joints. No matter how carefully it is laid, there is a possibility that they will be noticeable. You can disguise the joints using design elements or make them look like that themselves - for example, by using tension fabrics in a contrasting color.
In addition, without the appropriate skills, installing a suspended ceiling with your own hands will be quite difficult.
In general, suspended ceilings are the best option for use in the construction of a private house: hygienic, easy to install and relatively inexpensive.
Using tiles
Foam tiles are easily fixed using a special adhesive composition. The only condition is that the surface must be well prepared. The ceiling must be thoroughly cleaned of any remaining wallpaper, old paint or lime. Today there is a wide range of different designs. This finish will look attractive for a long time.
This option is the cheapest and is suitable when you need to quickly update the ceiling surface. Gluing products is not as difficult as it might seem at first glance. The procedure will not take much time and effort.
Working with ceramic tiles is more labor-intensive. The surface must be smooth and must be pre-treated with a primer. Particular attention should be paid to the choice of adhesive mixture. Ceramic tiles are a heavy material, so they need to be firmly fixed to the surface.
Often this type of finishing is used for the kitchen or bathroom, so the adhesive mixture and primer must contain an antiseptic that will protect against exposure to excessive humidity and the appearance of fungus. The variety of shades and patterns on products makes it possible to implement the most interesting design solutions.
Cassette ceiling
It should be noted that such structures are not particularly in demand in Russia, but they deserve attention. Cassette systems are structures on thin metal plates. At first it may seem that the result is a faceless ceiling, but this opinion is wrong.
Modern products are distinguished by a variety of shapes, designs and colors. Because of this, you can easily choose a system for any interior and create a truly original ceiling. A significant advantage is the ease of installation - installation can be carried out by a person who does not have special skills.
Another significant advantage is high hygiene. The fact is that the metal undergoes special treatment, so it does not accumulate bacteria and various microorganisms, even in conditions of high humidity. Therefore, it can be installed in the bathroom and kitchen.
The systems are easy to maintain; they need to be occasionally wiped with a special compound. During the installation process, you can easily install any type of lighting structures - from bulky chandeliers to spotlights.
The main disadvantage is the high cost, but if you look at it in general, this option deserves attention when choosing a finish for the ceiling surface in a private home.
Floor preparation
Before finishing the ceiling in a private house, you need to prepare the base surface and the entire ceiling. Unlike an apartment in a high-rise building, the ceiling of a private house requires additional insulation and protection from condensation and moisture.
That is why before finishing the ceiling cladding, take care of the following:
- lay thermal insulation material between the floor beams (this is especially important if there is an unheated attic above);
- a layer of vapor barrier is laid above the ceiling to ensure the removal of condensate that accumulates in the thermal insulation material due to temperature changes;
- Below the insulation, a layer of waterproofing is attached to the beams, which will protect the structure from moisture evaporating from the room and rising upward.
Thermal insulation and ventilation
Before choosing a material for finishing the ceiling, you should carefully consider the insulation option. This is a very important aspect, which directly determines how warm and comfortable the room will be during the cold season, as well as how long the ceiling structure can maintain its original appearance.
There are several options for laying the thermal insulation layer - using slats or a stapler. Often, foam plastic, mineral wool, expanded clay, fiberglass, etc. are used as insulation. Mineral wool is the best option, because it retains heat better than others. Glassine is laid on top of the insulation, and then the material with which it was decided to cover the ceiling in a private house from the inside is installed.
Particular attention should also be paid to the ventilation system. It should work well to prevent excessive moisture in the house. If the ventilation system malfunctions, there is a real threat to the ceiling structure, because mold can form on it, which must be combated with the help of special preparations.
If such a problem already exists, you need to dry the room thoroughly, and then treat the affected area with a special compound and dry it again. After this, you need to think about installing additional ventilation.
If a wood covering is chosen for finishing the surfaces at the top of the room, you need to periodically treat it with special compounds that prevent the appearance of moisture.
Cladding ceilings with clapboards in a private house
Lining is a thin planed board, a popular material for cladding ceilings in private homes. In addition to lining made from natural wood, with the development of technology, materials from plastic and MDF began to be produced.
The lining on the ceiling harmonizes well with the interior, which also contains other elements made of wood - walls, furniture, so finishing the ceiling base with natural wood is much more impressive than finishing with artificial materials.
Material selection
You must select a lining according to the following criteria:
- Regular or “eurolining” - manufactured according to GOST 8242-88 (USSR) or DIN 68126/86 (Europe);
- Profile view;
- Type of wood – coniferous or deciduous;
- Type of wood.
Considering that the requirements of GOST 8242-88 are tied to the main purpose of the lining - the lining of cars, Euro lining is used for finishing the ceilings - a material imported or manufactured by a domestic manufacturer in accordance with DIN 68126/86.
To better satisfy the consumer’s taste in finishing, eurolining is produced in various types of profiles - “softline”, “calm”, “landhouse”, “blockhouse” and “American”. Another type of lamellas is available - double-sided, with both sides facing, but it is not practical to use them on the ceiling.
For ceiling cladding, lining made from both coniferous (spruce, pine, larch, cedar) and deciduous wood (alder, linden, oak) is suitable. In this case, you should decide on priorities:
- Coniferous wood is more durable due to its resin content;
- lining made of hardwood has lower thermal conductivity.
As for the quality of the lining, the type of material speaks about it:
- “Extra” (knot-free) - the front side is smooth, one knot is allowed per 1 linear meter without cracks or chips, the resin shells are cleaned, puttied and sanded.
- Class A - minor defects are allowed on the front part (microcracks, imperfections), on the ends - cracks no longer than the width of the lamella, 2-3 knots per 1 linear meter.
- Class B – cracks no longer than 30 cm are possible on the front side; one lamella may have 2 falling knots. We accept an uncharacteristic color of wood, other than blue, and non-standard wood.
- Class C - all lining that does not correspond to a higher grade. Wood rot is unacceptable.
Dimensional tolerances for all grades of lining:
- Length - +/- 50 mm;
- Width - +/- 1 mm;
- Thickness: +/- 0.5 mm.
Preparatory activities
The purchased material must be prepared for use - for this, the lining is laid out in the house on a flat, solid base, preferably in the room where the ceiling will be covered with it, and left in this position for at least a month. This procedure allows you to avoid perspiration on the cladding and deformation of the lamellas after installation. After the lining has rested, it must be impregnated with an antiseptic and coated with a hydrophobic composition (nitro varnish is suitable) - this will significantly increase the service life of the cladding. If the sheathing for the hemming is made of wooden blocks, then they must be processed in the same way.
Tools required for covering a concrete ceiling with clapboard:
- Hammer drill with concrete drills;
- Laser level (bubble level will give an error);
- Screwdriver;
- Wood hacksaw;
- Roulette.
Before you begin covering the ceiling base, you must do the following:
- All loose finishes are removed from the concrete.
- On the cleaned rough ceiling, cracks are repaired and waterproofing is carried out.
Installation of sheathing
In the room, determine the lowest angle, step down 10 cm from the ceiling along it and make a mark. Using a spirit level, this line is transferred to other corners of the room, and the resulting four points are connected with lines - they indicate the horizontal plane in which the lower edges of the sheathing bars should be located.
The bars (40x40, 30x40 or 25x45 mm) should be mounted perpendicular to the direction of the lamellas, the outer ones - at a distance of 10-15 cm from the wall, and the step between adjacent ones - 0.5-0.6 m. To do this, markings are first made on the ceiling base.
Then, nails are driven into the starting lines on opposite walls, parallel to the direction of the bars, in increments of 1 m, and connected with a control thread-cord.
According to the markings, the bars are mounted on the ceiling using self-tapping screws, placing fasteners every 30-40 cm. The underside of each lathing element should touch the control cord, and for this purpose, under the bar at the fastening point, if necessary, place a gasket of the required thickness from scraps of boards or plywood.
After completing the installation of the sheathing, you can insulate the rough ceiling by laying a thermal insulator between the sheathing bars
If the thermal protection is made of mineral wool, then it is necessary to lay a layer of vapor barrier on top of the insulation - this will allow the material to release excess moisture and protect it from oncoming moisture from the air in the room.
The construction of a sheathing of a more complex design, using direct hangers, is clearly shown in this video:
Selection rules
If home owners are tormented by doubts about what to choose for finishing, they need to pay attention to what room they are talking about. For example, wooden covering for a kitchen or bathroom is not the best solution. This is due to the high likelihood of fungus occurring. In such situations, it is better to give preference to tension fabrics.
Choosing a ceiling structure for a private home should not only be for reasons of beauty, you should also think about practicality. If the house is used exclusively for recreation in the summer, and in winter it is not heated, wooden and plasterboard structures should not be installed, because these materials will quickly collapse under the influence of low temperatures and dampness. In such cases, it is better to use panels made of plastic or PVC.
If the house has a heating system and is used throughout the year, then you can choose wood paneling. The main advantage is environmental friendliness, strength and safety. With proper care, this design will last a long time. In addition, you can use drywall, because with its help you can hide various imperfections. After installing the material, the ceiling surface can be decorated in various ways - wallpaper, plaster, paint.
Stretch fabrics are moisture resistant, so they are suitable for any room. For example, for the kitchen you can choose glossy or matte; in the bedroom, a fabric covering will add coziness. Business premises do not require special beauty. Compliance with safety measures is very important here. In a boiler room, various pipes often run along the surface of the ceiling. They can not be covered, but simply plastered and then whitewashed the ceiling structure. If you need to hide communications from prying eyes, you can use fireproof plasterboard.
It should be understood that access to all communications is necessary, so in some places you need to leave openings and equip them with gratings, which can be opened as needed and the required work carried out.
Current trends
Modern ceiling structures (compared to classic ones) have a number of features. Among them:
- visual openness;
- use of natural materials;
- functionality;
- contrasting combination of shades;
- lack of pretentious elements.
Famous designers give a number of tips that will help you choose a more suitable finishing method. Some of them:
- Today, various eco- and ethnic motifs are in trend.
- When decorating spacious rooms, it is advisable to use multi-level structures, complex shapes, and smooth transitions.
- You need to buy materials that can mask all the flaws of the base.
- It is advisable to choose rich, but not flashy tones. It would be appropriate to use deep shades that will add originality to the ceiling structure.
- The ceiling should be combined with the rest of the decoration, and not look defiant against the background of the interior.
Today, construction stores have a huge variety of materials for finishing the ceiling surface. Each of them has its own advantages and disadvantages. Which one to choose directly depends on the purpose of the room, the interior being created and the taste preferences of the owners.
The second option is wood paneling
Natural materials will not only look organic, but also not affect the human body. There are also many options here.
Various wood ceiling finishes:
- Lining in the form of boards.
- Plywood. Rack panel.
- Suspended wooden structure designed by designers.
The most modern and popular idea is lining. What is she? And what does it look like? It looks like an ordinary board, but only planed. If you look closely, you can find a tongue on one side and a ridge on the other. It is directed into the ledge and this is how assembly occurs.
Lining is considered one of the cheapest materials for finishing the ceiling. This is one of the main advantages.
Solid wood elements are affected by temperature changes and moisture. Sometimes there is compression and expansion of the seams between the boards. They are often decorated during reconstruction.