Advantages and disadvantages of PVC panels
The plastic panel has the shape of an oblong rectangle. It consists of two PVC sheets connected by jumpers, which also act as stiffeners. Due to this, a void is formed inside the panel, which ensures its low weight. Thanks to this, the material is easy to transport and install. But this is not its only advantage; additionally, we can highlight the following:
- Wide range of applications. In addition to their direct purpose - finishing walls and ceilings, the panels are actively used to create window slopes, screens for bathtubs, and as formwork for non-standard steps - whatever the craftsman’s imagination is enough for;
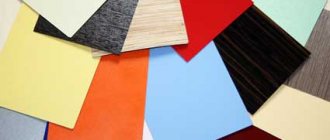
- many options for colors, patterns, designs and textures. If desired, you can apply any image using photo printing for a specific order. The panel design possibilities are unlimited;
- Easy maintenance – the smooth surface can be easily cleaned with a damp cloth. If necessary, you can use dishwashing detergent. The only difficulty is cleaning the seams. But if you purchased high-quality seamless panels, this problem will not affect you.
Flaws:
- low resistance to ultraviolet rays - over time the plastic may turn yellow;
- poor resistance to mechanical stress - it is very easy to pierce and pierce the lining;
- When burned, the material releases toxic substances.
Flaws
- prone to damage - only a small mechanical impact is enough to permanently damage the plastic;
- reducing the area of the room after finishing - this drawback can be mitigated by leveling the walls, but in this case you can forget about quickly repairing the room;
- meager choice of colors - in fact, manufacturers are working hard to expand color solutions, and you could see this above, but the fact remains: ceramic tiles have much more aces up their sleeves in terms of design, texture and color;
- deformation from temperature changes is a natural deformation of PVC panels, which most often occurs during a sharp temperature jump;
- flammability of the material - it’s easy to find a counterargument to this minus - everything burns, but in this case the greatest danger is posed by harmful combustion products.
Types of material
Plastic panels differ in several parameters:
- depending on their area of application. They produce products for walls and ceilings. Wall slats are more durable and therefore better able to resist impacts. In addition, they are less flexible than ceiling counterparts, which is very important, since after installation in a vertical position the cladding can move. The fact is that thicker and harder plastic is used for their manufacture. The thickness of the stiffeners in such products approaches 1 mm, which also increases the stability of the material;
- in size - the width of the plastic can be 125, 250 or 380 mm. Medium is considered optimal, but it is much more convenient to work with wide slats. The length of the panels most often ranges from 2.4 to 3 m. The thickness of products for the ceiling can be from 6 to 10 mm, and for walls - from 10 to 12 mm. If you want to install spotlights on the ceiling, it is preferable to choose panels with a thickness of more than 8 mm. Thinner ones will show through and the sheathing will be visible through them;
- by texture - laminated or simple. The former are more resistant to damage and contamination. This is ensured using a protective film. This material is of a high class; most often it can only be purchased in decor studios. In terms of durability, it may well compete with tiles.
Ceiling finishing
After completing the work on decorating the walls of the room, you can begin finishing the ceiling. The most common materials used for this purpose are:
- tensile structures;
- drywall;
- slatted fabric;
- plastic panels;
- plaster.
Tensile structures are an expensive design option, but they have an aesthetic appearance, have a smooth and even surface that hides all the unevenness of the ceiling, do not emit toxic substances, and are resistant to moisture, durability, high temperatures and various contaminants. For successful installation of the structure, a frame is built around the perimeter of the room. The film sheet is heated using a heat gun and securely attached to the frame. When using fabric material, you must have certain skills to complete the installation successfully.
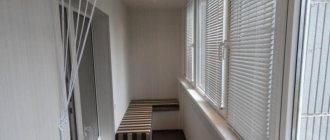
Stretch ceilings are ideal for visually increasing the height of the toilet room
The suspended plasterboard system is more practical and less expensive compared to the previous option. With the help of drywall you can successfully hide all the unevenness and communications. Finishing comes down to painting the surface or wallpapering. The advantages of a plasterboard ceiling include providing excellent sound and heat insulation, withstanding temperature changes and ease of maintenance. Installation of the structure involves the installation of special slats to which drywall is attached, as a result of which the height of the room is reduced. To obtain a flat and smooth surface, careful processing of the joints is required.
Slatted fabric is perfect for decorating a ceiling in any room, regardless of the size of the room. The material is resistant to various damages, moisture-resistant and fire-resistant. Installation does not require special skills or preliminary preparation of the base; it is enough to install the fastening system and assemble the structure (note that installing fasteners will reduce the height of the ceiling). Correctly selected shades will visually expand the room and create a harmonious interior. The cost of the material is quite high.
Plastic panels are an economical and affordable material for finishing the ceiling in the toilet room. Plastic has good moisture resistance, impact resistance, durability, is resistant to chemicals, and has excellent sound and heat insulation properties. Installation of panels does not require special skills or special equipment, and a wide variety of shades allows you to find the most suitable option. The only drawback of the material is its exposure to high temperatures, so when choosing this finishing method, you should take into account safety rules.
Plastic panels are an economical option for finishing the ceiling, with which you can hide communications and surface irregularities
Plaster is the simplest way to finish a ceiling. This technique allows you to create a fireproof, resistant to temperature changes and moisture, and a perfectly flat surface. If desired, the plastered surface can be painted with moisture-resistant paint. A textured or Venetian plaster ceiling will look great. The disadvantage is the inability to hide communications.
Tips and tricks for choosing
When choosing plastic panels, you should first of all pay attention to the composition of the products. The material for high-quality lamellas contains chlorine, hydrogen and carbon. Sometimes the composition includes bound lead, which performs a stabilizing function. Such panels do not release toxic substances into the air during a fire with high heat.
We recommend purchasing panels made of hard plastic - they are not flammable, in addition, they have excellent sound insulation characteristics and increased resistance to temperature.
A visual inspection will provide sufficient information about the quality of the material. Inspect the slats for:
- uniformity of coloring;
- the presence of black spots on the surface;
- the same width;
- absence of defects - drops, waves, chips, unevenness;
- integrity of the locks.
If you choose a product in an online store and you do not have the opportunity to inspect it yourself, get information from customer reviews of this company.
To test the strength of the material, press on the plastic. If only a small dent remains, the quality of the panels is satisfactory. Significant deformation and cracks indicate that such panels do not have sufficient strength and will not last long.
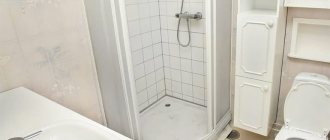
Disadvantages of finishing a bathroom with plastic:
Even such seemingly ideal panels have their drawbacks. There are few of them compared to the advantages, but we must tell you about them.
Fragility
If during installation you drop something heavy on the panel, it may crack or even break. So we can’t talk about super resistance to shock loads. If you suddenly want to punch a wall or throw something at it, think ten times.
Difficulty in arranging a room
Drilling holes for cabinets and shelves in plastic panels can be difficult, as they can crack and lose their attractive appearance.
Downsizing a room
If the room cannot boast of a large footage, finishing with plastic panels is not the best option. Lathing and cladding take up to five centimeters of usable bathroom space.
Unattractive appearance
This can only happen if poor quality panels are used with an uneven surface, which can cause gaps to form between them. This increases the threat of mold and mildew intrusion.
Calculate the exact cost of repairs using an online calculator
and receive a free detailed estimate for repairs
Calculate
Photo: bathroomcladdingdirect.co.uk
Matching style and design
When choosing a material for finishing a bathroom, you must take into account the general style direction of the house or apartment. In classic interiors, plastic will look alien. The same can be said about country, art deco and Provence. In these styles, it is better to use plaster, natural wood or tiles. But in modern styles - minimalism, modern, high-tech, plastic is quite acceptable and is used very actively.
The design of the lamellas - a wide color palette, various patterns and images, including 3D, imitation of tiles, stone, natural wood, mosaics - provides an extensive field for bringing the most creative design ideas to life. Modern manufacturers are trying to take into account all the latest trends in interior art.
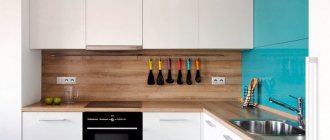
Color variety of panels
If a plain cladding seems boring to you, you can add additional shades to the interior. They can be either close and differ only in saturation and depth of color, or contrasting. Combinations of representatives of a bright palette with calm shades of a neutral range - white, gray, sand, black, beige - always look advantageous. Silver or mirror inclusions look great.
The latter also have purely practical benefits. A skillful combination of colors allows you to visually adjust the shape and size of the room. Narrow walls will look wider if plastic is laid in contrasting horizontal stripes; dark walls decorated with white accessories will visually “step back” and add volume to the bathroom. At the same time, light shades will visually enlarge the room.
The technique of combining shades can be used not only to decorate walls, but also to highlight individual zones. You can select an area with a toilet, sink or hygienic shower.
Combinations of shades are appropriate in any style. The main thing is to choose the right colors that are destined to become companions. For example, these:
- blue color - looks great next to white, black, blue, turquoise - this design will be ideal for a Mediterranean-style toilet;
- brown - combines well with yellow, sand, beige - these colors are typical for classic decoration;
- red shades can be emphasized with white, black or cream paints. Such combinations are suitable for modern styles - hi-tech, pop art;
- metallic - a shade of gray in combination with any shades will fit perfectly into minimalism and loft;
- green - in combination with golden and brown tones, suitable for styles that gravitate towards nature.
A combination of several shades can be arranged in a checkerboard pattern, outline geometric shapes, diagonals - the possibilities for experimentation are extremely wide. Design options for bathrooms using panels of different colors are presented in the photo.
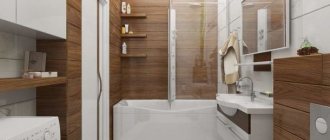
How to cover a bathroom with plastic panels
Modern wall panels are the most convenient material option for finishing a bathroom. A room covered with them will look quite modern and aesthetically pleasing.
Among other things, plastic panels are completely resistant to moisture, are hygienic, and their cost is low. Thus, using them you can make a budget, but at the same time high-quality repair.
Preparatory activities
Before starting repairs, an estimate is drawn up with a calculation of all the necessary materials. Here is a small example of a bathroom renovation estimate:
How to calculate the cost of toilet repairs
Of course, when renovating a small toilet in an apartment with your own hands, it is not necessary to make such a detailed list. But it’s still worth estimating the cost of basic materials.
Before finishing with PVC panels, all furniture and household appliances are removed from the bathroom. You can leave the plumbing fixtures during the renovation, but it is better to dismantle and put them away. Moreover, during repairs it is usually replaced with a new one.
Before finishing, old wallpaper should be removed from the walls, and their surface should also be cleaned and treated with anti-rot compounds.
Bathroom renovation. Preparing walls for finishing
Repair of a combined bathroom is carried out according to certain rules, since the air in such a room is very humid. In this case, the slats are installed only on the sheathing. In conventional toilets, slats can be glued directly to the walls.
Frame installation
Since the walls and ceilings in the bathrooms of modern apartments are rarely perfectly smooth, plastic lining is usually installed with preliminary installation of the frame. The latter is easiest to make from wooden slats 40x25 mm. The sheathing elements are usually attached horizontally. The frame is fixed directly to the wall using self-tapping screws and plastic dowels. The step between the slats is no more than 50 cm.
When finishing a bathroom, it is best to attach PVC slats to a wooden frame
. Tip: To level the frame, you can place slats of the required thickness or pieces of plywood in the places where the battens are attached.
After the entire wall is covered, you can begin installing the corner elements, as well as the upper and lower plastic guides. They are fastened to the frame with brackets using a construction stapler.
When finishing walls with panels, corner elements are pre-installed
Panel installation
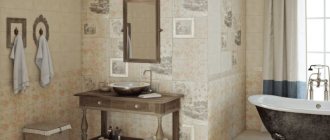
To renovate a bathroom, you can choose plastic panels of any color. But light slats will look better in this small room. There are actually many options for decorating a toilet with plastic. To verify this, just look at the catalog of any online construction store.
The design of such finishing as PVC panels can have very different
Actually finishing the bathroom with plastic panels is done like this:
- First, the tenon is cut off at the first lamella.
- After this, it is inserted into the corner starting element.
- On the reverse side, the first lamella will need to be secured to each lathing with a clamp or bracket.
Photo of a bathroom renovation with your own hands. PVC panels are fastened using a construction stapler
- The tenon of the second panel is inserted into the groove of the first. To insert into the upper and lower guides, the element will have to be bent slightly. The second panel is attached to the sheathing in the same way as the first.
- All other slats are installed in exactly the same order.
Bathroom renovation. Photo of installation of PVC panels using the tongue-and-groove method
- The last panel is inserted into the finishing corner profile without additional fixation to the sheathing.
- The ceiling is finished in exactly the same way.
Note: Today there is a PVC profile on sale, specially designed for the installation of plastic panels. In this case, the fastening of the sheathing and the lamellas themselves is carried out using the same technology.
Bathroom renovation in Khrushchev. Photo of plastic profile
Glue mounting
Repairing a bathroom with your own hands, if the walls are smooth and it is not combined with a bathroom, can be done using a simpler technology. In this case, PVC slats are attached directly to the surface of the room with liquid nails. The sequence of work will be as follows:
- Repairs begin by cleaning the walls and ceiling from dirt. Next, the surfaces should be primed.
Photo of the finishing of the combined bathroom. Walls should be primed before covering with PVC panels
- Large drops of liquid nails are applied to each panel in a checkerboard pattern in increments of approximately 30 cm.
- Next, the panel is pressed tightly to the surface and held in this position for several seconds.
- All other elements are attached in exactly the same way.
Renovation of a combined bathroom. Photo of a room decorated with PVC panels
Of course, as in the first case, the finishing and starting corner profiles, as well as the upper and lower guides, are first glued to the wall.
Below we invite you to watch how to renovate a bathroom with your own hands (video):
As you can see, using plastic panels, you can make very high-quality and inexpensive bathroom renovations.
Calculation of the required quantity
To correctly determine the amount of materials needed, you need to measure the room and determine the area of the walls that need to be lined. This number must be divided by the area of one lamella. This way we will know the required amount of material. But such a calculation is rough; a more accurate result can be obtained if you perform the same operation on each wall separately. Don't forget to subtract the area of the doorway and, if necessary, the window opening.
The resulting number must be rounded up and added to the result by 10-15%. The supply will be used for trimming, accidental damage and possible need for replacement.
Mounting options
When installing panels, two methods are used. The elements are fixed either with glue or with lathing. Let's look at each of these methods in more detail.
With glue
The easiest way, which will take a minimum amount of time and effort, is to glue the panels using liquid nails. In this case, the material is fixed directly to the wall, which saves maximum space. And this is a significant bonus for such a small room as a toilet. The only condition is that the base must be as level as possible. Unevenness of a maximum of 5 mm is allowed. Otherwise, it will be impossible to achieve complete adhesion to the wall. The slats in this place will sag and peel off very quickly.
When choosing such a technology, it is necessary to take into account the microclimate in the room. High humidity will inevitably lead to the appearance of fungus. Due to constant contact with the wall, condensation will form under the plastic, which simply cannot evaporate due to the waterproofness of the material.
This method has another drawback. During subsequent repairs, it will be very difficult to remove the cladding from the wall.
If you have smooth walls and you do not plan to change the finish soon, the method of installing panels using glue will be the best choice for you.
The installation process is carried out in several stages.
- Preparing the foundation. We clean the wall from dirt, dust, glue residues, old wallpaper, and greasy stains.
- Apply the adhesive composition in strips to the back side of the product.
- We apply the panel to the desired section of the wall, with force, but gently press it and hold it for several seconds.
Choose adhesive compositions that provide maximum adhesion of the base to the finishing material. The best choice would be “liquid nails” sealant.
With sheathing
If the toilet has uneven walls, you will first have to prepare a frame-sheathing, and then attach the panels to it using self-tapping screws, clamps or staples.
Wooden beams or a metal profile are suitable as materials for the frame. The first option is more convenient because it can withstand any fasteners used when installing slats. While only self-tapping screws are suitable for covering a metal profile.
The sheathing elements need to be fixed at a distance of 35-40 cm. They are fixed using dowels or self-tapping screws, depending on the material chosen for this.
Next, we mount the panels on the frame. This can be done with:
- small nails - driven into the technological tongue under the groove. The disadvantage of this method is difficult dismantling and the risk of damaging the lamella with a hammer;
- staples of a professional stapler. A quick and convenient method - but only suitable if the sheathing is made of wood;
- clamps - fastening elements in the form of clips that securely fix the panel even in a new building that is about to shrink;
- self-tapping screws - suitable for any frame.
Once the material for the sheathing and sheathing has been selected, you can proceed to installation, which is performed in several stages:
- install slats on the wall;
- we install fittings for decorating external and internal corners, finishing elements;
- we install the panels by inserting each of them into the mounting groove with a narrow shelf, after which it is fixed on the sheathing through a wide shelf;
- The final panel is placed between the previous and the final module with little effort.
The panels must be installed strictly vertically and as tightly as possible, avoiding bending.
Finishing with frame arrangement
After preparing and marking the sheathing, you can begin to secure it. Drill several holes in the wide side of the already cut metal profile at a distance of 0.5 meters from each other. The diameter must correspond to the size of the purchased dowels. By the way, you can find additional information on fastening PVC panels in our other article.
Assembling the load-bearing sheathing
First, you should install the outer guides, and then fill the middle of the wall with the remaining elements of the sheathing.
When performing this stage of work, attach the prepared strip to the wall and use a puncher to make marks on the surface through the existing holes. After this, move the profile to the side, and deepen the seats for the dowels with a concrete drill.
Drive one outer fastener into the wall through the profile rail. This will allow, if necessary, to level the sheathing vertically or horizontally. The remaining elements of the supporting frame are mounted in the same way. If there are unevenness and distortions on the original surface, you can use pads placed between the lath and the wall
At the next stage of repairing a toilet with PVC panels, a frame is assembled for a decorative box around a vertical sewer riser and other utilities. If there is enough space in the room, this can be abandoned. Just step back 100-120 mm from the back wall, mount a regular flat sheathing, and behind it place a riser, pipes, water meters and shut-off fittings. However, in this case you will have to install a technical hatch for access and maintenance.
To install a decorative box, vertical posts are installed at all its corners, which are fixed in starting profiles attached to the floor and ceiling. After this, they are fastened together with horizontal lathing. Individual structural elements are fixed with metal screws.
Fastening the panels
If there is a pattern on the surface, before starting installation, it is recommended to lay the material on the floor and mark the order of installation of the finishing elements. The existing ornament must provide an exact combination of all fragments of the pattern, as well as the location of the border lines.
When fixing the panels on the sheathing, the procedure is as follows:
- install a starting rail that will hide the figured lock edge;
- insert the first vertical panel into the groove of the starting element, and fix the second side to the sheathing using self-tapping screws, having first checked the vertical position;
- Insert the next panel into the already fixed one and screw it in the same way only on one side;
- The easiest way to go around corners is to use special plastic profiles.
Installation begins from one of the corners or from the doorway. Additional sealing of joints is not required.
Step-by-step instructions for finishing a toilet with your own hands
Before you begin installing the panels, read the step-by-step instructions.
Required materials and tools
To decorate the toilet with plastic panels you will have to stock up on:
- material for creating the frame - it is advisable to give preference to slats or metal profiles with a cross-section of 20x50 mm. The thin profile will allow you to save maximum space in the toilet or combined bathroom. When calculating the number of slats, you need to take into account the ceiling frame, as well as the decorative box that masks the pipes;
- dowels for securing a beam or profile - the reinforcement should be of such length as to extend into the wall by 50-60 mm. The amount of fasteners is determined depending on the dimensions of the frame, taking into account the step at which they will be located;
- 15-20 mm wood or metal screws, or small nails or a construction stapler with 10-12 mm staples;
- Liquid Nails sealant or tile adhesive - if the walls are smooth;
- means for treating wooden structural parts against rotting and insects;
- primer for treating ceilings and walls - enhances the strength of the base, increases the adhesion of the adhesive to the wall. If you choose a composition with antiseptic properties, you can reduce the possibility of fungus formation.
The set of tools varies depending on the chosen installation method and may consist of:
- hammer drill or electric drill;
- drill for wood or concrete;
- screwdriver;
- jigsaw or saw;
- hammer;
- metal scissors;
- construction knife;
- tape measure and square;
- pencil or marker;
- level with vertical and horizontal indicator;
- construction stapler;
- spatulas, roller, brush, hair dryer.
Preparing the walls
Before starting installation, it is necessary to prepare the base. The old finish is completely removed from the wall surface. After this, the walls must be cleaned and treated with an antiseptic to prevent the formation of fungus. After this, you need to fill all the unevenness and cracks with plaster or putty and wait for the material to dry. If the technology of installing panels on glue is chosen, it is necessary to level the walls using plaster or drywall. For the toilet, the first method is advisable, since the frame, together with the gypsum board, will “eat up” a fair share of the space. Before pasting on a wall – plastered or mounted from plasterboard – it should be primed.
Installation of sheathing
If you are not bothered by the loss of usable space, choose the method of mounting on the sheathing. This will make it possible to hide unaesthetic communications and supplement the design of the facing “pie” with heat and waterproofing materials. If the toilet is combined with a bathroom, the humidity in the room is increased. Therefore, it is better to choose metal or plastic profiles to create the frame. If you still decide to choose wood, treat the surfaces with moisture-proof, antiseptic and fire-retardant compounds and finally paint them.
Installation steps:
- We carry out the markings. The outermost slats - upper and lower - will be located at a distance of 6-7 cm from the floor and ceiling. We mark the ceiling in the same way. The supporting slats must be installed perpendicular to the slats, which can be installed vertically, horizontally or diagonally. The step is 40-50 cm.
- We mount the frame using self-tapping screws or dowels.
- We carry out the wiring and bring it out to the planned places.
- Insulation can be laid in the gaps of the frame.
- We make boxes to hide the pipes.
- We install a vapor barrier membrane.
- We cut panels and moldings according to the height of the room. During installation, we adjust and cut additional elements.
Panel installation
The sheathing is ready and it’s time to start installing the decorative panels. It is performed in several steps:
- install corner and side moldings;
- we attach the starting profile in the far corner from the front door;
- we insert the first lamella into it with a narrow shelf, begin to insert the element from the bottom corner;
- we fix the panel using suitable fasteners - clamps, staples, self-tapping screws, observing a step that can ensure rigidity of the structure;
- We install subsequent panels in the same way. During installation, it is necessary to monitor the tightness of the fit - the joints should not be obvious;
- We frame window and door openings with starting corners;
- We attach skirting boards that will decorate the cracks and give completeness to the appearance of the room.
When installing panels using a seam method or if the joints have become visible due to uneven walls, the joints must be sealed with silicone.
Tool
To decorate a toilet with plastic panels with your own hands, you need to have the following working set:
- screwdriver and hammer drill;
- jigsaw, hacksaw and metal scissors;
- tape measure, ruler, cord;
- bubble level and corner;
- pencil or marker;
- sharp knife, hammer.
If the surface of the walls requires preliminary preparation, then additionally prepare paint brushes, spatulas, a roller and a hair dryer for drying.
Features of installing panels on the ceiling
Let's get acquainted with the specifics of installing PVC panels on the ceiling. The very first and most fundamental thing to decide is the distance between the cladding and the ceiling. When making your decision, consider the type of lighting fixtures you are going to install. If the lamps are built-in, leave at least 10-15 cm. A space will be created behind the panels where all the wiring will be hidden. The locations of spotlights should be marked with a pencil. After this, we cut out the holes and install the lamp bases.
Without frame
If the walls are smooth and there are no construction defects on the surface, you can refuse to install the sheathing and use “liquid nails” glue or a compound for laying ceramic tiles to fix the coating. The glue is applied to the back side of the panels in longitudinal strips 10-15 mm wide. For tile composition, it is recommended to use a notched trowel.
The joints of the external and internal corners can be covered with a regular flat plastic profile or standard additional elements can be used. In the second case, glue should be applied to the internal cavity of the connecting lock. A decorative box for utilities cannot be closed without a frame. Therefore, it is necessary to combine two methods.
Combining PVC panels with other finishing materials
Another advantage of plastic panels is their ability to harmoniously combine with representatives of other groups of finishing materials - paint, wallpaper, tiles, MDF panels, plaster. This material provides unlimited design possibilities in terms of creating all sorts of, sometimes unexpected, combinations. The most common example for a toilet is when the bottom of the wall is covered with tiles and the top is finished with plastic slats. Another option is to have panels on the bottom and the top is plastered. The border between materials can be closed with polyurethane molding.
Panel care
How to properly care for the panels, what products can be used and what forms of cleaning can be used depend on the type of cladding you have. Panels are:
- laminated;
- simple.
Both of these materials are perfect for finishing a toilet. Keep in mind that material without a laminated layer better absorbs dirt and stains that cannot be removed later. Therefore, you should get rid of new contaminants immediately after they appear.
Surfaces that do not have a protective film should be cleaned “dry”, that is, using the “dry” method. Use a vacuum cleaner or dry cloth. If the stain cannot be removed, dampen the cloth and treat the stain again.
Surfaces not protected by laminate should not be rubbed vigorously. The abrasions may not be very visible, but as soon as dirt gets on them, they will immediately appear.
Laminate flooring is cleaned in the same way. However, the presence of a protective layer allows you to apply more force when washing the plastic. Grease stains, dried blots and stains can be wiped off at any time, even if quite a lot of time has passed. If necessary, non-aggressive and non-abrasive detergents can be used. Avoid chlorine-containing compounds, as they can cause irreparable damage to the paint of the panels. You can use a homemade soap solution, dishwashing detergent, or a slurry made from water and baking soda - applied to the stain for a couple of hours, after which it is washed off with warm water.
You can also care for the panels using cleaning chemicals from the store. It can be either a solution or an aerosol.
Installation of wooden sheathing under plastic panels
When the walls in the toilet and the wood are completely dry, you can begin fastening. First of all, fix the block a couple of centimeters above the floor, along the entire perimeter of the toilet room. The timber is passed under the ceiling in the same way.
If the ceiling in the toilet will also be finished with plastic panels, then lathing is needed on it too; the fastening technology is no different from the wall one:
- The block is applied to the surface, and using a hammer drill, a hole is drilled through the tree into the hay. The first fastening should be approximately five cm from the edge. A dowel is driven into the hole. The second edge is attached in the same way. Now that the block is fixed, it is further strengthened, with a step of 30-50 cm between dowels.
- When the bars around the perimeter of the toilet room are installed, use a tape measure to measure the distance between the lower and upper bars. It is divided into two, and another beam is attached exactly in the middle of the wall.
- The resulting two sections are once again divided in half, and the beam is placed again. This is done until the distance between the guides is approximately 50 cm.
- Certain difficulties may arise with communications, which also need to be finished with plastic panels. To do this, boxes are made from the same block as the sheathing, which are attached to the wall and floor of the toilet. You can connect the bars together with wood screws.
Advice! if spotlights are planned as ceiling lighting in the toilet, the block must be mounted below the ceiling, at least 15 cm. This is done using profile fasteners.
You can watch the video in more detail on how this is done.