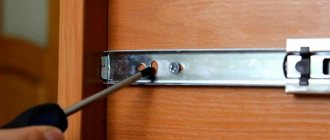
Modern design furniture is often equipped with telescopic runners. This is a simple design, convenient and reliable, but, like any mechanism, it can fail. If a part becomes unusable during operation, it must be replaced. This is where the owner has questions about how to remove the drawer from the guides.
At first glance, this seems incomprehensible, but if you follow the simple instructions given below, then everything will become extremely clear. The process itself will take no more than 1–2 minutes. So what is the procedure?
Dismantling sequence
Before you remove the drawer from the slides, note that each drawer has two of these features. You must act in the following sequence:
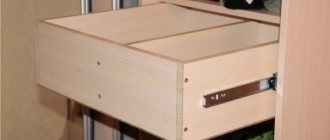
- Pull the drawer out as far as possible.
- Plastic fasteners will be visible in the window. Lower the special “tendril” down and then pull it towards you so that it comes out.
Before removing the drawer from the guides, please note that the arrangement of the antennae varies depending on the design: symmetrical or mirrored.
In the first option, lightly pull both elements down; in the second case, one “tendril” moves down, the other moves up. Determining which method is suitable in your case can only be done by trial and error.
3. Lowering the “antennae”, pull out the drawer. It comes out of the guides without much effort.
Assortment of closers for metabox drawers
For example, for the Metabox system, the manufacturer Blum offers additional Blumotion door closers. You can buy them at any time. Installing a closer on a drawer is quite simple: just remove the boxes themselves from the runners and secure the closers between the guides. Detailed instructions help to correctly install closers in a drawer, calculating all the necessary distances.
The principle of how to install Blum closers on a drawer is easier to understand from the video.
By the way, virtually any metabox can be equipped with closers. Overhead mechanisms with this function are offered by different manufacturers: Boyard, Amix, FGV, Blum and others. Some of them are quite interchangeable. The main thing is to carefully check the basic technical data before purchasing:
- The design of existing boxes,
- Depth, height of the side walls of the metabox
- The size of the gap between the side wall of the metabox and the body of the cabinet.
If all the calculations for your box coincide with the instructions for calculating the metabox parts of the selected system, then in 99% all additional accessories, including the door closer, will suit you perfectly. You can install the door closer on a drawer using the general diagram of the instructions. It is different for each mechanism and is included in the package. For example, for the SlowMotion Zeta door closer from FGV (Italy) it is like this.
A complete set of fittings (metaboxes + closer) for one drawer looks like this.
IMPORTANT! Since shock absorbers of this type are attached to the bottom of the metaboxes, it should be understood that they do not fit under the bottom drawer of a standard kitchen kitchen
There is simply not enough space between the bottom of the drawer and the bottom of the cabinet itself to install them. Therefore, the box itself is twisted higher (with a corresponding twist of the facade).
How to return the drawer to its original position
How to return the structure back is not difficult to guess. You just need to repeat the sequence of dismantling steps described in reverse order. Insert the box into the slides and push along the guides until you hear a characteristic click.
As you can see, figuring out how to remove a drawer from telescopic guides is not so problematic. Simple instructions will always come to the rescue if you are new to repairs and need express advice without leaving your home.
Repair of drawers: causes of breakdowns
Before you start repairing drawers with your own hands in a closet or chest of drawers, you should understand the cause of the breakdown. Understanding what caused the problem is the key to successful repairs. The main thing is not to confuse causes and effects. For example, warping the cabinet or cabinet body itself can cause incorrect movement of the guides and their failure. And if you do not “return” the body to the original correct geometry, replacing the guides simply will not solve the problem.
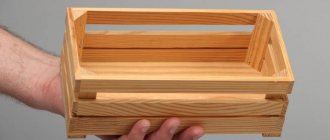
The box frame has fallen apart or the bottom is falling out
This kind of breakdown is especially common in wooden chests of drawers assembled on spikes. Over time, the boxes dry out and become unstuck. All that is required is to take them out, disassemble them into parts, level them, sand them and reassemble them with glue. For reliable tightening, use additional fasteners in the form of furniture corners and self-tapping screws.
The bottom of the fiberboard box may not be nailed securely at first. Fasteners on small nails are especially unreliable. If the drawer is made of chipboard, then it is better to attach the fiberboard bottom to it using 3x16 self-tapping screws. Use washers to expand the clutch area.
The drawer falls out or warps in the guides
Most likely the reason is the insufficient rigidity of the cabinet or chest of drawers itself. Due to the uneven load of the shelves, the body inevitably deforms: the sides bend, the distance between them increases, and the drawers begin to fall out. The cabinet may warp if the floors are uneven and the cabinet or chest of drawers itself is not level.
Correct, smooth movement of the guides is possible only with the correct geometry of all elements. That is, both the body and the boxes of the drawers must be aligned diagonally. Perhaps the assembly was incorrect from the beginning - if you screw the guides unevenly relative to each other by at least a millimeter, and over time, as the boxes are loaded and they sag, this inaccuracy will become critical.
Also, the cause of the box warping and falling out of the guides may be grinding and deformation of the rollers (ball bearings) of the rails themselves. It happens that the metal of the guides itself bends. The reason is simple - the fittings have exhausted their service life and require replacement.
The drawer doesn't slide out well, the guides stick
The reason may be either in the deformations described above or in the fittings themselves. Even if I installed Chinese analogues with thin metal on the guides, it is unlikely that the fittings were originally designed to fully load the box. Therefore, it cannot ensure the expected smoothness of closing and opening the drawer.
Some advantages of telescopic guides
Sometimes problems arise with such structures during operation, but these are just minor drawbacks compared to the characteristic advantages of telescopic drawer guides. Among the main advantages of retractable systems:
- Increased reliability of boxes of this type compared to roller mechanical systems.
- Long service life of structures.
- The quality of metal parts made from alloys that are durable. This ensures that the guides will not “twist” under the weight of the box.
- Easy and quick drawer extension completely or to the desired depth, combined with reliable fixation of the device.
- This option is more accessible due to its low cost compared to its analogue - tandem box.
Knowing how to remove a drawer from the guides and how to easily mount it back, you will not have problems using telescopic structures. With simple instructions on hand, consisting of just a few steps, you can dismantle the box yourself and just as easily return it back.
Disassembling the roll-out box mechanism
If such a need arises, rest assured, you can do everything yourself - remove the box and install it in place! This has been done several times at our house. The first time I removed furniture drawers was when the cabinet was completely new. The furniture company's specialists incorrectly set the position of the roll-out drawer guides in the children's room set. Because of this, it (the box) constantly moved out and opened spontaneously. First I’ll tell you, and then I’ll show you in video instructions how to fix everything...
Disassembling the roll-out box mechanism
So: at first we called the furniture company, but we couldn’t persuade them to have a master come and adjust everything. Therefore, we said goodbye once and for all to this organization and decided to do everything on our own. I didn’t immediately understand how to remove the box from the “guides”. It turned out to be simple! It is necessary to pull the drawer out as far as it will go, then the plastic “tongues” will come out.
Roll-out box repair
Drawer mechanism repair
Box removed
The tongue “sits” on a bolt, much like a clock hand, only of a very interesting shape. The protrusions of this “arrow” block the movement of the guides and prevent the box from falling out when assembled. To disassemble the mechanism, you need to pull the “tab” counterclockwise and pull out the drawer.
Left side of drawer with roll-out mechanism
On the left, pull the “tongue” up...
Roll-out drawer mechanism - right view
And on the right we pull the tongue down... The roll-out drawer (also known as a drawer) easily comes off the holding guides.
Using a “level,” I measured the position of these same guides. As expected, they were installed crookedly. First, I unscrewed a couple of screws, those in the depths of the frame. Again, using a “level,” I set it in the correct position, made sure that nothing would interfere with the movement of the box, screwed it on and assembled the furniture.
If you repeat this, make sure that the “guides” fall into place in the receiving glands. If it closes tightly, then perhaps something is crooked. Better check it again! If everything is in its place, it works fine! This same disassembly and reassembly method will come in handy if something falls from an overloaded box behind the back wall and you need to quickly get it out. This principle applies to shelves of computer tables, etc., etc.
Video instructions on how to remove the box from the runners. I filmed it with my phone, it’s better, of course, to use a normal video camera>>>.
Votes statistics
Visitor voices
[Total: 65 Average: 4.2]
Disassembling the roll-out drawer mechanism reviewed by admin on 02/03/2012 rated 5.0 of 5
Problems with the drawer design
The most common problem is the bottom of the drawer. There are two types of drawer bottom fastening. We can safely say that 90 percent of manufacturers simplify production and make an overhead bottom that is attached to the bottom of the box. Attached along the perimeter to the sidewalls. This greatly simplifies the technology; the bottom becomes another load-bearing part, which also takes on the role of a part that forms the geometry of the box. What to do if there are problems with this type of bottom fastening.
Most often, the reason is insufficiently strong and well thought out fasteners. The bottom is attached with nails to the front and back, and it is held in place by guides on the sides. At first, this scheme works quite well, but over time the nails become loose and the bottom comes off, even if the box is not overloaded. The solution is to replace it.
Nails - forget them right away. Today only the lazy and downright stingy use them. For repairs, it is easiest and most effective to use furniture staples. A furniture stapler is very inexpensive, staples are even cheaper. If your drawer is not loaded to its maximum capacity, 8 mm staples will be enough for you. They are easier to work without getting used to, they are less deformed and go to a sufficient depth. But if you are ready to practice first and fix the bottom more confidently, take 10 mm long hardened staples. You can use hardened nickel plated ones - they are even stronger and do not rust. Afterwards the procedure is simple. We remove the old fasteners and “shoot” the bottom with staples around the perimeter. Under the guides too. They are easy to remove - they are secured with three screws on each side. In this case, you must not disturb the geometry of the box, so punch the sides sequentially.
You can use screws if you have problems getting a stapler and staples. You will need screws with a diameter of 3.5 mm. There are two generally accepted standards for the length of furniture screws of this diameter - 15 and 30 mm. In principle, 15 is enough. However, it may be that the box is made of low-quality chipboard, which is porous inside, so it is better to use 30 mm screws.
Both of the above methods are also suitable for replacing the bottom of a box - you will need to cut the material to the required size and secure it to the box box.
The second type of bottom fastening is a mortise bottom. Most often this is thin plywood, which is glued into the slots on the walls of the box. Such a bottom very rarely causes problems; in most cases they are caused by its destruction. If laminated fiberboard is used, you may encounter a situation where, due to plasticity, the glued zones simply tear out of the grooves. This “disease” can be treated a couple of times by re-coating the groove and gluing the bottom in place, but it’s still better to change it right away. This is not an easy procedure, but with some skills it can be done.
- the box needs to be disassembled;
- clean the grooves without disturbing their shape and thickness;
- order or cut a new bottom part of the required size;
- reassemble the box by gluing in a new bottom;
- give time for the glue to dry thoroughly. Do not load the box.
If the box is assembled using self-tapping screws or confirmations, this can be done easily. However, if tenon joints were used, it is better to turn to specialists for disassembly if you are not strong in carpentry. The same actions are performed when you need to replace the plywood bottom. If it is cracked, damaged, deformed or lost its appearance.
A number of repair recommendations and useful life hacks
- For lightly loaded dresser drawers, eight-millimeter brackets are used when installing the bottom. But, it’s safer to take a hot 10.
- The worse the quality of MDF or chipboard, the thinner the fastening screws are chosen (maximum 3.0 mm).
- If the pins become loose, simply drill out the old holes to a larger diameter and take a larger diameter of the fastener.
- Pins, grooves, and even connections nailed with staples or screws are pre-coated with PVA for reliability.
- To ensure that the chest of drawers does not lose functionality, drawers do not become difficult to pull out, and the shelf doors do not stop closing, in no case should you apply too many layers of paint or varnish. If the appearance still requires a multi-layer coating, first remove the extra 1-2 millimeters of the base with a grinding wheel.
- Extend the life of retractable rollers by regularly applying silicone lubricant. This is, by the way, how to care for furniture from IKEA.
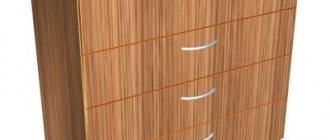
Strengthening the structure of drawers and chest of drawers
Very often, a chest of drawers in the basic design does not provide the required level of strength, which is why the panels become deformed, fasteners loosen faster, drawers move out worse or fall out, guides fly off, and a shelf falls. This means that the frame needs to be strengthened. For example, replace a thin bottom made of plastic or fiberboard with a similar thickness made of varnished plywood or laminated chipboard. Strengthen the back wall in the same way. If you plan to heavily load the furniture, it is recommended to additionally tighten the joints (facade - side wall, back wall - frame) with corners.
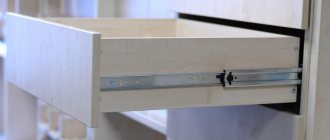
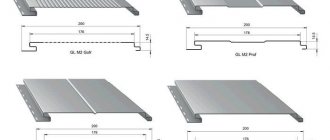
Ball guides
The second type of guides is ball guides. Or the “telescope” type. And their older brothers are “tandemboxes”. They are more expensive, but free from all the diseases of roller skates. Therefore, they are often used by those manufacturers who value quality over savings. They look like this
The ball guide can withstand many times the mass. In a roller there are two points of support - rollers on the supporting part and part of the box. In a ball bearing, there is a whole block (middle) on which small balls are located according to the principle of a rolling bearing. Plus, the thickness of the metal from which the guide parts are made is much higher. Three more most noticeable advantages are that such guides are almost impossible to install incorrectly; they allow you to pull out the drawer to its full depth and make it possible to firmly fix the drawer when closed. In addition, ball guides can be installed at any height according to the structure.