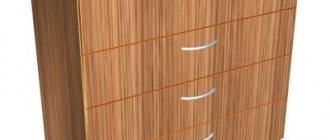
What are Ball Drawer Slides
Before calculating a box for ball guides, you need to find out the features of their design, find out the standard sizes and types. Their main purpose is to direct movement and ensure smooth, silent operation of the mechanism. Until recently, furniture drawers moved along wooden grooves when they were pulled out. This process was quite noisy and required some effort.
They provide the best stability of retractable systems and ease of use.
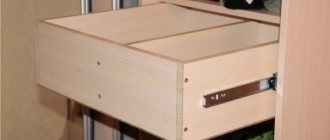
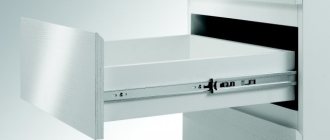
With the advent of retractable devices, the situation has changed radically. Structurally, they are made in two varieties - with rollers and with ball bearings. The advantage of the ball mechanism is that it operates more silently, smoothly and allows the drawer to be fully extended. Compared to roller ones, they require somewhat greater effort during operation. They are attached to the side surface of the box.
The action of this fitting is based on the mutual movement of durable steel tracks that make up the tire.
The dimensions of the drawer guides are as follows:
- the reinforced structure differs in height, which is 45 mm, while the base height is 35 mm;
- the thickness of the device is 13 mm;
- The length of the ball guides is always a multiple of 50 mm and usually varies from 25 to 60 cm for basic ones, reinforced ones - from 30 to 55 cm.
Since the tracks are nested inside each other, such systems are called telescopic.
Types of furniture guides
There are two types of designs of retractable mechanisms for furniture drawers:
- Roller - an economical option. Wheels are used as a moving element. Furniture makers install them on economy class furniture. The main drawback is the small power reserve; almost a third of the drawer remains inside the furniture body when pulled out. But they have an attractive price and a large margin of safety.
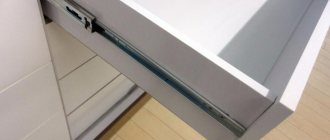
- Ball guides (telescopic). Provide full extension and smooth movement. There are options of reinforced construction and equipped with a closer. Balls are used as a moving element; they are silent when moving.
Depending on the intended use, ball guides can take different shapes and have a unique set of functions.
In addition, retractable devices have a number of other design features.
Roller
Such mechanisms appeared about fifteen years ago and instantly became popular among furniture makers and furniture consumers. Today it is difficult to imagine drawers in a closet without guides.
Drawer extension in this type of guides is only possible incompletely, but their cost is several times lower than that of ball-type ones.
The main advantages of this type of fittings are:
- work without lubricants;
- simple installation;
- smoothness and ease of movement.
The extension mechanism consists of two parts, one of which is attached to the side of the box during assembly, the second is inside the body of the product where the box is placed. There are no restrictions on the dimensions of the furniture; the roller mechanism has a length of 26-60 cm.
Roller guides create noise when opening the drawer; to eliminate this effect, rubber-coated rollers should be used.
With door closer
Extension mechanisms equipped with a closer and a damper are more popular than other systems. They are more reliable in operation, durable and can withstand higher loads.
They are similar in design to the previous version, the only difference is that these elements are equipped with a closer and dampers.
Mechanisms equipped with damping devices open and close silently and smoothly. The damper itself works as a shock absorber. It is effective when excessive force is applied when closing.
The closer picks up the box when closing, when it is almost in its extreme position and gently returns it to its original state.
The damper ensures that the drawer closes smoothly and silently.
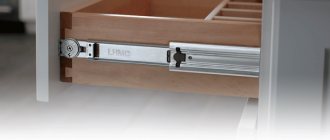
Ball
Guides on ball bearings or telescopic mechanisms for opening furniture drawers differ in their shape and some design features. Taking into account these features, three groups of ball guides are distinguished:
- Number of levels – one or more.
- Number of sections – one or more.
- Possibility of disassembling the mechanism - non-separable and collapsible.
Installation can be carried out on the side surfaces of the drawers or in the grooves of the side surfaces.
Non-separable guides have a lower cost due to the complexity of producing a collapsible design. The cost increases with increasing levels and sections. The balls in the bearing of a rail mechanism can be steel or plastic, and the latter are quieter, but less wear-resistant.
As a rule, the final cost of non-separable mechanisms is somewhat lower than their fragmented counterparts.
Hidden mounting
The rail mechanism for sliding elements of cabinet furniture with hidden installation is becoming quite popular among furniture makers. Such devices can be equipped with a closer and a reverse-action system. The main advantage is hidden installation; during assembly, it is installed on the bottom of the box. During operation. the retractable slats are not visible and the box appears weightless. Fittings of this design are highly reliable, providing soft and silent closing of retractable furniture elements.
Installation of guides of this type is considered the most difficult and time-consuming. But this fittings are becoming more and more in demand, as they are convenient to use.
Reverse action
Reverse-acting systems operate on the principle of a closer. A distinctive feature of such fittings is that the mechanism operates in the direction of opening. To pull out the drawer on which the slats are installed, with a reverse action, you need to lightly press the front part. When you hear a click, release the force and the drawer will slide out on its own. The presence of a reverse system on pull-out furniture elements allows you to avoid installing handles on them.
The advantages include good reliability of the products; the movement of the box is smooth and free of extraneous unpleasant sounds. Closes softly and quietly.
Full opening systems
When calculating drawers on ball guides in the manufacture of furniture with deep niches, the presence of full opening systems should be taken into account. The specific telescopic design of such rail sliding mechanisms makes it possible to completely open the drawer, which is very convenient for viewing its contents. This functionality is provided by folding racks and a ball bearing. Such systems are widely used in furniture production.
Full extension slides are popular modern designs.
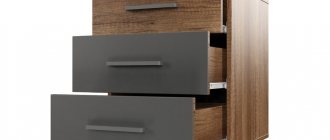
Installation and adjustment of drawer fronts
So, the first thing we will do is insert our drawers without fronts inside the cabinet. And now a very interesting and quite responsible part of the work begins. We need to align and evenly secure the fronts on the drawers. In general, when calculating facades, I always make the distances between them 2mm.
This is enough to, as they say, “get to size”, and “in case something happens” there is a small margin for maneuver.
Another convenient point when installing facades between which there is a 2mm gap is that you can simply put a 2mm thick PVC edge between the upper and lower facades and be sure that the gap is “caught”.
However, life is an unpredictable thing, and the life of a furniture maker is generally unpredictable chaos, depending on many external factors. Well, let's say you calculated all the gaps between the facades at the rate of 2 mm. And the sawyer Vasya took it, and missed a bit, and made your facades 1mm lower. As a result, at each joint you have a 1mm lack of façade height. Well, your lower façade may not end up looking particularly beautiful.
Therefore, no matter what, before you start installing the facades, you need to carefully measure everything and make sure that at the time of installing the facades you have a gap of 2 mm - this is exactly the gap that you need. If the sawyer Vasya did “take down” 1mm, then, probably, you need to make a gap between the facades of 3mm or take a baseball bat and go to Vasily’s house, well, invite him to play baseball or somehow otherwise agree with him that he remade the facades. Although, as for me, 3mm is not critical. The main thing is that everything is beautiful, uniform and organic.
So, you have measured everything and determined that your distance between the facades will be 2.7 mm. How to do it? Yes, very simple. We measure the internal space for the facades. Ours is 500mm. Then we measure the height of all facades. In our case, the total height of all facades is: 164mm*3=492mm. We have a difference: 8mm. We have three junctions. It turns out that each joint accounts for 2.7 mm. It turns out that simply adding a 2mm edge won’t work, but we can still take it as a guide.
How to attach fronts to drawers
Now we need to set (adjust) the facades. But first, we need to figure out how exactly we will attach these facades to the drawer. The most popular and widespread method of fastening facades is to fix them with 3-4 screws measuring 3.5x30mm. Or as furniture makers say: “Put it in the thirties.” Which in translation means: “Fix with screws 30mm long.”
Why exactly “thirty”? Well, everything is simple here too. Our chipboard thickness is 16mm. “Thirty” goes right through the front wall - this is already 16mm for us and crashes into the facade, which has the same thickness, and stops 2mm from its front side. As a result, we have a rigid fixation of the facade, as well as an aesthetic appearance of the product. However, I want to warn you that facades are different.
For example, facades made of milled MDF panels are not 16mm thick over their entire area. Here you need to carefully calculate the places where the facades are attached and make sure that it is in these places that your screw will not get into the thin area of the facade and will not come out from its front side. Well, if your drawer fronts have a uniform thickness over the entire area, then don’t bother too much with calculating where to fix the front.
Because no matter where you screw them, you still have no risk of ruining the facade by screwing it through with a screw.
In general, having decided on the places to drill holes for the “thirty”, we take a drill in our hands, load a drill with a diameter of 2 mm into it and drill through holes for 3.5x30 mm screws in the front wall of the drawer. Then we take a screwdriver and screw in the screws so that their tips do not stick out from behind the front wall and do not interfere with further installation of the drawer fronts.
Let's start installing drawer fronts
There are many ways to install drawer fronts. Furniture makers came up with them not because they have nothing else to do, but because there are situations when something is not available in production, and then they have to be sophisticated in solving this or that problem. After all, the work still needs to be done. I will tell you about the simplest and most convenient way to install a drawer front. After all, you have nowhere to rush, and if you don’t have something in stock, you can always safely go to the market or hardware store and buy it. After all, the main thing for us is quality. Right?
Which retractable mechanism to choose
The calculation of drawers is always associated with the choice of a retractable mechanism. Three points are fundamental in this matter:
- Reasonable price.
- Design load.
- Design – design features, color.
Ball guides have a positive effect not only on convenience, but also on the efficiency of using furniture.
These points should be considered together, choosing the most compromise option. The most economical choice is roller guides of a standard design. But low cost is not always justified. If large loads are expected, then in order to avoid premature destruction of the guides, attention should be paid to ball structures or the possibility of hidden installation of the rail mechanism.
To limit the movement of the carriage and prevent the box from falling out of the working system, a limiter is installed on one side of the rail.
For furniture design features that do not require handles, it is best to use reverse-action systems, but they are not advisable in children's rooms. For furniture with deep niches, telescopic mechanisms for full opening will be most acceptable. If you don't have budget restrictions, use tandem boxes.
Such fittings appeared on the market relatively recently, but quickly became in demand.
Helpful installation tips
It should be noted that many people often confuse ball drawer slides with their roller counterparts. Therefore, when choosing a mechanism, you should pay attention to many factors. Thus, roller products are mainly painted white. In this case, the drawer is pulled out using plastic wheels. Experts say that these devices are less convenient and wear-resistant, so they are not worth installing. During operation, you can often hear a squeak, and the plastic wheels often break down over time and also fly out of the guides themselves.
If the bottom of the box is inserted into special grooves, then it is better to secure it using thin self-tapping screws with edges. Otherwise, the contents may begin to fall out along with the bottom. In case of heavily loaded drawers, a double set of guides can be used.
Experts recommend that the installation of this mechanism be carried out immediately before assembling the furniture. The fact is that in this case it is much more convenient and easier to carry out all the work, and it will take significantly less time. In this case, after assembly it will only be enough to make all the required adjustments.
When installing, also pay attention to the fact that the height of the drawer should be approximately 4-5 cm less than the height of the facade itself.
In fact, installing drawer mechanisms does not cause any problems. To do this, you just need to purchase high-quality guides and install them correctly. It is important to comply with certain standards and carry out measurements and adjustments correctly. In this case, the mechanism will last quite a long time, and no incidents will arise during operation.
Drawer guides
Since devices have appeared in furniture production that provide easy and soft movement of retractable elements, they have constantly undergone design changes, improving their functionality.
The load that the roller guides can withstand is 25 kg.
Roller type guides have become the most popular. The simple design and installation make it easy to remove the drawer from the guides, which is very convenient for keeping it clean and finding lost items. Disadvantages - noisy operation, difficulty in choosing colors, demanding maintenance.
When choosing roller guides, it is important to take into account their thickness: in order for them to serve for a long time, it should be from 1.2 mm.
Mechanisms with ball bearings are more complex in design, installation and higher cost. They operate silently, run smoothly, and cope well with heavy loads. They differ in design features:
- have a closer and a damper;
- with hidden installation;
- telescopic, for full opening;
- with reverse action.
Tandemboxes are a complex design that consists of both a guide and a side wall of the box. Such systems have a number of advantages:
- durability;
- perfection at work;
- They are equipped with a damper and closer.
Due to excellent performance characteristics, the products are easy to use and have a long service life.
The disadvantage is the high cost.
Installation of guides
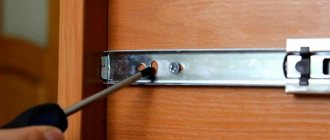
The nature of the fastening of the bottom of the box is determined by the type of guides used. When installing roller mechanisms, the bottom can be secured using furniture nails. When the installation of ball guides is provided, fastening is carried out with self-tapping screws or the bottom is made inset.
The most accurate markings when installing ball guides will allow you to avoid distortions of the drawers and other problems with the further fastening of the facades.
Let's look at the step-by-step process of installing rail mechanisms for drawing out a drawer:
- We disconnect the guide and place its inner part along the longitudinal axis of the outer side of the side part of the box. We adjust the location along this axis using the technological holes on the rail.
- We align the front edge of the guide with the edge of the side wall on the facade side. Then we adjust the transverse position of the strip and secure it with self-tapping screws.
- Similarly, we attach the outer part of the guide rail to the vertical surfaces of the niche. The longitudinal axes of movement are preliminarily marked.
- Before finally attaching the rail to the wall, check whether the drawer will close completely.
The set of ball guides consists of two steel symmetrical telescopic slides: left and right, each of which can be disassembled into two components.
It is important to take into account when marking that there should be gaps of at least 2 mm between the facades.
Basic installation errors
The one who does nothing makes no mistakes, but mistakes can and should be avoided. And we will learn from the mistakes of others. Assembling the structure is the final part, for which mastery of tools and care are important. Major inaccuracies are allowed at the stage of calculations and marking. The most common ones include:
- the depth of entry of the guide inside the niche is not taken into account;
- there is no gap left between the fronts of the drawers or between the front and the upper part of the structure;
- incorrect calculation of box dimensions;
- inaccurate measurement of the distance from the bottom edge of the facade to the bottom of the drawer.
There must be a gap of at least 10mm between the back of the chest of drawers and the back of the drawer.
During installation, the main thing is to install the left and right parts of the guides at the same height to avoid distortion. Flush mounting strips require very precise fitting.
The choice of movable fittings should be approached taking into account the design features of the furniture and personal wishes. If you want the mechanism to work longer, refuse the cheapest offers. In terms of price-quality characteristics, ball and retractable mechanisms are an acceptable option.
The minimum metal thickness should be 1 mm, but it is better to choose structures with a thickness of no less than 1.2 mm. This will allow you to easily cope with high loads and ensure long-term operation.
Calculation of roller box guides. General formula.
Accurate calculation of drawer guides is the key to correct installation of drawers. Correctly installed boxes are interchangeable, i.e. the drawer can easily take the correct position in the place of another without additional adjustment.
!
Interchangeability is only possible among drawers with fronts of the same size in height.
In this article I will describe a method for calculating the mounting dimensions of roller box guides. At the end of the article, as a logical conclusion, I will try to derive a universal formula for such a calculation. Using this formula, it will be possible to calculate the mounting dimensions of roller guides on all types and sizes of cabinets, tables, and chests of drawers.
A little bit of material. Diagram of the roller guides themselves and their mounting holes (Fig. 1):
Rice. 1.
For clarity, we will carry out the calculation using the example of a cabinet - the basis of a computer desk, with four drawers of equal height.
Rice. 2
| Rice. 3 |
|
And so, here is the classic marking of the guides for the table stand, the classic height of 734 mm. (Fig. 5).
Rice. 5
The diagram below (Fig. 6) shows the initial data for such a calculation.
Rice. 6
Explanations for the drawings.
Calculation of guides, universal size.
The height of the side of the cabinet = 734 mm. Base = 70 mm. 4 box fronts. The amount of gaps between the facades is 4 x 3 mm. = 12 mm. We get: 734 - 70 -12 = 652 mm. And divide by 4, then the height of the facades (highlighted in yellow in Fig. 6) = 163 mm.
In order to calculate the mounting height of the guides so that they are interchangeable, it is necessary to take into account all the extreme positions of the drawers and the overlap of their facades with the frame of the cabinet. The extreme positions are the top and bottom drawers, where their fronts overlap the top link or bottom of the cabinet. The easiest way is to start from the bottom, where the bottom of the cabinet sets the lower limit of the guide mounting. The center line of the mounting holes, as can be seen in Fig. 1, is 18 mm. from its lower edge, while the bottom of the box installed on the guide just coincides with its lower edge (Fig. 1).
We consider this: if the bottom of the drawer coincides with the bottom edge of the guide, then we will add another 4 mm in height to the protruding screw head so that they do not touch the bottom of the cabinet. Then we get 18 + 4 mm. = 22 mm. — height of fastening of the first guide from the bottom of the cabinet. Or 70 mm (base) + 16 mm (bottom) + 22 mm. = 108 mm. from the lower end of the sidewall of this cabinet (Fig. 5.).
Why exactly 4 mm? For a self-tapping screw head, 1 - 1.5 mm will be enough. 4mm. This is a universal size, taking into account the fact that the frame of the cabinet can possibly be made not only from a 16 mm thick slab, but also from an 18 mm thick slab. Then, even in this case, there will be enough clearance for the screw head.
Size 1.
From the above calculation and Fig. 6 it is clear that the distance from the lower end of the front of the lower drawer to the axis of the guide fastening is 38 mm.
, i.e. 22 mm. + 16 mm. (the bottom onto which the facade overlaps). From here it is very easy to determine what the distance will be from the lower end of the front of the lower drawer to the bottom of the drawer. This is 38 - 18 = 20 mm
. (see Fig. 6).
And so, the key size for calculations is
38 mm
.
, applicable to other drawers to make them interchangeable.
The next guideline is calculated even more simply. Let's look at Figures 5 and 6. Base (70 mm) + first facade (163 mm) + gap between facades (3 mm) + 38 mm
. (Size 1.) = 274 mm. (see Fig. 5). And so on, along the remaining guides.
Constant: 38 mm.
Calculation of the height of the box itself and the facade attached to it.
Now let's turn our attention to the top drawer. In most cabinet designs, a connected part is installed at the top - a connection that ensures the rigidity of the entire structure and allows you to maintain the exact distance between the sidewalls to avoid jamming of the drawers when moving. What should you pay attention to here?
When removing a drawer from the slides or installing it, you should always tilt the drawer body slightly to be able to slide the rollers into the slides. And so that the box body does not rest against the connection, you need to calculate the sufficiently necessary height of the body. The size should be universal and suitable for any drawer, no matter where it occupies in the cabinet.
By and large, a high box is useless. Logically, a drawer is simply a retractable bottom of a niche, even if the front is 163 mm. make the height of the box only 50 mm, in 90% of cases it will fully perform all its functions. But we will try to take into account the remaining 10%, when, for example, a person really wants to fill a box to the top with small objects and he will constantly lack the height of such a box.
The minimum sufficiently necessary gap between the drawer body and the connection is equal to the diameter of the guide wheel, i.e. only 18 mm. But this is just right, so for greater convenience we will add another half of this size - 9 mm. Thus the gap will be equal to 27 mm.
Now having this data you can calculate the universal height of the box. Let's look again at Fig. 6. The dimensions of the box along the facade are 166 mm, which is 3 mm. (front gap at top) + 163 mm. (facade height). We determined the distance from the lower end of the facade to the bottom of the box earlier in part 1 - it is equal to 20 mm. The distance from the upper end of the facade to the top of the drawer is calculated as follows: 16 mm. (connection thickness) + 27 mm. (accepted gap) = 43 mm. From here we subtract 3 mm. façade gap, we get a final size of 40 mm.
With a façade of 163 mm. minus 20 mm. below and minus 40 mm. on top we get a box with a height 103
mm.
This is the height of a box with a 3mm thick fiberboard bottom. Subtracting this thickness, we obtain the net height of the chipboard box part equal to 100
mm.
This is the height of a universal drawer for a cabinet of this size
.
And so, let's derive an intermediate formula and check how it works in the variants.
where, Nya is the height of the body (part) of the box; Hf is the height of the drawer front. NDVP - the thickness of the bottom of the box.
*
— this part of the formula should be present only if the box has a false bottom made of fiberboard. If the bottom is made of chipboard and is internal, then this part of the formula is discarded or considered equal to zero.
Let's check it using this cabinet as an example (Fig. 7):
| Rice. 7 | The bedside table uses drawers with two standard sizes of fronts. The top two are 120 mm each. and two lower ones of 206 mm each. Gaps are 3 mm. Boxes with the same standard size of facades, according to the formula, should be interchangeable with each other. Let's check if the formula works correctly. In Fig. 8, 9 shows a drawing of this cabinet. As you can see, everything seems to be without flaws. And judging by the size, the boxes with fronts of the same standard size are interchangeable. |
— Body height of the top drawers: 120 — (40+20) — 3 = 57 mm.
(I remember that previously they left a small margin for the upper gap between the box body and the connection equal to 9 mm. This margin allows you to round, with an accuracy of 10 mm, the size of the height of the case, according to the rules of mathematics
up or down. Then the body of the top drawers can be safely made to a height of 60 mm.)
— Body height of the lower drawers: 206 — (40+20) — 3 = 143 mm. (rounded to 140 mm.)
| Rice. 8 | Rice. 9 |
1.
Universal size when calculating furniture roller guides = 38 mm. from the bottom edge of the front to the bottom of the drawer.
2.
Formula for calculating the height of the box body: Nya = Nf - (40 + 20) - Ndvp
(all links open on a new page)
- Making a drawer.
- Tool for assembling furniture.
- How to drill assembly holes.
- If you need to install a furniture lock in the top drawer, then for ease of installation, one front part of the drawer body can be designed and made a couple of centimeters smaller, as in this figure: