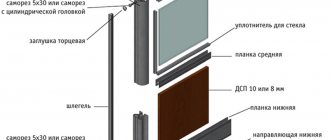
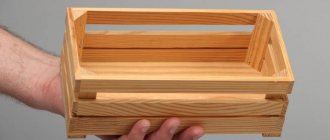
Drawers are an integral part of the kitchen interior. Moreover, these days such drawers are beginning to be actively built into other furniture that has nothing to do with storing kitchen utensils - chests of drawers and wardrobes increasingly require the presence of one or another retractable system. Drawers not only save space, but also constructively organize the space from the inside, allowing you to quickly access the things you need. We'll talk about what types of drawer systems exist and how to make a drawer with your own hands below.
How to make a drawer with your own hands
Location of drawers in the closet
The main advantage of assembling drawers in a ready-made cabinet is that you do not need to disassemble things, take it to a service center or call a specialist to your home for reconstruction. It's easy to do it yourself.
Selecting the location of the boxes:
- Separately from each other.
- In a module that is built into the wardrobe.
The disadvantage of the first type of arrangement is the difficulty of adjusting the guides after several years of use. When using the cabinet over time, the walls may bend. This leads to curvature of the compartment geometry and makes it difficult for the box to move freely along the guides.
The block-modular option is better because:
- assembled outside the cabinet, makes work easier during installation;
- Less dust is generated when built into a wardrobe, so you don’t have to put things away.
It is advisable to install the module no higher than 1 meter from the floor. If there is no space in a compartment with shelving shelves, then place it in a niche with a barbell under the hangers. When determining the location, remember that the door side hinges should not interfere with the extension of the box. Therefore, consider the distance between them. And in wardrobes, do not place the block-modular structure close to the intersection of the sliding doors.
Two types of drawer arrangement without a separate box
Advantages of drawers
The main advantages of retractable drawers are practicality and the possibility of full access to all items contained in them. An ordinary shelf cannot provide such freedom of action.
When choosing drawers for the kitchen, make sure of the high quality of all components, and especially the fittings.
The varied shape and purpose of such furniture allows you to maximize the functionality of the kitchen, free up space and increase the effective area.
Assembly is assembly, but in order for hand-made furniture to please the eye and soul, it is necessary not only to assemble it efficiently, but also to correctly calculate the dimensions of the parts. If we talk about drawers, then it is very important that a well-assembled structure slides easily and naturally along its guides, without the irritation of having to make an effort to pull out the drawer. Also, it’s not very pleasant when a drawer falls through because the opening is somehow wider than it should be. Of course, it becomes a little sad when the drawer does not slide in completely because it is longer than necessary. All these problems can arise if you incorrectly calculate the dimensions and indentations during the design process of furniture, namely drawers. Therefore, let's first figure out the dimensions and indentations, and only then we will proceed directly to the manufacture and assembly of drawers.
Even though roller guides and ball guides are “two big differences,” they have a lot in common. For example, they have common size ranges and also have the same installation clearances. Simply put, calculating the dimensions and offsets for installing drawers on roller guides has the same parameters as for ball guides.
Now let's move on to specific numbers. So, according to furniture design technology, the width of the drawer should be 26mm less than the width of the opening in which it should be installed. It turns out that 13mm is allocated on each side for installation of guides.
In the figure we clearly see all the design parameters for installing drawers on roller or telescopic guides. Please note that the calculation of the width of the drawer is made not relative to the overall width of the cabinet, but relative to the internal opening for the drawer. In this example, the overall width of the cabinet is 400mm, and the internal width is 368mm. The internal opening is the overall width minus the thickness of the two bulkheads. In our example, the cabinet is made of 16mm thick chipboard. Thus, the internal opening turned out to be equal: 400-16-16 = 368mm. This is such simple arithmetic.
And now it is in relation to the width of the opening that we calculate the width of the drawer. For us it is equal: 368-26 = 342mm. That's all. Although, on the one hand, it seems like everything, but if you think carefully, it’s not quite. Look, if the dimensions of the bottom of the cabinet are exactly 400mm, then the bulkhead will definitely be screwed with a slight offset inward (as a rule, this offset is due to the thickness of the edge, in our case it is an edge of 0.5mm, so the offset will be somewhere around 1mm ). Thus, the internal size of the opening will decrease by 1mm on each side. As a result, we get the following: 400-16-16-1-1=366mm. And the drawer will then have a width of: 366mm-26mm=340mm. As you can see, its width differs by 2mm from previous calculations. And in our situation, it is this width that will be calculated correctly.
You may object: “What are these 2mm? What kind of weather can they do in the process of installing a drawer?” However, in the furniture business, sometimes 2mm can play its evil role. In this case, a wider drawer may cause the drawer to move “stiffly” along the guides. So, it is better to make calculations for installing drawers very carefully and scrupulously, so that later, as they say, “excruciatingly painful ...”
Regarding the calculation of the length of the drawer, you need to first of all know that roller and ball guides come in the following lengths: 250mm, 300mm, 350mm, 400mm, 450mm, 500mm, 550mm, 600mm. These are, so to speak, the most popular sizes. There are also ball guides up to 800mm long. For roller guides, as far as I know, there is a length limit of up to 650mm. Although, you can clarify these parameters with the accessories seller, someone who knows exactly what he has on sale.
It would seem that calculating the length of a drawer is as easy as shelling pears: if we install guides with a length of 500mm, then, accordingly, the length of the drawer will be equal to 500mm. But for our people, 4 centimeters is not just 4 cm. No, for us it’s FOUR CENTIMETERS! And the fight for them will be tough and principled.
So, in our situation, the internal depth of the cabinet is 490mm. It is clear that a box 500mm long will not fit here. It turns out that you need to place the drawer on guides 450mm long. But we have 490mm of free usable space. We will not give 40mm to the enemy! Well, it’s not 40mm, but somewhere around 35mm (5mm can be left for force majeure situations that may arise during the furniture assembly process). In general, we make a drawer 485 mm long and rejoice at the additional space we have gained. True, such a box will not move out completely, because our guides are shorter. But this is not critical. There will still be enough access to the things stored in the box. But we increased the capacity of the structure. Amazing!
I would also like to draw your attention to this. The fact is that drawers come with internal and external facades. So, when calculating the length of a drawer with an internal facade, you must always remember the thickness of this very facade. That is, if the internal depth of the cabinet is 490mm, then the useful free space (provided that the facade has a thickness of 16mm) will be equal to: 490mm-16mm-1mm=473mm. It is from this size that we “dance” when calculating the length of the drawer. And I discarded 1mm so that the inner facade of the drawer was slightly recessed into the cabinet. By the way, we also screw the guides, stepping back from the edge of the bulkhead by about 17mm. So that the facade “goes” inside.
Calculation of the lengths of walls and drawer fronts (block-modular version)
Before you start making parts, take measurements of the finished cabinet and make calculations based on them (see the instructions for an example). To eliminate errors in the lengths and heights of retractable boxes, calculate them separately.
Instructions for calculating the lengths of walls and facades
As a basis, we will take the design of a wardrobe niche with dimensions (VShG): 400 mm x 500 mm x 500 mm. Calculation steps for manufacturing a block of drawers:
- Make the upper and lower parts of the compartment 500 mm in length and width, in the amount of 2 pieces.
- Calculate the length of the walls at 368 mm. From the total height, subtract the thickness of two chipboard sheets. Make calculations using the formula: 400 mm - (16 mm x 2 pieces = 32 cm).
- Take 480 mm for the width of the module sides (allocate 20 mm for the façade).
Knowing the dimensions of the compartment walls, make boxes.
- Take 450 mm for the length of the side of the box.
- Make the rear panel 410 mm. Calculate this size using the formula for adding the thicknesses of all chipboards and the gaps for the guides: 500 mm - (16 mm x 4 pcs. + 13 mm x 2 pcs.). 13 mm is the gap for installing guides on both sides.
- Subtract 4 mm from the dimensions along the outer perimeter for the gaps: 500 mm - (2 mm x 2 pcs) = 496 mm.
- Make the bottom smaller than the box by 1 mm on each side.
Calculation of drawers with roller and ball guides
Almost any cabinet furniture is equipped with retractable mechanisms, from bed bases to wall kitchen cabinets. This is a convenient storage system for anything: various small items, office supplies, linen, tools and kitchen utensils. How to calculate a drawer depends only on the type of guides selected. And there is no difference if roller or ball are chosen.
Roller or ball guides, which one to choose?
From the point of view of calculating drawers, the formulas for roller and ball guides are absolutely the same. You can change one on a chest of drawers, a cabinet or a closet at any time without any changes in the design of the furniture. The only caveat is that there will be holes left from the fasteners, which can be masked somehow, because:
- Roller guides are attached along the bottom edge of the box, with a grip on the bottom.
- Ball guides are usually mounted in the center of the side of the drawer.
If we talk about which of the above guides is better, then the answer lies in the budget allocated for the manufacture of cabinet furniture.
Roller guides are economical. They are used on production office furniture. As in principle, ordinary roller guides are installed on any drawers of economy-class cabinet furniture, including kitchen ones.
Fittings of this type are quite practical and durable. If you don’t heavily load the box (and the bottom made of thin fiberboard won’t allow you to do this), then it will last for decades.
The design of the roller guides is such that there is nothing to break there.
Full extension ball guides are in a higher class in terms of cost and performance characteristics.
A drawer equipped with them extends completely, without blocking the back part with the top shelf (table top), which is very convenient for viewing everything stored in it. Also, ball guides boast a smooth, pleasant motion.
There are options with a built-in closer (they can be identified by a spring built inside the mechanism with a plastic stop).
When choosing retractable mechanisms, you should not chase cheapness. A lot depends on the thickness of the metal and the accuracy of the calibration.
Chinese analogues with thin metal fail very quickly - the guides themselves wrinkle and bend, rollers and ball bearings fly out even under non-critical loads.
Therefore, be careful when purchasing and give preference to high-quality, popular items from well-known budget brands.
Calculation of drawers
To avoid confusion and misunderstanding, let’s define the initial data:
The furniture is made of laminated chipboard with a thickness of 16 mm; fibreboard with a thickness of 4 mm is used for the bottom.
- Width of the cabinet/cabinet (external dimensions) = X.
- The height of the niche for installing drawers in the cabinet/cabinet (minus the overhead countertop) = Y.
- Depth of the cabinet/cabinet stand (sidewall) = Z.
Calculation of the drawer front
Whatever one may say, the calculation of the inside of the box largely depends on the front part.
The facade can be internal (rolled over the side walls of the body) or overhead.
As you can see from the drawing, the choice of overlay or internal front can affect the depth of the drawer. In the case of an inset one, it is rolled deeper to the thickness of the facade (-20 mm from the depth of the stand).
The height of the drawer front usually varies between 150-200 mm. It all depends on what will be stored inside. For documents and stationery in office cabinets, smaller drawers are made, 120-150 mm deep, rarely 180 mm.
The linen drawers of the chest of drawers are designed deeper, ranging from 180 mm to 250 mm.
For toys and bedding, drawers can be even deeper along the height of the facade, but in this case it is necessary to reinforce the bottom with a stiffener or partitions.
The size of the drawer fronts, taking into account the technological gap, is calculated by analogy with other doors; you can read more in detail here. In short, 2-3 mm is subtracted from the dimensions along the outer perimeter; the gap between adjacent facades is also 2-3 mm.
An example of how to calculate the fronts for two drawers relative to our cabinet with dimensions X*Y*Z.
- Internal facade: ( X-16*2-3) x(( Y-16*2)/2-3)
- Overlay facade: ( X-3) x( Y/2-3)
The height and length of the facade can be swapped if there is a texture and the desired direction of the pattern - longitudinal or transverse. When edging PVC facades around the perimeter, it is necessary to take into account the thickness of the edge!
How to calculate the side of a box
Drawer guides are available in 50 pitches, ranging from 250 mm to 550/600 mm. Hardware manufacturers always have a similar layout in their catalogs, which can help you navigate the dimensions and markings for fasteners.
dimensions of roller guidesdimensions of ball guides
Thus, the depth of the sides of the drawers is taken in increments of 50. For the shallowest drawers, 250 mm, and further, correlating the depth of the standing cabinet/cabinet with the length of the suitable guide - 300, 350, 400 mm, etc.
The narrowest side of the cabinet/cabinet for built-in is 260 mm for the overlay facade and 280 mm for the internal facade (for a 250 mm guide). The required clearance at the front edge for installation is usually 2 mm. The gap at the back is arbitrary, from 1-2 cm to 5 cm. If there is more left, it is better to purchase longer guides so as not to waste space behind the drawer. It turns out:
Calculation of drawers (built-in version)
As an example of calculation, let's take a cabinet niche with dimensions W*D*H=600*550*784mm. The calculation is made for internal boxes of the same size in the amount of 4 pieces.
Facade dimensions
The minimum allowable gap between drawer fronts is 2mm. You need to retreat another 2mm from the top and bottom shelves, between which the drawers are located. Thus, the maximum height of the facade is:
Vf=(Vn-(Kf-1)*2-4)/Kf, where
Vn – niche height;
Kf – number of facades.
In our case we get:
Vf=(784-(4-1)*2-4)/4=193.5mm.
It is not advisable to make drawer fronts larger than this value, since they can cling to each other.
Side wall height
If the bottom of the box is overhead, and 3mm thick HDF will be used as the material, then the minimum distance from the bottom of the facade should be 5mm (3mm on HDF+2mm of gap).
If the bottom of the drawer is inserted into grooves, or is made of laminated chipboard, then the minimum distance from the bottom of the facade to the bottom of the sidewall can be reduced to 2 mm.
The minimum distance from the top of the facade is 2mm, but usually it is made a little more, from 10mm. This does not play a significant role in storing things, but it allows you to reduce the weight of the box and, accordingly, the load on the guides, which increases their service life. In addition, the height of the sidewalls and back wall can be varied to obtain optimal cutting.
Thus, the maximum height of the side of the drawer is:
Vb=Vf-7 – for an overhead bottom made of LDVP;
Vb=Vf-4 – for the inner bottom made of laminated chipboard or LDVP.
Depth
The depth of the inner drawer should not exceed the depth of the niche, that is, in our case, 550 mm. However, for ease of closing, it is customary to leave a gap between the sides and the back wall, the size of which varies as desired. The thickness of the façade should also be taken into account.
Thus, the depth of the side of the drawer is:
Gb=Gn-Tf-Gz, where
Gn – niche depth;
Tf – thickness of laminated chipboard facade;
Гз – gap depth.
DIY drawer
The assembly of the box is largely determined by the individuality of the craftsman who chooses certain tools. That is why all existing instructions will differ from each other in one way or another. Some craftsmen use templates, some do not, some craftsmen work only with clamps, and some consider them a waste of time.
In this regard, the sooner you develop your own manufacturing style, the better it will affect your work.
Available materials
To install the drawer you will need the following tools:
- laminated chipboard (chipboard);
- drill and screwdriver (you can choose one);
- hexagon;
- drill;
- self-tapping screw;
- guides;
- awl;
- measuring square;
- ruler;
- pencil.
Prices for the range of drills
Drill
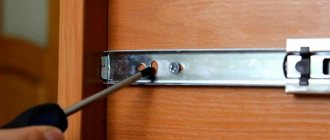
Step-by-step instruction
Step 1. The first and one of the most important stages in making a box is the correct marking. In order for the parts to connect, the conformation must be located in two places - below and above.
There should be two holes for future screws, as well as markings
The holes should be equidistant from the edges of the side panel
Step 2: Take a 50mm template and make a mark on the top and bottom of the board. It is not recommended to measure less than 50 millimeters, since the fittings can split the chipboard.
When creating a box, you can work without a template, but it greatly simplifies the work
Step 3. Measure half the thickness of the material from which you are assembling the box. For such purposes, it is also convenient to use a template. Repeat this procedure for the top and bottom marks.
The template performs several useful functions at once when making a box
Step 4. To prevent the drill from going away during work, tap a hole at the intersection of the two marks using a screwdriver or any other sharp object.
The hole will be needed for further drilling with a drill.
Step 5. Align the parts of the future box using a template.
Before using the drill, make sure the sides of the box are not warped.
Step 6. Take the drill and press its tip into the indentations already made to fix the tool. While drilling, try to hold the drill straight so that the hole left by it will help the guides fit correctly.
You need to drill the hole gradually so that it comes out neat.
Step 7. Insert the screwdriver into the conformat bit, then insert the conformat itself and position it in place of the hole, smoothly placing it into the recess. If you find that the box has become skewed while placing the conformat, press it out using a hand hexagon and straighten the sides, then clamp it back. To avoid inconvenience, you can use corner clamps, which will immediately give the box the correct angle of inclination.
Insert conformat into the hole made
Step 8. Turn the box over and do the same procedure with the second hole.
Repeat with the second mark
Step 9. Once all other sides of the box have been drilled using the same method, check the diagonals to make sure they match each other.
The side panels folded together should be perpendicular to each other.
Step 10. Screw the bottom to the box, first leveling it. You can use an MDF board (six) as the bottom. If desired, the plate can be coated with enamel.
Fiberboard is often used as a bottom for drawers
Video - How to assemble a drawer
Drawer guides
Types of guides:
- Roller. This is the cheapest type. Its disadvantages lie in the incomplete removal of most of the box. They also make loud noises when leaving or entering.
- Ball. This is a telescopic type of guide. There are two subtypes: regular and enhanced. The height of regular ones is 35 mm (for light laundry: socks, belts, etc.), reinforced ones are 45 mm (for heavy laundry).
Standard sizes of ball guides - Metalboxes, or metaboxes. They are installed on the bottom and are characterized by improved load-bearing capacity. They differ from the first two in that they are the sides of drawers.
- Closer and pusher systems. These are complex and expensive designs. Closers are needed for silent operation. Pushers allow you to install a box without handles due to the spring, which, when pressed, automatically pulls out the box.
Expert opinion
Alexander Didenko
Furniture assembler at Mabaks
The system of closers and pushers is a complex design, so it is advisable to entrust its installation to furniture specialists.
Marking for guides
The thickness of the guides is the same and equal to 13 mm. Select the length according to the side wall, a multiple of 50 mm in the smaller direction. For example, if the width of the above compartment is 480 mm, then select the guides at 450 mm. Install them after assembling the box and bottom.
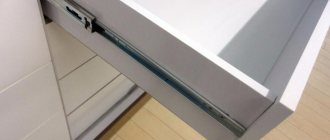
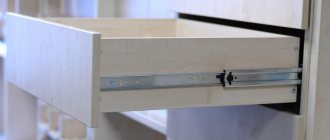
Attach roller-type guides to the bottom of the drawer. And install telescopic ones in the center of the sidewalls.
Roller guides are attached to the bottom of the drawer Ball guides are attached to the middle of the wall
Mark the location for the guides on the inside of the module walls, and on the drawers - on the outside.
Markings for attaching retractable skids
Drawer handles
Furniture handles for a closet can be made in three ways:
- Cut-out. Oval cutout at the top of the drawer front. Cover the cut with melamine edge.
- Railing. For facades longer than 450 mm. Attach them with screws to the facade. When determining the length of the drawer walls and the front, take into account the distance between the front and the handle so that it does not stick out and allows the cabinet door to close.
- Mortise. Save useful cabinet space. Installation: make a cutout in the facade with a milling cutter. Insert the handle into the groove and secure it from the inside.
On the left in the photo are cut-out handles. If you don’t want to bother with decorative cutting, you can make indents between the drawers and thus the top edge will be the handle.
Last but not least, we should mention the castles. To lock the drawer, use a furniture lock. It is more reliable than overhead and looks aesthetically pleasing.
Instructions for manufacturing a vertical retractable module:
- Determine the dimensions based on the interior niche of the cabinet. The height of the structure can be from 1 to 1.5 meters. Depth up to 50 cm. Now you can attach drawers to it.
- When making boxes, take into account the dimensions of the chipboard board, so make the length of one box less than the entire finished structure by 3.2 cm (1.6 cm on each side). The shelf width varies from 30 to 50 cm.
- Screw the wheels to the bottom.
- Make the back wall and sides. Drill grooves for future shelves. At the same time, fix the wheels so that they do not move while working on the walls.
- Attach the shelves to the structure using nails or use two timbers on either side of the structure on which to install the shelves. Now take it off, clean it from dust and put it back on.
You can make such a box with or without wheels
Attention! To make the drawers and cabinet, laminated chipboard was used as a base, but such structures can be made from wood, MDF or plywood.
Calculation of drawers of a built-in wardrobe with your own hands
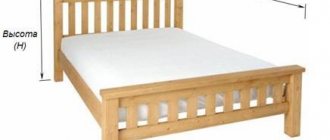
Let's calculate the dimensions of the parts of the drawers of the built-in wardrobe, which we will make with our own hands. The initial data will be the dimensions of the opening for the drawers from the sketch: height 784 mm, width 600 mm, depth 550 mm.
Let's calculate the lengths and heights of the parts separately. Detailed instructions and drawings below will help you not get confused and make mistakes in the calculations.
Calculation of the lengths of the walls and fronts of drawers
First, let's look at the drawer from above. The dark gray color in the figure indicates the side walls of the laminated chipboard frame, and the dotted line indicates the rear main wall.
Despite the abundance of dimensions in the sketch, the “freedom of choice” is small - we can only change the size of the gaps - between the facade and the side walls, and between the back wall of the box and the rear main wall (highlighted in red).
As a result, only the calculated lengths of the facade and side walls (highlighted in blue) will change.
This is explained by the fact that when preparing a sketch of the filling of the built-in wardrobe, the width of the opening in which the drawer should fit was already set - 600 mm. The filling depth was also set - 550 mm.
The known thickness of the laminated chipboard is 16 mm, and the thickness of the ball guide is 13 mm (more details about the guides are below).
Thus, to determine the lengths of the drawer parts, you only need to determine the gaps and carefully calculate everything.
Calculation of the height of drawer parts
To calculate the height of the drawer parts, let's look at them from the side. In the picture, the upper and lower shelves of the frame are painted gray, with drawers located between them. The drawer guides are not indicated in the figure, since they do not affect the calculation of the height of the parts.
The height of the space for placing four drawers is 784 mm - in accordance with the filling sketch. Let's start by calculating the height of the facades.
The fronts of the drawers in my wardrobe also serve as “handles” so that the drawers can be pulled out. Here we meet the first limitation.
The minimum height gap between the fronts of adjacent drawers should be such that your fingers, when opening the drawer, do not touch the drawer on top or the shelf above the topmost drawer.
Based on my experience, this distance should be at least 30 mm. I put in 35mm.
There should also be a gap between the bottom edge of the bottom drawer front and the shelf underneath it. In my example - 3 mm.
Then we get that the height of each facade will be 160 mm
. Calculated using the formula: (784 mm - 4x35 mm - 3 mm) / 4 = 160.25 mm. Round up to 160 mm. I’ll put an “extra” 1 mm in the top gap - anyway, the facades will have to be installed in place. Yes, and the shelves above and below the drawers can stand with a slight deviation in height from the calculated values.
Note:
If relatively heavy items are stored in the bottom drawer, it is also necessary to take into account how much the bottom of the HDF drawer will sag under their weight. You may need to raise the bottom of the bottom drawer above the shelf underneath. This will affect all drawer height calculations below.
The side and back walls of the box are the same height.
When calculating, I proceeded from the following considerations. The bottom edge of the facade of each drawer was 5 mm away from the bottom - this is 3 mm for the thickness of the HDF bottom, and 2 mm for the installation error of the facade (see the sketch of the top drawer in the figure).
Drawing programs
To independently calculate furniture dimensions, the following computer programs will help:
- PRO 100;
- "Basis furniture maker";
- Woody;
- "Aster".
Table of advantages and disadvantages of these programs:
| Name | pros | Minuses |
| PRO 100 | Clear interface. High-precision calculation of materials. Libraries with a rich information base. High quality visualization. Low cost of licensed software. | The program does not see the functional difference between objects. Limited functionality in demo version. More suitable for sellers and managers. |
| "Basis furniture maker" | Professional graphic editor. Creation of three-dimensional models. Setting up conditions, algorithm, automatic generation of specifications. | A large number of modules in which an incompetent user may get confused during installation. The need to spend time on training. Expensive licensed version. |
| Woody | Clear interface. 3D design function. Display each part on the screen with a marking diagram. Automation of the drawing process. | Has no updates. Not compatible with many operating systems. |
| "Aster" | Analogue of PRO-100. Low cost of licensed software. Improved cutting and filling functions. | Paid. Few opportunities for designers. Difficult initial training. |
Don't forget to watch the video on how to secure drawer fronts evenly and quickly. Two methods from Igor: