0
14011
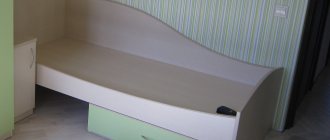
New furniture means comfort, coziness and aesthetic pleasure. But some 7-10 years will pass and your favorite bed or sofa begins to age: the wooden frame cracks in places, the upholstery tears, the foam base sags. Many owners are beginning to look at the bed differently and are thinking about replacing it. Of course, you can buy new furniture, but you can also try to repair it. Repairing beds and sofas helps extend the life of once-loved furniture, as well as save money in the family budget. If you have the desire and a little knowledge, you can easily restore your furniture. First you need to understand what is the cause of the breakdown.
What to repair and with what
Even the highest quality bed from a reliable manufacturer may sooner or later require repairs. Most often this moment comes unexpectedly. The fundamental, most functional elements may break, without which the use of furniture will become impossible or much less convenient: the base, legs, fastenings. If the side fastenings or backrest break, comfort is practically not reduced, but from an aesthetic point of view, repairs are still required. Sometimes all parts and mechanisms remain intact, but a squeak appears, which you also want to eliminate.
In most cases, it is possible to repair a bed with your own hands, having basic woodworking skills and tools such as:
- drill or screwdriver;
- saw;
- level;
- roulette;
- hammer;
- screwdriver (if you don’t have a screwdriver at hand).
We offer a detailed look at the various types of repairs.
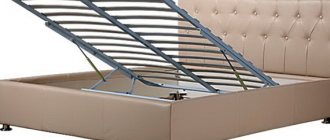
Base repair
Let's start with the basics. In order to repair the base of the bed, it will have to be disassembled almost completely. We remove the bed, mattress and everything that is in the bed drawers, if any. We disassemble the frame, unscrew all the fasteners - bolts, nuts, brackets, and so on. After this, we completely separate the parts of the bed and replace those that need repairs.
If necessary and desired, you can make the base yourself. To do this you will need boards, timber, tools and consumables such as screws and glue. A 7x4 cm beam is best suited. The boards should be no thinner than 2 cm and about 18 cm wide, but the length is at your discretion if you are making the base from scratch, or depends on the length of the existing frame. When the material is prepared, the beams are attached to the side walls of the frame with self-tapping screws. Boards are laid on them at a distance from each other, which are also fixed with self-tapping screws.
You can further strengthen the base boards by coating them with regular PVA glue. In this case, the bed can only be used after some time, when the glue has dried and the smell has disappeared. However, this process will take no more than a day, but the base will be strong and protected from squeaking.
A bunk bed can be repaired using the same principle, but requires more dismantling. Regardless of which of the berths you repair, the upper tier will have to be disconnected and then reinstalled.
This method is quite simple and requires a little time and effort. Its only disadvantage can be considered the lack of an orthopedic effect on the bed, which can be achieved with the help of a well-chosen mattress.
How to choose the right lamellas?
If you are wondering how to choose the right lamellas, we recommend paying attention to certain characteristics and properties
The type of fastening for the slats should also be selected based on the base of the bed.
The more slats there are at the base, the longer the bed will last you.
A variant of the single bed model, the base of which has wooden slats installed.
A double room should have more than 30, and a single room should have more than 15 pieces.
Standard placement of slats in the base of a double bed.
The distance between the plates should be minimal.
Choose for yourself the bed with the minimum distance between the slats at the base.
For an orthopedic bed with slats, you need to choose appropriate mattresses to distribute the load evenly and avoid deformation.
An orthopedic bed base made of slats should be complemented by a high-quality mattress, then your sleep will be perfect.
Don’t forget to pay attention to the cost of the products, the material from which they are made, and most importantly, the name of the manufacturer
The fastening of wooden slats is carried out using various methods, none of which is inferior in reliability and quality.
Are “magic plates” worth buying?
Definitely worth it, because they have more pros than cons.
The slats should only be attached to the metal bed frame using metal fasteners.
Moreover, at the moment there are many profitable options for purchasing and replacing them. If you have any doubts, you can always consult with specialists.
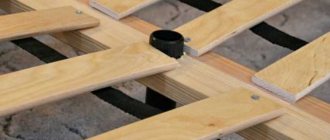
Slat repair
The slats are the cross bars at the base of the bed. In the type of repair discussed above, their function was performed by boards. Real lamellas are made from bent-glued wooden plates. The wood species can be almost any.
The main feature of the lamella is its increased elasticity and flexibility. They are what make the bed orthopedic and as comfortable as possible, and also ensure good ventilation of the mattress.
If you have broken one or two slats in the center of the bed, the easiest option is to swap them with intact slats at the foot or head, where the load is less and the orthopedic effect is less important. However, the set of lamellas in a bed is not endless, and the functionality of the frame is noticeably reduced, and the load on each lamella increases.
Manufacturers offer to purchase separately lamellas with a standard length of 900 mm and a width of 53 or 68 millimeters. In this case, repairs are performed as follows. The required size is cut from this lamella, special lat holders are put on both ends, after which the new lamella is inserted into the existing grooves in the frame. At the same time, it would not be amiss to swap entire slats: this is due to the unevenness of the load in different parts of the bed and, consequently, differences in deflections and deformations.
If you are not just repairing the bed with your own hands, but making it yourself, then when laying the slats you must follow the following rules:
- the number of slats for a single bed should be at least 15 pieces, for a double bed we double this number;
- the distance between the two slats should not be greater than the width of the plank itself;
- The lamellas can be fastened using the already mentioned tips or using individual frame stands.
For all their advantages, the slats are one of the most fragile parts of the bed. If you do not want to periodically repair the base, replace them with two sheets of plywood 12 mm thick. The sheets must be firmly connected to each other and to the frame, forming a rigid structure. For ventilation, drill several small holes in the plywood. This will also save you from creaking, which is often caused by the lamella plates.
How to replace a corner with your own hands
You can independently fix not only the new canvas, screw on the handle, but also repair the mosquito net, even if the corners of its frame have burst. Plastic elements break under uneven load resulting from improper installation of the structure. The store sells both standard and reinforced corners, which are characterized by high strength and long service life. To replace a broken part:
- Using a sharp object, pry up the cord intended for sealing and remove it from the groove located in the upper part of the frame.
- By tapping the board with a hammer, they take out the broken plank.
- Holding with pliers and pushing with a screwdriver, the broken parts of the corner are pulled out of the grooves and the new part is fixed to the top bar.
- The edges of the mesh are straightened, tightened, the sealing cord is placed in the frame, pressing tightly with scissors or a screwdriver.
You cannot hit the plastic with a hammer, but it is better to place a block of wood, then the paint will not peel off and cracks will not appear on the surface. To extend the service life of the aluminum profile, it is recommended to attach a corner made of galvanized steel sheet. It does not need to be inserted into the grooves of the frame, but should be installed on plastic elements, drilling holes on both sides, and connected with rivets. The metal corner is treated with sandpaper, primed, and painted white.
Repair of frame frame
The frame frame consists of front and rear backs and side elements, or crossbars. Its task is to provide an aesthetic component, that is, to add a beautiful appearance to the rich functionality of the bed.
Most often, over time, the bolts that hold the backrests and crossbars together become loose, the fastening becomes loose, and the wood wears out. As a result, the side components pop out and the backs fall off. Due to wear and tear, in most cases it is not possible to connect the sidewalls and backrests in the old place, and more thorough repairs have to be carried out.
This is done very simply. We drill three holes at the end of the cross member, one above the other. We insert connecting tenons (plastic or wooden) into the outermost ones, leaving the middle one for the coupling bolt. The diameter of the bolt should be slightly smaller than the hole for it. Now we turn to the side of the cross member. At a distance of approximately 40 mm from the end, we make a hole about 30 mm in diameter, exactly above the place where the tightening bolt will pass. A clamping boss or eccentric is inserted into this hole, through which the bolt is inserted.
On the wrong side of the sidewall, we drill two holes for the guide pins and one for a metal fitting, which we screw or press into this hole. We screw the coupling bolt into the footing. The back and crossbar are connected.
In some cases, it is enough to insert the fallen foot into its original place. For this you will need:
- or a small wooden barrel, which is inserted into the loose hole from under the foot and in which a new hole is drilled;
- or thread and wood glue, which will help to securely glue the futurka to the old place.
Main rules
Repairing and manufacturing a bed, like any other furniture, requires compliance with basic immutable rules:
- for self-tapping screws, holes are pre-drilled with a depth of 2/3 of the length of the screw and a diameter of 3/4 of its diameter;
- before screwing in the screw, this hole is coated with a water-polymer emulsion or PVA;
- We also glue all connections with PVA;
- from the nails we select those that have a ring notch;
- hammering can only be done 12-16 hours after gluing;
- do not forget to coordinate the size of the bed with the size of non-handmade elements, such as a mattress and bed linen. To make it easier to cover, add a couple of centimeters to the width of the mattress.
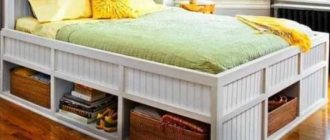
Case manufacturing options
Assembling a rectangular box using confirmations does not seem to be a particular problem. For this purpose, the boards must be of such a height that a 50–70 mm edge is formed above the mesh, protecting the mattress from slipping. With a standard height of furniture legs of 250 mm, the height of the decorative box will be about 300–350 mm. The length of the side walls should allow the walls of the box to be moved back to fit more tightly to the wall and hide the fastening parts of the headboard. The width of the front wall is generally equal to the width of the mesh (mattress), although it is recommended to make a small allowance of about 5 mm.
w, d, h - width, length and height of the main body elements; w1 - length of the side wall, selected equal to the width of the mattress; d2, h1 - dimensions of the niche for the drawer
You may be interested in making side drawers for bed linen - there is nothing complicated about it either. To do this, the walls of the body kit need to be connected by two parallel crossbars no higher than the bottom of the grille. In the space between them there should be no legs on which the mesh is installed.
h - height of the front panel of the drawer, optimal size 200 mm; w — box width, up to 700 mm; d is the length (depth) of the box; h1 - the height of the main profile of the box, it is better to take it equal to 150 mm
Rectangular cutouts are made in the side walls from the bottom edge; the resulting fragments are used as the front of the drawer. The design of the box is very ordinary, the bottom is lined with thin plywood and screws.
To connect cabinet elements made of chipboard, confirmats with decorative plugs are used. 1. Confirmation. 2. Decorative plug
There is only one problem in the arrangement of hidden storage: the side walls cannot form a persistent side for the front board. Therefore, the closed box needs to be aligned with the facade, and then the stop bar must be screwed behind it using confirmations. An interesting effect can be achieved if you make rectangular projections of 50–60 mm on the internal crossbars with a space of 300 mm from the edges. The entire body kit will rest on them, so the bed will “hover” above the floor.
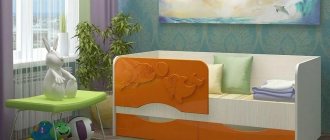
Bunk bed
Nowadays, bunk beds are becoming increasingly popular. It saves space significantly, and children are also attracted to the bed under the ceiling. Models offered on the market often do not satisfy buyers with their price; moreover, it can be difficult to choose an option that is suitable both in terms of functionality, appearance and dimensions. In this case, the solution would be to make a bunk bed yourself. And since such furniture is used in most cases in the nursery, the need for repairs may arise much more often due to the increased energy of little boys and girls. Let's look at what you need to consider to make your bunk bed comfortable and reliable. The same information will help you during repairs.
Making a bunk bed
So, for the bed you will need timber 50x100 mm, solid boards 40, 30 and 20 mm thick, MDF with wood texture or laminate (for the outer parts). If desired, you can use plywood and self-adhesive film. All lumber must be edged and planed. Choose the type of wood according to your taste and financial capabilities. The main thing is to take accurate measurements so that the bed fits well in the intended place and is comfortable at the same time. Fastening is carried out with self-tapping screws, nails and steel angles with mandatory stiffeners. Don't forget to glue the joints with PVA glue.
Scheme for making a bunk bed
The main points of connecting the parts of the bed to each other were studied above. Let us now note some specific features that a bunk bed has. Its weakest point is the corner posts connecting the lower berth and the bed under the ceiling. Their design should be given special attention. To increase strength, we recommend making them from two 30 mm thick boards, without using tie-ins and external fasteners. For rigidity and support of the timber frames, use a regular floor plinth secured with self-tapping screws. You can hide the fasteners in the corners of the second tier with pieces of fiberboard.
Do not forget that a bunk bed must not be larger than certain dimensions. You should not make the width more than 710 mm, and the length more than 1900 mm, as this will negatively affect the strength of the bed, especially its second tier.
An important element of a bunk bed is the ladder. The easiest way is to make a vertical inclined staircase; all you need is a wooden beam and 6 mm bolts connecting the steps and the bed itself under the ceiling. The tilt will provide additional safety. A vertical staircase without a slope takes up less space and may look nicer, but it is less convenient. You can make a staircase with metal steps, which will also benefit aesthetically, but there will be a risk of slipping.
It is equally important to properly think through and implement the fencing on the second “floor”. A bunk bed has only one drawback - it is unsafe in some versions. Therefore, it is necessary to make the fence high enough and long enough. It would be nice if it occupied almost the entire length of the bed, leaving only an opening for the stairs at the foot.
Variations on a theme
A bunk bed is often presented in another version, called a loft bed. It has only one sleeping place; upstairs and downstairs there is either a work area or a relaxation area. This bed is located under the ceiling, and therefore can be additionally attached to it using metal pipes. Another support can be a ladder made of the same pipes. Making such a bed with your own hands is somewhat more difficult, but possible.
To save space in adult bedrooms, a folding or retractable bed is sometimes used. During the day, such a bed hides in a wall or closet, freeing up additional space, and at night it lowers down and turns into a full-fledged sleeping bed. You can also make it yourself, since there are special legs, reclining mechanisms, and even ready-made frames with a mattress on sale. The latter are the simplest, since it is enough to attach them to the floor, but their price is higher. When choosing a reclining mechanism, it is better to choose an option with spring dampers: they will work smoothly and will not suddenly throw the bed onto the floor or press it into a niche. A wardrobe is ideal for hiding the legs of a bed.
A homemade bed will not only fit perfectly into your interior and save money, but will also reflect your personality and create a unique look for your bedroom.
Video material
As you can see, restoring a sleeping place is not particularly difficult, but sometimes you have to tinker. If you are afraid that you will not be able to make high-quality repairs, contact a specialist.