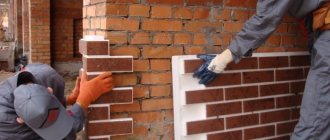
For the purpose of cladding and renovation of buildings, a wide variety of materials are used. The block house is one of the most famous varieties at the present time, as it is able to add an attractive and reliable image to housing.
But a block house is used quite often for interior decoration of a house. The material itself is slightly expensive to manufacture and, in addition, does not have major installation difficulties.
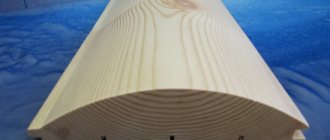
If you look at a block house, you will notice that it is similar to a regular lining, but there are a number of significant differences among them. The house panels have a semi-cylindrical configuration on the outer edge, which gives the feeling that the house is made of logs.
For this reason, this material is perfect for cladding a building externally, despite the fact that it can also be used internally as a decorating product.
To the sample, for cladding frame walls, walls made of timber and structures, as well as concrete surfaces. But for these purposes it is necessary to use limited panels, so that they are more suitable for cladding the building from the inside.
Putting the panels together is quite simple, since next to them there is a palace-like “tenon and groove” joint, but in the end it is fixed with self-tapping screws.
The material itself means practically nothing and will not put a large load on the building and foundation; it is perfect for cladding outdoor structures: gazebos and terraces and other prefabricated buildings.
Wood block house
Often, deciduous logs such as burdock, shrub, and ailanthus are used. But in addition, among the coniferous species they prefer: conifers, pine and larch, since their wood is the most resistant to moisture absorption and decomposition.
The panels themselves have specialized mounting grooves; they are also used for ventilation. During production, the tree is carefully cultivated, dried at high temperatures, and the composition of the material itself eliminates the possibility of destruction in the product.
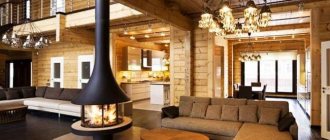
Wood will provide you with natural decorative properties and low thermal conductivity, thanks to which a house clad in a wooden block house will be cozy and warm.
What you will need
To carry out installation work, in addition to the block house, you will need some tools and additional consumables. The main ones will be:
- miter saw or hand-held circular saw;
- hammer;
- nails;
- roulette;
- laser level;
- marking tool;
- hacksaw;
- plane;
- hammer drill
The block house is not attached to the wall on its own; it requires support in the form of sheathing. It will require an additional board. At the same time, it is worth paying attention to ensure that there are no parasites in it that could subsequently harm the block house. The thickness and width of its profile are 30 cm.
Vinyl block house
When produced using a special technology, this material is produced with a two-layer coating; the base is made of PVC components, the first layer serves for a decorative appearance, and the bottom provides resistance to temperature, deformation and impact.
However, when purchasing, you should pay attention to what the vinyl material is made of, because the best characteristics are found in a panel made from the first vinyl powder, that is, primary raw materials. And if you take a panel from recycled materials, then most likely it will have poor stability and fragility.
If it is not noted what material the vinyl panel is made of, then you need to focus your interest on the plane of the outer and inner cover and their tone. It is not permissible to use a vinyl block house made from recycled material for the purpose of cladding a building.
How to choose
When choosing a block house, you need to decide what material is required for the interior cladding and in what room it will be used. Wood is an ideal option, as it is living, breathing. However, wood does not have a smooth surface without flaws; such properties are inherent only in artificial materials. Each beam has its own unique original pattern.
A block house made of wood has three main grades: grade A (1), grade B (2), grade C (3). Also, some manufacturers highlight another variety, “Extra,” which is quite rare on the market. When choosing a board, you need to pay attention to the following features:
- You should not use boards with defects: mold, cracks on the surface, rotting knots;
- It is better to give preference to longer lamellas, which will reduce the number of joints;
- Choose a denser material, which significantly improves all other characteristics;
- Having made a choice and calculated the required quantity, you also need to pay attention to the method of storing the product, the integrity of the packaging, and the absence of damage.
Method of using a blockhouse from the inside
When installing panels in a source house from the inside of a building, it is necessary to install them on slats with a width of at least 30 millimeters, so it is possible to assemble panels on almost all kinds of walls, and it does not matter what kind of wall covering you have.
If you want to insulate the inner walls, you can do this by slipping the material under the panels during the paneling process. But in this case, the layer of slats must be larger.
In the main situation, the block house is located in a horizontal state for the purpose of interior decoration, but in certain cases a vertical system is also used, for example, in baths or steam rooms, this is necessary so that moisture does not accumulate in the grooves, but flows down.
Finishing technology
The process is divided into a series of sequential actions that must begin immediately after purchasing the material.
Product preparation
To ensure durability of the interior lining, the product must be prepared:
- The parts are unpacked and laid out on a flat surface. It is not allowed to place them vertically. This procedure allows the parts to acclimatize.
- All elements are evaluated: defects are identified, fragments with serious flaws are rejected.
- The material is impregnated with fire retardants and antiseptics. It is recommended to do this before installation, since this way the entire parts can be processed.
- The product is left until completely dry.
If decorative wood stain treatment is planned, it is carried out simultaneously with the application of protective impregnations.
While the products are drying, the sheathing is erected. The frame is necessary to hide defects and curvature of the walls, so all racks are fixed level. A wooden beam is used for work; its preparation must be carried out in advance according to the principle described above. Fixation is carried out using self-tapping screws or corners; the elements are placed vertically in increments of 35 to 55 cm.
Further work begins only after preparation.
Installation of material
Installing a block house is not the most difficult task, but it requires care.
- Installation can be started from the top or bottom; the latter option is more preferable in the absence of professional skills.
It is better for an amateur to sheathe the walls from the bottom up, constantly checking the level of the plane - The block house is fixed to the wall by adjusting the first part; alignment is carried out using a level. If internal corners are formed by trimming, then the initial element of the first wall is fixed solid, and the adjacent one is cut in half. For direct joining, a corner beam is installed in advance.
- The best method of fastening is the use of clamps. The staples grip the groove of the end and are fixed to the sheathing. In their absence, hidden fastening is carried out by screwing a screw into the tenon of the part and then recessing it.
When fixing panels with self-tapping screws, there is a high probability of chipping, especially if the technician has no experience - Grooving is carried out effortlessly; if necessary, gentle tapping is allowed. Each element must be fixed securely, without visible cracks or distortions.
- After covering the main wall, they begin to work on the adjacent ones.
- Working with window and door openings is somewhat more difficult. The parts are first tried on and cut to the required dimensions.
It is advisable to perform cladding with “Block House” panels without the use of corner overlays and profiles, this way it looks more organic - If the outer part is joined at an angle of 90 degrees, then the fragments are cut taking into account this connection.
The final stage of finishing is coating the material with varnish or wax. This will give the surface a more beautiful appearance and protect the product from damage.
Evaluation of block house panels, their advantages and disadvantages
Different types of block house have their own characteristic features, but if you look at it in general, this treatment stands out for its own.
- Decorative beauty.
- Easy to install.
- Strength when used correctly.
- Eco-friendly, made from organic materials.
Log panels have an excellent decorative effect and heat resistance. The complete material used, with correct and prompt treatment with fungicides and antiseptics with varnish, will delight your eyes for a long time with its excellent appearance.
But if this is not done, the material used will begin to decompose and reliability will be lost. I would like to highlight the significant price of the material and the likelihood of fire, so you need to be careful in use.
Vinyl panels will be an excellent budget option for cladding; it cannot become infected with fungus and begin to rot; the excellent appearance of the panels, as well as the ability to choose the desired color, are perfect for almost any conditions.
It is not very flammable and is a difficult to combustible material, that is, without a source of fire it will not support combustion, but instead of burning it melts, and it requires almost no maintenance.
Among the disadvantages, one can note a higher sensitivity to temperature changes; also, over time, it can lose its color and brightness and begin to fade.
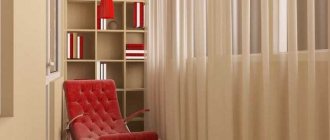
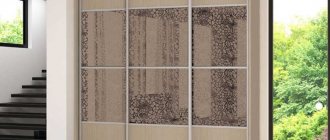
Design options
The block house combines perfectly with other materials if the junction points are properly designed. Based on this, the decoration of the walls inside can be fragments or whole, as can be seen in the photo. In the second case, it is assumed that the plane of the wall will be completely covered only with a block house. This creates the effect of a wooden house. In the second case, the block house can be adjacent to tiles, clapboard or simply a painted wall.
The calculation of the amount of material required will depend on the choice of finishing method. When fully finishing a block house, you need to calculate the area of all the walls, multiplying the length by the width, and adding the results together. For fragmented finishing, you will have to separately measure each area where the block house is supposed to be installed.
Note! Be sure to make a small supply of material when purchasing. It can be useful for replacing damaged strips or for other problems. This will make it possible to purchase all the material from one batch, which will guarantee its identity.
Preparing the block house
Step 1. Preparing for work
It is necessary to remove the old cladding or finishing, in the form of plaster and paint, and clean the walls from any remaining dirt and dust. Also, do not forget to remove the decor and corner frames on the windows.
Step 2. Installing a vapor barrier
For this purpose, various materials can be selected, in the form of a film, a membrane. It's simple, they are placed on the wall. However, if coating or mastic is used, then it should be applied with a brush and not with a foam sponge.
Step 3. First level of sheathing, its installation and subtleties
Use well-dried and even bars with a diameter of 40x40 for the frame. The most important thing is to make an accurate calculation of the distance between the risers of the sheathing; experts recommend taking the width of the thermal insulation as a guide, because it will be superimposed on this support.
If you need to level the wall, then the beams are secured to a metal hanger, which is used when installing drywall. The suspension consists of a thin and limited bar, with holes or, in professional parlance, perforation.
Self-tapping screws are driven into them; this is necessary to bring out the plane of the wall; you will need a bubble level of a good length.
However, you can use a laser level or level. The most important thing is that all the bars are located evenly and on the same plane. If we take into account the sequence of work, this is how they do it: they draw a plan, which must indicate the dimensions of the walls and the distance between the sheathing bars.
Then the sheathing itself is installed with an indentation of 40-45 cm between the risers of the frame, and a thread is pulled in the higher and lower components; it is intended to establish the plane of the frame. After this, the legs of the suspensions are bent and the bars are installed and fixed in the legs, with self-tapping screws, at the top and bottom they are secured with bars of a similar cut.
In most situations, this type is simpler and easier to install. It is absolutely necessary to highlight that the 2nd degree plate should be in a vertical position, this can help fix the horizontal ones.
Step 4. Installing insulation
In this case, it is possible to use various types of insulation, narrow-roll or sheet, but in general polystyrene foam or cotton wool is used, it is placed in gaps of the 1st degree. They are fixed with the support of nails, self-tapping screws or watery nails with glue.
Step 5: Windbreak Base
To protect your walls from strong gusts of wind, various membranes and films can be used, there are many different companies, choose the one you need, the installation itself is carried out in the same way as vapor barrier.
Step 6. Installation of a wooden frame of the 2nd level
For this, we use exactly the same materials as in the first tier, but we don’t need hangers here. The wooden blocks are fastened at a distance of 60-65 cm, and they are installed to the first level of the rack.
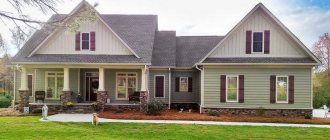
On the question of choice
If you decide to decorate your house with a block house, first decide whether the cladding will be internal or external. Finishing materials intended for facade work have a large width (usually 23 cm). To cover the inside of the premises, a narrower house block, 7-12 cm wide, is produced. This is due to the visual effect: thin planks visually increase the space, making the room “promising” and airy.
It is worth paying attention to the thickness of the wood. For external cladding, it is better to take panels as thick as possible, 4.5 cm. For interior decoration, a minimum thickness of 2 cm is sufficient.
Now about the type of wood from which the block house is made. For interior decoration, panels made of pine, spruce or cedar are recommended - they maintain a unique microclimate in the house and have an elegant texture. However, if the room being finished is a bathhouse or steam room, coniferous wood should be avoided: when heated, this wood releases resins that are not beneficial to the body and becomes very hot, causing discomfort. For a steam room, it is better to prefer linden, alder or aspen.
As for quality, block house panels have several classes. The elite variety is very expensive and is used exclusively for finishing top-class houses. Grade A is used for cladding residential premises (outside and inside), grade B is suitable for decorating steam rooms and baths (only from the inside; it will quickly fail during external work). Class C house block is used only for finishing utility rooms.
Metal block house
In addition to structures made of wood, the construction industry offers consumers vinyl and metal panels. However, we note that both of them are suitable only for facade cladding. Moreover, metal building material is used mainly for finishing industrial premises - it does not add comfort and elegance to a residential building. And vinyl material has installation features that only a professional builder can handle. Therefore, most people prefer finishing materials made of natural wood.
Installation of panels from a block house
Installation is very simple and does not require special qualifications, however, there are some rules and basic principles that the contractor must adhere to in order to ensure high-quality installation of this finishing material. The method itself consists of several stages.
- Preparation of the used material is also plane to work.
- Laying insulation, insulation and other components.
- Connection and installation of panels.
- Installation of corner cornices and other components.
Following the instructions for use as specified by the manufacturer can help you create a strong and reliable cladding protection for your home.
Internal lining
Before upholstering the walls of a house block, it needs to be “adapted” to the operating conditions. To do this, the purchased building materials are removed from the packaging and left for several days in the room that will be finished with them. Then the wood should be treated with an antiseptic (and preferably a fire retardant) and wait until the composition dries. The installation itself consists of the following steps.
- If the walls have old finishing, it is dismantled.
- In adjacent corners, two planks are leveled and fixed.
- A cord is stretched between the slats - it will help simplify the placement of other sheathing slats, since it will eliminate the need to check each of them for level.
- The remaining lathing strips are installed at a distance of 50-60 cm from one another. There is no need to level the walls to accommodate it: the curvature is leveled by placing wooden scraps under the bars.
- If desired, insulation can be placed in the cells of the sheathing.
- The first board of the house block is set strictly horizontally (control the level). Fixation can be done using any fastener, but clamps are preferable - they do not leave holes. The correct arrangement of the elements is with the spike facing up. Thanks to this position, condensation will not accumulate in the grooves.
- Each subsequent plank is placed in the groove with a tenon. For a tighter fit, it should be knocked down with a hammer with a rubber attachment or a wooden mallet. However, the elements should not fit end to end: a gap of 1-2 mm is left between them, since the wood “breathes,” either increasing or decreasing in volume.
- The internal corners are joined with decorative overlays. The openings of windows and doors are closed with special strips.
When all the walls are tiled, you can go over the block house with a sanding machine. The last step will be to open the surfaces with stain or varnish. If varnish is used, apply at least two coats.
DIY block house
Material selection
Decorative finishing should begin with the selection of materials. The block house is divided into several types depending on the type of wood and class of material.
Wood type
Block house slats can be made from several types of wood, differing from each other in texture, color, technical properties and cost.
First of all, you should choose the type of wood based on where it will be used. The more intense loads expected on the finished surface, the harder the wood should be.
The table shows the comparative hardness of some types of wood used for interior decoration.
Use coniferous wood for residential premises
For residential premises - living rooms and bedrooms, it is recommended to use coniferous wood. The subtle pine smell that will emanate from the walls and ceilings will have a calming effect on the nervous system of the inhabitants of the house.
In addition, the resin of coniferous trees has antiseptic properties, preventing the development of pathogenic bacteria in the room.
For cladding interior spaces with high heating temperatures (saunas, baths), it is recommended to use deciduous wood, since coniferous wood varieties tend to release excess resin when heated.
For finishing a bath, it would be optimal to use larch
You should also take into account such a factor as high humidity, so decorating the walls of a block house in such rooms involves the use of wood that is resistant to dampness.
At the same time, an important criterion for choosing the type of wood is personal preference. After all, the main purpose of decorating a wall with a block house is to create an interior that is pleasing to the eye, so if you like the openwork texture of Karelian birch or beech, purchase just such a material.
If you like something more exotic, take wenge, merbau, mahogany.
Panel size
To decorate rooms, use thin panels.
When choosing panels, you should also pay attention to their size. Typically, the width of the lamellas ranges from 80 to 230 mm, but there may be exceptions to these rules.
Wider panels are used to decorate the facades of buildings, since inside the house they will look too massive, creating an oppressive feeling and “eating up” the space.
As practice shows, for interior decoration it is better to take thin lamellas, 8–16 cm wide. The thickness of the lamella can be from 20 to 50 mm. The length of the block house slats can vary from 2 to 6 m, so when choosing a material, this parameter should also be taken into account so that there is as little production waste as possible.
To decorate limited areas, narrow and long planks should be used. They tend to visually expand the space, increasing the size of the room. Massive slats have the opposite effect, so they should not be used inside the house.
Material class
Extra-class materials have a high price.
In addition to the type of wood and size, the block house is also divided into classes depending on its quality.
It has enhanced decorative qualities; first of all, it is characterized by the almost complete absence of knots and other cosmetic defects. However, the cost of such a block house is quite high.
The next class of material is “A” and “B”. They have a larger number of knots, and some other defects are acceptable on their surface.
The cost of such material, accordingly, is significantly lower than that of the extra class, but if you are not too demanding of quality, then you should pay attention to this economy class option. Moreover, repairing small chips or dents is not difficult.
Calculating the required amount of material is quite simple. You should multiply the height of the wall by its width. Add another 10–15% to the resulting value in case of unforeseen expenses: unintentional damage to the material, etc. Also, we should not forget about additional elements - corners, platbands, plinths, sheathing.
Lathing, insulation and fastening materials for simple and quick installation
The classic method of attaching a block house involves installing lathing. It is better to start work by marking the walls in order to complete the installation as smoothly as possible. The block house is traditionally mounted horizontally, so the lathing is done vertically.
When constructing lathing for interior work, I use timber measuring 40x40 mm and planks 20x50 mm. First, the entire wall is covered with a foil layer of vapor barrier material, and then the fastening of the sheathing begins. The beam is nailed vertically, as the basis of the supporting structure, and the planks between it horizontally, as additional reinforcement. The step between each bar is maintained within 40 - 50 cm.
The next stage of work directly depends on the purpose of the room. If it is a bathhouse or sauna, additional insulation with a mineral veil is required. If you install a block house yourself in a warm residential building, you don’t have to install insulation.
It is best to use clamps as fastening materials. They are easy to install, invisible under the finish and provide the opportunity for the lamellas to expand and contract under the influence of seasonal temperature changes. If desired, you can secure the boards with nails and even self-tapping screws.