SHARE ON SOCIAL NETWORKS
FacebookTwitterOkGoogle+PinterestVk
Fireplaces made of plasterboard are decorative elements that are most often installed in apartments. Thanks to the variety of facing materials, such designs can be combined with various interiors. Anyone can make a fireplace out of plasterboard with their own hands, since creating one requires only having minimal skills in working with plasterboard material and strictly following the instructions.
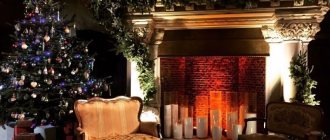
A fireplace with a plasterboard base can be decorated in any style
Features of false fireplaces made of plasterboard
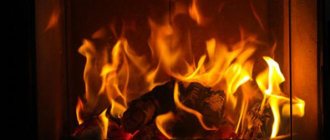
The use of full fire in such an artificial fireplace is strictly prohibited. There are articles online that provide instructions for finishing plaster fireplaces to use real flames rather than fake ones. Experts categorically do not recommend implementing such instructions, as the consequences can be fatal.
A false fireplace can be installed in any room and decorated at will with any objects without fear of fire
Assembling a false fireplace from plasterboard with your own hands allows you to get not only an elegant interior element, but also a heating device. Heating in such units is carried out by special heating elements, which are powered by energy from the electrical network.
Types of false fireplaces
All fall fireplaces can be divided into three categories: authentic, conventional and symbolic. Once you understand which option interests you, you can begin to implement it.
A decorative chimney gives greater authenticity to the entire structure
Authentic fireplaces are made to be exact replicas of the original designs. If this option is used outside the apartment, then you will never think that this is an imitation. A characteristic feature of such structures is the use of furnaces where various types of fuel are burned. The imitation comes out so good that it has the appropriate dimensions and design principles. Such a fireplace made of plasterboard in the interior can look very massive, and it is rational to install it in a cottage where there are large rooms.
A very popular false fireplace design
A do-it-yourself fireplace portal made of plasterboard can be classified as a conventional type. Such a design always intentionally protrudes significantly from the wall, and is created with a firebox hole, where firewood or other decorative elements are usually placed. Most often, this type is combined with conventional electric fireplaces.
By itself, such a design will not look beautiful.
Symbolic structures are used only for decorative purposes and do not have the function of heating the room. This decorative fireplace with your own hands is made from plasterboard only for beauty.
Don't forget about your imagination. Nothing prevents you from taking a regular battery as a basis and sheathing it with plasterboard. This imitation of a plasterboard fireplace will have a decorative and heating function. You can even put stones on the battery, hiding it from view. In this option, the radiator should not be located under the window. But the point is to use your imagination, and not just mindlessly follow the instructions you find.
What are the advantages of self-made false fireplaces?
Decorative fireplaces made of plasterboard have many advantages. Let's consider the advantages of using such devices in more detail:
- An imitation fireplace made of plasterboard can be installed in any apartment. Moreover, for such work you do not need to obtain any permits;
- the shape of the device is selected to match the features of a specific interior, which is very convenient;
- assembly of a fake stove is carried out using simple materials that can be easily purchased on the market or in any specialized store;
- the absence of an open flame source makes it possible to ensure the safety of such a structure;
- organizing a plasterboard stove in an apartment or house has low financial costs;
Imitation fireplace made of plasterboard, decorated with real logs
- The upper partition of this design is functional, as it can be used as a stand for family photos (or any other items).
Note! If necessary, a decorative plasterboard fireplace assembled by yourself can be equipped with electric heating.
The organization of electric heating is quite simple. As mentioned above, the use of open flames in such structures is strictly not recommended. If you decide to use an open fire in such an imitation of a stove, then you need to take care of covering the back panel and side surfaces with fireproof materials. This type of cladding is quite easy to do with your own hands. Photos of decorative plasterboard fireplaces with different heating options can be studied on the Internet.
Such decorative elements do not need to be fixed to the wall, which will allow it to be moved to any point in the room at the request of the owners.
Advantages of a false fireplace
Frame of a false fireplace made of plasterboard
A decorative fireplace, which you can easily build yourself, has many advantages:
- this device can be installed in a city apartment, and there is no need to take out any permits or complete additional documentation;
Drywall fireplace drawing - a fireplace made of plasterboard can be of various shapes and configurations, which will allow it to fit into any interior;
- to build a false fireplace you need to use simple materials that can be bought at any hardware store;
- high safety of this design, since there is no source of open flame;
- the installation cost of this decorative element is small;
- such a unit can act as a shelf or stand;
- To simulate a flame, you can install an electric fireplace in a prepared niche that acts as a stove body.
If the unit body is not screwed to the wall, it can be easily moved around the apartment. In this case, the decorative fireplace can be used only when necessary, while installing it in the right place.
Types of decorative fireplaces made of plasterboard
Depending on the purpose of use, there are two main types of these units:
- interior;
- electric.
A plasterboard fireplace that serves as a decorative interior decoration
In the first case, the stove is used as a decorative element of the interior. Imitation of flames in this design is carried out due to the process of burning ethyl alcohol. Such a fireplace is not suitable for full heating of a room. Today, the most popular are interior units made of plasterboard sheet (GKL). During installation of such a device there is no need to use fire-resistant materials. Almost anyone can organize such a false fireplace. Photos of similar structures, as well as all the necessary drawings, can be easily found on the Internet.
All interior units can be divided into the following categories:
- simulating the burning of fire;
- simulating burning fire and smoldering logs;
- imitating a natural fireplace.
The third option is the most popular, as it does not require the organization of a ventilation system. In the first two cases, ventilation may be required to eliminate gas combustion products.
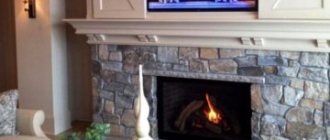
A plasterboard structure can be equipped with an electric fireplace that looks like a real one
The electrical device, in addition to serving as a decorative decoration for the interior, also serves as a heater. Electrical devices are highly powerful and have an appearance that closely resembles natural fireplace models. Ready-made false fireplaces are sold in specialized stores, as well as on the Internet. You can buy a ready-made structure to save time, however, from a financial point of view, it is better to assemble this unit from plasterboard yourself.
Preparing for work
Start making a fireplace with your own hands from plasterboard with the preparatory process. At this stage, the optimal location for the structure is selected, materials and tools are prepared, and a project is created.
Advice! To make the future structure aesthetically pleasing, you will need to create a drawing. In addition, it will help you accurately calculate the required amount of materials.
Selecting a location
Since the design is, in fact, a dummy fireplace made of plasterboard, the choice of location is approached especially carefully. The finished false fireplace should create an illusion and look like a real one.
The creation of a reliable illusion of the authenticity of the fireplace depends on the choice of place for the dummy
First, they decide on a room. Traditionally, this is the living room. In rare cases, a bedroom is decorated with a fireplace, and only if it is large. After choosing a room, they think about the optimal location. The best place is considered to be the middle of the longitudinal wall. However, depending on the layout and technical nuances, the false fireplace can be moved to the edge of the wall or placed in the corner.
Advice! For a small room, it is optimal to choose a corner location of the dummy. A plasterboard structure will not take up much free space.
You should avoid placing a false fireplace near furniture, heating radiators, doorways and windows. It will look ridiculous, constantly get in the way, and will often be damaged by careless actions.
Selection of drywall
The main building material is plasterboard. Sheets vary in size, thickness, and purpose. As for the dimensions, you first need to draw up a drawing of the fireplace. Using the diagram it will be easier to choose the sheet of the right size.
A sheet of suitable size is selected after drawing up the drawing
It is optimal to give preference to plasterboard with a thickness of 12.5 mm. According to their intended purpose, the sheets are moisture-resistant, fire-resistant, combined or ordinary. If there is dampness in the house, it is optimal to use drywall marked GKLV. For dry rooms, regular gypsum board sheets are suitable. Fire-resistant GKLO or combined GKLVO sheet is more expensive due to special impregnation. There is no point in buying heat-resistant drywall for a fireplace. Even if there are burning candles in the firebox, the portal will still have to be additionally protected by sheathing made of non-combustible materials.
Drywall for different purposes is distinguished by markings and color shade
Drawing of a decorative plasterboard fireplace with dimensions
Drawing up a drawing yourself without experience is a difficult task. If you want something exclusive, it’s best to show a roughly hand-drawn diagram of a plasterboard fireplace with its dimensions to a specialist. He will make adjustments and give valuable advice.
The simplest scheme for a false fireplace can be found on the Internet
Many fireplace diagrams are posted on the world wide web. One of them can be taken as a basis. Dimensions, if necessary, are changed to suit the parameters of the room.
Preparation of tools and materials
In addition to drywall, you will need other material to create a fireplace. The frame is created from a profile. In this case, guides and racks are needed.
The shape and size of the profile are selected depending on the complexity of the frame
To fasten the profile, metal self-tapping screws are used - bugs. To fasten drywall sheets, you need wood hardware. The frame itself will have to be attached to the wall. Dowels will be needed.
Finishing materials are purchased depending on the chosen style. This could be paint, wallpaper, plastic tiles and other options. However, before finishing, it is necessary to prepare the surface of the fireplace. To protect the corners, purchase perforated corners. For rough finishing you need a primer, putty, and reinforcing mesh.
To assemble the fireplace you will need a screwdriver, an electric drill, a sharp knife, a level and a tape measure. A spatula and a paint brush are needed for priming and putty. The list of other tools depends on what material will be used for finishing.
DIY plasterboard fireplace: choosing a design
Installing a full-fledged fireplace in an apartment not only requires large financial costs, but is also accompanied by other difficulties. But an indoor stove of this type creates a unique atmosphere in the house, so many owners decide to install a decorative plasterboard fireplace with their own hands. Photos of apartments with fireplaces indicate that this element often becomes part of the interior and makes it unique. The photographs will also help those wishing to acquire a false fireplace decide on the design and choose the most suitable option.
The dimensions and design of the imitation furnace are determined according to the following rules:
- if you intend to install a fireplace that will have medium dimensions, you can place a small plasma TV inside it. This solution will allow you to simulate flames without installing gas burners and ventilation pipes;
A decorative fireplace in the living room and surrounding accessories attract attention and make this composition the highlight of the interior.
- To simulate flames in a small device, you can use a regular LED photo frame. It will perform the same function as a plasma TV (picture transmission);
- To get as close to a natural device as possible, it is recommended to install an electric heating system in the decorative stove. In this case, you can get not only a decorative interior element that imitates a flame, but also a full-fledged heater.
Helpful information! Please note that in small rooms corner fireplaces made of plasterboard are most often used. This solution allows you to save useful space in the room.
False fireplaces can also be used as a stand for a plasma TV. Using a structure in this way is a fairly common practice.
The shelf above the false fireplace can be used as a TV stand
Plasterboard cladding
It is not necessary to buy fireproof boards; you can also use moisture-resistant material. Cutting drywall parts is done using a simple paint knife. A cut is made along the marked line under any straight plank, after which the canvas is bent. The cardboard on the other side is trimmed.
When making a functional fireplace, the firebox and smoke exhaust box must be installed with thermal insulation and a foil reflector inside the device.
Do-it-yourself lining of a fireplace insert with plasterboard can cause difficulties in hard-to-reach places. And so the assembly technology is no different from any other gypsum board construction:
- The sheets are sewn to the profiles using metal screws. The hats go deeper into the canvas. It is better if individual parts are cut from a single sheet. This will make pre-finishing much easier. To process the corner joints of the structure, use a special plasterboard plane or a painting knife.
- For thermal insulation on the inside, the cladding is made using a basalt slab and foil. There is foil mineral wool. But attention should be paid to the quality of the glue used in this material. It must meet safety standards and withstand prolonged exposure to elevated temperatures.
The smoke exhaust box can also be made of plasterboard. Thermal insulation and foil reflector should be installed inside the device. The chimney box has holes for ventilation grilles.
How to choose a place for a plasterboard fireplace?
Before you move on to studying the instructions, which tell you how to make fireplaces from plasterboard with your own hands, you need to decide on the choice of place for it. If you plan to install this device in a large living room, then the best solution would be to place the fireplace at a point that corresponds to the middle of the longitudinal wall.
If desired, you can also make a decorative chimney, which will give the structure the most realistic appearance. The main thing is to decide on the size and design to create your own fireplace from plasterboard. Photos of structures equipped with a chimney will help assess the feasibility of such a solution and the possibility of installing a chimney in your room.
Experienced craftsmen do not recommend installing fake fireplaces in hard-to-reach areas of the room. This rule especially applies to structures that are equipped with heating devices. Hard-to-reach places include:
- space in front of the heating radiator;
- points located near the doorway;
- places near cabinets and other bulky structures.
The fireplace should be located in a place where it will be accessible to everyone
Briefly about fireboxes
Conventionally, they can be divided into two large groups:
- Functional: open, closed. According to the material of manufacture, steel or cast iron, brick. Such equipment requires additional fireproof protection of walls and floors.
- False fireplaces. Instead of a real firebox, screens with imitation flames of fire are used. For such devices, chimneys are not installed, but an electrical supply is required.
There are no restrictions on the shape of the portal (fireplace facade): rectangular, complex geometric shapes, radius, corner. For every taste and color. It should be noted that finishing a fireplace with plasterboard with your own hands is a process of preparing a rough base for the finishing cladding.
Creating a drawing for a plasterboard fireplace
A drawing or sketch is the first step in creating a decorative plasterboard fireplace with your own hands. You can complete the drawing and project yourself or use an Internet search. It is best if the drawing is made in full size (scale 1:1). In order to make such a drawing, you will need:
- large sheet of paper;
- ruler;
- pencil or marker.
The drawing must be attached in the place where the gypsum plasterboard stove will be installed and visually verify that the location of the structure is correct. After this, you can begin assembling the layout.
The drawing must indicate the dimensions of each element of the future fireplace
A drawing with the dimensions of a plasterboard fireplace must include every detail of the future design. Dimensions, relief, shape - all this must be noted when creating a design for a gypsum plasterboard stove.
We mount the frame
For the frame, it is necessary to prepare a metal profile; this is the most preferred material, since it is easier to work with. Over time it will not deform. As a rule, a regular small profile measuring 28x27 mm is used; to create arches, a special arched profile is required.
The guide profile is attached to the walls and floor. It is important to consider distances here, because... after covering the profile with plasterboard, its thickness will increase by 12 mm.
To attach the profile you will need a screwdriver. The markings are created using a tape measure and a pencil. The building level is used to check the evenness of the walls; markings are carried out taking into account the width of the profile and the plasterboard sheet. There is no need to make a foundation, since there will be no open source of fire in the decorative fireplace.
The base is assembled along the wall; this is the basis of the structure, which determines its size. Then profiles are installed that are adjacent to the floor and the top of the base. They are connected to each other using self-tapping screws with a wide head every 20-30 cm. You can cut the profile to the required size using a grinder or metal scissors.
Comment from our expert: for plasterboard fireplaces, most often only a 27*28 guide profile is used. A wide rack profile is also sometimes found, but it is usually needed in places where you need to make the structure as rigid as possible.
You can increase the strength of the structure using jumpers. Small sections of the rack profile secure the main guides to each other. To do without screws, a staple profile is used. But, often the fastening elements are simply impossible to install due to the small space - so we use screws with a wide head. The creation of the frame proceeds from the bottom up. This is the most labor-intensive process.
Do-it-yourself plasterboard fireplace: making a layout
Experienced craftsmen advise that after completing a drawing of a plasterboard stove, make a model of it. This recommendation especially applies to beginners who have no experience in creating such structures. Why do you need a layout? Assembling the model allows you to realistically evaluate the structure that will be assembled according to the drawing and identify errors made at the stage of creating the project.
The materials and tools that are required to organize the layout - these are foam sheets and PVA glue - are inexpensive. Assembling the layout does not cause any problems and allows you to correct design errors before expensive materials are used.
To fasten drywall sheets, use a U-shaped metal profile
How to make a fireplace from plasterboard with your own hands: materials and tools
To make a fireplace from gypsum plasterboard, you need to purchase the following tools and materials:
- metal profile in the shape of the letter “P”. Slats are used as guides;
- GKL;
- self-tapping screws for frame construction. The length of the screws should be approximately 14-15 mm;
- Self-tapping screws are used to fix the gypsum boards. The head of such self-tapping screws must be countersunk;
- ordinary dowels;
- tape measure (for measurements);
- screwdriver;
- perforator;
- Bulgarian;
- building level. You can use a plumb line as a level;
- sealing compound (silicone);
- putty;
- paint (water-based).
All of the above tools and materials are necessary for assembling a false fireplace made of plasterboard. You can buy them in almost any specialized store.
Related article:
Fireplace in the apartment and the best design options using it
Principles of using a fireplace as a key element of the interior to create a cozy environment in different styles. Popular design techniques.
The screws must be special, designed for working with drywall, and also of a suitable length. The last parameter depends on the thickness of the gypsum board.
First of all, you need to mark the fireplace on the wall according to the drawing
Assembling the frame of the structure
When you have thoroughly prepared, when you have a drawing, tools and materials, you can begin building the frame of the false fireplace. The step-by-step methodology involves the following steps:
- Transfer the drawing of the future fireplace in real life, onto the walls and floor in the right place. Use tools to mark the level and size.
- According to the markings, attach the guides to the floor and walls. If you need to attach a guide to a concrete wall, this is done as follows. First, the profile is applied to the intended line, holes are made in it and the wall, then dowels are inserted into the wall, the metal guide is again applied and secured.
Setting up the main supports and guides of the future fireplace
- When the guides are secured, racks are inserted into them and secured with metal screws. To work with self-tapping screws, use a screwdriver; using a screwdriver to carry out such work is very tedious. When assembling the main frame, make sure that it is level and the racks are in a strictly vertical position. The wall may be curved or blocked, so you should not focus on it.
- Having assembled the general frame of the structure, you can move on to a more detailed study of the portal, and then to the construction of the firebox. At the same time, do not forget to regularly insert jumpers into the profile, at a distance of 10-15 centimeters from each other. They will give the entire system the required rigidity.
- If it is necessary to make rounded edges, then in this case the profile is cut with metal scissors in several places and bent.
Good to know: Decorative fireplace made of polyurethane, how to make it yourself
When assembling the frame, you will have to try, but the resulting structure should instill confidence in you. The frame made by your own hands will become the basis for the entire building. Now we have to cover it with plasterboard.
Fully assembled frame of a false fireplace made of metal profile
To make the necessary patterns on a sheet of drywall, you will again have to use the drawing. To cut drywall, you can use a construction knife or a jigsaw, whichever is more convenient for you. In this case, we immediately cut the sheet with a jigsaw, but with a knife we act differently.
To cut a piece of drywall from a sheet, you should attach a level or an even metal profile to the line drawn with a pencil and make a cut with a knife. This way you can cut through the cardboard and catch some of the plaster. Then you should break the sheet of drywall along the resulting cut, bend it, then cut the second layer of cardboard shell and separate the piece.
You may not be able to cut a piece straight the first time, but after some practice the work will improve. Now the cut parts should be secured to a metal profile. For this, wood screws and a screwdriver are used. Try not to push the head of the screw too far into the drywall. Place the fasteners in increments of 10-15 centimeters and try not to get into the places where the jumpers are installed to stiffen the frame; it will be incredibly difficult to get through them with a self-tapping screw.
Properly screwed self-tapping screw into drywall
Covering the frame of a false fireplace with plasterboard is a very labor-intensive task, but does not require any special skills; all of them will appear during work. Try to handle the drywall carefully, do not drop it on the floor; when screwing in the screws, try not to press too hard or sharply so that the screwdriver does not fly off and damage the drywall.
Frame of false fireplace covered with plasterboard
At the final stage, when the frame of the structure is built and sheathed, putty can be applied. Putty will allow you to make smooth joints and hide minor structural defects. After grinding, you will get a portal with smooth edges and walls. Now we can assume that you have built a false fireplace from plasterboard with your own hands, all that remains is to decorate it. Note that for many people it is easier to buy a ready-made portal, for example, made of polyurethane, in order to immediately move on to the decorating stage.
DIY false fireplace. Step by step instructions. Photos of work stages
How to make false fireplaces for the living room or any other room? In order to answer the question of how to make a fireplace from plasterboard material, it is necessary to study the three main stages of its creation:
- execution of the frame;
- covering the structure using gypsum plasterboard;
- portal design.
The frame is the basis of the future furnace portal. The work of assembling the frame structure must be taken very seriously. Before installing the frame, it is necessary to apply markings to the surfaces to which the structure will adhere. The markings convey the contours of the future furnace and allow you to estimate its actual size.
Important! When marking, you must ensure that all lines are straight. As a result of the intersection of the line, the walls and floor should form a right angle (90°).
Method of fastening metal profiles together
After completing the markings, you can proceed directly to assembling the fireplace from plasterboard with your own hands. Step-by-step instructions for making the frame are presented below.
To assemble the base of the rear wall, guide profiles are fixed to the wall (according to the markings). The profiles are secured using dowel nails. The base of the rear wall includes two vertical and transverse posts. When assembling the frame, it should be remembered that the numerical indicator (cm) from the floor to the bottom crossbar is the determining factor in the height of the parapet.
Next, the guide profiles are fixed along the contour of the combustion chamber. After this, the profile is fixed on the floor, which is fixed along the parapet line. Then the front racks are mounted, the distance from which to the rear wall is an indicator that determines the depth of the fireplace. The front pillars are connected to each other by means of crossbars. The front pillars are connected to the rear wall using crossbars located in a horizontal plane.
To bend the profile, you need to make cuts on it at regular intervals.
After assembling the front and rear posts of the fake stove, you can proceed to installing the parapet posts and tying them with crossbars. Then, in the front part of the frame of the unit, the racks of the combustion compartment are fixed, which must be connected to the main racks using crossbars.
At the end, the arch of the combustion chamber is mounted. To make a curved arch, you need to cut the profiles and bend them in order to obtain the desired shape. The pitch of the cuts should be approximately 1.5 cm. Thus, the frame of the portal for the fireplace is assembled from plasterboard.
On the Internet you can find all the necessary materials for assembling a fireplace with your own hands from plasterboard. Photos of frame structures at different stages of assembly will help you do this job correctly.
An example of a finished frame for a false fireplace made of plasterboard
Do-it-yourself fireplace made of plasterboard: step-by-step instructions for covering the frame
In order to cover a fireplace with plasterboard sheets, you first need to cut them (in accordance with the dimensions specified in the project). Let's consider the procedure that needs to be done to cut the gypsum board:
- First you need to press the ruler to the surface of the gypsum board. The ruler must be pressed strictly along the cutting line;
- Next, you need to draw a construction knife along the ruler;
- After making a cut along the line, you need to break the plasterboard sheet with your hands and cut through the cardboard layer on the other side.
Helpful information! Complex fireplace elements (for example, the arch of the combustion chamber) require high precision when cutting them out of gypsum board. Therefore, you must first mark such parts on a sheet of graph paper.
Cutting sheets of drywall must be done very accurately, using a ruler
Cutting out complex parts is done using a special device - a jigsaw. On the Internet you can see various photos of plasterboard fireplaces made using intricate elements.
The finished parts are fixed to the frame using self-tapping screws, which must be suitable for working with plasterboard material. The pitch indicator for such self-tapping screws ranges from 10 to 15 cm.
It is necessary to strictly follow the algorithm of actions proposed below in order to make a plasterboard fireplace with your own hands. Step-by-step instructions for covering the fireplace frame with plasterboard parts look like this:
- a chamfer is cut from the joints of sheets that are placed in the same plane (the cut width should be approximately 5 mm);
- after this, the joints are reinforced. For this, a special sickle mesh is used;
- then the joints are covered with two layers of primer. The second coat of primer is applied only after the first coat has completely dried;
Before applying putty, gypsum board joints must be reinforced with a special mesh
- after the second layer of primer has dried, the resulting structure is treated with putty (starting);
- then the entire portal is treated with putty.
Thus, a ready-made portal for a plasterboard fireplace is obtained. It won’t be difficult to do it yourself, however, you need to take into account all the above nuances.
How can you decorate a false fireplace with your own hands? Photos of interesting ideas
Let's consider the most popular materials used to decorate fireplaces:
- self-adhesive film or “self-adhesive”;
- ceramic tiles (the most common material for decoration);
- stone (natural or artificial);
- brick;
- marble;
- tree.
A plain plasterboard fireplace can be decorated with a variety of decorative elements
In addition to the above materials, forged metal elements can be used for cladding a decorative fireplace. However, an important point when choosing a facing material for a portal is that the decorative structure should not experience excessive load.
You can cover the fireplace with any material with your own hands, but experienced craftsmen do not advise decorating the stove yourself if the cost of the material is significant (for example, natural stone).
Cladding the fireplace portal with ceramic tiles is quite simple. To do this, you need to use a special tile adhesive and use it to glue the tiles to the portal. Instead of glue, you can use liquid nails, which have also proven themselves well in this matter.
Raised fireplace with ceramic tiles and plaster moldings
Making a frame from a false fireplace
The frame is an integral part in the construction of a fireplace structure. Here we need to create a false fireplace with our own hands, i.e. a strong foundation (more on this in a separate article). For those who plan to use an electric fire instead of a live fire in the future, electrical wiring should be done to hide all the wires to which the electrical appliance will be connected. If you suddenly plan to use an imitation fire (candles, bio-fireplace), then you will not need a power supply.
The finished frame is made of a metal profile, the outside is finished with sheets of plasterboard. The photo shows the design for an electric fireplace
Installation of a fireplace can be divided into the stages of constructing a frame, covering it with plasterboard and decorating the finished portal. Step-by-step instructions for installing a gypsum plasterboard structure are as follows:
- Along the lines marked on the wall, you need to fasten the profiles to form the back wall of the artificial firebox. The fastening is done using dowels, ensuring the strength and stability of the entire structure. When installing profiles, you need to carefully check the horizontality and verticality of each element.
- Separately assemble a frame of the same size for the front wall of the portal. Based on the dimensions in the drawing, install 2 sections of the profile on the sides of the firebox mouth. Screw to them the parts that limit the opening at the top and bottom. If you want to make an arched vault of the hearth, then the upper profile should be attached at the highest point of the arc. If desired, you can notch the sides of this segment and bend it along the desired radius.
- Attach the resulting frame with the firebox opening to the back of the structure. To do this, cut off parts of the profile with a length equal to the designed amount of the portal protrusion above the wall plane. With a small size and rectangular shape of the fireplace, 4 parts will be enough for mounting in the outer corners of the portal.
- 2 more of the same parts need to be fixed at the level of the firebox. To give the hearth strength, you need to screw 1-2 segments to them, the length of which is equal to the width of the portal. Fastening is done using self-tapping screws. This is especially true if you plan to install an electric fireplace or lay down logs to simulate a flame.
- The frame for the chimney is made in the same sequence, but its front wall does not have holes, so the frame can be a simple rectangular shape, trapezoidal, inclined towards the wall, etc. If the chimney must be high, then it is necessary to install crossbars in increments of about 50 cm .
- Install the podium along the lines marked on the floor, if required by the selected design.
The result will be a metal frame as in the photo above. When installing frame profiles, you must constantly monitor the verticality and horizontality of structural elements. Straight corners can be made using a construction square or a school protractor. For the mantelpiece, it is best to use a thick board or sheet of foam.
Sheathing the gypsum board frame
For this part of the installation, you will need to cut the sheet material into parts corresponding to the sidewalls, top panel, bottom and front part of the portal. If gypsum board trim is used for cladding, then some parts will have to be made from separate pieces. In this case, additional profiles must be installed at the joints of the parts. The edges of the gypsum board patterns should meet in the middle of the auxiliary element. The parts should be fastened using self-tapping screws with a recessed (countersunk) head (photo below).
To successfully complete the curved elements of false fireplaces (arch, podium, chimney), you will need a cutter. Using a toothed roller, you need to make holes in the paper covering on one side of the gypsum board part. Wet the part thoroughly so that the water penetrates the plaster layer, but does not wet the other layer of cardboard. Wait 12-30 minutes and try to bend the workpiece. Soaked plaster usually bends well.
Bend the workpiece along the required radius on a pre-prepared template and secure it to it. Any object with a suitable rounded surface can be used as a template. If necessary, you will have to make the mandrel yourself: from plywood or other material.
The workpiece fixed to the template should dry within several hours. After that it will become hard again. Screw the made curved element to the desired location.
After all structural elements are secured, the false plasterboard fireplace needs to be puttied. After the putty has dried for 24 hours, the gypsum board surfaces should be treated with emery cloth or an abrasive mesh. The portal you made yourself, all that remains is to decorate it to your taste.