What should a shield be like for a bathroom?
There are a lot of options for what you can do under the bathtub. They differ from each other in appearance and functions.
When selecting manufacturing material and installation method, we usually focus on the following design requirements:
- Moisture resistance
. Considering the fact that the humidity in the bathroom is constantly high, it is recommended to make the screen exclusively from moisture-resistant materials that will not deteriorate in such a microclimate. If this condition is neglected, the fence will begin to accumulate fungus and mold on its surface. There is also a possibility of rotting and destruction of the material under the influence of high humidity and temperature fluctuations. - Airtightness
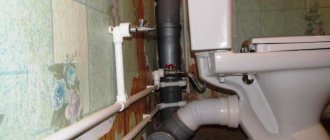
. To prevent water from the room from getting under the bathtub, it is necessary to create an airtight barrier in its path. - Possibility of access to communications
. It is prohibited to build a completely solid partition under the bathtub, since from time to time the drain and overflow pipe will need maintenance. To do this, the screen is equipped with windows and doors, or it is made sliding.
Most often, a do-it-yourself bathroom screen is made from the following materials:
- Plastic
. The most common option for self-implementation. Plastic partitions are hygienic, moisture-resistant and durable. The construction of such a structure will be very inexpensive, and installation work will take a minimum of time. As a decorative design for the finished screen, you can use a special film, choosing its color to match the overall decoration of the room. In addition, marine-themed stickers look stylish. In addition to single-color designs, sets of plastic panels of various colors are often used. - MDF panels
. They take second place in popularity when creating screens for the bathroom. MDF is chosen in cases where the bathroom is well ventilated, because... This material is not completely moisture resistant. To ensure that such a partition lasts as long as possible, it is additionally coated with a water-repellent composition. Installation work is in many ways similar to the construction of panels for a bathtub from plastic panels. - Plasterboard sheets
. To finish the bathroom, you must use a moisture-resistant type of plasterboard (such sheets have a specific green color). The advantage of gypsum plaster boards is that they can be used to create a very flat base, convenient for tiling, moisture-resistant wallpaper, decorative plaster, painting with moisture-resistant paint, and gluing film. - Wooden panels
. A similar screen is built in bathrooms decorated in country style. To protect the finished structure, varnishing or special hydrophobic impregnations are often used.
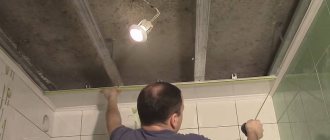
Required Tools
Before you make a bathtub screen with your own hands, it is important to prepare the tools used during work. They may differ depending on the chosen design, but some elements are always used:
- plumb line, level or other high-quality and reliable measuring equipment;
- cement mortar if you plan to use brick during the work;
- grout for joints in brickwork or tiles, acting as a decorative material to create a coating;
- grinder for cutting various materials;
- a screwdriver and a drill, and these tools provide a frame, which is then sheathed with various selected finishing materials;
- special impregnations used for wooden or metal elements, increasing their resistance to moisture;
- polyurethane foam or sealant for remaining gaps in structures, which allows you to create a perfectly sealed structure.
Other tools are often required, since their choice depends on what material is used in the work process.
Tools that may be needed to install a screen under a bathtub
Material
Choose a bath screen online
There are DISCOUNTS for our readers in the LEROY MERLIN store.
Buying online is cheaper than buying in a store (lower prices)! It is very profitable, convenient and safe: you can buy a bath screen without leaving home or visiting a store. All purchases will be delivered to your home.
In addition, in the online store, on each product page you can see the exact characteristics of the screens and real customer reviews.
To choose the best screen model, follow the link>>>
Making your own sliding screen
Technological openings and doors for access to communications are made differently. They open vertically (hinged) or horizontally (hinged). Installation requires additional profiles, canopies and a special mechanism for the hinged doors to hold them in a fixed position. In a limited space they are inconvenient - they take up space when opened.
MDF has good properties. The sheet sizes are suitable not only for sliding doors, but also for other types of screens. Due to increased sensitivity to moisture, the panels are pre-treated with a special impregnation, then with a primer. An additional ventilation hole is installed on the side opposite the inspection hatch. Decorate a small opening with a plastic grill.
Screen made of MDF panels with sliding doors
Door guides consist of a special profile along which they move. It has an W-shaped cross-section. It can be made of plastic, but preferably aluminum, which is stronger and holds its shape well. Sold in construction stores that sell furniture components
Install at the top and bottom of the structure, paying special attention to the location in the same plane, otherwise there will be distortions. The same profiles are placed on the sides as spacer posts
With two sliding doors
For the manufacture of doors, materials similar to the main one, or acrylic, are used. It is sold in specialized stores, has a thickness of 5–8 mm and a variety of colors. It is sawed with a jigsaw, then the edges are processed with a file with fine notches. The finished doors are inserted into the guide profiles. Screw on furniture handles and use them.
Sliding panels based on PVC window profiles
Various options for installing sliding screens are possible. It is often divided into three parts: a central fixed one, on one side there is access to sewer pipes, on the other there are shelves for storing small items. If preference is given to doors that move along the entire length, two parts are prepared. The dimensions are calculated so that they overlap each other by several centimeters. Installed in different grooves.
How to install a plastic screen yourself
Installing a fence made of PVC panels yourself does not require any special skills. You will need a standard set of tools, a little patience and accuracy.
Sliding screen for a bath: components and main design functions
To secure a sliding screen based on PVC panels, you will need the following components:
- plastic blanks;
- metal profiles or wood blocks;
- "liquid Nails";
- UD profiles with fasteners;
- aluminum guides.
Tools you will need:
- perforator;
- screwdriver;
- knife;
- square;
- construction level.
Making a frame for a bathtub screen
Begin assembly by marking. Draw a vertical line where the screen touches the wall using a level.
Start counting from the top edge of the font. Draw a second line in a direction parallel to the bathtub, from the drawn verticals. Its thickness is equal to the thickness of PVC blanks. Also make corresponding marks from the lines on the walls along the entire length of the floor along the bathtub.
To assemble the frame, measure and cut sections of the profile (beams), align them along the marks and fasten them. To increase the rigidity of the base, mount 1-2 more fasteners across.
Screen assembly from plastic panels
Aluminum profiles are installed to serve as guides. They are attached along the finished frame from below and above. Sliding doors, pre-cut from blanks, are mounted in the first groove, the fixed section in the middle. Handles are attached to the outside of the doors, and the joints in the corners are covered with corners on top.
Creation of designs, nuances of technology
There are certain requirements for a homemade product, as well as for factory ones. During the installation process, provision is made for free access to communications. The design must have a door, window, sliding or removable panel. The material is selected in accordance with the room conditions: high humidity and constant temperature changes. Not all finishing materials are suitable; some quickly collapse.
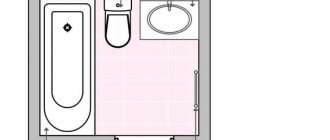
The screen does not serve as a support for the bath; legs are used for this purpose. The free space under the bowl is used as a niche for storing detergents, household chemicals, and various small items, although this is not necessary. You can also install shelves on the outside. This option is especially relevant for small spaces.
Types and features of bath screens
The future structure can perform several functions: be a decorative element, serve for storing things, or both at the same time. Depending on the purpose, there are different types:
- 1. Stationary - the simplest and fastest solution. The disadvantage is the monolithic structure. For repairs, small hatches are provided, which is not very convenient. The corner screen is mainly made in this design.
- 2. Removable - the space under the bathroom is not used, but there is access to communications. If necessary, the casing can be easily dismantled and reinstalled.
- 3. Sliding - all pipes are hidden, takes up little space. Allows easy access to sewerage.
- 4. Hinged - has doors that open towards the room. Convenient to use, but more suitable for spacious rooms.
- 5. Hinged - has doors that open in a horizontal position. Every little thing is stored behind them, but in a small room it takes up a lot of space.
A modern acrylic bathtub is purchased with ready-made plastic screens. They are made exactly to size and are very easy to assemble and install. Owners of old steel and cast iron ones are forced to do them themselves or leave the space open and see the sewer pipes. Whether or not to cover the space under the bathtub is a matter of taste for the owners.
Screen made of plastic panels with hinged doors
A bathroom with a screen is transformed, it is given aesthetics and a complete finish. But there is another reason to start making a structure: the space can be used profitably. The space under the bathtub is ideal for storing small items: the door opens and shelves behind it.
To make a screen yourself, you will need very few inexpensive materials of your choice:
- any bricks;
- moisture-resistant drywall;
- plastic panels;
- MDF or OSB.
With the exception of plastic, everything else requires further finishing. It costs little, is practical, biologically neutral, resistant to damp environments, and easy to clean. Despite the low strength, this drawback does not pose any big problems. If any element is damaged, it is easy to replace it without disassembling the entire structure. When using popular MDF panels, they must be treated with special compounds, because they are afraid of moisture.
Model with hinged doors
There are other options left. The design is easier here: finishing is allowed to suit every taste to match the style of the bathroom. The brick is faced with decorative plaster or ceramic tiles. Drywall and panels (not plastic) are painted, painted, covered with wallpaper and tiles. The possibilities for imagination are endless, the main thing is that after decoration the screen does not lose functionality.
Types of screens
Bath screens can be solid, hinged or sliding.
- Solid or solid - decorative, installed simply and quickly, with or without a frame, but it also has disadvantages - access to plumbing communications is difficult, it is not possible to fully clean the room, free space is not used.
- Hinged - gives access to communication nodes, is functional, provides access for cleaning, is installed on a frame, but swing doors, when open, occupy the free space of the room.
- Sliding is perhaps the best option for bathrooms. Free access for cleaning, checking and repairing plumbing units. Installed on the frame.
Plasterboard panels for bathtubs
To cover the space under a traditionally shaped bathtub, moisture-resistant green plasterboard sheets are sometimes used. The finished structure is additionally impregnated on both sides with an acrylic primer. It is allowed to use oil paint to finish the inner surface of the slab. When cutting drywall, they are guided by the height of the frame, making an indent of 20 mm. Fixing the sheets is accompanied by indentations from the top and bottom edges of 10 mm. This makes it possible to protect against moisture, which can lead to swelling of the material. The plasterboard sheathing is fixed to the profile frame using black self-tapping screws with fine threads. Their planting step is 15-20 cm opposite the line of the lower and upper profile.
A hole is cut in the area where the technological window is located, which will be formed with a hinged door upon completion of installation activities. If it is planned to use ceramic tiles as the final finishing of the panel, then its thickness should be taken into account when determining the thickness of the hatch. It is secured using furniture hinges. Ready-made plumbing hatches with fasteners are available for sale, the installation of which usually does not cause any difficulties.
Installation nuances
The question of how to cover a bathtub with a screen does not lose its relevance, despite the apparent ease of installation. Before starting work, it is necessary to take measurements and stock up on consumables and tools.
You will need:
- a set of panels according to size;
- the ordinary part of the panel is the initial strip;
- guide profile element;
- fasteners;
- adhesive composition;
- wooden bars.
In addition, you will need:
- square and tape measure;
- perforator;
- special knife;
- screwdriver;
- construction stapler.
Before starting work, the room must be put in order - all rubbish must be removed. Further, the construction process can be divided into several successive stages.
Stage 1
Using a ruler and tape measure, you need to draw a line that follows the curves of the bathtub. Vertical lines at the junctions with the walls are drawn with a level. The main reference point is the side of the bowl, from which the markings are made.
The second line should run parallel at a distance equal to the thickness of the panels. Using the resulting markers, a profile is laid, cut into fragments 10 cm long.
Using a hammer drill, holes are made in increments of 15 cm. An expansion dowel is driven into the recesses and added with screws for reliability. You need to fix it from the inner edge.
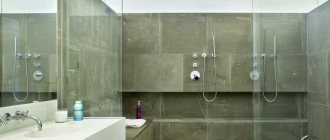
Also interesting: When there is no room for a bidet, installing a hygienic shower will help out
Stage 2
In the place where the side is bent, wooden blocks are installed. In order for them to accurately fit into the gap, their size should be approximately 6-7 cm in length and 3 cm in height and thickness.
The edges must first be treated with adhesive or liquid nails. In this place, the bars cannot be mounted with screws, as the surface of the bowl can be damaged. The starting tape is attached to the wooden parts using a stapler or self-tapping screws.
Stage 3
Having previously calculated the distance between the inner lower and upper points of the frame, the resulting dimensions are transferred to plastic sheets. Next, cut out the required blanks.
On the first fragment of the panel, which will be located against the wall, put on a starting tape of the same length. To do this, lubricate the strip with glue, slightly push the edges apart with a knife and insert the plastic.
The lower part is fixed with self-tapping screws to the profile, but in such a way that they remain on the inside. Subsequently, this part will be covered with a plinth. The upper part is secured with staples or adhesive.
Stage 4
Using this scheme, you can cover the entire bathtub, with the exception of the last fragment. It must be measured separately and cut according to the obtained parameters.
The difficulty lies in the fact that the initial strip along with the sheet needs to be driven into the hole of the previous strip, slightly pulled down and carefully fixed. The result should be a solid structure.
At the end of the work, the screen is decorated with a plastic plinth. Since it bends well, giving the desired shape will not be a problem.
Screen selection nuances
Before installing the screen on the bathtub, you must purchase it in advance, carefully considering which model is best suited.
When making a choice, you need to take into account:
- appearance;
- durability;
- functionality;
- price;
- complexity of installation.
If the screen is attached under the bathtub to close unsightly communications, you can consider the option of installing simple removable or stationary products with a hidden hatch.
When the active use of the space available under the plumbing is planned, the home craftsman will need to figure out how to install a sliding screen with doors under the bathtub. This most convenient option is universal for bathrooms of any size. As for hinged doors, they are convenient to use exclusively in spacious bathrooms.
When starting work like assembling a screen for a bathtub, you need to prepare the fittings, but they must be made of corrosion-resistant materials, otherwise the product will soon lose its original attractive appearance. It should be taken into account that plastic components wear out quickly and are characterized by low strength.
In turn, parts made of galvanized steel retain their inherent qualities throughout the entire period of operation. When purchasing all the elements, you need to make sure that they are of high quality, have smooth door movement and a tight fit to the frame.
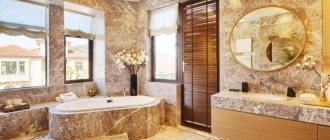
The decorative design of the structure must match the style of the bathroom in texture and color scheme. In small bathrooms, mirror products look advantageous, since their reflective surface expands the surrounding space.
The image on the front panel and photo printing must match the interior. For example, a screen with a floral print in a room decorated in a marine style will look out of place. An image of the inhabitants of the sea or waves is ideal.
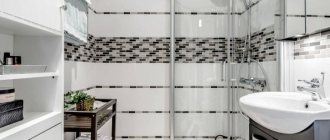
When there are a lot of contrasting and bright elements in the bathroom, it is better to install a single-color screen and vice versa; for a bathroom decorated in soothing colors, a product with a large colorful pattern is well suited.
When making a choice before installing a screen under the bathtub, it is advisable to pay attention to the product manufacturer. The most popular models among consumers are TM OSM, Vannbok, MetaKam, as they are distinguished by the variety of materials and colors used.
We make a screen from PVC panels or plastic lining
As we mentioned above, almost all materials used in making a structure with your own hands require additional finishing. The only exception would be a plastic product made from lining or PVC panels. It is this circumstance that determines the popularity of such cladding. In addition, it has a number of other advantages:
- high resistance of PVC to moisture, no need for additional waterproofing;
- corrosion resistance;
- spectacular appearance, a wide variety of colors, allowing the product to fit into any design of the room;
- ease of maintenance. It is enough to periodically wipe the plastic surface with a damp cloth to keep it perfectly clean.
In addition, the advantages of polymer materials also include ease of installation, which is carried out in several main stages:
- applying markings using a plumb line. Be very careful at this stage, since the aesthetic appearance of the entire structure depends on the quality of the markings;
- do-it-yourself installation of the starting profile, which is the basis for the frame - it is on the latter that the entire “screen” will be supported. It is best to use a wooden beam for this purpose, which differs from plastic load-bearing structures in its increased reliability. It is better to fasten profiles not only at the edges, but also in the center, in order to significantly increase the rigidity of the facing panels or lining;
- cutting materials with your own hands, carried out strictly according to specified dimensions.
As a result of cutting the panels, you will get a kind of plastic screen that can already be attached to the profile. But we still recommend taking your time. First, cut a ventilation window in the product, which will subsequently be covered with a PVC grille. This approach makes it possible to eliminate the occurrence of dampness and mold under the bathtub.
The last stage involves attaching the finished screen to the supporting profile. For this purpose, self-tapping screws are used that securely hold the lining or PVC panels and do not damage the material, unlike other fasteners.