Types of shelves and fixtures
Everyone, even those who have never encountered such a task, knows that attaching a shelf to a wall can only be done with the help of fasteners. In stores and along with shelves you can find dozens of types of fasteners, which may differ in both appearance and design. But they can be divided into two main types, with hidden fastening and external.
In addition, the shelf mounting itself can also serve a decorative role, creating the desired design effect.
The shelves themselves are also very diverse both in their appearance and in the material from which they are made, and they also do not have a clear classification; they can be single-tiered or multi-tiered and intended for any room. The type and material of the shelf depends only on your needs or tastes. If you wish, you can even make a homemade shelf.
Hidden
Hidden fastening for shelves is a solution for interiors decorated in high-tech, minimalism or modern style.
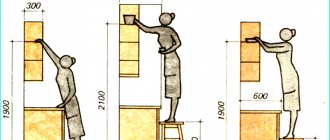
To install shelves on the wall use:
- Hidden hinges. They are suitable for products of different thicknesses and materials (chipboard, solid wood, plywood). Using a building level and a marker, mark points on the surface of the wall and drill holes for fasteners. Then the dowels are driven in and the hinges are secured with self-tapping screws. At the end of the shelf, with which it will adjoin the wall, it is advisable to make a recess to the size of the hinge, so that due to the protruding fittings, no free space will form between the wall and the shelf.
- Metal rods. This type of fastener belongs to the console type. It is usually sold complete with the shelf itself, in which holes of the required diameter and depth are already made. The method of fixation may vary - either it is screwed into the wall with a dowel, or it is attached to flat hinges or strips. Reliable fixation is ensured only by those hardware whose diameter is at least 10 mm.
- Wooden beam. Used for installing closed shelves. On the wall, using a level and a marker, draw a line on which the auxiliary fasteners will be placed (it should go under the shelf). Then the block is attached using dowels and screws. Hang the shelf and secure it with an additional block.
Where are shelves most often used?
The main place where you simply cannot do without a shelf is the bathroom. This is where shelves are a must-have attribute, as they allow you to conveniently store bathroom accessories. In most cases, even several shelves are used, but fixing a shelf in the bathroom is the most difficult, since the wall covering here is ceramic tiles, which must be handled very carefully.
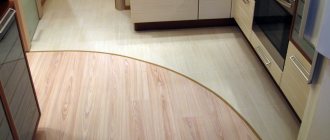
You can’t do without a shelf in the kitchen, since it greatly increases practicality and you can place on it all the accessories that the housewife constantly needs at hand.
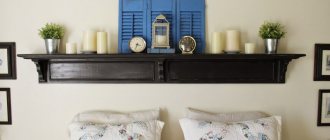
In the bedroom or living room, shelves mainly serve not a practical, but a decorative role and serve as a stand for souvenirs, jewelry or books.
Additional recommendations from professionals
In order for the design to serve for a long time and be reliable, you should listen to the recommendations of professionals:
- All fasteners: brackets, corners, hinges, shelf holders must be firmly fixed.
- The dimensions of the fasteners must correspond to the planned loads.
- Structural elements can be fixed in any area of the cladding if its thickness is more than 18 mm.
- All hardware must be correctly selected and protected with an anti-corrosion coating.
- The location of the holes should be checked with a building level to avoid the slightest distortion.
- When fastening the shelf in two places, it can support a load weight of 40-70 kg.
- When purchasing fasteners, take into account the material of the wall to which the structure will be attached.
To feel safe in your home, you should take the choice of fasteners and installation of the structure seriously. Professionals use fasteners only from the world's leading brands. When purchasing, you should ask the sellers for quality certificates. It is necessary to check on the spot what material this or that element is made of.
Which shelf mounts should I use?
To attach racks and shelves, you can use different types of fasteners, depending on the material of the wall on which they are attached.
For walls made of bricks, blocks and other traditional building materials, you can use:
- Anchor bolts
- Dowels
- Nails
Anchor bolts, the newest and most reliable fasteners. It can withstand significant loads and is even suitable for aerated concrete or foam blocks, which can crumble during operation. In addition, anchor bolts are easy to work with.
Dowels are also a fairly reliable way to attach a shelf. But they have one drawback: under heavy operating loads, the plastic can wear out and the dowel will simply begin to gradually crawl out of the wall. Therefore, dowels are a cheap way to secure shelves with little load. Usually these are shelves that are used to store souvenirs.
The oldest, but also unreliable method is to simply nail the shelf to the wall. But it is not recommended to nail it if you want the shelf to stand for a long time. In addition, when nailing a shelf, you always risk damaging the finish, and this is undesirable, even if the shelf itself will hide these flaws.
For wooden walls, it is best to use special screws, although in some cases you can limit yourself to nails if you do not plan to use the shelf often.
Build your Home!
1 – bracket for fastening the shelf; 2 – mounting holes; 3 – steel axle; 4 – suspension; 5 – shelf.
With thinner bricks, cinder block and plasterboard walls up to 100 mm, it is possible to use invisible fastening of shelves to the wall, but such shelves are suitable only for decorative purposes.
Since they simply will not withstand additional loads.
Then you need to determine the thickness of the shelf itself.
It can be determined by placing a load of expected weight on it. The absence of visual deflection and deflection to the touch indicates sufficient thickness of the board.
An exception may be cases when the choice of a thicker board is dictated by the general concept of the interior.
However, it is also necessary to take into account the fastening features, due to which the thickness of the board, as a rule, cannot be less than 30 mm. The thickness of the shelf must be selected depending on the load, for example, for books - boards with a thickness of 45 to 60 mm are suitable.
The board must be dry and processed in accordance with its purpose.
Types of fastening shelves to the wall
After this, the types of fastening the shelves to the wall are selected, depending on its purpose and the thickness of the board.
There are a huge number of fastening materials that can be expertly hidden from prying eyes; let’s look at some of them:
- The most popular at the moment is
the use of hidden hinges located on the back of the shelf.
Fastening technology using hinges:
For accurate hanging, you need to accurately measure the distance between the centers of the loops. This distance will determine the markings on the wall for the mounting holes. To ensure that the shelf hangs evenly and does not warp, it is better to use a building level, which will ensure an accurate horizontal line for the shelf. After the holes in the wall are drilled in accordance with the markings, they are filled with a plug into which screws are screwed. The screw should be screwed in deep enough, but the distance between its head and the wall should allow the shelf hinges to be put on.
The shelves come complete with special fasteners designed for invisible installation. A shelf installed in this way will be securely fastened. This will create a visual impression that it is literally hanging in the air.
Method of installing shelves using special furniture fittings
Let's look at the step-by-step implementation of this installation.
It starts with purchasing a modern shelf in a furniture supermarket or online store.
Step 1. Measure the distance between the centers of the mounting holes directly on the product.
Step 2. After this, mark the location of the shelf on the wall. Using a building level, we draw a horizontal axis on which we mark the position of the mounting holes, taking into account the center-to-center distance between them.
Step 3. Next, we attach the bracket to the resulting axis in the center of the shelf holes and mark the places for its future attachment to the wall. They must be located strictly along the horizontal axis.
Step 4. The next step is to drill a hole for attaching the brackets. They must be made strictly perpendicular to the wall, this will ensure that the shelf angle is 90 degrees relative to the wall. To simplify drilling, it is advisable to use a square.
Step 5. Next, remove the remaining drilling products from the holes and hammer in wood plugs or plastic dowels.
Step 6. Then we attach the brackets to the wall using self-tapping screws.
Step 7. Now we carry out the direct installation of the shelf. To do this, we put it on the steel axles of the brackets, alternately tapping it with a rubber hammer on the left and right sides in the front part. The shelf will be evenly installed on the fastening elements, eliminating distortions.
Step 8. The final stage will be to check the play and reliability of the fastening. After this, we remove the remaining debris and install a flowerpot with an orchid. The installation process is complete.
Another method of invisible fastening (metal rods)
Installation technology for fastening metal rods:
As a rule, reinforcing pins or threaded rods with a diameter of at least 10-12 mm are used.
First of all, we take our shelf and measure its length and width.
Then, using a ruler and a building level, we mark this length on the wall (not the entire distance, but a little shorter), at the location of the future location of the shelf.
We mark three board thicknesses on each side of the shelf and drill holes equal to the diameter of the pins; we make such holes in the shelf itself (you can use a template, since the holes in the wall and in the shelf must match exactly).
Then judge from the subsequent filling of the shelf, if there will be light souvenirs there, then these two pins will be enough, but if there will be heavier things, you can make more fastenings (even every 5 cm)
. We take the required number of long rods (their length should be approximately 1/3 of the width of the shelf, but keep in mind that there should be at least 10-15 cm of pin in the wall).
Insert the rods into the wall half their length, check with a level so that they are exactly perpendicular to the wall; the durability of the entire structure and the safety of the objects standing on it depend on this. Then fix the rods with synthetic glue or resin and wait until the glue dries.
After this, we place the shelf on the rods (you can additionally glue the pins to the shelf by pouring glue into the holes). One of the mounting options can be considered preliminary installation of a square block into the wall (usually used for narrow shelves). Fastening installation technology: To do this, a square block is attached to the wall, the side of which is equal to the thickness of the board for the future shelf.
It is attached using dowels, nails or plastic anchors with self-tapping screws. Then, round wooden pins (pins) are driven into the block into holes pre-drilled according to the template, which are lubricated with glue, after which the wide part of the shelf is put on them.
In order to place the board on pins or dowels, use a mallet with a rubber striker, which is gently struck on the outer edge of the board.
By varying the height, texture, color and thickness of the shelves, you can achieve an original and unique design and create a feeling of orderliness and completeness in the design of the room. Without limiting your imagination and taking advantage of all the advantages of the modern construction market, you should remember about safety, carefully manufacture and check all fasteners. In this case, the shelves, like any other element of the functional decor of the room, will serve for a long time, remaining a reliable, useful and beautiful element of the interior.
You can also watch a video of hanging a shelf on the wall
Shelf installation process
If you bought a shelf along with fastenings in a store, then the first thing you need to do is read the instructions on how to attach it. After all, some modern models have their own algorithm for attaching the shelf to the wall. You should especially carefully look at the instructions if the shelf has invisible fasteners, since in this case you need to use exactly those fasteners that the manufacturer recommends, otherwise you won’t be able to hide them.
Video on how to quickly hang a shelf Before attaching the shelf, you need to choose a place where it will be located. But you shouldn’t rush to drill into the wall right away; before fixing the rack, you need to measure everything so that it hangs beautifully and evenly.
The first thing you need to do this is to attach the shelf to the wall, and mark with a pencil on the wall the place where one of the bolts will be and put a mark there. Be sure to mark the center of the holes.
After this, we measure the distance between the centers of the fastenings, and from the mark made we measure the same, and put a vertical line.
Type of fastening
Then we simply apply a level to the wall and place a horizontal line in the area of the previous mark. The intersection of these lines will be the center of the bolt hole. You can check this by simply placing the shelf back against the wall.
Then you need to carefully make holes in the wall. To do this, you need to use a drill of the same diameter as the fasteners. If you take a smaller drill, the bolt simply won’t fit into the hole, and if you take a larger one, it will simply wobble and fall out.
In addition, when drilling, it is important to keep the drill level so as not to widen the hole, since in this case the fastening may also fall out, especially if you are using dowels rather than anchor bolts. Additionally, the hole should be deeper than the length of the mount you plan to use. After all, the drill does not remove all the debris from the hole, so you need additional space inside so that you can easily install the shelf.
When the mounting points are ready, you can hang the shelf. This also needs to be done carefully; if the fasteners do not fit into the hole, then you just need to lightly tap them with a hammer. First you need to install the shelf itself, and then install the fastenings. It's much simpler and easier.
Well, in the end you just need to tighten the anchor bolts or dowels until they stop.
The fasteners attached in this way will hold the shelf securely and firmly.
Features of fastening shelves depending on the type of wall
When installing fasteners for shelves to the wall, you should take into account the characteristics of the material from which the base is made. The higher its strength, the more securely the hinged structure will be fixed. Soft wood and brittle plasterboard surfaces are not capable of providing quality support. The methods for attaching shelves to them and the type of fittings used differ.
Concrete wall
To drill a hole in a solid concrete surface, you need a hammer drill. The work must be performed using a special concrete drill, the diameter of which is selected according to the size of the dowel. The depth of the hole must match the length of the fastener.
The drill is positioned at a right angle; with the slightest tilt, the diameter of the hole at the entrance will increase, and therefore the dowel and self-tapping screw will not be firmly fixed. This may cause the shelf to fall down in the future.
Plasterboard wall
When working with gypsum boards, 2 methods are used:
- The first is suitable for already erected structures, however, suspended structures installed in this way can only be used for decorative purposes. Heavy objects cannot be placed on them. In this case, holes are drilled in any place where you want to fix the shelf on the wall. The most reliable fixation in a fragile material is provided by a specially shaped dowel - a butterfly. It is inserted into the hole, and when a self-tapping screw is screwed into it, the wings of the dowel open. They distribute the load over the entire adjacent area of the gypsum board, so the material does not crumble.
- The second requires preparation at the stage of creating a plasterboard partition. When constructing a frame on the line where it is planned to install wall shelves or other heavy hanging pieces of furniture, additional crossbars are made. They are attached to vertical posts. This improves the rigidity of the entire structure. The fasteners are then screwed strictly into these crossbars.
Hidden shelf mounts allow you to create additional storage space with minimal disruption to your interior design. The installation can be carried out independently, however, it is important to correctly calculate the load and select hidden fittings in accordance with it.
Shelf in the bathroom
The bathroom has its own nuances when working with shelves. If the walls are covered with tiles, then you can fix the shelf only at the seams. After all, if you try to drill a tile in the middle, vibration may cause it to crack or even fall off. Of course, there is special equipment that allows you to drill tiles, but it is expensive and it is not economically profitable to buy it. Even at seams, you need to drill the tiles carefully, and it is not recommended to turn on the vibration function until the drill reaches the wall. Only when you get to the base, then you can drill like a regular wall.
If you have a corner version of the shelf, then, as for a straight one, you must first make markings. But in the bathroom it is not necessary to use a level, since the anchors will still be in the seam, and even if it is uneven, it will still not be possible to retreat.
Assembling a rack for a workshop or garage: material, shelves, components
The more order in the garage and workshop, the safer it is to work there. In this article, we have collected useful tips on how to organize space for storing tools, spare parts, consumables and materials. We help you choose racks and components.
Shelving material: wood, metal or plastic
First, let's decide what you will store on the shelves. Heavy objects: winter tires, electric wood splitter, circular saw require a metal rack. The wooden structure will withstand small and medium-sized plumbing and carpentry tools. The plastic version is suitable for boxes with nails and screws.
Advantages and disadvantages of shelving made of metal, wood and plastic:
Please note: wooden racks are less stable than metal racks. The wooden shelves and side walls are connected to each other with self-tapping screws; the structure is not rigid enough - therefore, we recommend attaching wooden racks to the walls.
Rack: do we buy ready-made or make it ourselves?
Now let's decide what to choose: buy a ready-made rack or make it yourself. Each option has its own advantages and disadvantages. A homemade rack will cost less than a purchased one. But at the same time, you will spend time on drawing, selecting materials and components, cutting and assembly. The ready-made option is suitable for those who want to set up a garage or workshop as quickly as possible.
Ready shelving
If you have a standard room where a factory rack can conveniently fit, choose ready-made options in the Leroy Merlin Storage department or on the website in the Storage section. The width of structures made of wood, metal and plastic is from 60 to 100 cm, height is from 143 to 200 cm. One shelf can support from 30 to 150 kg.
Three options for spacious shelving from Leroy Merlin:
| Everest rack, metal 100x200x50 cm 4 shelves, load per one - 150 kg | |
| rack, pine wood 63x159x28 cm 4 shelves, load per shelf - 30 kg | |
| Optimus rack, plastic 90x187x40 cm 5 shelves, load per one - 70 kg. |
Wooden structures are fixed with self-tapping screws, metal ones with screws, parts of plastic shelving are connected using clamps.
A plastic shelf can be placed outdoors, wooden and metal - only indoors.
Wooden structures are sold untreated. You can cover the surface with varnish or paint. Painted racks look more aesthetically pleasing; they can be installed not only in a garage, storage room or workshop, but also at home. This storage system will fit into Scandinavian-style interiors and is suitable for rooms in the Provence, loft and rustic spirit. You can store books or indoor flowers on painted shelves.
How to assemble a ready-made shelving unit from Leroy Merlin
Let's look at the assembly using the example of one of the most popular racks in our hypermarket.
Reviews of the wooden shelving unit from the Leroy Merlin website:
“Performs its functions perfectly as a balcony storage space,” Sergey.
“Comfortable, looks great! Doesn't take up much space. It stands firmly, everything is included in the kit for assembly,” Alexandra.
“The rack is quite strong, for household needs. It is better to secure it to the wall, otherwise it will wobble. You can paint it any color, but I soaked it in bath oil,” Andrey Bolshakov.
“We made repairs in the pantry and the question arose that we needed to put some kind of shelving there. And then these racks caught my eye. We covered them with stain and joined them together and secured them, and it turned out very well. We’re thinking about buying more,” Marina.
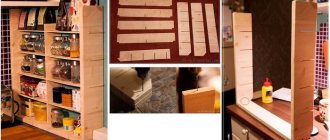
The rack is sold in minimalistic packaging: the parts are wrapped in thick film, and instructions are included inside.
The boards have grooves and holes for self-tapping screws. For assembly you will need a screwdriver or screwdriver. First, we assemble the shelves themselves, each consisting of three boards and two crossbars. Then we connect the vertical racks with the shelves.
Installation takes about 20 minutes. We advise you to attach the structure to the wall in the future.
Prefabricated structures
If you have a small or non-standard room where a ready-made rack does not fit, you can assemble a structure from ready-made shelves, racks and other components.
To use more space, assemble a structure that will occupy a corner of the room. Use corner and sectoral shelves.
This is what a corner metal storage system might look like, fragment:
The advantage of self-assembly is that you can choose all the design parameters yourself. You can, for example, mount a storage system across the entire wall, or vice versa - make very narrow shelves that fit into a niche.
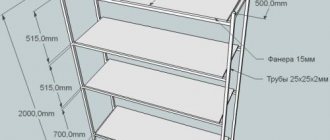
To decide what set of materials you need, draw a future rack. You need to know its height and width, the number and depth of shelves, the load that will fall on each shelf. The design can be straight or angular.
These tips will help you avoid mistakes when designing shelving:
- There should be at least a meter of free space in front of the rack, otherwise it will be difficult for you to put bulky items on and off the shelves.
- On the top shelves it is most convenient to store tools and materials that you rarely use, on the middle shelves - all the essentials, and on the bottom - heavy things.
- If you are installing a structure on an entire wall, leave 10 cm of free space on both sides. This will make it easier for you to install the rack and, if necessary, dismantle it.
If you need to assemble a bookcase of non-standard sizes and shapes, contact the consultants of the Storage department. Our employees will help you draw a diagram of the rack and select the necessary materials and tools.
Useful tips
Even if you think that you don’t know how to hang a shelf correctly, you shouldn’t immediately call a professional. All you need to do is show a little effort and diligence, and you can easily get the job done. If, for example, you also need a shelving unit hung in the closet, then you can first practice on it, and then move on to working in rooms where there is finishing.
In addition, the greater the planned load on the fixed rack, the stronger the fasteners should be used. After all, over time, they may weaken, and the shelf will fall with all its contents. And this is extremely undesirable. Therefore, it is not recommended to skimp on bolts, as this can have negative consequences.
How can I mount a shelf on the wall?
To hang a shelf, you do not need to have great skills and abilities. Sometimes it is enough to have the shelf itself, a hammer drill and a building level on hand. Next, the work will go quickly and smoothly - hanging the shelf will take five minutes. However, these interior items can be fixed in different ways. This is often influenced by the type of shelf, the owner’s desire to use visible or invisible fasteners, and a number of other factors. Sometimes the type of fastener is important.
Table. Methods of fastening shelves.
| Mounting option | Short description |
| Bracket or holders | This option assumes the presence of visible fastenings for shelves. They can be seen, and they are fixed both below and above the shelf. The brackets can also be hidden. Visible brackets can be simple or decorative. They come in both plastic and metal, ornate and simple, etc. One side is attached to the wall, the other to the shelf itself. However, it is important to understand that this option is not suitable for every interior style. |
| Loops and corners | This is the choice of those who save on mounting costs, but want to install the shelf as quickly and easily as possible. It is suitable for almost every interior. Moreover, this is a fairly reliable fastener, and depending on its size, you can vary the load on the shelves. |
| Fastenings for glass options | These fasteners are used only for fixing shelves made of glass and characterized by their large mass and fragility. They are usually made of metal and have special gaskets that will allow you to securely fix the shelf itself to the wall, preventing it from falling. There are also suction cup fasteners for glass, but they are not very reliable. As a rule, the suction cup is fixed on the underside of the shelf. Typically, such fasteners are small in size. |
| Invisible | This option will allow you to install the shelf so that the fasteners themselves will not be visible from any side of the shelf. It will seem like it's just glued to the wall. |
Concealed shelf holder
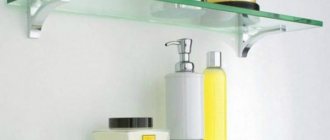
Attaching a glass shelf to the wall
Installation diagram for glass shelves
To install a glass wall shelf, you will need:
- Electric drill,
- Building level,
- Brackets,
- Pencil,
- Roulette,
- Insulation tape,
- Wall-glass connector
- Fastening elements (screws, self-tapping screws and screws).
After you have prepared all the necessary fasteners for the glass shelves, make sure that the wall can hold all the fasteners and the glass shelf itself with various items. It is not advisable to attach a shelf to a plasterboard partition.
Point elements for fixing glass to the wall
Today, the most popular point mounting is “glass-wall”. Read more about this in the article on our website “Fittings for glass shelves”.
Let's proceed to the direct step-by-step installation of glass shelves to the wall:
1. Determine the place on the wall where the glass shelf will hang. To do this: carefully place the product to the planned location and use a pencil to mark the locations for fasteners and contours.
Important! If you want to attach a glass shelf to decorative stands, first mark out the locations for them. Please note that the racks must be without distortion, i.e. strictly in a vertical position.
Marking
2. Using an electric drill, drill holes for fasteners (screws, self-tapping screws or screws) in the marked locations. Determine the depth of these holes based on the length of the fasteners. The greater the load on the glass shelf, the longer the fastening element should be. Typically the length of the screws is from 55 to 65 mm.
3. To make precise holes, wrap the drill bit in a specific place on the electric drill using insulating tape.
4. Insert suitable sized wooden plugs or dowels into the resulting holes.
5. Separate the mount or brackets from the shelf.
6. Install the brackets one by one using self-tapping screws to the places prepared in advance on the wall.
Important! Make sure that the surfaces for future glass are parallel to the floor plane and there are no distortions. Otherwise, under heavy loads, excess stress may appear on the glass plane, which will cause chips.
Glass installation
In addition, carefully inspect the glass from which the shelves are made. The corners of the glass should be polished and rounded. And the glass itself should have a glossy surface without any cracks, scratches or chips.
7. If there are no defects on the glass, then feel free to attach it in the intended place.
Important! If the shelf has several levels, then first you need to make a fastening for the glass shelf of the upper glass, and then the lower one.
8. The shelf is attached to the wall. Place on it everything that you consider necessary.
It's good when a house or apartment is tastefully furnished. You come home from work and plunge into a cozy atmosphere. But there are feelings that something is missing, there are definitely places where you need to hang something. Maybe a cabinet, but it somehow doesn’t fit into the interior or isn’t the right size. Then the best option would be a shelf. It will fit perfectly into the overall decor of the house and, importantly, will help save a lot of space.
You can keep various items and literature on the shelves.
After it has completely hardened, a shelf is put on the pins.
You can keep various items and literature on the shelves. They are attached to absolutely any room. How to properly fix a shelf on the wall so that it fits perfectly into the interior? It's not difficult as it may seem. Anyone can do this work if they want to.
Selection and methods of fastening
The types of fastening of shelves made of different materials differ significantly. For example, glass or plastic shelves are quite fragile and can be damaged when installed in a hidden installation. The choice of suitable holders is also influenced by the weight of the shelves and the things that will be placed on them. For heavy souvenirs and numerous books, you need to install the most reliable fastenings. Otherwise, it will not be possible to guarantee the integrity of the shelf or the strength of the fixation. When selecting holders, you should take into account the specifics of the fastened product. For corner and non-standard figured shelves (for example, consisting of numerous frames), fasteners are selected that will reliably support their individual parts. Particular attention should be paid to the evenness of the fasteners. Even a slight horizontal misalignment will lead to an uneven load on the product.
Wooden
Due to the ease of working with wood, wooden shelves can be hung on any mounts. The most popular option remains corners and brackets. They are ideal considering the fact that even a small board will have a lot of weight. In addition to the classic options, there is a special hidden method of attaching wooden shelves with an auxiliary beam (not a slat!). It is stuffed into the place where the interior element is installed and acts as a support (base). The shelf itself is fixed to the beam from the inside or from underneath. As for shelves made of derived wood materials (MDF, laminated chipboard), it is recommended to hang them on brackets, hinges or corners. The use of hidden metal rods installed inside the shelf used will lead to rapid destruction of the compressed raw materials.
Glass
For glass shelves, plastic or metal fasteners with plastic, rubberized inserts are used. Most often, glass items are hung on the following holders:
- pelican mounts;
Plastic fasteners include a small top and a wide bottom. They are connected to each other by a short vertical bar. One-piece pelican mounts are mounted on the wall, glass is inserted between their upper and lower parts.
- corner with rubber spacer;
The corner is mounted on the wall, and the glass shelf is screwed to its rubberized spacer.
- shelf holder with suction cup.
It is used for fixing a glass shelf in a cabinet, but is also suitable for mounting the product on a wall. A long mount (it is advisable to choose models with 2-3 suction cups) is mounted to the wall with dowels. The glass is attached to the holder's suction cups.
Corner
Due to their unusual location, corner models are attached to special fasteners. So, for a single shelf, small corners or brackets are used. This method of fastening is also suitable when individual shelves are located at a significant distance from each other. In the bathroom, chrome or plastic shelves can be fixed using suction cups. The non-standard option is attractive for its ease of implementation: the owner does not need to use an auxiliary tool to carry out the work. Another way to fix corner shelves is with common vertical strips. Shelf holders are attached with dowels to adjacent walls. And the shelves themselves are installed directly on the side slats. For this purpose, the vertical strips are supplemented with special protrusions.
Metal
To properly fix a metal shelf, you must first determine its purpose. Forged elements installed in hallways for storing hats are secured with hinges. Light metal shelves for cosmetics in the bathroom are fixed with hinges and suction cups. If an unusual metal shelf will be used to store books or potted plants, then it can be secured using hinges or corners. Installation of products in workshops and garages is carried out using durable metal brackets. The brackets themselves should be mounted on anchors recessed into a wall made of brick, concrete or foam block. Otherwise, it will not be possible to guarantee that the selected fastener will withstand a lot of weight.
Plastic
It is customary to hang plastic shelves on brackets or metal and plastic corners. Initially, plastic shelves have special holes for fasteners, which eliminates the need to drill them yourself. After screwing the plastic shelf to the installed mount, you can use various types of plugs. They will cover the head of the screw. Another type of fasteners used for plastic shelves are pelicans and similar-shaped fasteners made of plastic and metal. The shelf holders are mounted on the wall, and the shelves themselves are inserted into the recesses allocated for their installation. The advantage of this installation method is that it is easy to do it yourself. But when using curly corners or decorated brackets, you can emphasize the design of the installed shelf and complement the interior in an original way.