The most important element of a kitchen set is the countertop. During its entire service life, it is exposed to various negative factors in the domestic environment, since all food preparation work is performed on it (kneading dough, cutting meat, fish, vegetables, etc.). Therefore, the countertop must have maximum strength and resistance to mechanical damage.
A kitchen countertop made of porcelain stoneware is an excellent solution for the design of a modern kitchen.
Porcelain stoneware is considered one of the best materials used to make this work surface. In terms of its performance properties, artificial stone is no different from natural stone, but has a more affordable price.
The biggest advantage of porcelain stoneware is its affordable price.
Features of porcelain stoneware countertops
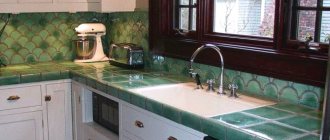
The porcelain stoneware countertop is a horizontal stacked panel, the upper plane of which is lined with porcelain stoneware tiles that have minimal seams between the tiles. The space between the tiles is treated with sealant, which avoids the leakage of all kinds of liquids. The end of the tabletop is finished with the same artificial stone or supplemented with another material that matches the relief and color.
Porcelain stoneware is a moisture-resistant material, which is an important aspect for a kitchen space.
Porcelain stoneware tiles are lightweight, so they are laid on load-bearing surfaces made of:
- wood;
- metal;
- plastic;
- concrete.
Porcelain stoneware tiles can be laid on different surfaces.
Tabletop made from leftover tiles
Another saving option.
LowerFORUMHOUSE Member
There are tiles left from the floor. I thought, calculated, and did it myself. The frame was assembled from wooden slats 4x4 cm, the base was made of chipboard, primed, tile adhesive for wooden surfaces, tiles. Frieze – anodized aluminum outer corner. It's been a year without problems.
Advantages
The main advantages of countertops made of porcelain tiles include the following factors.
- Attractive appearance.
- Resistant to chips and cracks, as well as chemical influences (oils, paints, detergents).
- High heat resistance, allowing you to install the work surface next to the stove.
- No harmful additives or dyes in the material.
- Durability.
- Easy to care for.
The biggest advantage of porcelain stoneware is its durability and resistance to damage.
Note! Artificial stone is presented in a wide color palette, so the countertop can be matched to any kitchen interior.
Choosing tiles for countertops
When choosing materials for a kitchen countertop, special attention should be paid to such parameters as strength, moisture resistance, temperature resistance and reliability. The most suitable material is porcelain stoneware, which is not inferior in strength to natural stone.
The main advantage of porcelain stoneware over the same stone is its pleasant appearance, smooth surface and the ability to neatly fit it into the design. Natural stone looks rougher and more inconspicuous.
The increased strength of porcelain stoneware protects it from cracks and chips that can appear from impacts with dishes, a kettle, or a knife. The material practically does not absorb water and is suitable for covering countertops in the area of the sink and water filter.
Porcelain tiles are practically not affected by various types of acids and detergents with a high content of chemicals.
When choosing a detergent, you can safely choose any one - it is unlikely that any of them can cause significant harm to the porcelain stoneware.
Self-production
Installing a porcelain tile countertop is not a very labor-intensive process, so you can do it yourself. The main thing is that all the tiles have smooth, polished edges and are cut strictly to size.
You can install a porcelain stoneware countertop yourself.
Preparing the base
Porcelain stoneware is a tile material, so it is placed on a strong base.
The most practical option is considered to be a load-bearing surface made of concrete. Before laying the tiles, they are cleaned of dust and dirt with sandpaper and primed with a solution of water and PVA glue (in a ratio of 1 to 3).
The metal base is degreased with a nitro solvent, treated with sandpaper and covered with two layers of primer (with a time interval of 3 hours). After this, a steel mesh is attached to the surface and tile adhesive is applied to it in an even layer.
Important! The tiles are laid 24 hours after the preparatory work so that the base dries properly.
A moisture-resistant sheet of plywood no more than 22 mm thick is placed on top of wooden and plastic surfaces. To avoid the moving of the tiles, which occurs due to changes in the size of the plywood as a result of sudden temperature changes, cement-bonded particle boards are fixed between the chipboard and porcelain stoneware.
Laying and grouting
To install ceramic granite tiles, tile adhesive or liquid nails are used. Tiles can be laid in any way (rows, herringbone, diamonds, patterns). The outer finishing elements should protrude slightly beyond the edges.
Regular tile adhesive is suitable for laying porcelain tiles.
The end is faced in the same way as the upper plane. However, to prevent the tiles from falling, they are secured to the countertop with construction tape. After the glue has completely dried, the tape is removed.
It is better to fill tile joints with moisture-resistant epoxy grout. If a regular cement-sand mixture is used for this purpose, after 7 days it is additionally coated with hydrophobic impregnation.
To fill tile joints, you can use moisture-resistant grout.
Features of wide format material
The sheet size of large-format porcelain stoneware is 10x30 cm. This material allows you to minimize the amount of waste when performing finishing work. Its cutting is done with a grinder with diamond discs.
To cut porcelain stoneware, you can use a grinder with a diamond blade.
Laying tiles
- Using a small spatula, apply tile adhesive to the smooth side of the comb and distribute it evenly over the surface of the countertop. Using the serrated side of the comb, remove the excess to create even grooves of glue. Apply the mixture in sections, otherwise after 15 minutes it will become covered with a film and lose its elasticity.
- Start laying from the first row. It should hang slightly over the edge so that after laying the tiles on the end they become equal. You can also use special corner elements as the initial row.
- Regular ceramic tiles and porcelain stoneware are laid with joints. For this, plastic crosses of 1-2 mm are used.
- Check the levelness of each tile using a short level and make adjustments until the adhesive has set. When you have laid a whole row, you need to check it with a long level.
- When you have laid all the whole elements, use a tile cutter to cut pieces of the required size. The site has a separate article on how to cut tiles correctly.
- After the tile countertop is made on top, proceed to tiling the end. Glue the 5 cm wide trims to the tile adhesive and secure them temporarily with masking tape.
Applying glue and laying porcelain tiles
We use an electric tile cutter for precise cutting
Glue the porcelain tiles to the end of the countertop and secure it with masking tape
Article on the topic: how to make a tile apron.
DIY porcelain stoneware countertop
When making a kitchen countertop from porcelain stoneware with your own hands, you should adhere to these rules.
- The bearing surface must be as rigid as possible. This will help avoid movement and deformation of the tiles during operation.
- The size of tile joints should not exceed 2 mm.
- When laying, it is necessary to check the horizontalness of the tiles with a building level.
To install a porcelain stoneware countertop yourself, you need to follow some rules.
How to do it yourself?
Making a countertop is not a difficult task even for a person who does not lay tiles professionally. The main stages of work consist of:
- from preparatory activities;
- from the installation of tiles and end parts;
- from finishing seams.
When finishing a kitchen countertop from tiles yourself, you need to ensure that the surface is horizontal and try to place the tiles with equal gaps.
Preparing the base
If you plan to make a common countertop that will cover the top of several cabinets and a sink, then before starting work you need to remove the old covers from these items. Then you should align the cabinets in height, focusing on the location of the upper sections of their walls, on which the base of the kitchen tile countertop will rest. Finally, adjacent cabinets must be rigidly connected with metal plates.
After this, dimensions are taken from them to calculate the width and length of the product. Based on the drawn up sketch, a tabletop pattern is made, taking into account that its outer edge should protrude forward by 7-10 cm in relation to the vertical panels. When making calculations, you need to take into account the thickness of the edge material: profiled tiles, borders or tiles.
To make the base, use:
- FSF brand plywood (moisture resistant);
- Chipboard.
Having cut out the base material according to the prepared pattern, you need to try on the tabletop and eliminate any existing defects. Cut holes for the sink and hob, sand the edges. Secure the base to the cabinets using self-tapping screws. The fastener pitch is 7-10 cm, the caps must be completely immersed in the wood.
After installing the base of the tabletop, carefully prime the ends and surface of the material. Impregnate the sections of the sink recess with a moisture-proofing agent.
A backing made of gypsum fiber sheets is placed under the tiles. It is cut out according to the base patterns, and the materials can be joined using glue for installing the tiles.
Laying tiles
If the countertop does not have holes for built-in elements, then you can lay the tiles from the edge, from the wall or from the corner of the table. With this method, it is important to ensure that the cut parts end up against the wall or at the end of the tabletop.
When using built-in equipment or performing mosaic work, you should mark the surface:
- draw a horizontal center line (along the length of the table);
- determine the center of the tabletop on this line;
- if you need to make decorative contrasting inserts, determine their location and draw perpendiculars to the center line.
In this case, the masonry is laid from the center (the intersection of the lines) to the edges, and the cut tiles for the countertop in the kitchen are placed near the sink or stove. When inserting decorative sections, first install the panels, focusing on the marked center of each of them, and then lay out the background rows.
Apply a layer of tile adhesive 0.8 cm thick to the marked surface with a notched trowel. Each part must be placed on the greased surface and pressed lightly, aligning the height with its neighbors. To make the seams neat, use dividing crosses. The standard gap width is 2-4 mm.
A mosaic from fragments is assembled according to the principle of compatibility of the contours of the parts, and if necessary, the pieces are trimmed. It is advisable to leave minimal gaps between elements.
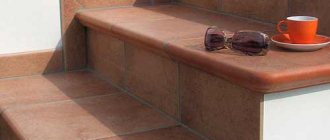
How to cover the end of a tabletop?
To finish the edges, special borders with a profile surface are used. When choosing tiles, you need to choose a border with corner elements that matches the color and texture. In the store you can also find special profiled tiles with an edge element. Such products are installed along the edge of the tabletop.
At the end of a tile countertop, you can install strips of cut pieces of simple tiles. In this case, the outermost elements on the table plane must be mounted with a slight offset above the edges. The tile strips need to be attached to the end so that they are under the protruding part of the upper parts.
Grouting joints
The final stage of finishing proceeds only after the glue has dried. This period is indicated in the instructions for the composition, but does not exceed 24 hours. Grout mixtures are purchased separately. When choosing, you should give preference to moisture-resistant compounds (for example, epoxy-based).
The grout may be colored or white. It is convenient to choose the color of the mass to match the main color scheme of the countertop, but you can highlight the seams between the tiles in contrast.
The composition is carefully rubbed into the seams between the masonry elements, trying to fill all the gaps. Without waiting for the grout to set, you need to wipe off the excess mixture from the surface of the countertop, while smoothing the seams. Once the grout dries, it will be difficult to remove marks. After drying, the tabletop is ready for use.
Care
The porcelain stoneware countertop is cleaned for the first time immediately after the tiles are installed. Remains of glue and grout are first moistened with water and then removed with a weak solution of hydrochloric acid. This should be done with gloves so that the caustic liquid does not burn your hands.
Small stains can be removed with a dry or damp cloth. In more serious cases, acidic detergents are used.
Dirt on the surface of porcelain stoneware can be cleaned with a damp cloth or sponge.
Important! Do not use abrasive pastes or powders as they may damage the material.
Advantages and disadvantages
The main advantages of the material are the following:
- Beautiful appearance. You can choose the color and design at your discretion, and for a kitchen countertop it is best to choose a matte surface, because chips, cracks, and scratches from knives and other utensils are less visible on it.
- High strength. Ceramic tiles do not lose their excellent properties even after some time, and if all installation technologies are followed, the degree of susceptibility to mechanical damage will be extremely low.
- Resistance to moisture, making the tile suitable for tiling kitchen countertops, where moisture will be an essential companion.
- Resistance to creative influences. A tabletop of this type will not be damaged by a saucepan or a hot kettle, and no marks will remain on the surface.
- Ceramic tiles do not require special care; it will be enough to wipe them with a damp sponge and a small amount of detergent from time to time.
Now we propose to consider how to choose material for cladding.
Stylish ideas from designers
The countertop sets the style for the entire kitchen interior, so the choice of artificial stone should be taken very seriously.
The countertop should match the design of the kitchen.
Designers give several recommendations regarding facing the work surface with porcelain stoneware.
- Clinker brick tiles look good in rooms in a minimalist style.
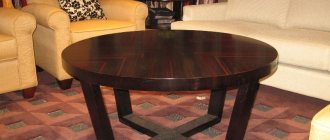
- Tiles that imitate wood will make a simple interior more comfortable.
- Glossy and polished tiles suit any design.
Tabletop made of porcelain stoneware imitating wood.
Professional advice on choosing
Porcelain stoneware has excellent technical characteristics, so any type of this artificial stone is suitable for finishing the countertop. However, when purchasing, you need to pay attention to the texture of the coating, since dirt and food debris accumulate on relief tiles, which significantly reduces its hygiene.
Porcelain tiles with a flat surface are suitable for a kitchen countertop.
Covering countertops with porcelain tiles is particularly popular. Artificial material allows you to hide all the irregularities on the load-bearing surface. In addition, it is resistant to mechanical stress, high temperatures and bacterial growth.