What a do-it-yourself balcony rack can look like: design options
Most often, balcony racks are made by hand. The reason for this is the individuality of the design of balconies, and a self-made structure is much cheaper. In addition, by doing this work yourself, you have the opportunity to give your rack the shape and size that you need.
A do-it-yourself balcony rack is an excellent opportunity to give your balcony an aesthetic look, even to decorate it in a certain style. A properly designed and high-quality rack will become a reliable assistant in your household.
Racks are completely different in shape and size. In addition, they differ depending on the material from which they are made.
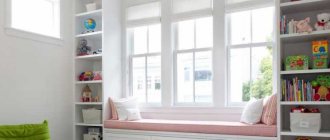
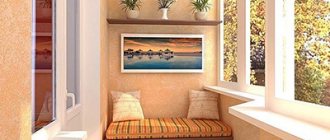
If you have a small balcony, then you can install a compact built-in rack in it
Types of shelving for balconies:
- Traditional. Standard rectangular design with open shelves.
- Angular. This rack is placed in the corner. You can place two corner shelves around the perimeter, which will give the balcony a more elegant look.
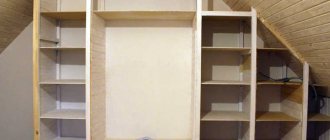
- Built-in. Great for balconies with existing niches.
Ready-made racks for balconies are also available for sale. And if you have neither the desire nor the ability to tinker with making a rack yourself, then you can purchase a ready-made model.
Where to install the shelving in the house?
For each room in a house or apartment, its own furniture is selected, based on this, it is worth understanding what models and types of shelving are purchased for each type of room. It is clear that a small bookcase will simply get lost inside a spacious living room, just as a large bookcase will look ridiculous in a small bedroom.
Taking all this into account, the choice of the type and location of furniture should be approached with all responsibility, choosing the most functional and convenient ratio!
In the living room
The living room has always been the most visited room in the house, and therefore any owner wants to arrange this room as conveniently and beautifully as possible, so that both themselves and their guests feel comfortable in it! Family photos, paintings, and all sorts of beautiful trinkets and accessories often find a place here, giving the living room a certain character and style.
But to accommodate all of the above, you need space and shelves; for this purpose, a display rack or a slide for the home can be useful in the living room.
Based on the design, shelving in a house can partition a room, be placed across an entire wall, frame a doorway, be forged with glass shelves and interesting metal decorations, wooden or low with narrow side cabinets. Lots of options!
White shelving is perfect for an art deco style living room, bringing more freshness and cleanliness to the room. Colorful shelves will fill the room with good mood, joy and cheerful highlights. Metal paired with good lighting and glass will transform the living room into an airier and lighter space. Wooden furniture will bring comfort and warmth to the interior. The latter is especially true if you have a chalet-style house.
However, home shelving can help create a more modern and original solution! For example, a model equipped with wheels will allow owners to periodically make adjustments to the interior of the living room, redistributing zones in the room in a new way. It would not be amiss to use all kinds of doors with drawers, as well as the presence of hidden lighting, which will make the living room more elegant, individual and stylish.
Especially for those who like to experiment with design, many manufacturers produce shelving in unusual colors and shapes. With the help of some decorative techniques, you can make an ordinary living room look like a cabin of a space or sea ship. Much depends on the means and imagination of the owners.
For zoning rooms
In addition to the living room, a display rack, whether with a through wall or with a back wall, is often used when arranging spacious rooms. In this case, the furniture is placed as a partition, advantageously separating different areas in the room, for example, a relaxation area from the workplace. In this case, the furniture does not clutter the room, and a large number of open shelves gives the room lightness and grace.
In a small children's room, high and low open shelving is often placed. They allow air and light to pass freely, separating the study area from the bed. Thanks to this, the child calmly does his homework, without being distracted by toys, and before bed, a feeling of privacy is created.
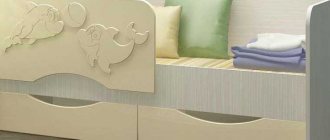
Another successful solution for a child’s room will be a shelving house, as well as models equipped not just with shelves, but with shaped walls , which will make it possible to place various things and toys inside the drawers.
In a small apartment, using a shelving unit, you can advantageously separate the living room from the bedroom by installing a double-sided model. This way, access to the shelves will remain in each zone. In addition, open shelves will not block natural light. Often this design solution is used in small studio apartments.
In a spacious room, it would be great to install a shelf with a chest of drawers under the TV, which will allow you to conveniently turn it in the right direction if necessary. At the same time, the chest of drawers will provide an opportunity to put personal belongings out of sight without forcing you to buy additional furniture for this.
In the kitchen
The kitchen in the house always requires special attention to itself and its design, because it is the second most frequently visited place after the living room! This is where we welcome guests and holidays. In addition, food is prepared here, and therefore the material for the shelving must be resistant to sharp and hot objects, contact with fat and frequent washing. In addition, in addition to the decorative function, the shelving in the kitchen should also have considerable practicality in use, good capacity, convenience and functionality.
It would be great if the rack has a mobile base , which will allow you to move it during cleaning and simply to change the design of the kitchen. For the same purpose, it is worth taking a closer look at models with legs.
And, of course, the furniture should not be bulky, especially in a small kitchen. In addition to elegance, furniture shelves must have good strength, because a considerable load awaits them.
In the hallway, on the balcony and in the bathroom
These rooms, as a rule, have a small area, and therefore racks for them should be selected in compact sizes. Shelves for the home, made of waterproof materials, for example, plastic, will allow you to decorate the bathroom in such a way that the furniture can accommodate a lot of objects without interfering with walking around the room.
Quite often, the unused space above the washing machine or sink can be successfully occupied with a functional hanging rack, which will allow you to get rid of the ottoman or laundry basket on the floor.
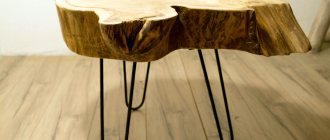
As for the balcony, a solid wood rack can be ordered in accordance with the dimensions of the room. The finished structure will be treated with water-repellent impregnation, increasing the service life of the furniture by decades!
In the hallway, it is best to use solid and modular shelving for your home, complete with special cases for storing clothes, things, shoes, hats and gloves.
A mirror with lighting will bring warmth and comfort to a spacious hallway, and to a small space!
Do-it-yourself metal rack for the balcony: manufacturing stages
Racks differ not only in the shape and number of useful elements in them, that is, shelves, but also in the material from which they are made. There are basically two types of racks: wooden and metal.
A do-it-yourself metal rack for a balcony differs from a wooden one in its strength and durability. Having made such a rack once, you can use it for many years.
To make this design you will need a metal profile pipe, a sheet of plywood about 15 mm thick, an angle grinder, a tape measure, a screwdriver and self-tapping screws.
To make your own balcony rack, you should prepare the tools for the job in advance.
Stages of manufacturing a metal rack:
- We measure the necessary parameters of the future rack;
- We develop a design drawing with dimensions;
- We calculate the required amount of materials;
- We purchase materials, prepare tools;
- From a profile pipe we make blanks of the required sizes for racks and fasteners;
- We connect the racks with fasteners;
- We cut the shelves to the required size and attach them to the fasteners.
Your rack is ready, all that remains is to coat it with an anti-corrosion compound and let it dry.
Wooden rack for a balcony: difference from metal
The second option for shelving for the balcony is a wooden shelving. It differs from metal in the strength and weight of the structure. It's lighter. But maybe that's a good thing. For balconies, the less weight of objects on it, the better. However, if your balcony is not sufficiently insulated and condensation occurs, then such a rack can quickly become unusable.
A wooden rack for a balcony is a completely acceptable design. If it is properly made and impregnated with the appropriate solution, it will serve you for a long time.
The stages of making a wooden rack are in many ways similar to making a metal one. The differences are not significant, but they cannot be ignored.
If you decide to use wood to make the rack, then it will need to be treated with a special antiseptic solution
Distinctive features of making wooden shelving:
- Choose timber for racks somewhere around 50x50;
- For the shelves, boards 2 cm thick will fit;
- Be sure to sand the finished structure with fine sandpaper;
- Seal the edges of the shelves;
- Treat the wood with an antiseptic solution and paint.
The rack does not have to be sewn up on the sides. The open design looks better and does not burden the module. Don't make shelving too wide, even if space allows it. Without realizing it, you can pile so many things into a wide shelving unit that your balcony slab will be at risk.
Is it possible to equip shelves on the balcony with your own hands?
In cases where it is not possible to equip a rack on the balcony, or you simply don’t want to clutter the space with unnecessary elements, you can simply install shelves.
Making shelves for your balcony with your own hands is as easy as shelling pears. The main requirement for them is reliability of design and safety in use.
Shelves may not allow you to store as many things as a shelving unit, but there are times when this is not required. Nowadays, more and more often, the balcony is used not as a warehouse for things, but as a room for relaxation and private pursuit of what you love. The design of such balconies differs from the design of old structures, and shelves here will come in very handy.
Small shelves on the balcony can be used as stands for flowers or books
What can you use shelves on the balcony for:
- For placing decorative elements;
- As a light shelf for flowers;
- Open bookcase;
- For placing items related to the functional responsibilities of the balcony space.
In simplified balcony structures, you can still store canned food and food on the shelves, but by giving the shelves a style or zest, you can ensure a pretty good appearance for the balcony structure.
Shelves on the windows
A new trend in design solutions for those who like to have a lot of colors in the room.
A large number of flowers love sunlight. But it is impossible to place every pot on the windowsill.
Therefore, designers have developed small shelves that are specifically designed for window openings.
Such shelves are usually made in steps and are small in size. This allows the sun's rays to penetrate into the room.
Built-in shelving on the balcony: how to make it yourself
Many balconies in apartments in multi-storey buildings have niches - spaces between the outer wall of the balcony and the outer wall of the house. Many people place things there for storage. This space can also be refined. And give it a stylish, cozy design.
Internet sites, professional designers and renovation magazines will tell you how to make a shelf on a balcony with your own hands from a built-in niche. To some extent, we can say about such a rack that it is a closet.
In terms of installation complexity, this type of rack is the simplest. In addition, if there is not a lot of space on your balcony, and you do not have enough space to open and close swing doors, then you can install on such a cabinet structures with doors like a wardrobe, or roller blinds. Such doors do not require a lot of free space, but a closed rack with cans. It looks much neater with boxes and old things.
It is quite possible to make a built-in rack yourself, the main thing is to familiarize yourself with all the nuances in advance
How to make a built-in shelving unit with your own hands:
- Since you already have a ready-made cabinet frame, you only need to take measurements and make shelves;
- Prepare the necessary fasteners for the shelves; there should be 2 more of them than the intended shelves.
- Install shelves inside the rack;
- A sliding door system will require you to have some knowledge of its installation, if you do not have it, contact a specialist.
- Give the design one overall harmonious background.
By decorating the shelving doors with an interesting painting or in a style that is in harmony with the decoration of your balcony, you will make your loggia elegant and useful.
How to install a rack on a balcony (video)
A shelf for a balcony is a necessary thing. After all, when the room has only bare walls, there is nowhere to put even an ashtray or a cup of tea, so every balcony, even the most elegant one, should have its own shelving.
Shelves are often used not only to complement and decorate the overall interior of the room, but also for a clearer and more expedient organization of space. Thanks to their use, the apartment owner has the opportunity to conveniently arrange a huge number of small things that would simply get lost in closets.
Today, there are a lot of different models on the market that are made of different materials. They also differ in design.
You can choose not only products with classic designs, but also ultra-modern designs.
But more and more often people prefer to make such interior details themselves. Wondering how to make a shelf with their own hands, they re-read a lot of literature and look through many catalogs.
However, this does not mean that making a shelf yourself is difficult and is beyond the capabilities of a person who does not have special skills. No, that's not true at all.
In this case, familiarization with the literature is necessary in order to create a product with a beautiful design that will fit into the overall interior. Let's take a closer look at what kind of shelves there are.
Bookshelves
In many modern interiors, shelves are used to store books. It is especially convenient to place books on hanging shelves. This way you can save space in the room, which is very convenient if the room has a small area.
Shelves are made of wood or metal. However, there are models that are made from two materials at once.
Shelves in the living room can have different shapes. Therefore, a shelf can not only be an additional element of furniture, but also become the highlight of the entire interior. Let's consider what basic forms of shelves exist:
- the traditional form has side and back walls;
- corners can be straight or rounded;
- shelves can be made of solid wood or thin chipboard;
- arrangement possible vertical, horizontal;
- can be closed or open;
- one shelf can contain several tiers.
Modern shelves in the living room can have any shape, the most important thing is that they fit into the interior of the entire room.
Types of shelves
Any specialist will tell you that before you start creating a product, you need to decide for yourself what kind of design you want to get and whether it will be combined with the interior. And only after that you can start creating the product.
After all, for a house decorated in a classically styled style, it is completely unacceptable to use trendy and modern shelves. They will look extremely ridiculous.
The most popular and widely known subtype of shelves is the classic shelf. This is due to the fact that it is quite easy to install, and the appearance, thanks to its simplicity, seems refined and sophisticated.
Both open and closed shelves are used successfully. Closed products are most often used for decoration and installation in rooms decorated in more modern styles. Glass and sometimes plastic are used to construct them.
Open structures can be used both in modernly decorated houses and in apartments with a classic design. Over the past few years, this particular type of shelf has gained enormous popularity and is therefore gradually replacing the classic options.
In small rooms, you can often see corner shelves that have a special method of fastening. They are mounted on adjacent walls that are adjacent to each other. They are most often used in bathrooms, kitchens and utility rooms.
In addition to the above types of shelves that are mounted on the wall, there are suspended and floor-mounted structures. Hanging shelves are mounted in an unusual way.
They are installed using cables and vertical posts, and attached directly to the ceiling. This mount looks quite unusual and original.
Floor structures are most often used in hallways. After all, hand-made floor shelves for shoes not only look beautiful, but also help you organize the space of a small hallway. At the same time, making them is quite simple.
LiveInternetLiveInternet
Quote from message Baikalochka_10
Read in full In your quotation book or community!
Decorating a rack or shelves: key principles and stylish examples
Today I would like to touch on an important topic that relates not to interior design, but to decorative art - that is, in fact, to something that we can do on our own in our free time. I want to talk about the design of shelving or bookshelves. It would seem, what is there to discuss here? Placed the books/figurines and you're done. However, you should not write off shelving as an exclusively functional thing. With a few principles and tricks, you can transform your shelves into stylish decor that reflects your passions and matches the style of your home.
WHAT TO PLACE ON THE SHELVES?
Here your imagination is limited only by the items available. You definitely shouldn’t stop at books only. Put on the shelves everything that makes sense to you: your collections, souvenirs brought from travel, photo frames, cups and awards, beautiful dishes and vases of flowers. We'll talk about how to combine all these items and avoid chaos below.
LIMIT THE NUMBER OF COLORS USED
The classic rule of three colors in design: if you are afraid of making a mistake with a combination of shades, use no more than three colors. When decorating the shelving, you can add another neutral one (white, black, gray). Combine the color of the decor on the shelves with the color of other interior items.
If your book covers are too colorful and don't match, wrap them in pretty paper in a coordinating color or place them in cardboard folders.
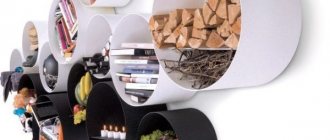
HIDE ALL EXCESS IN BOXES AND BASKETS
Beautiful boxes, caskets and wicker baskets look neat and aesthetically pleasing. Remove small items, magazines, books, and dishes that are not intended for display.
HOW TO ARRANGE OBJECTS?
BUILD TRIANGLES
I especially like this principle, and I bet 90% of the people you know have never thought about it! Pay attention to the shelving designed by a professional decorator. Everything looks logical and harmonious. But how to achieve the same effect?
Now visually connect vintage Kushinas, white books, figurines, aged greenish bottles with lines... do you see the triangles? Each object in this composition has its own clear position, corresponding to the triangle rule.
Moreover, the triangles do not have to be identical and isosceles. Triangles of different shapes add dynamics to the composition.
Emily Henderson, the famous American decorator, is a true genius of composition. Each item in her works is carefully selected and takes its place for a reason. Pay attention to this rack. Golden rooster tail - bowl trim - chain; blue vase - book cover - plate; gray vases - picture in frame; milky dishes.
In this composition you can see gold, white, black, blue triangles:
An endless number of examples can be given. On this rack you can find a lot of triangles, due to which the composition looks balanced and logical.
Now you can easily notice the relationship between vases of flowers, metal objects, vintage items and book covers in this photo:
Here are a couple more examples:
LAYERING: USE THE HEIGHT AND DEPTH OF YOUR SHELF
All items on the shelf should be harmoniously combined in height: if you want to place a low vase or small figurines on the shelf, place them on stacks of books. This way you will place them on a pedestal and draw attention to them.
If you're placing a short item on a shelf, place a book or photo frame behind it to balance the height of the arrangement.
Use layers to make your composition interesting and dynamic.
The same effect can be achieved by combining stacks of books laid horizontally and arranged vertically.
FREE SPACE SOMETIMES MEANS MORE THAN THE DECOR ITSELF
You shouldn’t fill every centimeter of the shelf with books and decor. Even beautifully grouped interesting objects can become a shapeless heap if you do not visually separate the objects from each other. Free space on the shelves will make the room visually more spacious, which is especially important when working on the design of small apartments.
If you have a huge number of books and you don’t know where to put them, make several compositions: put books on the coffee table, put them on shelves in other rooms, put books that you have hardly opened in the last few years in boxes.
SYMMETRY AND PAIRED OBJECTS
Another win-win option: use several identical items standing in a row or symmetrically on adjacent shelves.
5. HEAVY DOWN, NICE UP
Here we mean not only physical, but also visual weight. Place large encyclopedias and stacks of magazines on the lower shelves. Place small books in beautiful covers, decorative items, and candles higher - at eye level. The lower shelves solve functional problems, the upper ones solve aesthetic problems.
Anyone can design a beautiful shelf or bookshelf; you just need to know a few key principles and not be afraid to use your imagination. I wish you success in this exciting activity!
SOURCE:
Blog about beautiful interiors “Your Designer”
https://subscribe.ru/group/mir-iskusstva-tvorchestva-i-krasotyi/6578641/
.
How to make a simple shelf?
To create the claimed product, you should purchase or prepare some tools and materials in advance. As connecting elements, you can use whatever suits you best. But the most popular are ordinary screws, brackets and dowels.
Note!
For example, let's take a photo of the shelves with our own hands, which is presented below. It shows a product with the following parameters: width 250 mm, height 300 mm, length 1100 mm. For convenience, the manufacturing process will be divided into stages.
Stages of work
At the first stage, you need to complete the markup. To do this, you should lay the boards on a table or any other flat surface and transfer the measurements from the drawings. The side walls must be exactly 268 mm high.
This marking is optimal because the side walls will be located between the two parts.
The second stage requires cutting the boards. To get smooth and neat cuts, you need to use a jigsaw. After cutting, you will end up with 2 fairly long pieces and 2 shorter ones.
At the third stage, you can begin processing the resulting workpieces. The resulting sections should be coated with a special protective varnish or stain, having previously sanded them.
Note!
If you only plan to paint the shelf, you can get by with treating it with a regular antiseptic primer. This way you will not only increase the service life, but also achieve a more uniform distribution of paint.
At the fourth stage of making a wooden shelf with your own hands, you begin to directly assemble it. The bottom board should be laid on a flat surface. Step back 8 mm from the ends of the workpiece and draw two lines parallel to the cuts.
2 points should be marked on them with a distance of 5 cm from the edge. At the marked points it is necessary to drill holes for self-tapping screws. The same manipulations must be done with the second workpiece.
After this, you should install the side blanks on the lower section of the board and secure them. Once you are done with attaching the side panels, proceed to install the top panel and secure it.
At the fifth stage, you should attach the brackets to the ends of the side panels, and make several holes in the wall for the dowels. After this, screw in the screws so that they protrude by 5 mm. And now your shelf is ready.
You can make acoustic shelves in the same way, but you need to take into account the size of the equipment itself. Measurements should be taken carefully, because if you make a mistake, the work will have to start again.
Note!
Shelves in interior styles
Designers often use shelf arrangements to divide a room into functional areas. For each style, a specific shelf layout has been developed.
High tech . In such a living room it is necessary to place shelves made of glass or metal in a zigzag shape. You should get rid of accessories so as not to overload the decor. Such shelves stand out for their unusual appearance, so there is no need to fill the interior with unnecessary accessories. It is enough to install a home telephone, a photo frame or a clock.
Modern . For this style, shelves may seem like a bulky element, but there are many successful examples of this design. Usually they are hung separately, but in some cases they act as an integral part of a modular wall.
Provence . In this direction, open shelves are rare, and functional shelves on which things are stored are not allowed at all. Typically glass shelves are used here. Strong, reliable glass of various colors is used, which looks elegant in tandem with vases and figurines. In addition, whitewashed shelves decorated with flowers and hearts are well suited to the Provence style.
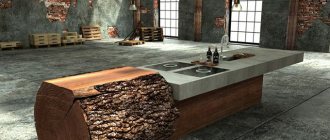
Loft . Maximum diversity gives us an independent loft. At the same time, it is not at all necessary to sand the boards to perfection - minimal carelessness will be in complete harmony with the brick walls characteristic of this style.
Baroque . This kind of design involves a huge number of pictorial components; for this reason, the racks are certainly decorated with exquisite patterns, carved elements or stucco. It is very important that they contain elements of wealth and solemnity characteristic of this direction.
In the interior of many modern living rooms, shelves play a very serious role. Objects are placed on them, with their help they delimit space and create a unified style in the room. When designed correctly, they can qualitatively transform the decor of a room. It does not matter at all whether the shelves are part of the furniture or act as a separate group.
They will always be involved in creating the look of the room along with other items. Directly for this reason, designers have a huge interest in them in their work.
DIY photo of shelves
Today's developers, unlike their colleagues of the previous generation, do not strive to equip living space with storage rooms. This increases the living space, but does not allow you to optimize the space and have the sometimes necessary storage area.
The presence of a storage room in an apartment becomes a gift for the hostess and sometimes a luxury that is not available to others.
Unfortunately, the pantry is not always equipped with shelves and racks for placing and storing things, so you have to install shelves in the pantry yourself.
Making shelves in your pantry with your own hands is not a difficult task.
Before you start creating a rack, you need to decide what the shelves in the pantry and the structure itself will look like, as well as what fastenings to connect the shelves to the wall.
There are only two options for how to make a rack, namely, make a free-standing shelf, or simply attach the boards directly to the wall.
First, you should draw the idea on paper. This will allow you to visualize the desired rack, take measurements and most successfully place it, taking into account the wishes and intended storage items.
In order for a pantry to be equipped with shelving, it must have enough space.
It must be taken into account that the shelves should be positioned in width from bottom to top, that is, the bottom shelf will be the widest, and the top, accordingly, the narrowest. This is due to the fact that the largest items will be stored on the lower shelves, which are inconvenient and impractical to lift upstairs.
It is necessary to carefully consider the distance between the shelves and correlate it with the items that you plan to store.
Depending on the wishes of the owners, the racks can have any shape that the location chosen for attaching the structure will allow.
You need to consider the amount of free space - if the racks take up too much space, then it will be uncomfortable for you to walk in the pantry.
More often, U-shaped and L-shaped shapes are chosen; this type of shelves is the most practical. For installation, it is better to prefer metal brackets and fasteners; they are the most durable and will withstand any weight on the shelves.
Choose any option that suits you.
How to decorate a shelf with your own hands?
The apartment is most often decorated with your own hands, and shelves are no exception. To get the job done, you need to buy a regular shelf, no frills. Most often it is a piece of wood or plastic.
The decor is made using materials such as leather, natural wood additions, forging, and dyeing.
It’s not at all difficult to design a unique shelf; the main thing is to think through a work plan. It is best to make basic outlines on paper, and then design the product.
There are different options for how to design a shelf, and there are a lot of ideas on the Internet that are worth checking out. There are so many ideas that it’s not difficult at all, even without designers, to create beautiful decorative shelves for a TV in the living room.
Necessary materials
When deciding how to make shelves in a pantry, you need to decide on the material from which the structure will be made. There are several options.
In addition to wooden materials, you can choose others, the main thing is durability and the possibility of self-assembly. In addition to the shelves, you should stock up on the fasteners on which the shelves will be installed, and the consumables necessary for the work.
In order to make wooden shelving for a pantry, you will not need a lot of materials and serious tools.
Photo of shelves in the living room
Look here: Living room chairs - fashionable design and review of options for using chairs (90 photos and videos)
Did you like the article?
0
Tools for work
To understand what tool is needed for the job, you need to clarify what exactly needs to be done. If the material for the shelves is not prepared and needs to be trimmed and sharpened to the required dimensions, then it is imperative to have a jigsaw or a hacksaw for wood and a plane. They will help you make shelves of the right size. You will also need sandpaper to sand the edges of the cuts and give the shelves a finished look.
Tools needed for work.
You need a hammer drill to create holes in the wall for dowel-nails to attach brackets, and a screwdriver to connect parts to each other, if necessary.
This is enough to ensure that the pantry has good and reliable shelves on which you can store anything.
You will definitely need:
Choosing a place for a shelf
When thinking about how to make shelves in your pantry, it is important to decide on the location. The place where the shelves will be attached should be chosen taking into account many factors.
The wall on which it is planned to mount must be load-bearing.
This is the key to the strength and durability of the structure. A thin interior partition may not withstand the load and shelves filled with heavy objects will collapse.
In addition to boards, you can use particle boards, plywood and other suitable materials.
If the fastening is not carried out directly to the wall, then you can use your imagination in accordance with the desired shape of the location.
Consider the dimensions of the items you intend to store.
It is important to prepare the storage room itself, level and tidy up the walls in advance so that the shelves stand up straight and there is no need to adjust them to the topography of the wall.
It is worth taking care of lighting before the installation of the rack occurs.