32372
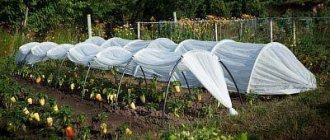
After repair or construction work, a lot of materials remain. Lovers of handmade items will no doubt find a use for them. After renovation work in the bathroom, you can easily make furniture from PVC pipes with your own hands, using leftover materials.
Pipe shoe racks
DIY shoe rack made from pipes
A very simple version of a shoe rack made of pipes, the creation process is very simple, so we won’t focus on it, you’ll understand everything from the photo
Unfortunately, the author of the photo could not be identified.
Large shoe rack made of pipes under the stairs
Another option for a shoe rack, only larger in size. The space under the stairs is usually empty unless various unnecessary things are put there. And you take it and make a shelf like this from pipes for shoes .
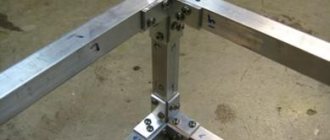
You will need pipes, fittings, adapters and a full set of plumber's tools. But everything is reliable, thorough, in a real industrial style. First, you make a drawing for a specific location, calculate the crossbars and other details, then select fittings and pipes. All this iron can be painted with metal paint, or you can leave it like that, it will look cooler.
Now we assemble all the parts according to the diagram, and at the end we attach the boards.
It turns out this is a multi-tiered shelf made of pipes
Desktop
Various tables and small tables are among the most popular types of furniture. We suggest making a simple desktop with your own hands from polypropylene pipes and a hollow door leaf. This tabletop size will allow you to place a laptop, textbooks, notebooks, maps, diagrams, etc. on the surface. Therefore, the product can become a workplace for both a school student and an office employee.
Prepare everything you need
Tools and materials:
- A hacksaw or miter saw to cut material to the desired size.
- A screwdriver or hammer drill will help attach the legs of polypropylene structures to the working surface.
- Threaded screws for 1.25, 1.5 – 15 pcs.
- PVC glue can be replaced with small self-tapping screws.
- End caps – 5 pcs.
- Desk plugs – 5 pcs.
- Cross-shaped plugs – 4 pcs.
- T-shaped regular plugs – 4 pcs.
- T-shaped four-way connectors – 4 pcs.
- PVC pipe sections: 5 pcs. 0.075 m (3 inches), 10 pcs. 0.3 m (12 inches), 4 pcs. 0.5 m (20 inches), 4 pcs. 0.75 m (30 inches) each. In the diagrams, the dimensions of polypropylene pipes are presented in inches.
All T-connectors can be replaced by soldering. Please note that this will slightly reduce the final cost of the table, but its appearance will suffer.
Description of work
- First of all, we start assembling the left side of the frame. The assembly includes 4-way and regular T-connections, tabletop and flat plugs. All details are shown in the picture.
First, we simply assemble the structure to check the accuracy of the plastic parts. Then we disassemble it and assemble it completely, fastening the joints with glue. After using a special adhesive composition, it will no longer be possible to redo the work.
PVC glue should be applied to the inside of the connecting element. Check that all parts are correctly placed, only then forcefully press the pipe into the hole of the fitting connector and hold for about 30 seconds.
Attention! The adhesive is not recommended for use indoors, so instead you can seal the connection between the pipe and the connector with a screw. Also, if you do not want to erase markings from plastic pipes with acetone or another solvent, place the parts when assembling so that the inscriptions are on the back side.
- The steps for assembling the second side part of the base exactly repeat the previous ones, but with a mirror image. T-shaped four-way fittings are turned in the opposite direction.
- Let's start assembling the rear part of the support structure. The table plug, flat fitting, 2 cross connectors should be used. Using them, assemble pieces of plastic pipes of 30 inches, which is equal to 75 cm, as shown in the diagram below. To ensure that long parts are installed exactly parallel to one another during assembly, place them on a flat surface, such as the floor, while working.
- At this stage, we assemble ready-made fragments of the PVC structure. It is necessary to place the ends of the polypropylene pipes with their backs into the fittings that correspond to them on the sides: left and right. Everything is shown in detail in the diagram. Assemble the fragments and check for correct assembly. Then completely disassemble and reassemble using adhesive.
Apply the chemical to the inside of the first side fittings, holding the connection for up to 30 seconds until the chemical cures. Then do the same with the second side fragment of the structure. The base frame is completely ready.
- The last stage of DIY work is installing the tabletop on the base. Since the work surface is a hollow door leaf, care should be taken. The space inside is filled with foam, cardboard, or completely free. Inaccurate drilling can damage the entire structure.
Recommendations
- We recommend placing the door face down on a clean, level surface. Install the finished PVC structure symmetrically - the way it should be positioned in its finished form. The table caps will be adjacent to the door.
- Use a pencil to make marks where the holes should be drilled. After this, remove the base from the tabletop.
- Using a screwdriver or drill, screw the screws into all marked places. If the job was easy, you can insert a screwdriver instead of a screw to widen the holes. If there were difficulties (the screw got into the bar), you will not need a screwdriver. For now the screw needs to be removed.
- Place the PVC base on the door, adjust the position so that all the holes line up. Insert the screws and connect the work panel and legs.
It is better to use varnish or paint as a finishing touch. While working at the table, various contaminants will certainly fall on it. Therefore, the coating will protect this furniture from rapid damage and make it easier to care for.
= What shelves can be made from:
| made of wood Example: DIY flower shelves 230 | from metal pipes Example: DIY pipe shelves | from PVC pipes |
| made of cardboard Example: Shelf rack made of cardboard boxes | from paper | from plasterboard |
| from glass Example: Shelves in Art Nouveau style 180 do-it-yourself photos | from old boxes Example: DIY drawer shelves 120 photos | from pallets pallets |
| stainless steel | from glass | from old stairs |
| From bars | from bottles Example: Glass bottle shelves | from driftwood and branches Example: Bookshelf made of branches and driftwood |
| made of bricks Example: Bookshelves made of bricks and boards | from newspapers Example: Newspaper shelf | From cans Example: DIY kitchen shelves: 456 photos, drawings, instructions |
Choose: chair or high chair
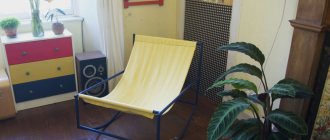
A chair made by yourself will delight you with its lightness, cheapness and practicality. In addition, you must initially decide what size furniture made of plastic pipes you need, and accordingly, adjust the specified parameters of the parts.
Preparing for work
For each chair you will need:
- About 3 meters of PVC pipe.
- 8 swivel fittings for right angle connections.
- 6 T-shaped connecting elements.
- Glue intended for joining plastic parts: special or universal.
Attention! If you do not have sufficient experience in connecting plastic pipes, for work, choose not a special quick-drying adhesive composition, but a universal, slower-acting product. In this case, you will get an additional chance to correct a possible error.
- Hacksaw or saw with fine teeth.
- Fabric for sewing the soft part of the seat.
- Sewing machine.
You need to prepare with your own hands the following sizes for a 2-year-old child:
- 7 pieces with seat depth and width (part A) - 25 cm.
- 4 pieces with a distance from the surface to the seat (part B) - 13 cm.
- 4 pieces with armrest height (detail C) – 10 cm.
- 2 pieces with back height (detail D) – 15 cm.
Or, for example, for a child who is already 7 years old:
- 7 pcs. A – 41 cm.
- 4 things. H – 25.5 cm.
- 4 things. C – 13 cm.
- 2 pcs. D – 23 cm.
Chair assembly
- Cut the pipe according to the selected parameters.
- First, assemble the part that makes up the back of the chair.
- Assemble the seat and side parts.
- Check the stability of the product.
- Cut a strip of brightly colored cotton fabric 2 times larger than the width of the seat. Fold in half, face inward, sew, turn inside out. At both ends, tuck and sew pockets through which the pipes will be threaded - the top one for the back and the front one for the seat (like in a chaise lounge).
- Disassemble the frame and install the seat in place.
The child will appreciate the new piece of furniture and will be able to easily play with it. The use of plastic water pipes is absolutely harmless; they do not emit toxic substances. And reliable assembly makes the product completely safe.
Furniture for home and garden can be made not only from water pipes, but also from sewer pipes, but the former have significantly higher environmental characteristics. Large-diameter pipes are used to create creative storage systems, original decorative objects, etc.
25.10.2016
no comments