If you look at the surrounding objects in more detail and add a little of your own imagination, then everyone can turn into something interesting and unusual. PVC pipes were no exception.
A DIY screen made of plastic pipes is one of the most common options for using old or defective PVC pipes. In everyday life, such products are used for arranging sewer, heating and water supply systems, however, with the right approach, they can be used in a different way. If a craftsman gets to work, the pipes will transform into amazing things.
Decorative partitions are usually used to delimit large rooms into separate zones or to hide certain areas of the room from prying eyes. Designs such as screens made of plastic pipes, which you can make yourself, have been used since ancient times.
Screens can be mobile, stationary, transparent and compact. A variety of materials can be used to make them, which can come in different shapes and sizes. If you have a significant budget, partitions can be decorated with precious items and rare materials.
Screen made of PVC pipes
It was these designs that were used in the arrangement of rich houses during the Roman Empire, Egypt, Greece and China. For their manufacture, it is recommended to use lightweight materials that will make the decorative element mobile.
Modern businessmen even make partitions from plastic pipes with their own hands. In addition, you won’t need any special expenses, just a little free time and the desire to create.
What is needed to make screens from polymer pipes
To create a structure that is lightweight and safe for children, you need to decide in advance on the size of the product, its design, and prepare the following materials and tools for work:
- plastic pipes with a diameter of 2.5 cm (4 for each section);
- corner fittings (4 elements for connection per section);
- double special fasteners (for joining sections);
- single support (for “legs” under the frame);
- machine for welding plastic pipes;
- roulette;
- marker;
- saw for shortening plastic pipes;
- scissors;
- durable fabric;
- Velcro fastenings;
- ribbons/laces for garters;
- glue;
- additional material for creating pockets;
- compositions for dyeing fabrics.
A soldering iron for polypropylene allows you to work on connecting pipes quickly and efficiently. Tip! If there is no special apparatus for welding plastic pipes, it is quite possible to use the method of conventional heating over a stove.
Wall metal rack
First, we’ll tell you how to weld a wall-mounted or stationary rack from a pipe.
This work includes several stages:
- Design;
- Preparation of materials and tools;
- Assembly of the structure.
Start working on creating furniture by preparing a project
Project preparation
First, you need to decide on the location of the future product in the garage so as not to make a mistake with the dimensions. Write down the results on paper immediately.
Then you need to draw a design diagram. If the rack is portable, then its basis is made up of sidewalls in the form of two racks, between which jumpers are located.
The sidewalls are connected to each other by beams. In this case, the lintels and beams form the basis for the shelves. Stationary racks have the same design, but without rear posts, and often there are no rear beams. Therefore, the jumpers are attached directly to the wall.
Be sure to indicate the following design parameters on the diagram:
- Overall height - to save space in the garage, it makes sense to make the furniture as high as the ceiling. On the upper shelves you can store items that you rarely use;
- The length of the structure and the depth of the shelves - these parameters have already been written down on paper, since they correspond to the dimensions of the area on which you want to place the product;
The distance between all shelves does not have to be the same
- The distance between the shelves is selected depending on the dimensions of the items that will be stored on them. It must be said that the distance between the shelves does not have to be the same. For example, the compartments for storing rubber can be made larger - 600-700 mm, and it would be advisable to make the space between the remaining shelves smaller so that more of them can fit.
After preparing the project, you can start working.
To make a rack you will need pipes and fittings
Preparing materials and tools
First of all, you need to prepare the pipes. There are no specific requirements for their diameter or, for example, wall thickness.
Therefore, if you specifically buy materials for these purposes, estimate the future loads on the structure, and in accordance with them, select the pipes “by eye”. But, most often, such furniture is made from what is available “at hand”, so there is no choice.
Advice! It is advisable to use profiled pipes for shelving, as they are more durable. But, if you don’t have these, use regular ones, i.e. round.
The only thing is, if you are going to make furniture not for the garage, but, for example, for the house or cottage (see Shelving for the home: types of structures), it is advisable to use chrome pipes for the shelving, as they have a more attractive appearance.
In addition to the main material, you will need fittings to connect all the parts - 90-degree angles and tees. To find out the required number, count the number of 90-degree connections, as well as “triple” joints.
It is better to make furniture for home from chrome tubes
Flanges are ideal for future design legs and wall mountings. Also calculate the number of flanges you will need on the diagram.
You should also prepare the material for the shelves - this could be plywood, OSB, boards or wooden slats. To attach shelves to lintels and beams, use self-tapping screws and horseshoe brackets that match the diameter of the tubes.
To protect the product from negative influences and give it an attractive appearance, you will need paints and varnishes for wood and metal.
Use brackets to secure shelves
As for the tools, prepare the following set:
- Grinder/hacksaw for metal;
- Welding machine (if you don’t have a welding machine, you can connect all the elements using a thread. In this case, you will need threading dies or other tools for these purposes);
- Metal files and sandpaper;
- Tape measure and pencil;
- Electric drill;
- Jigsaw;
- Paint brush.
Important! If you are making shelving for your home, cut the chrome pipe yourself using a special cutter, which allows you to preserve the chrome coating.
Use a special cutter to cut chrome tubes
It is also advisable to have a workbench with a vice, which will greatly simplify the work.
Assembly of the structure
The instructions for making a rack are as follows:
| Illustrations | Actions |
| Apply markings to the workpieces according to the dimensions of the parts indicated in the project. |
| Cut the workpieces with a grinder or a special marking device. The result should be racks, lintels and beams. |
| Cut threads on the ends of all parts. |
| To ensure that fittings can be easily screwed onto the prepared parts, lubricate the threads with machine oil. |
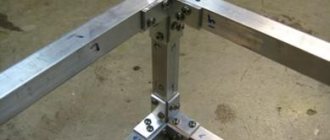
| Assemble the structure according to the project. First, the sidewalls are assembled from two posts and lintels, and then connected by beams. If the structure is stationary, a flange is screwed onto the free end of the jumper. |
| If the tubes are not chrome, paint them. For these purposes, you can use car paint in a can. |
At this point the frame is ready. In the same way, the product is made by welding, the only thing is that the work is somewhat simplified, since there is no need to cut a thread.
Now you need to complete the shelves:
| Illustrations | Actions |
| To make shelves, mark the material from which you are going to make them according to the project. |
| Cut the shelves according to the markings using a jigsaw or other tool. |
| Sand the surface of the shelves with sandpaper or an electric sander. |
| Paint or varnish the shelves using a regular paint brush. |
| To attach the shelves to the frame, use staples and screws. The latter are screwed in from below, making the fasteners invisible. The main thing is that the screws do not go right through the shelf. |
Note! Shelves are not required for all types of shelving. For example, it is more convenient to place automobile tires in the space between the beams. Also, a pipe rack, which most often has a cantilever design, does not require shelves.
Racks for pipes and rims do not require shelves
With this our rack is ready. Using this principle, you can assemble any type of structure.
Plastic pipe screen size
You can make a screen for a puppet theater from pipes, or for other events such as quizzes, thematic scenes, in accordance with the following dimensions:
- Side frame. The width is 79 cm and the height is 118 cm.
- Central frame. The height from the bottom to the middle pipe is 72 cm. It is better to attach panels made of leatherette to the frame - it will be much more practical and durable. It is worth attaching curtains made of synthetic fabric (polyester) to the central frame to the top tube, which practically does not wrinkle, has an increased degree of wear resistance and resistance to heat and light. In addition, polyester is easy to wash, it dries quickly and does not require special care.
- Leatherette panels. The dimensions of the side parts are 112x65 cm, and the bottom central part is 65x65 cm. One curtain is 42 cm wide and 48 cm long.
The screen can have any size and design, but it must be safe for children, without sharp corners
. It is better to attach leatherette panels, as well as curtains to the screen frame using buttons or a wide elastic band. Its optimal length for fixing to the frame is 12 cm.
Shelving for the garden
After renovation, not only polypropylene pipes may remain in the house, but also a metal profile, from which you can try to make a shelving for your summer house without using welding. To work, we only need a tape measure, a pencil, a screwdriver and a hacksaw.
First of all, it is necessary to design the future rack. Draw a diagram on paper, observing all dimensions. Next, you can purchase an additional profile to the existing one, and also find several sheets of plywood 15 mm thick. You can also make a rack from PVC pipes with your own hands, using the diagram for the profile.
Let's look at the manufacturing process using a specific example:
- Take the profile and cut it into pieces: 4 vertical posts, 8 front and 8 rear crossbars;
- Assemble 4 frames that should become shelves in the future;
- Using self-tapping screws, secure the resulting frames to the vertical posts;
- If you wish, you can screw the rack to the wall and paint it, after which you can lay plywood on the frames to make shelves.
How to make a frame for a screen from pipes
When all the consumables and a set of tools are prepared, you can begin work on making a frame for the screen from plastic pipes. So, the first step is to cut the PVC pipes according to specific dimensions using plastic cutting scissors or a hacksaw.
Important! The height of the decorative partition, regardless of the purpose of use, should not be greater than the height of children.
To assemble one section of a screen for a kindergarten, you will need:
- 2 pipes of the same size (setting the height of the structure);
- 2 PVC pipes of similar parameters (setting the width of the section);
- 4 plastic connecting corners per section.
Connecting structural elements is equally effective - both by using hot and cold welding. It is very convenient and reliable to use a plastic heating device for these purposes; you don’t have to buy it, but rent it. As an option, a special adhesive composition for connecting plastic pipes, which can be purchased at a hardware store, is also suitable. It’s easy to work with; first, apply it to a section of polyvinyl chloride pipe, wait a few minutes until it melts, and then quickly press the parts together.
The step-by-step process of manufacturing one section of a partition for a kindergarten from plastic pipes consists of the following steps:
- Cleaning and degreasing pipe ends.
- Applying cold welding in places where joining is planned - on the outside of the edge of the pipe, as well as inside the connecting element-angle.
- Connections with fittings. This manipulation must be done when the surface has softened sufficiently. The other parts of the section are joined in a similar manner. During installation, you should control the parallelism of workpieces of equal length, otherwise the structure will be skewed. If there is excess adhesive, it is better to immediately remove it with a soft cloth.
Using this technology, the remaining sections of the screen are assembled from pipes in the preschool educational institution.
How to make multifunctional screens for preschool educational institutions with your own hands?
It is necessary to think over the design, calculate the amount of material (polypropylene pipes). Another important assistant in your business is a machine for welding polypropylene pipes.
Then you can start manufacturing. The screen frame is made of polypropylene pipes. Diameter - 20 mm, the pipes are connected to each other using a plastic corner. The size of the sections depends on the imagination of the teacher. The sections are connected to each other with special double fasteners. All the material is quite durable, and most importantly, accessible and relatively inexpensive.
After the teacher has made the frame, we proceed to sewing the “covers”. Here you can show your imagination and creativity. This could be a military vehicle (green cover), an ambulance (white cover, with a red cross), or a fire truck (red cover).
For the boundaries between the centers (corners) of the group, screens of different configurations can be used, and the covers can be of different colors, from plain pastel to brightly delicate children's drawings (fortunately, there is a wide choice in stores).
The case itself can carry a semantic load. Firstly, the method of fastening to the frame (laces, adhesive tape, buttons - and this, as you understand, is the development of fine motor skills, the strengthening of sensory standards). Secondly, you can place pockets on the cover (for various small and light items), or make an applique.
A simple example is “Tree”, the leaves (according to the seasons) are made of textile material. Using sticky tape, the child himself distributes the leaves on the tree. Using this principle, you can create panels of different themes.
There is a lot of room for imagination here for the teacher.
How to make a screen from plastic pipes
Having assembled all parts of the screen, they proceed to creating the overall structure. It is good to use double fasteners as connecting elements. If these are not available, then you can use plastic ties (clamps), which are characterized by high tensile strength with sufficient elasticity. Despite their versatility and ease of use, nylon ties have one drawback - they can only be used once.
The screen is assembled using double fasteners or a nylon tie
Sections of the screen will be in a movable state. Thanks to this, there will be no difficulties during transportation or moving to another place. This design can be used in a room of any size.
Decoration
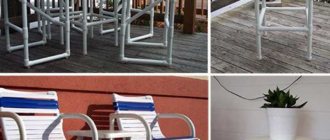
One of the options for decorating furniture made from pipes is to use different colors of the material. A table with blue legs will become a bright element in the room. Products come in different colors: white, black, blue, blue, yellow. Connecting elements also come in different shades. Thus, the pipes will be one color, and the fasteners will be another. Combinations of white and blue or black and red look beautiful.
When it comes to armchairs and chairs, they are decorated with decorative pillows. The foam lining on the back and seat is covered with a beautiful bright fabric. Decorative pillows decorate the product, making it cozy, comfortable, and original. They come with embroidery, buttons or tassels. The color range of pillows is varied. When choosing it, it is necessary to take into account the overall design of the entire room.
Children's furniture should be interesting and colorful. It is recommended to cover the chair or high chair with durable fabric with a bright pattern. This could be a cartoon character, toy cars, dolls, stars and much more. Pay special attention to furniture made from PVC pipes for children; it must be safe, without sharp elements. Otherwise, the kids may get hurt.
Making furniture from PVC pipes is easy. It will become a highlight in the room and will attract the attention of guests. Plastic pipes are inexpensive, so you can save a lot of money, since new furniture is expensive.
How to make a doll screen from plastic pipes
To create an interesting and practical design for a screen partition made of plastic pipes, you need to make covers. It would be good if fabric with a meaning was used. There are no restrictions on the choice of design here; any fantasies can be safely realized. The main thing is that it has a positive effect on children and attracts their attention.
Often children themselves show interest in decorating the screen; it is better if the design process is carried out together with them
To make covers, you need to correctly calculate the area of the fabric used; its dimensions must correspond to the parameters of the frame section. Finding the area of the material is not difficult; just multiply the height of the partition by its width, and finally by the number of such sections.
Covers on the partition can be secured using buttons or tapes
In order for the covers to serve for a long time and not fray around the edges, they need to be stitched on a sewing machine. To attach Velcro tape or loops, you must sew on it by hand. You can simply fix it with glue on the top side of the panel.
If desired, the screen made of PVC pipes can be painted. But it is recommended to do this in a well-ventilated room. After this, the partition should dry. To avoid loss of functionality, intersectional fasteners should be painted separately from the entire structure.
The finished screen for kindergarten is decorated with covers, on which interesting applications can be glued for greater decorative effect. It’s also good to equip them with small pockets.
Types of screens and their purpose
The design of the future partition completely depends on the functions that it will perform and on the time available for the implementation of ideas.
Depending on the purpose, screens can perform the following functions:
- decorative - a partition is used to decorate the interior of a room, being an artistically designed object;
- division of space - a screen visually divides the room into zones, which is often used by designers in large rooms;
- implementation of creative ideas - a small screen made of pipes acts as theatrical equipment when performances are staged at home.
The size of the future product is also important for the project, so you should immediately decide on its function. Most often, partitions are made from plastic for a kindergarten group, for playing tabletop puppet theater, for fulfilling household needs, for zoning a one-room apartment, trying to separate an office from a bedroom or living room.
And also, this is a favorite craft of creative and creative craftswomen who prefer to make an unusual and completely unique thing with their own hands.
In principle, it is not at all difficult to buy a screen for every taste and size - manufacturers offer a huge range of different purposes from a wide variety of materials.
Image gallery
Photo from
Plastic screen-blinds
Artistic forged partition
Wooden partition in the interior
Textile and wood screen
Ready-made solutions offered by art studios are not very expensive. Therefore, it is much more interesting to build a partition yourself. Moreover, there are always improvised materials at hand that will work, you just need to show your imagination.
You should immediately think about the design - mobile (on wheels), portable or stationary partition. It is also important whether it folds or not.
All these points need to be carefully considered, because the project of the future homemade screen depends on them.