To eat organic vegetables and be confident in the quality of the products, it is best to grow them in your own garden. But for good growth of vegetable crops, a certain level of temperature and humidity is required.
An excellent solution for creating comfortable conditions for plants is the construction of a greenhouse from polypropylene pipes, which you can make yourself.
Such greenhouses have long become an integral part of any site, since the structure is simple, its construction does not require special knowledge or a lot of money, the main thing is to follow the instructions. In addition, heating comes from the sun, and no separate heating is required.
Advantages and disadvantages of polypropylene pipes
Polymer is a relatively new synthetic material compared to wood and concrete. It is resistant to mechanical stress and precipitation.
Recently, pipes began to be made from polypropylene, which quickly gained popularity because they are not expensive and have excellent performance characteristics. The diameter of polypropylene pipes ranges from 20 to 1200 mm.
For its positive qualities, polypropylene is widely used in the manufacture of greenhouses and greenhouses.
| Advantages | Flaws |
| Easy to process | Does not tolerate sunlight well |
| Special fittings allow you to make a folding version, which is convenient for storage | Despite the fact that the light weight of the pipes is a positive quality, however, in strong winds the structure can overturn |
| The PVC pipe structure is rigid and does not require additional reinforcement | |
| Excellent resistance to corrosion, rot and weathering | |
| Service life of at least 10 years | |
| Difficult to ignite | |
| Pliable, it is possible to make any designs | |
| Light weight for easy transportation | |
| Eco-friendly |
Assembling a frame from pipes
There are several installation options:
- 1 way. The frame is assembled completely using fittings by welding.
- Method 2. Cut arches from pipes and place them on pins. For additional rigidity, install wooden racks with a ridge crossbar.
- 3 way. Arches and connect to the lintels with furniture bolts.
- 4 way. Fasten the pipes together with plastic clamps.
Arched greenhouse secured with clamps
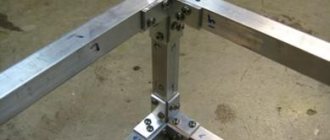
Welded frame
The frame made by welding has the greatest strength and stability. You will need a tape measure, a marker, scissors, a polypropylene soldering iron, fittings - crosses, tees and corners.
Sequence of work:
- Pipes are cut into separate short elements according to the drawing.
- Heat the nozzles on the soldering iron to the desired temperature. For polypropylene it is 260-300°C.
- A pipe is put on one nozzle and a fitting on the other.
- Wait a certain time, which is specified by the welding equipment manufacturer in the instructions.
- Remove the heated elements and press without force.
After a few seconds, as a result of polymerization, the connection becomes strong.
Small structures are welded successively into larger ones. Start with the upper elements, then move to the lower ones. In this way, a frame is prepared for installation on the harness. You can first weld separate large sections, and then connect them in place.
Prefabricated frame
Prefabricated frames are not as strong and rigid as welded ones. Due to the fact that the pipes have a round cross-section, some play is formed during assembly. However, they are quite suitable for seasonal use, and not all gardeners have a welding machine.
Assembly is carried out sequentially:
- The arches are installed and secured.
- Jumpers are laid underneath and connected to the arches with bolts or clamps.
- To add rigidity, braces are installed in the plane of the pediment and side wall.
The fasteners must be positioned in such a way that the covering material is not damaged during installation.
Doors, vents
Working openings are arranged at the ends of the greenhouse, where separate boxes can be provided for hanging the door leaf and vents. For their manufacture, boards, metal or the same polymer pipes are used.
Some zealous owners adapt old window frames or doors for these purposes, which also saves a lot of money. The boxes are firmly attached to the bottom frame and gable frame using lintels and braces. Loops are used for hanging wooden panels, and plastic fastening clips are used for pipe structures.
Installation of covering material
The easiest way is to attach film coatings to the finished frame. They are laid out on top of the greenhouse, slightly stretched and screwed with self-tapping screws to the bottom frame through wooden pads or glazing beads. Separate panels are placed on top of each other with an overlap of 30 cm, and the joints are sealed with tape.
To attach the film to the pipes, use factory or homemade clips. They can be made from pipe scraps or plastic bottles. A cut is made along the part, and when installing the connection, the edges of the clip are bent and put on the pipe over the film. There is no need to make extra holes, the mount is sealed and strong enough.
Cellular polycarbonate is a more rigid material than films, which additionally gives the greenhouse stability. It is durable, not afraid of frost, and protects the polymer frame well from ultraviolet radiation.
Attach polycarbonate to polypropylene pipes using roofing screws. Protective profiles are installed on edges where moisture may enter.
Rules for fastening polycarbonate
Where to place the greenhouse on the site
In order for the plant to grow well, it is not enough to make a greenhouse; it must be correctly positioned on the site. There should not be a tall building or large trees blocking the light nearby.
In addition, during heavy rain or heavy watering, water should not accumulate, as this will negatively affect the growth of plants. If the place is low, then you need to make a platform or some kind of elevation. The easiest way is to half-dig the logs onto which the frame itself is already mounted.
Exposure to a large amount of sun will not harm the plant, since the structure can be covered with a special mesh for shading.
How to choose a location for a greenhouse
When choosing a place to build a greenhouse, you need to give yourself answers to a number of questions
- Which place has the most light?
- Where should you expect strong gusts of wind?
- What kind of soil is on the site?
- Are there plans for additional communications to the greenhouse?
After analyzing the answers, it will become very clear to you which place on the site will be ideal for the future greenhouse.
Please note that experts recommend placing the greenhouse from east to west; it is in such beds that plants will have enough light for normal growth and development.
Diagram of the most favorable location of the greenhouse relative to the cardinal directions
Types of structures
When choosing a model and size, you need to know exactly its purpose. If you plan to grow vegetables only for yourself, then a size of 0.5 meters wide, 1.5 meters long and 1.3 meters high is sufficient (this is the standard height of greenhouses).
By type, greenhouses are divided into:
- Arched is the simplest and most inexpensive option for assembly. Its streamlined shape resists wind and rain well. This model of greenhouse is often made from polypropylene pipes by gardeners; the sizes can vary. Usually covered with film.
- A mini-greenhouse made of polypropylene pipes is a common home-made option among summer residents and comes in different shapes:
- In the form of a simple square frame covered with film. It is used more often for germinating seedlings. This model can be bulk or ground, since after 3 months the soil is depleted. Another minus is the lack of light. But on 1 m2 you can grow seedlings for 20 acres of land.
- “Butterfly” is a model for crops that require constant air. It is built like an arch and has opening doors on the sides, which is very convenient. Excellent option for peppers, tomatoes and cucumbers.
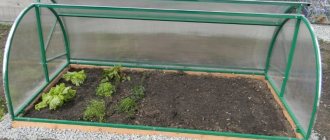
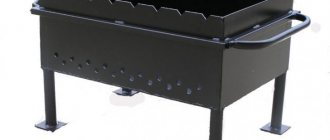
- “Breadbox” - suitable for gardeners with little experience. It is inexpensive and the installation process is simple. The “bread box” made of polypropylene pipes is intended for low-growing crops; it is a box with an opening lid.
- Rectangular - consists of walls and a roof, which can be single-pitched or gable. Also often found in areas.
- Shed - a structure of three walls with a covering on top. The roof has a steep slope. Typically used for growing radishes and carrots.
- Gable - a classic option, from the middle of the roof the slopes diverge in both directions.
- Combined - with several sections, not very popular for construction on a small plot with your own hands.
- Wall-mounted is an excellent solution for a small area. Saves both space and material. In addition, this structure is stable and durable, as it rests on the wall of the house. But it is suitable only when the house does not create shading on the greenhouse.
Almost all types of greenhouses made of polypropylene pipes can be made either permanent or collapsible.
However, the collapsible design is more convenient and mobile; it can be removed for the winter, or, if necessary, moved to another area. In general, polypropylene pipes, in addition to plumbing purposes, can also be used for the construction of greenhouses and greenhouses.
Greenhouse design and types of materials
The frame of greenhouses is made of wood, metal pipes and corners, plastic pipes of various compositions and qualities, and finally, the entire greenhouse can be made of ready-made aluminum or wooden double-glazed windows.
To protect from rain and snow, cold and wind, the frame is covered or equipped with a polyethylene film - sleeve, reinforced or bubble (which protects better from the cold, but transmits light less well); nonwoven materials (spunbond, agroscan); plastic sheets (cellular polycarbonate) and even glass. The last two positions, like aluminum double-glazed windows, are used for heavy capital greenhouses of the “greenhouse” type, operating all year round.
Which pipes to choose
You can make a frame for a greenhouse with your own hands using plastic pipes of various diameters (16 - 110 mm), the possible length is 2 - 5 meters. You can also make them from PVC water pipes, polypropylene (PPR) or made from polyethylene, which have low pressure but high density.
Pipes with an aluminum or fiberglass layer are suitable, but their cost is higher. It is recommended to take pipes with different diameters for different parts of the structure.
When choosing, you must take into account the availability of welding equipment that is designed for welding plastic pipes, and experience in such work. Although, the process is simple, and anyone can handle it.
Choosing polypropylene pipes: useful tips
- When choosing polypropylene pipes, you need to pay attention to the manufacturer of the material. It is best to give preference to Czech or Turkish companies, as they offer high-quality products that will last longer than pipes from a Chinese manufacturer. Domestic products can also be of fairly high quality. When purchasing PP pipes, you need to inquire about the quality certificate.
- For greater structural strength, it is recommended to purchase pipes with a wall thickness of at least 4.2 mm (inner diameter 16.6 mm, outer diameter 25 mm).
- The reinforcing bars must match the diameter of the pipes so that they can fully ensure the strength and rigidity of the greenhouse.
- The location for the greenhouse must be open and sufficiently lit. Before starting work, you need to clear it of excess debris and vegetation. Remove the top layer of soil and cover the area with organic fertilizers.
Cleared plot of land for greenhouse construction
- Check the area for proximity to groundwater.
Necessary tools and materials. Calculation of materials
For construction, you need not only polypropylene pipes, but you should also stock up on:
- edged boards - 4 pcs;
- reinforcement with a diameter of 10 m - its quantity is determined by the size of the structure;
- snap holders;
- slats;
- tees - if the design is more complex;
- wood screws - if polycarbonate (35 and 50 mm) will be used.
To work, you need to prepare a standard set of tools:
- screwdriver;
- large hammer;
- two types of shovels - bayonet and shovel;
- grinder;
- file;
- knife;
- blowtorch;
- drill.
An important point is the correct calculation of the required material, especially for pipes. Today, on the Internet there are a large number of calculators for calculations, but the result obtained will be approximate. If you want to get an exact figure and not waste money on unnecessary material, then you can make a simple calculation yourself.
Let's consider the calculation using the example of the most common arched model. Using the Pythagorean theorem and Huygens' formula, you can calculate the size of the arc. To do this, you need to know what width and height the structure will be.
In our example: height 100 cm, width 120 cm.
m = √b²+a²=√100²+60²=√13600=116.61.
Now, using the Huygens formula, we calculate the length of 1 arc.
L≈2∙116.61+(2∙116.61–120)/3 = 233.22+(233.22–120)/3 = 233.22+113.22/3 = 233.22+37, 74=270.96 cm.
Next, it is necessary to determine the total length of the pipes; for this, 270.96 is multiplied by the number of arcs. To the result obtained we add the length of the transverse pipes, which are installed to strengthen the structure. This result will be final.
Film is usually used for coating; a 6-meter roll will last for several years.
Greenhouse cover
Today, the building materials market offers several polymer films that can be used to cover greenhouse structures, including propylene. This:
- polyethylene;
- bubbly;
- reinforced polyethylene;
- non-woven.
Polycarbonate stands out separately in the list of materials for greenhouses. It is usually used only if the greenhouse will be used for a long time at any time of the year.
If we talk about the methods of fastening each material, the films are usually connected to plastic pipes using clips or tape. Polycarbonate only with self-tapping screws. For this, a special fastening element is used, which is a structure with grooves into which the polycarbonate sheets will be inserted with their edges. This is how they will fit together hermetically.
So this fastening element is itself secured to the frame structure of the greenhouse with self-tapping screws. The main thing is to install it at the junction of two polycarbonate sheets. Therefore, under this fastener it is necessary to lay transverse pipes to which it will be attached. Then the polycarbonate is installed. Note that the sheets need to be fastened only along the lower perimeter, for which special self-tapping screws with a plastic cap are used.
Rules for fastening polycarbonate Source stroyfora.ru
Greenhouse made of polypropylene pipes - make drawings with dimensions
Before you start installing a greenhouse made of polypropylene pipes with your own hands, you need to decide on a model and make a drawing; it will help you correctly calculate the material and plan the area of the site. When drawing up a diagram, you need to think about the principle of connecting elements and the arrangement of load-bearing parts; they must be at the same distance.
In addition, it is necessary to choose the type of coating, since the film is light, and if you use polycarbonate, it is heavy, and the building may not withstand its weight. Therefore, additional reinforcement of the structure with supports will be required.
In the diagram - drawing, all components should be noted, with dimensions and fastenings. In addition, it is worth considering the characteristics of the site itself, and what crop will be grown on it. If you are planning a mini-greenhouse, then it is enough to make a schematic image.
Arched mini-greenhouse “Butterfly” made of pipes, intended for temporary use (for the summer period) for growing seedlings. It is covered at night and opened during the day to let in the sun and air, which is very convenient.
Creative crafts for the interior
From pipe sections of various diameters and lengths you can get a lot of different household products. There are many interesting crafts made from pipes on the Internet, and to make them, it is enough to have basic skills in using construction tools.
Car trunk. To make such a device you will need plastic water pipes. It is better to choose the most reliable method of fastening them - using bolts or glue.
Small bumpers for the bed. The diameter of the tubes should be small, then the product will have a more aesthetic appearance. Bed bumpers will protect your child from falling at night.
Flower pots and vases. Using a hacksaw, cut the required lengths from medium-diameter plastic pipes. Next, their outer walls are covered with a beautiful film, and a small dish with water is placed inside at the bottom. The result will be a vase for fresh flowers. Flower pots are made in a similar way.
Barricade in the doorway. You will need small-diameter PVC pipes and connecting tees. This homemade device will not allow the child to leave the nursery.
Waterfall for children. Using a homemade waterfall, you can carry out hardening procedures for children. The product requires a minimum of materials and little time for assembly. It is necessary to drill many holes in the upper crossbar through which water will flow, and it will be supplied through the lower supports.
Photos of crafts made from pipes will help you decide on the choice of product.
Step-by-step instructions on how to make a greenhouse from polypropylene pipes with your own hands
When the drawing is ready and the necessary material has been purchased, you can begin installation. We present step-by-step instructions for the work.
Installing a foundation for a greenhouse
For any building, even such a small one, it is necessary to equip the foundation:
- It is necessary to level the surface in the selected area.
- Use pegs and string to make markings. To make the rectangle even, the cord must be stretched crosswise from one corner to the opposite. If the length of the two stretched cords is the same, then the shape is correct.
- Under the foundation it is necessary to pour a sand cushion 5-10 cm thick. The foundation itself is made of wooden beams with a cross-section of 10 x 10 cm, with its help the load is evenly distributed. The timber is inexpensive, but will last more than 15 years. The foundation installation process is as follows:
- cut the timber into pieces of the required size, soak it with an antiseptic, and then dry it;
- to check the size, the timber must be laid on a sand base or on built-in posts;
- connect the beams to each other using self-tapping screws or corners; you can use staples.
- Then sand should be poured over the entire area of the foundation to secure the structure.
Frame installation
You need to start assembling a greenhouse frame from polypropylene pipes by preparing the material of the required size. You can cut the pipe with a hacksaw, and trim the edges with a file. In order not to confuse the parts, it is better to make marks on all parts with a felt-tip pen. Other elements are cut out during the work process.
Let's consider the installation of the two most popular and simple models of pipe frames.
Assembling an arched greenhouse
- To strengthen the polypropylene arches of the arched model, it is necessary to install reinforced metal rods into the base. Fittings with a diameter of 10 - 12 mm and a length of 150 cm are suitable. Install one rod on the outer side of the corner of the wooden frame. Other fittings should be fixed opposite. If the ground is soft, the rod must be driven 70 cm into the ground, above the surface it must have a length of at least 60 cm. The principle of fastening the remaining rods is the same. The distance between the reinforcement should be 60 cm. It is important that the rod located opposite is at the same level, otherwise the structure will warp.
- Install the arcs of the arched greenhouse. To do this, one end is placed on the reinforcement located on the outside, and the other is put on the rod located oppositely, and an arc is formed. The remaining ribs are mounted according to the same principle.
- To secure the frame and make it more reliable, the ends of the pipes should be fixed to the foundation. To do this, screw brackets to the wooden frame and insert pipes into them. The option with brackets is very convenient, since if necessary, the arches can be easily removed and the structure can be disassembled.
The simplest collapsible greenhouse
This version of a greenhouse made of polypropylene pipes is easy to build with your own hands. It is assembled quickly and does not require foundation preparation.
Video
Step-by-step instructions are as follows:
- You need to cut off one and a half meters of pipe - this is the standard size of the bed. The number of such pipes depends on the length of the bed.
- Bend the pipe into an arc, dig both ends into the ground so that the bed is under the arc. Such arcs are made every 50 cm.
- After which you can stretch the film over the arcs.
How to attach film to frame
To attach the film to a frame made of PVC pipes, you can cut pieces of 50-100 mm, cut a quarter along the length, you get staples. After the film is stretched over the greenhouse, the resulting latches secure it to the vertical and longitudinal posts.
More ways to attach film to a greenhouse made of PVC pipes:
- mesh throughout the frame;
- ropes;
- on double-sided tape glued to the frame;
- Using strips cut from linoleum, fasten with ordinary self-tapping screws.
Good to know: It is recommended to make the film longer than the greenhouse frame made of PVC pipes so that it lies 100-200 mm on the ground. After installing the structure, the edges are sprinkled with earth, this will prevent drafts in the greenhouse.
Which covering material for greenhouses to choose
After assembling the frame, it must be closed; you will need covering material. Glass is not suitable for covering a greenhouse made from pipes, as it is heavy and fragile.
Cellular polycarbonate is suitable, it does not break, is easy to cut, is easy to attach, withstands slight deformations and has less heat transfer.
An excellent option for a greenhouse is polycarbonate, which has a thickness of 4 - 6 mm, but in this case, polypropylene pipes with a diameter of 32 mm or more must be taken. Despite the fact that polycarbonate is quite expensive, it will last longer.
You can buy a cheaper option for covering a greenhouse, this is:
- polyethylene film;
- reinforced film 11 mm thick - it is stronger than polyethylene, so it will last longer;
- bubbly - is an excellent heat insulator;
- non-woven (agrospan, agrotex, spunbond, agril) - more durable compared to film, retains heat well and allows rain to pass through, not transparent, which will protect plants from excessive sun.
We attach it to the frame
The method of covering the greenhouse depends on what material you choose:
- Film - there are several ways to attach it, using ropes, tape, mesh or self-tapping screws. When using self-tapping screws, you can use linoleum or pieces of plastic bottles as a washer to protect the film from damage. You can purchase special clamps; they will simplify the work and ensure reliable fastening. In addition, unlike self-tapping screws, some of them can be removed during the day to open the greenhouse. And the film is attached to the wooden box using a strip. The film should be cut immediately on the greenhouse; the strips are made slightly longer than the size of the ribs, this is required for fastening.
- Polycarbonate - attached to the frame with special thermal washers, at a distance of 0.3 - 0.5 meters from each other. The polycarbonate leaves are connected to each other by a profile. Polycarbonate should be laid so that its internal channels are vertical. The edges of the sheet must be covered with caps.
- Non-woven material - fastening methods are the same as for film.
Important! Polycarbonate changes in size with temperature changes. In this regard, during assembly you should make gaps between the sheets. The structure of a greenhouse lined with this material can be used even during frosts.
Manufacturing options and assembly methods
How to build a greenhouse from plastic pipes with your own hands depends on whether you need a permanent, mobile or collapsible structure, as well as on its spatial shape. In any case, a drawing is first made indicating all the components, dimensions and individual elements (doors, windows), which helps to calculate the required amount of materials.
Scheme of a greenhouse with a gable roof Source teplica-exp.ru
Capital permanent structures
As a rule, if a greenhouse is installed in a permanent place for long-term operation, a foundation is made for it. It can be made of brick or concrete blocks, made of timber treated with a powerful antiseptic, or be a shallow monolithic strip of concrete.
The fastening of the frame to the foundation is selected depending on its type. The easiest way is to fix the posts or arches on a wooden base using clamps or strips of perforated metal tape and self-tapping screws. It will have to be secured to brick and concrete with dowels. And when pouring, “glasses” made of pipes of larger diameter can be installed in the strip foundation, into which the greenhouse support posts will subsequently be inserted.
Even more reliable fastening will be provided by pieces of reinforcement 60-80 cm long, driven into the ground along the outer perimeter of the foundation at an equal distance from each other.
Advice! The distance between the posts of a large greenhouse should be maintained no more than 100 cm, and between the transverse runs no more than 50-60 cm.
Size and drawing
A greenhouse differs from a greenhouse in that it is large in size, allowing an adult to go inside. A greenhouse also requires careful arrangement, a well-thought-out roof design, and the presence of vents and doors. While you can make a greenhouse from pipes very quickly, a greenhouse requires a more serious approach. For this purpose, an accurate drawing of the structure is required, which indicates the dimensions of all parts, the type of pipe fastening, and the location of doors and vents.
A simple drawing should show the dimensions of the greenhouse
Polypropylene pipes are suitable for creating structures of any size, but when constructing a greenhouse longer than 4 m, the load and strength of the roof are taken into account. Acceptable parameters are: height - 2 m, width - 2.5 m, length - 4 m. Such a greenhouse allows you to easily grow several beds of garden crops, providing normal conditions for plants.
When creating a drawing, you need to consider the type of foundation
When developing a greenhouse project made of polypropylene pipes, one should take into account the uniform placement of load-bearing elements and connecting units. This will ensure the stability of the large structure. In this case, the weight of the outer covering requires special attention. Film or agro-fabric is lightweight, but polycarbonate sheets are heavy and can damage the structure. In this case, it is necessary to provide additional supports in the middle of the greenhouse roof.
Key details are shown on the drawing
A structure longer than 6 m is spacious, but requires correct calculation of parameters. In the absence of experience, it is best to build a spacious greenhouse, the length of which does not exceed 4 m and the width is about 2.5 - 3 m. The height of 1.9 m is optimal for comfortable operation of the structure, but this parameter depends on the height of the users.
Selection of materials
The quality and parameters of materials are the key to the durability and reliability of the design. Polypropylene pipes must have an internal diameter of at least 16 mm, and the wall thickness is 4.2 mm. Such elements belong to the category of thick-walled pipes and are reliable material for a greenhouse. The elements should not have cracks or deformation, since the quality of the greenhouse depends on the base.
The greenhouse requires pipes and fittings
To fasten the pipes together, you will need fittings, the inner diameter of which must correspond to the outer diameter of the pipes. Tees and crosses are the main parts for connecting elements. The base can be made of wooden boards 150x30 mm or a concrete foundation can be created. The choice of a specific base depends on the size of the structure, but often greenhouses made of polypropylene pipes have a wooden base. Thin strips of metal, film clips, screws and nails should be selected with reserve. To strengthen the structure, reinforcing rods are needed, the diameter of which is about 10 mm.
Quantity of materials and tools
When creating a greenhouse, arches or an angled roof are often made from several elements. For example, for one arch you need to connect two equal sections of pipes. Taking this into account, it is necessary to calculate the amount of material for the frame. The base or foundation requires the presence of high-quality boards, the length and width of which correspond to the parameters of the future greenhouse. To calculate the amount of material, you will need a design drawing. If it is impossible to draw up a diagram of the product, then you can take a ready-made version with suitable parameters as a basis.
The interior space should be optimal for plants
Nails, screws, PVA glue and other consumables are prepared in abundance. This allows you to create a reliable greenhouse without saving on fixing components. To work, you will also need thin slats for attaching the film, but they can be replaced with special clamps. It is better to install the base of the structure on bricks. Steel wire will be needed to secure the parts. The amount of film or polycarbonate is calculated taking into account the surface area of the greenhouse. To do this, measure the length of the structure, the length of the arch and calculate the area.
To work you need the following tools:
- screwdriver, drill and hammer;
- garden auger and sledgehammer;
- sharp knife;
- hacksaw for working on metal;
- roulette and level.
Reliable fixtures and power tools are essential to building a greenhouse. At the same time, it is important to follow the creation technology, because the durability and reliability of shelter for plants depends on this.