No big holiday is complete without a sweet table! Sometimes it's topped by cake, sometimes it's limited to cupcakes and donuts. Of course, the main role is played by the taste and appearance of the sweets themselves, but we should not forget that it is important to present it all beautifully on the festive table.
Here we will look at 5 master classes on making stands for cakes and cupcakes of different shapes and sizes with your own hands.
- 1 No. 1 Stands for cupcakes and muffins made from glasses 1.1 Step-by-step maser class:
- 2.1 Step-by-step lesson with photos
- 3.1 Master class:
- 4.1 How to do:
- 5.1 Step-by-step instructions:
No. 1 Stands for cupcakes and muffins made from glasses
We offer a simple way to make a stand using dishes you have at home as a base . By adding bright colors, you get wonderful coasters that give you a spring-summer mood.
Necessary materials:
- Various dishes and dessert plates;
- Champagne or martini glasses (wide at the top and with a stable stem);
- Household silicone sealant (suitable for aquariums);
- Aerosol matte paint for glass;
- Aerosol paint in bright colors;
- Paper towels.
Step-by-step maser class:
Step 1: Preparing materials
First, find a few plates and glasses that will serve as materials. Their color does not matter, since we will apply paint on top.
- The more varied the shapes and sizes , the more interesting the final result will look.
- If you don't have any utensils at home that you could use, then go to the store and buy the cheapest ones.
After you have chosen the dishes, remove price tags and manufacturer stickers from them, if any.
Step 2: Painting
In order for the paint to lay well and evenly on the dishes, it needs to be prepared.
- To do this, you must first apply matte colorless paint.
- Spray matte spray paint on both sides of the plates and on the outside of the glasses.
- Let dry, this will take about 10 minutes.
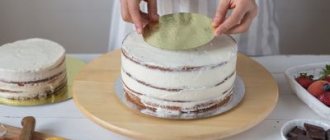
- Now you can start color painting. Place the dishes as in the photo below:
A detailed lesson on how and what to paint glass is in this article!
The glasses should be located strictly in the center of the plates, you can outline them with a pencil to avoid displacement, and then we will apply sealant along this line. Spray colored paint and let dry. Then paint the tops of the plates in the same way. To get a rich color you need to apply 2-3 layers of paint . In this case, one stand is orange and the other is pink, and you choose according to your taste.
ATTENTION: We apply the paint before the sealant, because it will not lie on it.
Step 3: Connecting the parts of the stands
Once the paint has completely dried (at least a few hours), you can apply the silicone sealant.
- It must be applied along the intended line, that is, along the plate where the paint ends.
- ring must be wide enough so that the glass is securely attached to the plate. Press the glass onto the plate along the intended ring, you can put some weight (for example, a book) on top for better fixation, and leave it to dry for about 12 hours (more precisely, on the packaging of a specific sealant).
- During this procedure, a small amount of sealant may come out; it can be carefully cleaned, but do not overdo it, so as not to worsen the fastening.
Here the residues were not cleaned to ensure a secure connection; it is not noticeable at the bottom of the stand.
Once the silicone sealant is completely dry, the stand is ready!
The coasters can be easily washed under water, like other dishes.
TIP: Before placing the cake on the cake stand, place a paper towel, lace napkin, or something similar on top, as direct contact between food and paint is not recommended.
These are the wonderful stands we ended up with:
If desired, you can make a multi-level stand in a similar way. In any case, it will wonderfully decorate the holiday table!
Types of Wedding Cake Stands
A large number of modern styles for decorating wedding celebrations will require choosing all attributes in conceptual accordance with the plan of the chief designer.
The variety of designs and materials for making cake stands allows you to purchase or make yourself what you need in this case.
You can use products made from the following food grade materials:
- porcelain;
- plastic;
- glass;
- aluminum, stainless steel;
- tree.
Homemade products are often made from scrap materials covered with foil: plywood, cardboard, polymer tiles.
A classic porcelain shelf looks both solemn and homely, which adds a special atmosphere to the holiday.
Due to the simplicity and completeness of the lines, acrylic products allow you to concentrate all attention on the wedding cake. It is important that they have little own weight.
Metal stands made of openwork wire perform their role gracefully and reliably. Such a sweet set can be solemnly brought into the hall without the risk of destroying the composition.
The absence of a central support rod makes it possible to conveniently manipulate the contents of the platform.
Glass can become the only material for making the base, and then it will be almost invisible to viewers. Transparent platforms framed in steel represent the union of fragility and reliability.
Compositions that depart from the traditional pyramidal arrangement of elements look original.
The platforms are twisted in a spiral, installed at different angles to the horizontal plane, cascaded down or form symbolic figures.
Racks for multi-tiered cakes
Grand multi-tiered desserts are displayed on stands that clearly express the theme and style of the celebration and emphasize the exclusivity of the sweet treat.
Such attributes themselves often evoke the admiration of guests for the masterful execution of details and the arrangement of various materials that correspond to the status of the event.
Often, multi-tiered stands at a crowded wedding are used to place desserts accompanying the main course: cakes, fruits, muffins, sweet canapés, candied fruits.
You can make your own original themed pyramid out of paper and imagination.
Substrates and stands for single-tier cakes
The classic presentation of a single-tier wedding cake on a tray is best complemented with a stand that is high enough so that it can be seen from any edge of the table.
This technique creates a favorable impression of solemnity, but does not look too pompous (modest, but tasteful).
It is practical to place and finish decorating the cakes on the rotating stand. In addition, it will be convenient to cut into portions during the holiday. Such products are made from stainless steel or plastic.
There are ready-made solid substrates on sale that can be used both for single desserts and by placing them in the form of a spatial composition.
The ceramic dish, taken into account in the overall design of mastic, looks original.
No. 2 Foam cake stand
This type of stand can be made in different heights and widths. Using the same scheme, you will get a two-level stand, only the polystyrene foam circles in this case need to be taken not of the same size, but of different sizes (for example, one circle with a diameter of 15 cm, and the second with a diameter of 30 cm). Let's now look at what we need and how to do it all.
Necessary materials:
- 2 polystyrene foam circles (you can use squares or rectangles if you wish). In this case, the height of each circle is 5 cm and the diameter is 30 cm.
- Kraft paper and crepe paper in your chosen color
- Glue, brush
- Pencil
- Scissors
- Double sided tape
- Thread matching the color of the crepe paper
- Ribbons/decorations
Step-by-step lesson with photos
Step 1: Cut out the top cover Place two polystyrene foam circles glued together on craft paper and trace along the outline with a pencil. After this, cut out the circle with scissors.
Step 2: Apply Glue Apply glue (PVA glue will work) to the top of the polystyrene foam cylinder. Use a brush to spread the glue evenly over the surface.
Step 3: Glue the paper on top of the stand Then place the cut out circle of craft paper on top of the cylinder and press down with something heavy so that it sticks evenly to the entire surface.
Step 4: Making Crepe Paper Side Decorations Cut a long strip of crepe paper.
- The width should be the same as a polystyrene foam cylinder + 2-3 mm. Fold it in the middle so you can see where to sew.
- Then unfold this strip and sew it with a simple stitch in the middle. Gently pull the strip together to create gathers.
- Secure with a few stitches to keep the gathers from falling apart. Repeat, making these voluminous strips until there are enough to cover the entire circumference of the cylinder.
Step 5: Attach the crepe paper Glue the strips you made in the previous step to the side surface of the cylinder in three layers to make it more fluffy. The glue needs to be applied little by little and not over the entire surface, but in places, so that the paper (which is thin in structure) does not fall apart.
Step 6: Add Ribbon Tie the side over the crepe paper with double-sided tape. Do this in the center, thus overlapping the thread used to stitch the paper.
Step 7: Additional decorations The stand is already ready and looks soft and airy. You can place the cake or cupcakes on it right now and serve. Or you can add a little more decoration to your taste, for example, more ribbons or sparkles.
Whatever stand you choose, it will wonderfully complement the holiday table and make it more perfect. Good luck!
You can also decorate with beads or gold fabric!
How to make a cake base with your own hands from polystyrene foam?
In addition to polystyrene foam, you can also use polystyrene foam boards (penoplex), but only for cakes weighing up to 1 kg. To make the substrate you need:
- polystyrene foam or penoplex;
- a stationery knife (if you don’t have one, you can take a regular kitchen knife, but you first need to warm it up in the sun);
- cling film;
- fine sandpaper;
- double sided tape;
- decorative satin ribbon along the thickness of the base material.
Now you can make a cake base with your own hands, following the instructions:
- Cut out a circle or any other shape from foam plastic, depending on the design of the cake itself.
- Sand the edges of the workpiece with sandpaper.
- Wrap the cut out circle in cling film so that the edible cake does not come into contact with the foam (the latter tends to crumble).
- Now you can decorate the base depending on the design of the cake. For decoration you can use satin ribbon (wrap the edge of the product with it), foil, mastic.
No. 3 Two-level cake stand made of plastic dishes
This version of the cake stand is the cheapest and fastest to manufacture, and at the same time is not inferior to others in appearance.
Necessary materials:
- 1 plastic plate with a diameter of 25 cm
- 1 plastic plate with a diameter of 18 cm
- 2 plastic glasses with a capacity of 400 ml
- Pink spray paint
- Latex gloves
- Hot glue
Note: Plastic utensils must be strong for the rack to hold.
Master Class:
Step 1: Paint the dishes
In a well-ventilated area, spray paint onto two plastic cups (sides) and two plates (both sides). Let dry for at least an hour.
Note: If you want to place food directly on the rack without covering it on top, then paint only the undersides of the plates, the paint should not come into contact with the food.
- Step 2: Apply Hot Glue Apply hot glue to the bottom of one glass.
- Step 3: Connecting the Coaster Pieces Attach the bottom of the glass to the bottom of the larger plate. One level complete! If you need a stand for a small cake or other treats, you can stop here. Here's what happens:
- Step 4: Add a second level. Apply hot glue to the top and bottom of the second glass. Then attach the top of the glass to the top of the larger plate (center). Attach a smaller plate on top (bottom to bottom of glass) for the top tier.
Here's the end result: Looks amazing, add your cake or any sweet treats!
Do it step by step
- Measure and mark the center of your largest plate. Many cake stand dividers will be secured with a clear plastic guide.
- Place a small piece (about an inch) of tape in the center to prevent the plate from splitting when it is drilled.
Adding a few drops of water to the tape will keep it cool and help prevent cracking!
- Place the plate on a wooden cutting board and drill the center hole (be careful and wear safety glasses for this operation).
- Remove the tape, wipe the plate clean and repeat with your other plates.
- Now you can start twisting everything together! Starting with the flat bottom screw in the largest plate, the spacer rod first, and then your middle plate. Use small foam washers between the china and any screws as this will protect the china.
- Continue building with your second divider, your third plate, and your final handle to finish!
That's all! You can also buy other types of divider kits and make your stand larger. Follow the instructions and your stand will be no worse than a store-bought one! Good luck!
No. 4 Multi-tiered cardboard cupcake stand
This method allows for variations in stand width and number of tiers because you can cut the cardboard to the size you need.
So you can strictly follow the instructions below, or you can take it as a basis and make your own adjustments.
Necessary materials:
- Several polystyrene foam disks (you can also use something else, wide and quite low, to serve as a base)
- Tin cans for support between tiers (you can also use polystyrene foam cylinders as shown in the top left corner, but cans guarantee a more durable end result)
- Cardboard circles, two of each size, here we used circles with a diameter of 30 cm, 25 cm, and 20 cm, for a three-level stand
- Cardboard to cover the top of each level (optional), base and dividing posts (you can also use fabric or tape to cover the base and posts).
- Glue gun
- Ribbon for decorating tiers
- Ruler
- Stationery knife
- Pen
- Scissors
- About 30 minutes of your time (or 45 if you take photos as you work :))
How to do:
Step 1: Making the Base
First, you need to make the base of the stand by gluing the polystyrene foam discs together into an even column using a glue gun.
Step 2: Making Cardboard Circles
Glue together two cardboard circles of the same size, with the less beautiful side facing inward. I also use a glue gun.
The result will be a double layer.
Repeat with remaining measurements until all cardboard circles have been doubled in size.
Trace each of the cardboard circles onto thin cardstock and cut out. This will cover the tiers.
Glue these circles to our double cardboard circles using a glue gun (only on one side, which will be the top). Now they are ready.
If desired, the edges of these circles can be trimmed with decorative scissors to create a scalloped border, adding another detail to the overall look.
The result is these three circles.
Step 3: Making partitions between tiers
Now you need to cut out two strips of cardboard, the length equal to the circumference at the bottom of the cans, and the width equal to the height of the cans.
Use a glue gun to secure the cardboard strips to the tin can. Repeat the same for the second jar. The bottom column of polystyrene foam should be covered with cardboard in the same way as cans.
Tip: The glue can be very hot - too hot to touch - so you can use a ruler to press the cardboard strip firmly against the surface until it clicks into place.
You should now have two columns and a base covered.
Step 4: Putting all the parts together
One thing to keep in mind when assembling all the components is to position all the cardboard seams covering the Styrofoam cylinder and can columns to one side so they can be the "back" of the stand and not visible to guests. Simply place the stand with the side with the seams facing the wall so that they are not noticeable.
- To connect, you need to mark the center on each circle; this can be done in several ways: with a ruler, compass, thread.
- Now glue the styrofoam base in the center of the bottom tier (be sure to glue it to the bottom, the uncovered side of the cardboard circle).
Then glue the tin can column in the center of this circle, but on the other side. Now glue the next cardboard circle on top of the column. Check the stability of the structure.
Tip: Since the lid of the can may not have a smooth surface, you will need to glue the edges to ensure that the can has a firm contact with the cardboard circle.
Repeat the previous steps again until all the pieces are in place.
Step 5: Decorate the edges of the tiers with ribbons
- Cut three pieces of tape equal to the circumference of each cardboard circle.
- Apply hot glue along the edge of the cardboard circle and press the tape down, being careful to leave the top edge of the tape slightly above the surface of the circle.
Tip: it is not necessary to glue along the entire perimeter; you can apply glue every few centimeters.
- If the tape you choose is thin and shows through, you may need to add a second layer to make it look less translucent so the edges of the cardboard don't show through.
- The tape used here was thick enough that one layer was enough.
Repeat the same steps with the middle tier, and then with the top, until you get this result:
Now you can fill the stand with cupcakes or other goodies and be ready for your guests to arrive!
How to make your own cake stand
Many people believe that things made with their own hands have a special energy and create harmony in the home. If you're of the same mind, or just like to make things, here are some easy options for cake holders.
From foam plastic
- Glue two circles of foam plastic (square, oval, etc.) together.
- Place them on corrugated paper and trace them. Cut out the circle.
- Glue it to the top of the foam cylinder.
- Cut a strip of corrugated paper. Its width corresponds to the height of the foam cylinder. Fold it like an accordion. Sew in the middle.
- Glue the strip in several layers along the side of the structure. Decorate the middle with decorative ribbon or beads.
Such a holder can be covered not only with corrugated paper, but also with fabric, strings of beads, and sparkles.
From plastic dishes
- Paint the prepared dishes: two glasses, two plates.
- Glue one glass to the bottom of a large plate.
- Glue the top of the second glass to its inside, and the bottom to the bottom of the second smaller plate.
The main thing is to get a harmonious composition with the cake.
Made of wood
- Paint or coat wooden circles of different diameters with a special product.
- Place them on special columns.
- Attach their lower part to the prepared platform in a semicircle or other shape.
Cutting circles for a stand out of wood yourself is feasible, but labor-intensive.
A cake stand is a functional and effective attribute of any celebration or simple tea party. There are many varieties of it, each of which is suitable for a specific occasion. This makes this design even more practical and convenient. And the main thing is that everyone can make it with their own hands and decorate their home in a special way.
The finished stand must be perfectly clean and safe for use, because children are rightfully considered the main lovers of sweets at all celebrations.
No. 4 Wooden three-level stand
To make such a stand for cake or cupcakes, you will need more professional materials, but it will also last much longer. If you need a stand for reusable or even permanent use, then this is exactly what you need.
Necessary materials:
- Wooden boards, saw, jigsaw (or ready-made wooden circles)
- Wood glue
- Turned wood parts: 5 low and 2 high columns and a tip (as in the photo below)
- Sander or sandpaper
- Wood paint (dark brown and white)
- Brush
- Epoxy resin or super glue for wood
Step-by-step instruction:
Step 1: Making Wooden Circles
Buy two long boards with a 2.5 cm x 10 cm cut and cut them to these dimensions:
- 4 boards 37 cm long
- 3 boards 28 cm long
- 3 boards 20 cm long
Attach each set of boards together using wood glue. At the same time, while drying, clamp the boards together so that the glue fixes them well together. You need to glue the boards with the side surface to form rectangles, as in the photo.
In order to cut circles from wood, you need a jigsaw with a special device for cutting circles. Making the circles will take no more than 10 minutes.
Sand each of the circles to make the surface smoother, level the joints of the boards and the side surface.
ATTENTION: If you do not have the necessary tools, order circles from a hardware store. In this case, you will not need to buy boards, saw them and glue them, that is, you can skip the entire first step
.
We will need circles with the following diameters:
- Large circle: 35 cm
- Middle circle: 27 cm
- Small circle: 19 cm
Step 2: Paint the details
We will paint it so that the stand looks antique. To do this, first apply a little dark paint in several places on the wooden parts (as in the photo above). Then we sand the products so that small traces of dark paint remain (see photo below).
Now we can paint all the parts white, using translucent wood paint, so that the structure of the wood remains visible and the dark paint shines through.
Other painting options
- How to age wood - in this article
- How to paint wood antique - in this article
Step 3: Connecting the parts together
To attach wooden columns and circles we will use epoxy resin (or super glue for wood). First glue the 4 small pieces to the bottom of the largest circle.
We will attach high columns between the tiers.
For the top of the stand, you need to connect a small column and a carved decorative tip.
Now everything is ready!
This is what the stand looks like along with the cupcakes. A real highlight of the holiday table! On non-holiday days, the stand can be used as a living room decoration by placing candles and decorative flowers there.
Fiberboard stand
This material consists of particle boards of a certain size. Despite its apparent flexibility, the fiberboard substrate can support a cake weighing up to 5 kg.
It is not always possible to use this material to make your own cake base. This is due to the need to use a special tool - a jigsaw. In addition, a lot of debris may remain when cutting a circle, so you will have to allocate a separate room, which is also not always possible.
If you manage to find a company that provides a service for cutting fiberboard, or a ready-made circle, then to make your own cake base from it, just wrap the workpiece with foil or cloth, and then with cling film.
LiveInternetLiveInternet
DIY stands for cakes, pastries and fruits.
An appetizing, airy, creamy cake in itself is the best decoration for a holiday table during dessert. This means that the best place for it is to stand in the center of the table on a small pedestal - a stand that can be easily made with your own hands. If you add a few more “floors” to the stand, you will get an original multi-tiered stand for fruits, sweets and cakes.
To create such an original dessert stand with your own hands, you will need different utensils - cups, vases, glasses, glasses, bowls, saucers and plates! Look behind the doors of your sideboard or china cabinet - you will probably find very rarely or never used dishes that you would be sorry to throw away and have nowhere to put them. Why not give it a second chance to be the centerpiece of any holiday feast?
Such stands can become independent interior decor or used to store jewelry, decorations and other small items.
All parts are attached to each other with glue for glass (porcelain, ceramic) surfaces. You can purchase this glue at almost any hardware or construction store. If the stand will be used for food products, be sure to check the glue label to see if it is suitable for gluing dishes!
The technology is very simple. Prepare the dishes from which you will make the stand. Wash it well, dry it and degrease the surfaces that will stick. Ordinary nail polish remover is also suitable for degreasing.
The trays will be saucers and plates, and the connecting elements will be cups, vases and glasses. We turn the plate over and mark with a pencil the place where it joins the next dish, preferably exactly in the middle. Then the entire structure will be neatly level and without distortions. Then apply a thin layer of glue to both grease-free surfaces, press well for a few seconds and press down the glued parts with some heavy object (a heavy volume of a book will do). Immediately use a cloth to carefully remove excess glue.
Leave the press on for 15-20 minutes and then repeat the entire procedure for the next tier if you are making a multi-tier stand.
Interesting compositions are obtained by combining a variety of dishes. Try experimenting with any container to create original and unique trays for fruits, desserts, cakes and decorations!
Source
BAD CAT2008