The wonderful autumn season pleases us not only with bright landscapes, but also with numerous gifts. They fall from the trees, and it becomes such a pity that they will just die on earth that you want to give them a second life. How can you do this? There is a huge section of home crafts - autumn crafts from tree leaves. You can make a huge variety of beautiful works with your own hands. From tree leaves you can create panels, appliqués, topiaries, flower bouquets, wreaths and much more.
If you like to engage in creative activities with your child, then you know how boring activities with plasticine, paints, and paper can become over the summer. Then this can be replaced by activities with tree leaves. You must first collect them during a walk. This activity can not only entertain the child, but also teach him new skills. Leaves need to be collected beautiful and whole, and during the collection process you can tell your child the names of trees and interesting information about nature.
Autumn-themed leaf crafts will last much longer if made from dried leaves.
How to dry leaves for crafts:
If the leaves are damp, let them air dry a little. You can put them in a spacious box so that the leaves get air. This way you will get rid of possible mold on the leaves. If it is not important for you that the leaves are smooth and even, then leave them like that in the basket until completely dry.
But if you want even leaves, you can't let them dry out completely. Place them between book pages or sheets of paper/newspaper, but always under pressure.
Thus, the leaves should dry completely for about two weeks.
There is a special herbarium press. It will allow the leaves to dry much faster, and they will be ready for fall crafts in a few days.
But you can also speed up the process by drying with an iron. Turn your iron to the lowest setting and iron a piece of wood sandwiched between two pieces of white paper.
How to make DIY fall crafts from leaves
If you have prepared and dried tree leaves in advance, you can begin to create beautiful and original autumn crafts. They can create a cozy atmosphere in the home or be a suitable piece for display in a school or garden.
If you don’t have enough imagination and imagination to create crafts from leaves, then you can use a selection of works and master classes.
Evaluate your child’s age and skills before you start creating your own autumn crafts from tree leaves.
Related materials for working with leaves:
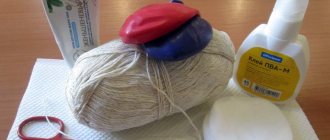
Colored cardboard and paper. Cardboard usually acts as a background and basis for work. If you glue leaves onto paper, it may bend and curl due to the weight of the leaves, so it is better to use cardboard. You will need colored paper for additional decoration (to make eyes or other parts of the animal’s body).
How to glue leaves: this can be done with regular PVA glue (it glues dry leaves well), but hot glue is also perfect.
DIY leaves
As for what to make leaves for a tree from, everything is simple: you can print out a sketch, blanks, trace the outline and then paint over the void with the desired color. Let's draw the veins and stalk, indistinguishable from the original!
We are talking about a pattern - this is a stencil or a fundamental structure, like a frame for the entire work.
Templates that you can color and also try to pass off as their originals:
DIY autumn crafts from leaves
The simplest crafts made from leaves are appliqués. For them, you can use leaves of different sizes, colors and shapes. The themes of the applications may also differ. These can be pictures of animals, landscapes and human figures.
Owl made from tree leaves
We will need:
- Dark leaves (oak, willow, birch)
- Colored paper
- Cardboard
- Branch of any tree
- Glue
Draw an owl on a piece of cardboard.
Let's cut it out.
You can use willow leaves for feathers. Glue them in rows onto the owl cut out.
To make the ears and paws of owls, take oak or birch leaves.
Cut out eyes and beak from colored paper. Glue them onto the owl's head.
Glue the owl onto a tree branch as if it were sitting on it.
You can decorate your autumn leaf craft with a sprig of fish or thuja.
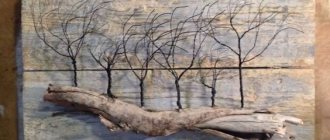
Leaves panel
You can decorate your house with an applique of leaves, making it not on paper, but on panel material.
We will use hot glue for this project, but young children can be involved in this work at the stage of collecting leaves. Choose the most beautiful and even leaves for the craft. Dry them first.
We will need:
- Wooden board (plywood, chipboard)
- Leaves
- Twig
- stain
- Brush
- Glue
- Marker
1.Prepare a sheet of wood by first sanding it and painting it with stain.
The stain dries quite quickly, so you won’t have to wait long.
2.Draw a maple leaf with a marker.
3. Glue the leaves onto the board using the fan method. To make the panel three-dimensional, do not glue the leaves completely. Then the edges will be free and a volume effect will be created.
4.After gluing, place a heavy book or other object on each leaf as a press.
To make your picture clearer, you can trim the leaves a little along the edges of the picture, creating a clear outline.
There can be quite a few types of panels. You can attach leaves and twigs to a wide wooden frame.
A cute fairy can be made from colorful leaves and cardboard.
Crown of tree leaves
For a little princess or an autumn photo shoot, you can make a simple but interesting attribute.
Necessary materials:
- Colored leaves
- Thin branches
- Tape
- Pliers
- Wire
Cuts a wire whose length is equal to the volume of the head + a margin of a few cm for connection. The resulting hoop should sit easily on your head.
Using tape, attach the leaves to the resulting wire hoop
You can alternate leaves with twigs or flowers
Maple leaf wreath
Beautiful large maple leaves can make a gorgeous wreath
The base for the wreath can be made from wire or willow twigs.
Attach the leaves to the base in a circle, twisting the leaf stalk on it.
Leaves should be attached along the entire diameter of the wreath base
This wreath can be worn on your head or hung as a decoration on your door.
You can add other elements to the leaves, such as acorns and flowers
For 2nd grade
Children of this age will be interested in creating autumn leaves on cardboard. In addition, such needlework includes two techniques at once: appliqué and drawing.
First you need to prepare the background using colored pencils, felt-tip pens or paints. The crown of a tree, fallen leaves and falling leaves can be decorated by gluing leaves of various colors and shapes; you can use them in crumbled form.
Autumn is the best time to collect a herbarium, which saves children from idleness on rainy days. Leaves are an excellent material for activities that develop creativity; in addition, they are easily accessible, one might say they fall into your hands in the fall. Even if dry leaves break, they are useful for some types of applications.
Volumetric crafts from leaves
Autumn leaves that have fallen from trees can be used for more than just appliques. You can make chic bouquets, lamps, compositions on the Golden Autumn theme.
But in order to make voluminous crafts, the leaves must be subjected to special processing, and upon completion the product must be varnished.
When creating home decor, you want the craft to last as long as possible. You can extend the shelf life of autumn crafts made from tree leaves using a special floral spray or acrylic varnish. This method will keep the leaves fresh and beautiful for a long time.
Crafts from maple leaves: mask
We will need:
- Maple leaves of different sizes
- Cardboard
- Thread
- Scissors
- Glue
1. Make a mask template on cardboard and cut it out
2. Make holes for the eyes
3. We insert an elastic band on the sides to put on the mask
4. Using glue, glue the leaves to the mask.
5. Trim any excess leaves inside the mask so they don't interfere with your eyes.
What gorgeous masks you can make from leaves with your own hands.
If you have beautiful leaves, you can make unusual candlesticks from wax paper.
Instead of paper, you can use a simple glass jar, decorating it with beautiful leaves.
Leaf pendants and garlands:
In order to keep this craft fresh for a long time, take the leaves and cover them with transparent varnish. Next, you should dip them into melted paraffin. Gather them in a bun or hang them on a string. In any case, they can be preserved for a long time and decorate your home.
How to Skeleton Leaves
Leaf skeletons, due to their lightness and transparency, look very impressive as decoration. To achieve this effect, you need to resort to a special technique - skeletonization.
What you will need:
- any fresh leaves;
- soda;
- egg dye;
- small container - ladle or pan;
- Toothbrush;
- paper napkins.
Crafts from waste materials: original ideas
DIY salt dough figurines: instructions, photo ideas
How to make skeletonized leaves:
- Mix soda and water in proportions of 1 to 4 and place the leaves in the prepared solution so that they are completely hidden by water.
- Bring the mixture to a boil and leave to simmer for 30 minutes.
- Remove the pan from the stove and remove the leaves, carefully placing them on the table with the glossy side up.
- Remove excess moisture using napkins.
- Clean the pulp from the leaf with a brush (this must be done very carefully, the leaves are quite fragile).
- Rinse the skeleton under water and then paint it the desired color.
- Leave the painted skeletonized leaves to dry.
The resulting material is ready for use.
Autumn crafts from maple leaves
Maple leaves are considered the most beautiful gifts of golden autumn: yellow, red, burgundy and orange. A carpet of maple leaves can be seen in every park in the fall, and by choosing the most beautiful leaves, we get chic crafts on the theme of golden autumn.
Rose from maple leaves: DIY craft
Roses made from autumn leaves remain very popular. For those who love flowers, this craft will be especially relevant. You can create a whole bouquet of roses or make a beautiful composition in a basket.
How to make a rose from maple leaves
1. Fold the top end of the maple leaf
2. Roll it, tucking the top edge to make the flower more voluminous. Don't forget to hold the bud down so it doesn't fall apart.
3. To make a large rose, you will need more than one maple leaf. Choose leaves of different sizes and start with the smallest ones.
4. The edge of each leaf can be secured with a stapler or wrapped with thread.
To make a rose from maple leaves, it is better to choose fresh material that has not dried out. Having collected the resulting flowers into a bouquet, spray it with hairspray.
DIY maple leaf plate
Maple leaves are ideal for many crafts due to their size and shape. Making a plate out of leaves is quite simple, but such an unusual decor will take its place in your home or be sent as a gift to your friends.
Necessary materials:
- Leaves
- Brush
- Glue
- Balloon
- A bowl
- Scissors
1. Prepare the leaves by cutting a stem from them.
2. Inflate the balloon to the required size and place it in a bowl.
3.Spread a thin layer of glue on it.
Place a leaf on top of the glue and spread it with glue. It should soften a little and stick to the ball.
We place the next sheet so that it partially covers the previous one, and apply glue in the same way.
Thus, we cover half of the ball with leaves.
Gently pop the ball to remove the resulting plate
You can decorate your front door in an original way by hanging a wreath of maple leaves on it. It is done simply by analogy with other wreaths
Glue beautiful maple leaves onto the base, complementing them with acorns, chestnuts and everything you find under your feet on an autumn walk.
Drawings
Let's make a simple and beautiful composition in the form of a drawing.
Take a leaf, in our case it will be maple. We attach it to regular printing paper (too thick for drawing). Dip the brush into gouache of the color you want to leave a mark on the drawing. We paint the leaf by pressing hard on it with a brush. If you wish, you can trace it along the contour. Then we put a napkin on top so that nothing moves out of place, otherwise all our work will be smeared and all efforts will be in vain. Carefully set the napkin aside and, with equal care, peel off the sheet. For the first five or ten minutes we do not touch it, let it dry. Next to the picture you can draw anything that comes to mind.
The composition of autumn birch and oak leaves looks extremely picturesque.
Other options are presented in the video:
Children's crafts from maple leaves
Children are especially interested in making crafts from leaves on the theme of autumn with their own hands.
At first, they enthusiastically collect the leaves under their feet, then they will help you dry them by laying them out in a book. And then you can share your knowledge with them and show them what can be created from the leaves of maple trees.
Maple leaf snail
We will need:
- maple leaves
- Scissors
- Plasticine
- Scotch
- Eyes
- To make the base - the body of the snail, take red plasticine and mold it into a sausage, so that one end is slightly thicker than the other.
- Make a cut at the thicker end and shape the halves resulting from the cut so that they look like the antennae of a snail.
- The body must be bent
- To use maple leaves for a snail's house, cut the cuttings with them
- Fold the sheet to make a strip
- Roll the strip starting from the narrow part
- To make the house more voluminous, twist several leaves in this way.
- Attach the house to the plasticine body
- Attach plastic eyes and define a mouth
Turkey made from leaves: DIY children's craft
We will need:
- Cardboard
- Stapler
- Scissors
- Glue
- Leaves
- Eyes
You need to cut out about 5-6 circles of different diameters from cardboard
Remove stems from the leaves except two leaves. We'll need them for turkey legs.
Attach each leaf to a cardboard circle
Stack the circles on top of each other using glue or a stapler
Glue a brown sheet to the back of the largest circle.
A triangle is cut out of a leaf to make a beak.
It must be glued to the center of the first sheet.
Attach eyes to your turkey.
Using colored paper and leaves you can make a cheerful family of owls.
Applications
In autumn, it is best to create using dry leaves. Material for creating future crafts can be found on an alley or in a forested area. To prepare the leaves for use, it is best to dry them in the pages of multi-page books. With simple glue and paper you can create extraordinary crafts.
When creating crafts, many people think about what kind of leaves can be used to make a craft? To add variety to your crafts, you can use leaves from different trees or shrubs of different colors.
Flowers from autumn leaves: beautiful DIY crafts
Flowers in any form are considered the most beautiful decoration of the home interior. Therefore, it is not surprising that they are made from all kinds of materials and autumn leaves are no exception.
Previously, we looked at how to make roses from maple leaves. They are most suitable for creating beautiful and lush bouquets. To keep the leaves in shape for a long time and not spoil, you can treat them with glycerin:
- Dilute 300 ml of glycerin in water (about 600 ml).
- Pour this liquid into the bag.
- Carefully place the leaves in the bag.
- The bag must be sealed and left for several days (about 3-5 days) in a dark place.
- Then take out the leaves and let them dry.
How to make flowers from leaves: step-by-step description
We will need:
- Red and yellow leaves
- Twigs
- Scotch tape or green tape
- Scissors
- Threads
Prepare the leaves first.
We begin to collect the flower from the core. To do this, take a leaf and bend it in half, face outward.
Roll the leaf into a loose roll.
In the second sheet, wrap the protruding upper part.
Wrap the leaf around the core of the flower, twisting it. Don't forget to pinch your future flower at the base.
Do the same with other leaves, twisting them onto the bud one by one.
Continue until the flower has a nice shape.
Insert the twig into the base of the flower and begin wrapping the tape.
Roses
For each rose we need to take seven or eight birch leaves, and they should not be the same in size. It is preferable to leave more medium and small ones, about two large ones. We cut off the sharp triangular part of all of them in order to give them the shape of a rose petal. We take three or four small leaves and place them one on top of the other. On top of each other they should occupy only three-quarters of the total space. After that we roll it into a roll. So we made the middle of the bud.
We wrap the rest of the leaves loosely around, the big ones at the very end. We wrap it tightly with thread at the very base so that our structure does not fall apart. Let's make a tight knot and cut off unnecessary parts. We bend the back petals a little to give a natural and natural look.
The photo shows how to make a rose from birch leaves:
By the way, roses can be recreated in different ways; you don’t have to limit yourself to just birch. For example, there is a method for maple. Take the first red leaf. We bend the middle part towards ourselves, and do the same with the rest. Roll it into a tube. We bend only the middle part of the second sheet, put the first piece there, and fix it with the side leaves. Then we wrap a couple more maple leaves around them. The result is a voluminous bud. We wrap the sticks with green blades of grass to create the impression that these are stems.
Master class on video:
Autumn crafts from leaves for kindergarten
The simplest crafts for kindergarten are applications. After all, it is easiest for children to cope with this process under the guidance of their parents. You can use ready-made templates.
Leaf craft templates
Lion made of autumn leaves
Turkey made from leaves
Or you can do interesting work that the baby will like.
We will need:
- White cardboard
- Dry leaves
- Black or brown paint
- Pencil
- PVA glue
1. The leaves must be crushed. Entrust this process to your baby.
2. On a white sheet of paper you need to draw a tree trunk. Here you can help your child
3. Help him paint the trunk with paints
4. When the paint is dry, you can proceed to the next step.
5. Apply glue to part of the trunk and branch
6. Sprinkle crushed leaves onto the glue.
Children love making animals, and they will love the idea of making a hedgehog applique from leaves.
And if you have collected brightly colored leaves and flower petals, then thanks to a printed template or a hand-drawn one, you can create beautiful pictures.
Dry composition in the interior
Paintings can be made to decorate the interior; the surfaces of furniture or walls covered with leaves look beautiful. Autumn material can be used in bouquets and placed in vases. Wreaths formed from leaves on the door look beautiful. Interesting compositions are those combined from dried leaves, dried flowers, cones, to which you can add pumpkins and other long-storable products. These include apples and pears.
Autumn bouquet
The easiest way to preserve the colorful magic of autumn for a long time is to collect a bouquet of leaves and place them in a vase of the appropriate size. To keep the leaves longer, you can spray them with hairspray.
Bright autumn bouquet
Bouquet of roses
Anyone who has formed paper roses at least once and knows the order of their assembly can easily apply this knowledge to leaves. To do this, roll the leaf crosswise. The result is a very elastic material that holds its shape well. Roll it into a tube, holding it by the stem. This will be the inside of the rose. Wrap all other parts around the middle, lifting each one slightly. The petals should overlap each other.
Making roses from dry leaves
Secure the resulting roses; you can use thread. After you have made several roses, at least three, combine them into one composition. Place several large sheets on the bottom. The decorative element is ready. Can be used for interior decoration. Retains its shape well when dried.
Ready-made bouquet of dry leaves
Autumn wreaths
Christmas wreaths have come into use and beautifully decorate the holiday. A wreath of leaves that can be used to decorate a door leaf will look no less delightful.
Autumn wreath made of dry leaves
To make the composition you will need a vine. You can use willow branches. If they are out of reach, make a regular circle of wire.
Wire wreath base
Collect beautiful leaves. Dry. You can use fresh ones. The easiest way is to glue the leaves with a gun. If you don't have it, use regular strong glue. After the glue has completely dried, decorate the door with a wreath. This technique will emphasize how much the owners love their home, value it, and are ready to maintain coziness and create comfort.
Glue the leaves with hot glue
To add more color and to emphasize the ethnic orientation of the composition, place pine cones, brownies, beautiful branches of a bush or tree, and dried autumn flowers among the details. The herbarium is beautifully decorated with bows.
Autumn wreath is an excellent decoration option made from dry leaves
Vase
After simple compositions, creating a vase will not be difficult.
Vase of autumn leaves
Carry out the work in the following sequence:
- Turn a vase in your house over so the inside surface is facing down.
- Cover it with a layer of cling film.
- Place a layer of leaves on its outer surface.
- Connect the leaves together with glue.
- Cover the structure with acrylic varnish.
- Turn it over.
Step-by-step production of a vase from leaves
The vase is ready. Use it to store small items.
Topiary
These trees of happiness are unusually popular.
Leaf topiary for home decor
In order to make them, you will need the following parts:
- small pot,
- a thick branch on which the entire composition will be fixed,
- leaves, you can add the following material: reeds, cones, bunches of rowan.
Using glue, secure it all into one composition.
Beautiful DIY crafts from leaves
Autumn girl: craft from leaves
Girls from an early age love to dress their dolls. Why not create an outfit for Barbie made from leaves. The result will be an original autumn craft.
Choose for her the most beautiful leaves collected during your walk.
We will need:
- Doll
- Leaves
- Glue
- Cardboard
1. Dry the leaves with an iron using paper
2. Make a cone out of cardboard that will act as a skirt.
3. Attach the cone to the doll by cutting off the top
4. PVA must be diluted with water 1:1
5. Glue the leaves onto the cone with diluted glue, starting from the bottom.
6. Don't forget about a hat for a fashionista
7. The bottom of the dress can be decorated with rose petals
In a similar way, you can make an applique by first drawing a girl on cardboard, but make the outfit from leaves
Birds
The list of crafts that can be made from leaves on paper also includes cute birds. This option is suitable for schoolchildren and children.
Arm yourself with a green or blue wax crayon and start creating. We make an interesting plain background, but it should not be bright. Place the base on a rough surface and scribble randomly. You will get an intricate pattern. Take a small plate that will fit on A4. Place it exactly in the center. Draw a semicircle with a pencil, the lower part is empty.
Cut out the body of a peacock from yellow paper. It's easy: we make it like a pear, but with an elongated top. Draw the eye and beak. Take red leaves. Red, burgundy and oblong ones will fit well. We lay them out, focusing on the circle, but not exactly along the contour. The layer located closer to the body should be wider and more magnificent.
Crafts from leaves for school: 2nd grade
What can be offered to children in the second grade for creative development? Of course, we can’t do without applications and crafts made from natural materials. After all, at this age it is important to introduce the child to the world around him and teach him to work with different tools and materials.
It is exciting for schoolchildren of this age to create silhouettes of animals they know.
Moose made of leaves
We will need:
- Leaves
- Maple seeds
- Brush
- PVA glue
- Sheet of white cardboard
- Black felt-tip pen or marker
- Scissors
Place the elk's body on a piece of cardboard. To do this, you will need two leaves: one large with a tail and the second smaller, round.
We will need maple seeds for our feet. Separate them and glue them in the right place to the body.
Using a felt-tip pen, draw the eyes, and the nose will be created from a dark-colored leaf.
Oak leaves and maple seeds are useful to make beautiful antlers.
You can complement the picture with a small tree
Like this moose, you can make many other paintings from leaves depicting animals, birds and insects.
Owl made of leaves
Hedgehog made from leaves
Leaf Butterfly
Leaf fish
Lion made of leaves
Crafts from leaves for 3rd grade
In autumn it is impossible to remain indifferent to the beauty of nature and it is very important to teach children to rejoice and enjoy what it gives us.
Therefore, the topic of autumn crafts for elementary school has been relevant for many years and is unlikely to lose its popularity for many years to come.
There are many options for fall-themed crafts for school.
Applications that look like real paintings
You can get creative with your child and create a beautiful house from leaves and other natural materials, using a cardboard frame as a basis.
By combining a child’s ability to draw and appliqué, real masterpieces can be created.
Wreath of leaves for the door
You will need:
- leaves
- a pair of willow branches
- thin wire or tape
- “helicopters” (if desired).
1.
Take willow branches and make a ring out of them, which you need to secure with wire or tape.
2.
Start twisting the leaves one by one in a circle into a ring and weaving the same way as a flower wreath.
How to weave a wreath of leaves (video)
3.
The leaf stems at the end of the wreath are tied to the base with wire.
Here's what it looks like from the reverse side:
If desired, you can glue maple pinwheels.
This wreath can be hung on a door or wall.
Corn Leaf Crafts
Another topic of interest for creativity was not covered in the article. Crafts made from corn leaves can be very beautiful and original.
Corn leaf flower
We cut out about 20 leaves from the pointed-shaped talash, and also prepare the substrate. We also need a strip of about 5 cm.
The strip must be folded and glued to the center of the backing. Now you need to attach the cut out petals in a circle. Let's start with the smallest ones
This flower can be used to decorate a gift or create a bouquet of leaves.
Butterflies
There are many ways to make crafts from leaves. It could also be butterflies.
We attach a beautiful flower field below. To do this, glue dried chamomile, clover, and violets to the lower half of the leaf. Here everyone is free to reproduce what their imagination dictates. So, let's move on to the most important thing, to the butterflies. We advise you to immediately draw the body with a felt-tip pen or colored pencils, and use it as a guide when creating insects.
We should have two pairs of identical leaves. The upper wings are more massive and small in diameter, while the lower ones are long and thin. We mirror the wings on both sides, placing them on the right and left sides. Then we take smaller leaves and a different color. Some people make four layers on the butterfly, but we will limit ourselves to three. We finish drawing the horns and eyes with a felt-tip pen. You can make a pattern, but the original material is quite enough.
Stages in the photo: