Types of pillows by shape and size
As a legacy from the Soviet era, we inherited large down pillows measuring 70*70 cm. Every home had a set of such large pillows, and standard bedding sets were (often still are) oriented towards these sizes. The market era, which declares a wealth of choice always and in everything, has not bypassed the sphere of bedding. Firstly, down and feather are now competing with a lot of innovative fillers. Secondly, pillows now come in a variety of shapes and sizes. Along with square ones, rectangular pillows have become popular, and equilateral pillows have become smaller in size in accordance with European standards. We are not even talking about non-standard orthopedic pillows that have a memory effect and repeat anatomical shapes.
Rectangular pillows have harmonious proportions with a side difference of 20 cm. Standard rectangular pillows, which have earned worldwide recognition, have dimensions of 70 * 50 cm and 60 * 40 cm (children's version).
Square pillows can have dimensions of 60*60 cm, 50*50 cm, 40*40 cm. Small pillows are most often not intended for sleeping and are decorative in nature.
The principle of sewing square and rectangular pillowcases is the same. The main difference is revealed when creating a pattern and lies in the fabric consumption.
Photo gallery of pillowcases that you can sew yourself
Pillowcases with “ears”
Rectangular pillowcases
Square pillowcases with zipper
Necessary materials
To make any pillowcase we will need:
- Textile.
- Sewing machine.
- Threads, preferably reinforced, matching the color of the fabric.
- Tape measure.
- Chalk or fabric marker.
- Scissors.
- Safety pins.
If you decide to sew a pillowcase with a zipper, then add to this list also a zipper that matches the fabric; its length should be equal to the width of the pillowcase.
How to choose fabric and calculate its consumption
Particular attention should be paid to the choice of fabric. Natural cotton materials are chosen for the sleeping pillowcase: chintz, calico, satin. Fabrics vary in density and weave of threads. Choose high-quality fabric, given that bedding is subject to intense wear and tear. The cheapest fabric looks bad and won't last long.
The pillowcase is cut using both a transverse and a longitudinal thread, so when choosing the width of the fabric, be guided by the dimensions of your pillow. Try to choose the width so that a minimum of fabric is used for scraps. The stores offer calico and chintz in widths of 80 cm, 120 cm, 150 cm, 220 cm.
Calculate in advance how much fabric you will need for one pillowcase, take into account the possible shrinkage of cotton after washing, multiply by the number of pillowcases and only then go shopping.
So, to make one pillowcase 70*70 cm with a wrap of 20 cm, you will need a piece of fabric measuring 170*75 cm, and for a rectangular pillowcase 50*70 cm - a cut with dimensions of 170*55 cm. Do not forget to calculate seam allowances, fabric supply, which will be required for “ears” or sewing in a zipper, if the selected model requires it.
Approximate pattern of a pillowcase with a flap for a pillow 70*70 cm
For example, with a fabric width of 220 cm, you will need a cut 175 cm long to sew three pillowcases 70*70 cm or four pillowcases 50*70 cm.
When choosing fabric, pay attention to fabric with a small pattern - it will not need to be adjusted when cutting. If your choice falls on a large pattern, you may have to take it into account when cutting. So, large flowers or animals should not be cut: they should fit entirely on at least one side of the pillowcase.
Before you start sewing, wash the fabric at the temperature at which you usually wash bed linen. Cotton fabrics shrink noticeably when washed, so it is better to carry out the shrinkage process in advance and then work with fabric that will no longer deform. The washed and ironed fabric is ready for use.
Choosing the right fabric
If you make the choice yourself, then you need to consider only high-quality fabric, preferably of natural origin. You should choose only those types of materials that have the following qualities:
- Hypoallergenic;
- Environmental cleanliness;
- Increased comfort;
- Air permeability;
- Easy to wash and care.
The set must meet all quality standards.
The best option is 100% cotton fabric. Bedding made from it is suitable for any season: summer and winter. There are the following classes of cotton fabrics, differing from each other in the type of weaving of the threads:
- Calico. It is hypoallergenic, breathable in both directions and has high wear resistance, but is rougher to the touch than other types and requires proper washing or it will begin to fade;
- Chintz. The material is natural and pleasant to the touch. It is also highly breathable, but unlike calico, it does not require special care. Its disadvantage is rapid wear and loss of brightness (color) over time. Ideal for children immediately after discharge from the hospital;
- Satin. It has excellent wear resistance, does not electrify and does not wrinkle. In addition, satin retains its appearance after repeated washings and transfers heat well. It has no distinctive disadvantages;
- Poplin. Excellent air permeability and evaporation of moisture, easy to wash and does not accumulate static electricity. It has virtually no negative qualities, but can shrink when washed in hot water;
- Bamboo. It has high strength and antimicrobial action. Excellently absorbs moisture and odors. The downside is the high cost;
- Flannel. Soft to the touch and becomes even softer after washing. Quickly retains heat and does not cause allergic reactions. Disadvantage: formation of pellets over time, as well as severe creasing.
You might be interested in this Instructions for manual sewing machines Podolsk with foot drive
Cotton is an ideal material for children's underwear
Scented pillowcase
A pillowcase with a smell (flap) is the easiest to sew. These are the pillowcases that are included in the vast majority of ready-made bedding sets. They are sewn from a single piece of fabric without additional parts.
We will show you how to sew a regular pillowcase measuring 70*70 cm. Keep in mind that rectangular pillowcases are sewn in exactly the same way and will only require recalculation of the fabric consumption depending on the size of the pillow.
A square pillowcase of any size is cut according to the following pattern:
Square wrap pillowcase pattern
The smaller the size of the pillowcase, the smaller the width of the scent.
- We cut out a piece of fabric measuring 174*72 cm.
- We hem the sections of the short ends of the fabric (72 cm) on both sides. This is done using a regular hem stitch with a closed cut. If you do not have enough skill and cannot ensure an even seam right away, use an iron. To do this, fold the fabric to the wrong side with an allowance of 0.5–1 cm and iron. Then fold another 1 cm, iron and stitch.
The edges of loose fabrics are processed using this seam.
- Place the fabric wrong side up. Measure 30cm from the stitched edge and fold the fabric right side up.
- Measure 70 cm from the other edge and also fold the fabric right side up; The edge of the cut should coincide with the fold. Pin the sides together using safety pins.
- Sew the sides from the front side, retreating 0.5 cm from the edges.
- Turn the resulting pillowcase inside out, not forgetting to turn out the valve. Smooth out the sides and tuck out the corners.
- Place side seams on both sides, leaving 1 cm from the edges.
Our pillowcase is ready. All that remains is to turn it out and put it on the pillow.
Step-by-step process (photo gallery)
Turn the pillowcase inside out and place it on the pillow
Turn the pillowcase inside out and stitch it from the inside out, leaving 1 cm from the edge.
Turn over the edge 70 cm wide, stitch from the front side 0.5 cm from the edge
We turn the edge 30 cm wide
Fold and stitch the seams from the wrong side
We cut out a piece of 174*72 cm
Video tutorial
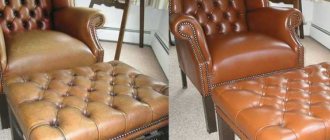
Methods for cleaning pillows
There are three main methods for cleaning feather pillows. The first option is to wash down products at home; this method takes more time, but if done correctly, you can effectively clean the pillows from harmful contaminants and pests. Hand or machine wash possible.
One of the methods known to many is dry cleaning; this technique allows you to completely get rid of field ticks, while each product is processed separately, without the use of chemicals. Therefore, sleeping on it after such restoration of the pillow will be absolutely safe.
The dry method is called taking the pillows out into the sun in the summer. An alternative and more effective method is to clean the products under the influence of ultraviolet rays in a special apparatus.
Dry air cleaning is carried out in dry cleaners that have special equipment. You can restore a product in this way in just 15 minutes.
We suggest you read: How to replace furniture polish?
As a result, the cleaned fluff is placed in a new pillowcase, the cost of which is included in the price of the service. The pillow becomes fuller and softer when exposed to an ozonator, which directs a powerful stream of air onto the feathers.
How much this service will cost depends on the salon.
You can use steam cleaning; for this, using an iron that has a “steam” function, the pillow is evaporated on each side for twenty minutes. After which it is dried under the influence of sunlight. Next, the bedding is replaced and this sleeping accessory is fluffed.
The method allows you to get rid of all existing types of pollution and pests.
Pillow with “ears”
The principle of sewing pillowcases in the Oxford style (as pillowcases with “ears” are officially called) is a little more complicated than ordinary ones, but they will require more fabric. But such a pillowcase will look original, so it’s worth a try.
We will sew a standard rectangular pillowcase with “ears” measuring 50*70 cm.
The calculation of fabric for a pillow with “ears” is determined as follows.
Cut length: two pillow lengths (2*70 = 140 cm) + 4 widths of “ears” (for “ears” 5 cm wide you need to add 5*4 = 20 cm) + wrap (25 cm) + allowances for hemming sections from two sides (2*2, 5 = 5 cm).
Cut width: pillow width (50 cm) + “ears” (5*2 = 10 cm) + seam allowances (2*1.5 = 3 cm).
So, we will need a piece of fabric measuring 63*190 cm.
- We process short sections (63 cm each) using a hem seam with a closed cut, as in the previous master class.
- We lay out the fabric with the right side up and bend the fabric 70 cm long from the edge up with the wrong side.
- We measure 5.5 cm from the edge of the folded fabric - this will be the fold line of the smell.
- We turn the opposite edge (smell) inside out, retreating 5.5 cm. Thus, the valve is located on top.
- We sew the cuts on both sides, retreating 0.5 cm from the edges.
- Turn the pillowcase inside out, smooth out the seams and iron.
- Along the perimeter of the pillowcase, measure 5 cm from the edge, using a ruler to draw a 50*70 cm rectangle. Use chalk, soap or a washable marker, since the line is drawn on the front side.
- We lay the final line along the line.
Video tutorial on sewing a pillowcase with “ears”
Pillowcase with zipper
A zipper is a convenient way to firmly “pack” a pillow.
To sew a square pillow 50*50 cm with a zipper, you will need a piece of fabric measuring 52*102 cm and a hidden zipper 50 cm long.
- Fold the piece in half with the right sides facing in and sew the side seams, leaving the armhole unstitched. Finish the edges with an overlocker or zigzag stitch.
- Unzip. Turn the top side out so the cloves are facing up on the right side. Iron. The bottom part should be parallel to the top.
- Using safety pins, pin the zipper on the front side, leaving 1 cm from the edge of the fabric.
- Using a special zipper foot, stitch it to the pillow. Don't forget to make a 2.5 cm indent from the side cuts, as shown in the picture.
- On the wrong side, sew a 2.5 cm long stitch from the side seams to the zipper, the stitch should run 3 mm above the zipper.
- Turn the pillowcase inside out and insert the ends of the zipper into the resulting holes. Trim excess if necessary.
Step-by-step process (photo gallery)
The pillow is ready!
The result is a pillowcase with a zipper
Turn it inside out
Place a seam from the wrong side on both sides (2.5 cm from the edge) just above the zipper
Leave 2.5 cm from the side cuts
Using a special foot, sew the zipper
Leave 1 cm from the edge
Attach the zipper with safety pins
Both sides must be parallel
Open the zipper
Unzipping
Leave the zipper opening unstitched
We make a seam, retreating 1 cm from the edge
Stitch and overcast the side seams
Video tutorial
Buy or make it yourself?
The main quality of a bedspread is strength (so that fluff and featherbeds do not fly in different directions). Products that are sold in stores are sewn using a special technology on industrial sewing machines with a shock-absorbing seam, overlaid along the edges.
But you can make such a case with your own hands. To do this you need:
- decide on the sizes - you can choose any, but it is better to take into account the parameters of the existing bed linen, so that later you can choose a pillowcase;
- choose fabric;
- cut out a rectangle taking into account the shape, leaving a 2 cm seam allowance on each side;
- Fold the rectangle in half and stitch it, leaving a hole on one side for filling the pillow with feathers.
- The product can be sewn in two ways: either with a linen seam, stitching the edges on the front side and then on the back, or sewing a bedstead with an edging, making one straight line;
- When the pillow is filled with down, sew up the hole manually or using a machine.
We suggest you familiarize yourself with How to replace lemon juice in cooking
The main quality of a bedstead is strength (so that fluff and featherbeds do not fly in different directions). Products that are sold in stores are sewn using a special technology on industrial sewing machines with a shock-absorbing seam, overlaid along the edges.
But you can make such a case with your own hands. To do this you need:
- decide on the sizes - you can choose any, but it is better to take into account the parameters of the existing bed linen, so that later you can choose a pillowcase;
- choose fabric;
- cut out a rectangle taking into account the shape, leaving a 2 cm seam allowance on each side;
- Fold the rectangle in half and stitch it, leaving a hole on one side for filling the pillow with feathers.
- The product can be sewn in two ways: either with a linen seam, stitching the edges on the front side and then on the back, or sewing a bedstead with an edging, making one straight line;
- When the pillow is filled with down, sew up the hole manually or using a machine.
Beautiful pillow made of small patches (patchwork)
Patchwork allows you to use a lot of small scraps left over from previous works to update your interior with your own hands and create your own unique atmosphere of comfort. A small sofa cushion is ideal for learning the basics of this fancy technique.
Important! For patchwork sewing, fabrics that are uniform in density and texture are selected. Pre-washing for shrinkage is also necessary.
Fans of patchwork have a solid selection of beautiful patterns according to which the patches should be placed in the product. Sometimes these schemes are complex and intricate. We bring to your attention a simple pillowcase made from triangular scraps, which even the most experienced needlewoman can sew. For such a pillow, two types of different fabrics are enough, but you can use four.
As a first experience, we suggest sewing a pillowcase on a pillow measuring 25*25 cm.
- To begin, draw an isosceles right triangle on paper with side lengths of 12.5, 12.5 and 18 cm. Cut it out.
- Attach the triangle to the fabric, trace, draw 1 cm seam allowances and cut along the outline of the allowances. You should get a triangle measuring 13.5*13.5*19 cm.
- Thus, cut out 8 identical triangles from different types of fabric.
- Cut out a 27*27 cm square from a single piece of fabric. This will be the back part of our pillowcase.
- Lay out the triangles on the table surface and select the optimal composition.
- Fold the triangles forming squares 13.5*13.5 cm in pairs and sew them along the hypotenuse line (the longest side), retreating 1 cm from the edge. You should end up with four multi-colored squares that are the same size.
- Press the seams from the inside out as shown in the picture.
- Now sew the squares together in pairs. You will get two rectangles measuring 12.5*25 cm. Sew them together along the long side.
- The front side of the pillowcase is ready. Trim off excess fabric at the corners from the wrong side.
- Place both sides of the pillowcase face to face, stitch them along three sides, leaving 1 cm from the edge. Finish the edges with an overlocker or zigzag stitch.
- Sew a 25 cm long zipper into the armhole following the example of the previous master class.
The shredded pillow is ready!
Step-by-step process (photo gallery)
Step-by-step patchwork process
Patchwork pillowcase: finishing the process
Video tutorial
Decorative pillowcases for sofa cushions
Decorative pillows, as the name suggests, are designed to decorate the interior. Such pillows are not used for sleeping, and this is the reason for the peculiarities of their manufacture. .
Firstly, they are made from dense fabrics, including furniture fabrics, which would be a bit rough for an ordinary sleeping pillow. Secondly, you can use a huge variety of decoration options for a sofa pillow: appliqué, embroidery, buttons, beads, rhinestones, ribbons, braid... On a regular sleeping pillowcase, all these elements will interfere with healthy sleep, so when making it you have to adhere to minimalism and lightweight natural materials . Give free rein to your imagination when sewing a pillowcase for a sofa cushion: here your inner creator will definitely have room to roam!
- Variety of materials. A sofa cushion can be made from almost any fabric. Depending on the style of a particular interior, you can use linen or brocade, cotton or wool, denim or knitwear. Moreover, the combination of various seemingly polar textures often brings unexpectedly bold, interesting and stylish solutions.
- Variety of forms. If sleeping pillows are most often square or rectangular, then decorative pillows boldly emerge from these narrow shores. A sofa pillow can be either a classic shape, or round, oval, triangular, in the form of a roller, in the shape of a heart or, say, a kitten. And if we haven’t mentioned some form here, perhaps you will become its inventor.
- Variety of decorative elements. A sofa cushion can be decorated using any technique. You can resort to your favorite type of needlework or master a completely new one for this occasion. We offer you a selection of pillowcases decorated with various decorative elements. Here you can get ideas for your own project.
Wash by hand
Hand washing should begin with preparing a soap solution. To do this, you need to mix one piece of laundry soap, which is pre-grated, with 1 tsp. ammonia and water.
Action steps:
- the breastplate is torn apart;
- the feathers are removed from the bedspread and immersed in parts into the prepared soapy water; there is no need to rush so that the feathers do not fly in all directions;
- feathers are left in water to soak for 2-3 hours;
- Next, the filler needs to be rinsed, they are rubbed between the palms, you can use a colander, running water, or a sieve to facilitate the process;
- clean feathers are placed in portions into prepared small gauze bags;
- The bags need to be tightly closed or sewn so that they can then be placed in the washing machine. Where they will be dried using the “spin” function, if possible, then a gentle option is chosen. The filler can be dried without a washing machine, but this will take a lot of time, and it may smell unpleasant;
- The products are completely dried in a sunny, ventilated place, the bags themselves should be shaken and turned over at least 3 times a day;
- after washing the napkin itself and the feathers are completely dry, they are re-placed in a clean napkin and it is sewn up.
We suggest you familiarize yourself with How to dry St. John's wort - Mom's advisor