Greenhouses on the windowsill and balcony: options for home greenhouses
Very often in winter, you want to pamper yourself with fresh vegetables or even fruits, but due to the inappropriate season, you have to buy products brought from distant countries. However, if you make a small greenhouse at home (on a windowsill or balcony), you can realize what you want and eat something not just fresh, but also natural, grown with your own hands. In addition, you can already start preparing for the summer season and get good seedlings that will bear fruit faster.
Purpose and advantages
Now in stores you can buy almost any product you could want, but it’s difficult to say for sure whether their quality is what you need. It is not known exactly how these or those vegetables or fruits were grown, how long and with what means the greens were sprouted, which should bring a wealth of vitamins to the body. All this makes you want to grow everything that will go into food yourself.
In the summer, this will not be difficult, because in the garden, under the scorching sun and with timely watering, any products will grow quickly and will soon yield the long-awaited harvest. But what to do in winter, when it is impossible to grow anything outside and you have to be content only with what you buy? In this case, home greenhouses can help. You can create a greenhouse on a windowsill or balcony quite quickly and get the first results in a short time.
To create a microgreenhouse at home, you can use a wide variety of objects. The main principle of operation of such a greenhouse is the creation of a suitable microclimate inside the structure, which is achieved by isolating the garden area from the outside world. Most often, polyethylene is used for this: they cover the area with the ground. But you can also use available materials in the form of a plastic bottle with the bottom cut off: if you put it on a pot of soil, you can achieve the effect of a greenhouse.
Now it is possible to purchase greenhouses in stores. They are completely ready and do not require any additional work other than assembling the main frame and installing the film around it. Externally, microgreenhouses may differ from each other, but they have the same task - the ability to have fresh food and herbs all year round, as well as preparing seedlings for the future gardening season.
DIY racks for seedlings ↑
It is best to place the shelving unit on a south or southeast window. If this is not possible, you can place it anywhere, subject to certain requirements.
Related article: What types of window sills are there for plastic windows?
Preparatory work ↑
Before you start arranging the rack, you must:
- Wash window panes clean to increase light intake;
- seal all the cracks in the window frames to prevent drafts;
- insulate the window with double glass so that in the frosty winter the seedlings located closer to the glass do not freeze.
Plant racks
What and how to make it from ↑
A good material for shelving is wood. Natural boards are a fairly strong material that will not bend or break under the load of containers. You can use ready-made shields (buy in a store), cut according to your order, or use iron, plastic, or other materials. Select material that does not corrode, does not get wet, does not rot under the influence of moisture, or is insulated from the negative effects of the environment.
If you choose the option of shelving for a window opening, then you need to measure the length, height and depth of the opening. Then divide the height by the number of shelves, which should be equidistant from each other by 40-50-60 cm. For each shelf, provide fastenings to the sides of the shelving box and fastenings for additional lighting devices. Having all the calculations, you can buy ready-cut boards and assemble them at home.
The good thing about making a shelving window installation yourself is that everything is done according to actual dimensions and does not require adjustments or alterations. Make the entire structure white so as not to darken the room.
Handmade shelving unit with lighting
Lighting for seedlings ↑
The biggest problem in January-February is lighting. Lack of light causes sprouts to stretch, and insufficient photosynthesis reduces metabolic processes. The seedlings turn out to be sickly with reduced immunity; transplanted into conditions of a different microclimate, it takes a long time to take root. It is necessary to think about additional lighting in advance.
In winter, the lack of light is compensated for by artificial lighting. Electrical goods stores offer a wide selection of lamps of various designs and prices. Lamps with a red or blue spectrum of rays are considered the best; the yellow-orange spectrum is less effective, but it does not tire the eye. Lamps should not emit thermal energy, which sometimes causes leaf burns.
DIY LED lighting
For a shelf 50 cm wide and up to 1.5 m long, phytolamps are considered the best for lighting. They do not emit thermal energy, which means they will not affect the surrounding air temperature. They are environmentally friendly, have a long service life, and are economical in operation.
LED lamps have the same qualities. When installing them, it is easy to select the required spectrum and lighting intensity. Experienced gardeners recommend using low-power cold daylight fluorescent lamps to illuminate the shelving structure. Linear, xenon discharge or halogen lamps can be used effectively.
Some people believe that 1-2 ordinary low-power incandescent lamps are enough for a rack. This is the most affordable option, but not effective. They emit a large amount of thermal energy and give off little light (5%). Every day the market offers more and more advanced lighting devices. The choice is up to the buyer.
Additional light is vital for Seine residents
Requirements for home greenhouses
Regardless of exactly what the greenhouse will look like, whether purchased or homemade, there are certain rules and requirements for its manufacture or operation that you need to know, otherwise the result of growing green space in such facilities will not have the desired result.
- Creating the most suitable conditions for the plant being grown. You should not place crops that require different growing conditions in one greenhouse.
- The greenhouse should be easy to use, so that it can be washed, something changed and adjusted at any time. All plantings must be in plain sight, clearly visible from all sides and have easy access for watering.
- In addition to convenience, it would be nice for the appearance of the greenhouse to be aesthetically pleasing and match the design of the room.
- An indoor greenhouse should be durable enough to withstand repeated use.
- The location of the microgreenhouse should be such that the plants receive enough light, but do not take it all away from the room.
- The best place to locate a house for future plants will be the window of a room where people are rarely present, which means that the loss of light from the greenhouse installation will not in any way affect the standard of living of the household.
- If it is not possible to find such an area in the house, you can organize a greenhouse in any place convenient for everyone, but provide artificial lighting so that the plants can grow and develop properly.
By following these rules, you can get a good greenhouse that will pamper you with fresh herbs or other fruits in the shortest possible time.
Types of mini greenhouses
If you are thinking about creating a greenhouse at home in order to be able to grow fresh herbs and prepare seedlings for planting in a garden bed, you need to consider all types of modern designs and decide which one will be most convenient in a particular room. For an apartment, the best location for a greenhouse for young plants would be a window opening on which you can build both shelving and a small greenhouse.
Parsley, dill or onion are usually grown on the window , which is what is most often used for food. If the purpose of the greenhouse is to grow seedlings for the garden, then it is most convenient to move the entire structure onto the balcony. In this case, you can afford a more bulky greenhouse, where it is possible to place a large number of trays with soil, where the seeds will already be sown. A balcony greenhouse will produce results when all the conditions for the growth and development of plants are present. If there is not enough light or the air temperature is below normal, seed growth will be difficult, if not impossible.
Mini-greenhouse and mini-greenhouses by the window ↑
At home, in addition to growing seedlings on shelves, you can use an indoor greenhouse.
Advantages of indoor greenhouses ↑
The greenhouse has a closed structure, which makes it easier to create optimal conditions for the growth and development of seedlings. The device must meet certain requirements:
- be durable enough to withstand repeated use,
- meet the requirements of the greenhouse, that is, maintain a microclimate favorable for seedlings,
- fit into the overall interior of the apartment.
Indoor mini greenhouse – “bread box”
A small greenhouse on the windowsill is more advantageous in that you do not need to change the temperature in the apartment or adjust it to the requirements of the seedlings. You can save on additional lighting and heating.
This can be made from any available material, any design that the owner’s imagination allows. The most convenient form is a “breadbox”, “house for Masha’s doll”, and plastic food containers are convenient for a mini-greenhouse for sowing seeds.
Mini-greenhouses “breadbox” and “house” ↑
The structure of the “bread box” is quite simple. The base can be made from PVC pipes. Cover all walls with film or cut and secure other transparent material. If it is tall and a lot of seedlings are required, shelves can be placed inside along the perimeter. Place greenhouses made of plastic containers on them, where the seedlings will be sown before picking. Under the containers you definitely need trays to collect excess water after watering. Make 1-3 holes at the bottom of the containers to drain excess water after watering.
The greenhouse will be illuminated from all sides by natural light during the day, and will only be illuminated with artificial light in the evening. To ventilate, simply lift the front door. Seedlings grow in containers until they are planted, and then cassettes or separate containers with planted seedlings are placed there, which are grown until planted in a permanent place.
Instead of a “breadbox”, you can make a transparent “house” over the entire window, the front wall of which will open like a door to the room. In this design, you can grow the pick. Greenhouses are very convenient for cultivating green and spicy-flavored crops (onions, watercress, parsley, radishes). Mini-varieties of peppers, tomatoes, and cucumbers grow and bear fruit well in them.
Mini greenhouse for seedlings
Home greenhouse for seedlings ↑
You can make a greenhouse for seedlings yourself from any available material. The main thing is the height of the structure so that the plant can achieve normal growth, drainage so that there is no stagnation of water. If you make a box for a greenhouse yourself, it can be made of transparent film, plexiglass, or transparent plastic. It is more practical to use ready-made containers for cake, eggs, and other products. Shade the structure from direct sunlight.
A more complex issue is the lighting device, but if desired, it can be resolved if you use easy-to-install fluorescent lamps or phytolamps.
Lighting
For the normal growth of any plants at home, it is important to create a suitable habitat for them. The most important factor will be the lighting, which should ideally be natural. So that the seedlings can receive sunlight, it is best to place them on the windowsill. If the side of the house does not allow you to receive the proper amount of light, then it can be compensated with a special lamp. With its help, you can get out of the situation when the seedlings are in a dark room.
It is most convenient to install a greenhouse on a balcony , because there is a completely glazed room and the light hits the plants as often as possible, which ultimately gives a good result. You can grow almost any plant at home, the main thing is to know what environmental conditions are typical for it and try to make them. To grow exotic fruits in a room, you will need an automatic greenhouse, because it will be able to provide all the components for growth, and this includes light, moisture, and air.
Unlike the human body, plants require a red segment to grow, develop and bloom. The waves must also have an appropriate length, which is between 600 and 700 nanometers. In addition, the blue spectrum is also important, the wavelength of which should be from 400 to 500 nanometers, which will enable seedlings to grow vegetatively and develop properly. Simple artificial lighting will be insufficient and, instead of being beneficial, will cause stress in a young plant, so it is important to select light in the spectrum of sunlight. If this is neglected, then fruits and vegetables grown in such conditions will have a different taste, lose most of their vitamins, and sometimes may be completely unsuitable for food. If we are talking about flowers, then in this case the effect is the opposite: from artificial light their growth increases, and flowering becomes brighter.
To ensure good growth and development of plants in a greenhouse, it is important to choose the right light, which will emit radiation of the appropriate color:
- purple or blue helps photosynthesis - plants become stronger and begin to grow faster;
- yellow and green contribute to inhibition of photosynthesis, and this causes plant diseases;
- orange or red are most suitable during flowering and active development of fruits, but you should be careful with the quantity, because a significant dose of this light will kill the crop;
- Ultraviolet radiation helps to accumulate a sufficient amount of vitamins in plants, in addition, resistance to cold increases.
Mini-greenhouse in an apartment: how to make a greenhouse from improvised materials
Very often in winter, you want to pamper yourself with fresh vegetables or even fruits, but due to the inappropriate season, you have to buy products brought from distant countries.
However, if you make a small greenhouse at home (on a windowsill or balcony), you can realize what you want and eat something not just fresh, but also natural, grown with your own hands.
In addition, you can already start preparing for the summer season and get good seedlings that will bear fruit faster.
It is not known exactly how these or those vegetables or fruits were grown, how long and with what means the greens were sprouted, which should bring a wealth of vitamins to the body.
All this makes you want to grow everything that will go into food yourself.
In the summer, this will not be difficult, because in the garden, under the scorching sun and with timely watering, any products will grow quickly and will soon yield the long-awaited harvest.
You can create a greenhouse on a windowsill or balcony quite quickly and get the first results in a short time.
To create a microgreenhouse at home, you can use a wide variety of objects.
The main principle of operation of such a greenhouse is the creation of a suitable microclimate inside the structure, which is achieved by isolating the garden area from the outside world. Most often, polyethylene is used for this: they cover the area with the ground.
But you can also use available materials in the form of a plastic bottle with the bottom cut off: if you put it on a pot of soil, you can achieve the effect of a greenhouse.
Regardless of exactly what the greenhouse will look like, whether purchased or homemade, there are certain rules and requirements for its manufacture or operation that you need to know, otherwise the result of growing green space in such facilities will not have the desired result.
- Creating the most suitable conditions for the plant being grown. You should not place crops that require different growing conditions in one greenhouse.
- The greenhouse should be easy to use, so that it can be washed, something changed and adjusted at any time. All plantings must be in plain sight, clearly visible from all sides and have easy access for watering.
- In addition to convenience, it would be nice for the appearance of the greenhouse to be aesthetically pleasing and match the design of the room.
- An indoor greenhouse should be durable enough to withstand repeated use.
- The location of the microgreenhouse should be such that the plants receive enough light, but do not take it all away from the room.
- The best place to locate a house for future plants will be the window of a room where people are rarely present, which means that the loss of light from the greenhouse installation will not in any way affect the standard of living of the household.
- If it is not possible to find such an area in the house, you can organize a greenhouse in any place convenient for everyone, but provide artificial lighting so that the plants can grow and develop properly.
If you are thinking about creating a greenhouse at home in order to be able to grow fresh herbs and prepare seedlings for planting in a garden bed, you need to consider all types of modern designs and decide which one will be most convenient in a particular room. For an apartment, the best location for a greenhouse for young plants would be a window opening on which you can build both shelving and a small greenhouse.
Parsley, dill or onions are usually grown on the window, which is what is most often used for food. If the purpose of the greenhouse is to grow seedlings for the garden, then it is most convenient to move the entire structure onto the balcony.
In this case, you can afford a more bulky greenhouse, where it is possible to place a large number of trays with soil, where the seeds will already be sown. A balcony greenhouse will produce results when all the conditions for the growth and development of plants are present.
If there is not enough light or the air temperature is below normal, seed growth will be difficult, if not impossible.
The simplest design involves a reduced variation of country greenhouses, where instead of a large room made of polyethylene or glass there is a small rack on which a special polyethylene cover is placed.
Usually the frame of the rack is made of metal, but at home you can also make a wooden version. For ease of care and watering, the polyethylene cape has zippers. By unfastening them, you can get to the required area without opening the entire greenhouse.
Racks can have a wide variety of dimensions, which are selected individually based on the available space at home. The height may also differ, depending on the tiers of the structure; there may be two or more of them. Usually, racks with more than five shelves are not used, because it makes it difficult to care for plants and view their condition.
If there is no need for a large greenhouse, you can use a tabletop type, which is somewhat reminiscent of an aquarium, but is made on the principle of window frames for outdoor polystyrene structures. If you want to purchase something more powerful, then in this case automatic systems will be most productive.
If a simple structure is a home for plants, where a comfortable temperature is created for them, and all care is done by a person, then automated greenhouses take on these functions.
Such systems can be partial (with a certain set of functions) or complete, where a person is not involved at all in the process of caring for plants.
The advantages of such systems are that there is no need to look for a convenient or suitable place for them, since they can cope with any location, be it a window sill or a basement.
There are several options for such automatic greenhouses.
- Grow boxes are a closed system with autonomous lighting, air supply, and light reflection. An important feature is the ability to choose the type of operation of the device depending on what exactly will be grown in it. Plants can be planted in such a box either in a nutrient mixture or in hydroponics.
- Thermoboxes are convenient to use in apartments. They can be placed both indoors and on the balcony. This device is not afraid of even negative temperatures and can independently regulate the microclimate inside so that the seedlings are comfortable. The device independently waters the plants, controls the supply of nutrients, and turns the lamps on and off at the required time. You just need to place the seeds in the box, and then the machine will do everything itself.
- Aerogarden is a tabletop mini-greenhouse where greenery grows using aeroponics (drops of a solution with nutrients in which the root system of the seedlings is located). The device not only helps to create ideal growth conditions, but even speeds it up several times, thanks to which you can get the finished product much faster.
READ MORE: Choosing a gasoline generator for home and garden, three-phase and single-phase low-noise rating of the best
For the normal growth of any plants at home, it is important to create a suitable habitat for them. The most important factor will be the lighting, which should ideally be natural.
So that the seedlings can receive sunlight, it is best to place them on the windowsill. If the side of the house does not allow you to receive the proper amount of light, then it can be compensated with a special lamp.
With its help, you can get out of the situation when the seedlings are in a dark room.
It is most convenient to install a greenhouse on a balcony, because there is a completely glazed room and the light hits the plants as often as possible, which ultimately gives a good result.
To grow exotic fruits in a room, you will need an automatic greenhouse, because it will be able to provide all the components for growth, and this includes light, moisture, and air.
Unlike the human body, plants require a red segment to grow, develop and bloom. The waves must also have an appropriate length, which is between 600 and 700 nanometers.
In addition, the blue spectrum is also important, the wavelength of which should be from 400 to 500 nanometers, which will enable seedlings to grow vegetatively and develop properly.
Simple artificial lighting will be insufficient and, instead of being beneficial, will cause stress in a young plant, so it is important to select light in the spectrum of sunlight.
To ensure good growth and development of plants in a greenhouse, it is important to choose the right light, which will emit radiation of the appropriate color:
- purple or blue helps photosynthesis - plants become stronger and begin to grow faster;
- yellow and green contribute to inhibition of photosynthesis, and this causes plant diseases;
- orange or red are most suitable during flowering and active development of fruits, but you should be careful with the quantity, because a significant dose of this light will kill the crop;
- Ultraviolet radiation helps to accumulate a sufficient amount of vitamins in plants, in addition, resistance to cold increases.
Advantages and disadvantages of a homemade mini-greenhouse
Like any building, a homemade mini-greenhouse has both positive and negative sides in its use.
- Among the positive ones are the following:
- it’s easy to adjust the size of the greenhouse to the dimensions of the room, and also use the design that you like;
- ease of use;
- you can grow plants throughout the year.
- The negative aspects of home construction include the following:
- high labor costs for manufacturing: a lot of patience is required, it is necessary to think through every detail of the design;
- high energy costs during operation.
Types of home greenhouses
A miniature greenhouse in a city apartment can be constructed without much difficulty. The manufacturing technology will depend on the type of greenhouse that you want to build at home, so you need to familiarize yourself in more detail with the basic designs of home greenhouses. The main types of home greenhouses can be: a classic greenhouse, a thermobox, a portable structure, a greenhouse in the form of a cabinet, etc.
Classical
A classic greenhouse is a miniature copy of a greenhouse with a gable roof. The first step is to assemble the frame, and then cover it with a special material, which must have light-conducting and heat-insulating properties.
When constructing the frame, you should use plastic or metal pipes, as well as wooden beams. Synthetic mesh, film, glass can be used as a coating. Some gardeners use plastic bottles.
Greenhouse-cabinet
Mini-greenhouses, which have the shape of a shelf or cabinet, can contribute to the comfortable development of plants in an apartment or country house. Despite its small area, this type consists of many tiers and can accommodate a large number of plants, which is the optimal solution for a city apartment. The main advantage of this type of greenhouse is mobility. In summer, you can grow capricious flowers in them, for example, petunia.
Growbox
It will be more difficult to implement such a structure at home than a classic greenhouse or greenhouse-cabinet. This is due to the fact that this design is a smart automated system. This type of structure for growing plants allows you to regulate not only the microclimate, but also maintain favorable development conditions.
The growbox is equipped with a lighting, ventilation, humidification, air filtration system, as well as a carbon dioxide saturation complex, and its internal coating is finished with reflective material. Growboxes come in the following types: standard, growcompact and stealth. The operating mode depends on the varieties of plants that are going to be grown in the greenhouse.
Thermobox
The thermobox can be used for growing seedlings, vegetables and herbs at home. It is recommended to place it on the balcony, as it can easily withstand temperature changes. Automatic support of an optimal microclimate is the main advantage of this type of greenhouse. The system can be configured to automatically supply all the necessary microelements, watering, and also regulate the temperature.
Aeroponic greenhouses
This type of equipment is a high-tech product based on aeroponics. The process of growing plants occurs without human intervention and without the use of soil. This method is based on a system of periodically spraying a mineral solution onto the hanging root system. The plant receives all the necessary amounts of nutrients.
What a greenhouse in an apartment requires: tips for beginners
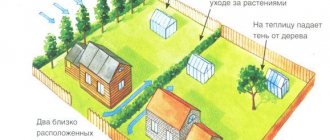
Regardless of what types of flowers or other plants you plan to grow, having a well-glazed balcony is mandatory. In addition, green spaces need a constant influx of sunlight. This means that the greenhouse needs to be built on the sunny side.
It is advisable not to go too far. Excessive amounts of solar heat will not have the best effect on the development of flora.
The gardener's further actions largely depend on the type of structure that will be used.
The following options exist:
- The garden-dacha option involves the construction of a smaller copy of a traditional greenhouse in the apartment;
- Multi-tiered greenhouse - the lower part of the structure is made more durable, otherwise it is impossible to fully place the seedlings on the second floor;
- A seasonal winter or spring-summer greenhouse involves insulation or supplying the structure with an irrigation system.
Moderate temperature conditions, absence of drafts and sun heat are the key to the constant development of flowers, vegetables and berries. The main thing is to place the structure correctly so that the seedlings feel comfortable at any time.
DIY greenhouse for seedlings on the windowsill
For a long time, gardeners grew seedlings at home without the use of special structures. To obtain high-quality and healthy plants, it is advisable to use small greenhouses. Such an indoor greenhouse creates the necessary microclimate for growing plants, which will maintain the necessary lighting, temperature and air humidity.
It is recommended to use the following window sill greenhouses:
- "House". A miniature copy of country greenhouses with an opening back or front wall. This type is better suited for the germination of pickled seedlings, and you can also grow the necessary greens throughout the year.
- "Breadbox". Such greenhouses are made of transparent materials with a front opening wall for caring for plants.
- "Container". Food storage containers are suitable for this design. It should be deep, with a drainage system to remove excess water.
Materials for making greenhouses in an apartment
If you do not want to spend money on purchasing an automated greenhouse, you can construct it from available household materials. For these purposes, you can take an old aquarium or food storage containers. Homemade shelving, which is covered with protective materials to create the necessary microclimate, is also suitable.
To successfully grow plants, all home mini-greenhouses must meet the following requirements:
- providing a stable and favorable microclimate for growing plants;
- high structural strength for use for several years.
Growing seedlings in a greenhouse on a windowsill
Growing seedlings on a windowsill is not difficult, since the process of sowing seeds is no different from planting them in a regular greenhouse or greenhouse (Figure 5).
Figure 5. Seedlings and greenery on the windowsill
First, you need to choose the optimal time for sowing, taking into account the climate and the data of the Lunar calendar. Secondly, prepare a loose nutrient substrate in which the seedlings will take root. It needs to be placed either in the greenhouse itself (if you are using a container model), or in separate containers (if you have a rack or other spacious structure). Next, the seeds are sown, but when growing on a windowsill, it should be borne in mind that such seedlings will need much more attention.
First of all, it is necessary to provide the seedlings with additional lighting, especially in winter, when the duration of daylight hours is short. In addition, containers with seedlings or the mini-greenhouse itself must be placed in a tray to protect the structure from the dry air of heating devices. It should also be taken into account that seedlings grown on a windowsill need to be fed weekly and watered regularly, after first checking the moisture level of the substrate.
From the video you will learn even more useful recommendations about arranging a mini-greenhouse in an apartment.
How to choose a ready-made home greenhouse
When choosing a ready-made home greenhouse, you should adhere to the basic rules, namely:
- pay attention to the material from which the greenhouse is made: it must be durable, transmit light well and be environmentally friendly;
- consider the size of the finished structure: it should fit in the place in your house where you plan to place it.
Following all the necessary recommendations from experts will allow you to grow high-quality vegetables and herbs in your own apartment throughout the year. In this case, you just need to choose the type of greenhouse that fits the dimensions of your home.
Greenhouse requirements
Adherents of the old school are surprised, why come up with something new, because the house is already warm and light, it’s enough to put boxes with seedlings on the windowsill, as they did before, and not complicate the process. However, if you think about it, creating a greenhouse is just a simplification of caring for young plantings. The air in the apartment, heated by central heating, suffers from dryness, and the amount of light from autumn to spring is so small that it is impossible to do without additional lighting sources. A properly built greenhouse solves these problems. Due to the created enclosed space and heating inside, the optimal level of humidity and temperature is maintained, and fluorescent lamps help increase daylight hours to the required number of hours.
To ensure that the design copes with its tasks and does not attract much attention, follow the requirements for a greenhouse, which are outlined by experienced gardeners:
- The main purpose of a greenhouse is to create comfortable conditions for plants. The choice of material for a greenhouse depends on capabilities and wishes, but you need to understand that, for example, metal walls will lead to overheating and lack of light inside the structure.
- The greenhouse should open without difficulty, the plants are easily accessible for inspection, care and ventilation.
- The aesthetic appearance of the greenhouse is no less important; it should fit into the interior as much as possible, or at least not attract the eye.
- If the construction of a greenhouse is made of strong and reliable materials, the device can be used annually, which saves time, effort and finances.
- The greenhouse is located on the windowsill, so it is important to think about the lighting of the room. Either the materials are transparent or the room is little used.
Making a greenhouse for the balcony with your own hands
Planting them directly in the ground will slow down the growth process; you will have to either wait for steady heat, or plant them in unheated soil, risking losing the harvest. In this case, a greenhouse built on the windowsill at home becomes a salvation.
Such a simple and accessible device for every gardener saves time and contributes to the appearance of healthy and actively fruit-bearing seedlings.
Adherents of the old school are surprised, why come up with something new, because the house is already warm and light, it’s enough to put boxes with seedlings on the windowsill, as they did before, and not complicate the process. However, if you think about it, creating a greenhouse is just a simplification of caring for young plantings.
The air in the apartment, heated by central heating, suffers from dryness, and the amount of light from autumn to spring is so small that it is impossible to do without additional lighting sources. A properly built greenhouse solves these problems.
Due to the created enclosed space and heating inside, the optimal level of humidity and temperature is maintained, and fluorescent lamps help increase daylight hours to the required number of hours.
To ensure that the design copes with its tasks and does not attract much attention, follow the requirements for a greenhouse, which are outlined by experienced gardeners:
- The main purpose of a greenhouse is to create comfortable conditions for plants. The choice of material for a greenhouse depends on capabilities and wishes, but you need to understand that, for example, metal walls will lead to overheating and lack of light inside the structure.
- The greenhouse should open without difficulty, the plants are easily accessible for inspection, care and ventilation.
- The aesthetic appearance of the greenhouse is no less important; it should fit into the interior as much as possible, or at least not attract the eye.
- If the construction of a greenhouse is made of strong and reliable materials, the device can be used annually, which saves time, effort and finances.
- The greenhouse is located on the windowsill, so it is important to think about the lighting of the room. Either the materials are transparent or the room is little used.
To build a greenhouse on a windowsill with their own hands, gardeners often choose the shape of a house or bread bin.
This choice is easy to explain: the design is simple and understandable, without complex elements, the walls of the greenhouse are transparent, which has a positive effect on the seedlings.
Depending on the choice of materials, the order of work becomes clear. I will list the main nuances of creating a greenhouse that you need to pay attention to before starting work:
- You need to install a tray at the bottom of the greenhouse; make several drainage holes in each container with seedlings. This stage is necessary to prevent moisture stagnation in the roots.
- Correctly calculate the height of the greenhouse so that the seedlings can develop without obstacles.
- Greenhouse walls made of polycarbonate or glass look aesthetically well-maintained, have a long service life, and are easy to clean. But it is important to remember that such walls retain heat inside the greenhouse several times more effectively than other options; do not forget about regular ventilation.
- A convenient option for a greenhouse is to create a frame structure covered with plastic film. Convenience lies in simple and quick access to plants, as well as easy replacement of material in case of damage or contamination.
In the case when you grow a lot of seedlings at home, one greenhouse is not enough, and you don’t want to take up all the window sills of the house either - a rack for seedlings will come to the rescue.
- A rack is several shelves attached to each other, occupying the entire area of the window.
- Before you start building the shelving, check the windows for drafts, install blinds to block out the hot sun, and increase the width of the window sill if necessary.
- Wood is a convenient material for making shelving; it is easy to work with and wood is warm.
- Do not forget about installing and connecting additional lighting before installing the plants in place.
- Make the height of the shelves in the rack different so that you can combine tall and short plants.
Creating a greenhouse with your own hands will not take much time. But plants grown in a greenhouse will respond with excellent health and a bountiful harvest.
The only problem is that those who live in multi-storey buildings do not have a plot of land, or it is located outside the city.
You can satisfy the desire to grow fresh vegetables for your table in another way - use a loggia or balcony for this. First of all, you need to glaze it, and then think about how to make a greenhouse on the balcony.
A greenhouse or a small greenhouse on the balcony solves many issues. For some, this is an opportunity to grow seedlings with their own hands and not buy them at the market, while others want to create a relaxation corner with evergreen ornamental plants. But most often the greenhouse is used for growing tomatoes, cucumbers and other garden crops.
- Growing vegetable seedlings and flowers;
- Growing early vegetables and herbs;
- Year-round cultivation of vegetables;
- To obtain vegetables only in summer;
- Creation of a winter garden.
READ MORE: The best waterproof paint for the bathroom - tips for choosing the right durable bathroom coatings
Depending on the purpose of the greenhouse on the balcony, different technologies for its construction are used.
In some situations, its installation will only require a few boxes, soil and lighting, while in other cases it is necessary to completely re-equip the balcony. Also, the complexity of the work depends on whether the balcony is heated or not, on which side it is located (how much light falls on it).
Let's look at each method of installing a greenhouse on a balcony separately.
If the balcony has cold glazing and is not heated, the greenhouse is set up according to the same rules as outdoors.
That is, it must be an independent structure, inside of which the air temperature is maintained different from the temperature inside. There are factory models of greenhouses for balconies.
In appearance, they resemble a shelf made of metal pipes or profiles, covered with thick polyethylene film or polycarbonate. Using the same principle, you can make a greenhouse with your own hands.
Factory model
Greenhouse drawing
The first step in setting up a greenhouse is drawing up a sketch and drawings. First, the balcony is measured and the area that can be allocated to create a greenhouse is determined.
When planning, you need to consider the following points:
- The location of the greenhouse should be convenient for weeding, loosening the soil and watering the plants;
- The structure should not create difficulties for using the balcony for other purposes, for example, drying clothes;
- Moisture seeping through the drainage should not reach the neighbors below, thereby creating inconvenience for them;
- Passages must be clear for safety purposes, and the structure must be stable to prevent accidental injury.
It is best to install the greenhouse at the end of the balcony farthest from the door, but it all depends on the wishes of the apartment owner. If you plan to use the balcony only for growing vegetables, the greenhouse can occupy a larger area.
The height of the structure and the number of shelves on the rack depend on what will be grown on them. For cucumbers and tomatoes you need a single-tier greenhouse, and for greens you can make several shelves.
All dimensions are transferred to paper, and the amount of materials required for construction is calculated.
You can make a greenhouse frame from a metal profile, but the disadvantage of metal is its high thermal conductivity - it cools quickly, so the heat from the mini greenhouse will quickly evaporate. Wood or plastic is more suitable for constructing a greenhouse.
The procedure for making the frame:
- Two frames are made from bars with a cross-section of 40 mm - these are the side parts of the frame. In each of them, at the level of the shelves, there are transverse bars;
- The frames are connected to one another by horizontal crossbars, the size of which is equal to the width of the greenhouse. They are attached at the level of the crossbars of the side frame parts;
- Planks are laid on horizontal bars to create shelves on which plastic boxes with soil are placed.
The structure is installed in the place prepared for it. The floor must first be leveled so that the rack is stable and does not tip over along with the plants.
A cover for a wooden frame is cut out of the film. It should be easy to put on, so when cutting, allowances of about 3 cm are made. The front panel consists of 2 parts connected by a zipper - this will provide free access to the plants without removing the film from the structure each time. All parts of the film cover are connected with tape or stitched using a sewing machine.
Only the fixed parts of the shelter can be made from polycarbonate: the back wall, sides and top. The front part, as in the previous case, is made of 2 parts of polyethylene film connected with a zipper. The film is attached to the carbonate using double-sided tape.
If the balcony is insulated, there is no need to build auxiliary structures to shelter plants from the cold, since the entire room can serve as a greenhouse at once. There are two ways to install a greenhouse on an insulated balcony.
High glazing opens up the opportunity to create a bed for growing plants directly on the balcony slab. But to implement this plan, you should take care of good waterproofing of the floor. If it is not there, moisture after watering the soil will seep through the concrete to the neighbors, spoil their ceiling, and also destroy the slab.
Procedure for constructing a greenhouse:
- A low (10-15 cm) elevation is made on the balcony slab: formwork is arranged and cement mortar is poured into it. The width and length of the pedestal corresponds to the parameters of the bed;
- A wooden frame 30 cm high is constructed around the perimeter of the resulting elevation. In its front wall, holes with a diameter of 3 cm are drilled at the very bottom every 40 cm - these are drains for drainage;
- A layer of waterproofing is laid on top of the cement screed. It can be made from roofing felt, thick polyethylene film or coating mastic. The waterproofing rises to the walls of the frame, but does not cover the drainage holes;
- Plastic tubes are inserted into the holes for water drainage, the joints between the walls of the box and the plastic are sealed with sealant;
- A layer (up to 10 cm) of drainage material is placed in the resulting box: coarse sand, expanded clay, broken brick;
- The box is filled with soil, the composition of which is suitable for the crop being grown.
Creating a greenhouse
To build a greenhouse on a windowsill with their own hands, gardeners often choose the shape of a house or bread bin. This choice is easy to explain: the design is simple and understandable, without complex elements, the walls of the greenhouse are transparent, which has a positive effect on the seedlings. Depending on the choice of materials, the order of work becomes clear. I will list the main nuances of creating a greenhouse that you need to pay attention to before starting work:
- You need to install a tray at the bottom of the greenhouse; make several drainage holes in each container with seedlings. This stage is necessary to prevent moisture stagnation in the roots.
- Correctly calculate the height of the greenhouse so that the seedlings can develop without obstacles.
- Greenhouse walls made of polycarbonate or glass look aesthetically well-maintained, have a long service life, and are easy to clean. But it is important to remember that such walls retain heat inside the greenhouse several times more effectively than other options; do not forget about regular ventilation.
- A convenient option for a greenhouse is to create a frame structure covered with plastic film. Convenience lies in simple and quick access to plants, as well as easy replacement of material in case of damage or contamination.
We create home greenhouses with our own hands
Once all the nuances have been considered, you can move on to the stage of practical implementation of the plan. A common option in all respects for constructing a home greenhouse is the use of obsolete equipment.
Depending on your aesthetic preferences, you can take the frame of an old TV or VCR.
If you don’t have time to tinker with this, you can make a fully functional frame from store-bought parts.
The advantages of this option are as follows:
- Eliminates the possibility of draft formation;
- Possibility to install a temperature level controller;
- The design is unpretentious in maintenance;
- The bottom of the greenhouse must be completely sealed;
- It is advisable to avoid using metal elements.
Alternative greenhouse option
In the case when you grow a lot of seedlings at home, one greenhouse is not enough, and you don’t want to take up all the window sills of the house either - a rack for seedlings will come to the rescue.
- A rack is several shelves attached to each other, occupying the entire area of the window.
- Before you start building the shelving, check the windows for drafts, install blinds to block out the hot sun, and increase the width of the window sill if necessary.
- Wood is a convenient material for making shelving; it is easy to work with and wood is warm.
- Do not forget about installing and connecting additional lighting before installing the plants in place.
- Make the height of the shelves in the rack different so that you can combine tall and short plants.
Creating a greenhouse with your own hands will not take much time. But plants grown in a greenhouse will respond with excellent health and a bountiful harvest.
Sources:
https://stroy-podskazka.ru/parnik/na-podokonnike-ili-balkone/ https://fermer.blog/bok/ogorod/teplicy/vidy-teplic/3731-kak-sdelat-domashnjuju-teplicu-dlja- rassady-v-kvartire-svoimi-rukami.html https://diy.obi.ru/articles/parnik-na-podokonnike-svoimi-rykami-20153/