Despite the abundance of various furniture in stores, a simple stool has been and remains a fairly popular piece of furniture in the home. It is especially relevant if the apartment is decorated in a rustic style - in a kitchen with such a design, an ordinary stool will be simply irreplaceable. But it’s not easy to buy a quality product now, so it’s easier to make it yourself. How to make a stool with your own hands from wood? The drawing, diagram and step-by-step instructions are in this material.
How to make a stool with your own hands from wood
Structure and terms. Dimensions
The seat and legs are the main structural parts. The transverse slats at the top are called drawers, and at the bottom they are called legs. Essentially, these are all terms. Next comes the sizes. It is best to take as a basis those that have been available and proven for a long time, which can be found in any house or apartment.
If it is not possible to measure the finished sample, you can follow these dimensions: Adult seat 30-45 cm, children’s seat – 25-28 cm. The height is selected individually. For an adult, the most suitable is 42-48 cm, for a child – 26-28 cm. A drawing is drawn up according to the dimensions and all the shortcomings are corrected on it even before they are transferred to the finished product. Here the proverb comes to mind: “Measure twice, cut once.”
Manufacturing process. General step-by-step instructions
Do-it-yourself children's tables and chairs are best made from wood. This is an environmentally friendly material and does not require special skills to process it. The first experience can be obtained by using scraps of thick plywood, MDF, bars or boards left over from the repair. The advantage of homemade products is that the product can be made exactly according to the child’s height.
Required materials and tools
To make a highchair, you need to prepare:
- lumber or thick plywood, chipboard, etc.;
- self-tapping screws for connecting parts;
- screwdriver;
- jigsaw or hand saw;
- medium-grain sandpaper;
- paints and varnishes;
- pencil and measuring tools.
When purchasing lumber from a store, you need to make sure that it is completely dry. If you use raw wood for crafts, the chair may warp when it dries.
We make blanks and parts
Before manufacturing, you should select ready-made drawings or make them yourself. A standard chair consists of front and back legs connected by horizontal seat supports and legs. The back and seat are attached to the frame.
To make wooden structures with your own hands, you need to determine the height of the seat and backrest that is comfortable for the child (the length of the front and back legs), as well as the width of the chair. These indicators are chosen arbitrarily. Cut the parts of children's high chairs according to the selected dimensions. You can do them:
- from bars 2.5x5 cm, 3x3 cm (frame);
- from a board no more than 2 cm thick (seat, back or decorative sides);
- from chipboard or MDF (any parts, simple or shaped);
- made of plywood 2-2.5 cm thick (all parts).
Material processing
When the parts are cut out, the wood must be sanded so that the finished product does not develop splinters and hangnails that could injure a child. It is important to process plywood parts and chipboard along the cut line, and boards and bars are sanded on all sides.
Assembly of the finished product
Using the assembly diagram, connect the elements in series:
- front and rear legs in pairs on the left and right: connect the short and long legs using a tongue-and-groove method or with self-tapping screws at the place where the seat is installed, and then place a leg at a height of 10-15 cm from the floor;
- attach the front and rear support for the seat, and, if necessary, install footrests;
- attach the back piece to the top of the rear legs;
- install the seat: its length and width should be greater than the parameters of the frame, so that the edges protrude beyond the supports by 2-2.5 cm around the perimeter.
After assembly, the tables and chairs are sanded again on the front sides and painted or varnished.
Making a regular chair and table
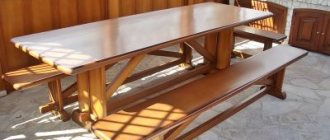
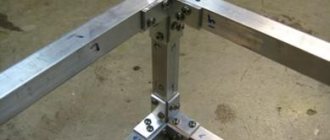
To assemble the chair and table, parts are cut: the chair consists of 2 short front legs, 2 long back legs, 4 crossbars, a seat support and 3-4 legs. The table needs 4 legs that are torn in height and 4 supports for the table top. It is better to make the last parts from a 2.5x5 cm block.
The table is assembled by connecting the upper parts of the legs with crossbars. To add rigidity, the bars are positioned so that the wide side is vertical. For additional strength, you can purchase special metal brackets for tables or screw furniture corners onto the inside of the joints, rigidly fastening adjacent crossbars.
The lid is attached to wooden pins or connected to the base with an angle.
Making a high chair for feeding a baby
To make your own high chair with your own hands, the drawings of a simple chair need to be supplemented with armrests and a removable or folding table. In this case, the height of the legs is selected so that the seat is at a height of 50-60 cm from the floor. This is a changeable parameter and can be adjusted to the height of the mother, who should be comfortable.
To make armrests, the front legs are also made higher than the seat level (by 15-20 cm). When assembling the sidewalls, support bars for it are installed between the legs, like props. The tabletop is cut out separately. Its installation is carried out after assembling the chair; fastenings can be made on hinges to the armrest or to the side of the back (with a bolt or pin).
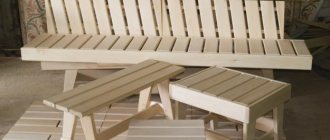
Children's chair and table. Two in one
The original design has a children's chair, made with your own hands for the growth of a child: for a baby it is suitable as a feeding chair. When needed, it can be easily disassembled and set up as a simple table and chair for study. Collect like this:
- cut the parts of the chair frame: 4 legs of the same length, 2 side legs and 2 armrests, 3 crossbars to support the seat and back, 1 tabletop;
- assemble 2 sidewalls in series from legs, legs and armrests, connect them with crossbars, installing 1 in front, 1 closer to the rear legs with support on the legs and 1 at the back, at the level of the armrests;
- attach the seat to the front and middle crossbar, and the back to the middle and top;
- the tabletop is attached to the front of the armrests.
2 rectangular frames are assembled for the table. To install the chair on top, the frames are connected with crossbars, placing 2 on the long side at a distance of 10 cm from the corners. The cross members should protrude 2.5 cm into the internal space between the frames. A tabletop is placed on the opposite long side. On 1 short side there are 2 crossbars, the distance between which is slightly less than the distance between the legs of the chair. On the second short side of the frames, the crossbar is placed under the tabletop itself.
To use it as a child chair, the table is turned on its side and a high chair is placed on top.
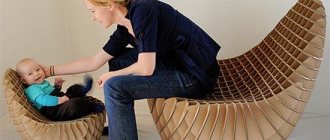
Children's chair made of plywood
Homemade children's chairs from plywood are made according to the same principle as wooden ones. It’s easier to work with plywood: you use a jigsaw to cut out the finished parts of the sidewalls. Crossbars made of a block or the same plywood will help connect them to each other. Assembled using self-tapping screws and corners.
Other types. Schemes and drawings of different models
A strong children's table and chair can be assembled from other available materials. Use a soldering iron to connect several pieces of plastic pipes, replacing wooden parts with them. A light and strong chair doesn’t even need finishing.
An option for a summer house is a garden chair made from PET bottles. Using the photo as a sample, the chair is easy to make yourself.
For an unusual product, branches, snags, driftwood, etc. cut from trees in the garden are suitable. Combine the parts processed by nature into a stable structure.
Decorating your stool
You can decorate your stool depending on the interior items where it will be located. You can apply a design on the surface of the seat with spray paint using a stencil. Then coat the surface with varnish. Or make a bold design move and decorate a retro stool using decoupage. This is labor-intensive, but effective, and you can involve the whole family in this interesting activity. For this we will need PVA stationery glue, beautiful napkins and varnish, preferably acrylic. The result will tell not only about your accuracy, but also reveal your taste. In the end, you can decorate just the seat by laying thin foam for softness. Then decorate it with beautiful fabric and decorate it with accessories to your taste. As they say, everything is in your hands!
Materials and tools
Making a stool will require high-quality materials that have stood the test of time. In the first place, of course, is wood. Wooden stools rank first in terms of convenience and second after forged ones in terms of durability. The wood should be dried in room conditions at 20-30 degrees; you should not use kiln-dried wood, as the possibility of cracking cannot be ruled out. After air drying, the material needs to be dried at home at room temperature for about a month. It is best to take hardwood: maple, birch, beech, wenge, hemlock, mahogany. Or make legs from them, which carry the main load, and the seat from pine, spruce, MDF, chipboard or plywood.
Chipboard is one of the cheapest, but unreliable materials. It has advantages, such as moisture resistance. But when making a stool, strength is much more important, and chipboard has insufficient strength, and it is also too fragile for furniture, although there are a couple of options in which the pressure on chipboard can be reduced. But the constant release of formaldehyde resins, which make this material unsafe, unfortunately, cannot be completely eliminated. MDF is an environmentally friendly material and quite durable. However, when making kitchen furniture with your own hands, it is better to use it in combination with hardwood, especially in the supports, that is, in fact, it is used only for the seat, or lid, as it is called in some sources.
A good substitute for wood is plywood, but then you will have to do a little magic with the design. Kitchen stools made from plywood are made from 3 parts, or from 4, so-called box-shaped. This design is now very common, especially in the furniture industry. Although it is perfect for making a stool with your own hands.
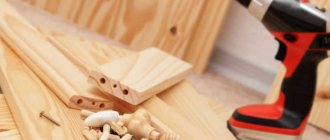
Tools are selected depending on the materials. To make wooden stools, we will need:
- roulette
- self-tapping screws
- screwdriver
- square
- jigsaw
- chisel
- emery
- wood glue
Terms, diagrams and a little history
A stool is one of the simplest types of furniture products. No matter what changes our life undergoes, it remains unchanged. Only the materials from which it is made change. In Soviet times, making a stool with your own hands was one of the first tasks in labor lessons. Not only boys knew carpentry. Sometimes representatives of the fair sex had to comprehend the basics of adult life and learn how to make a stool with their own hands. Modern furniture bears little resemblance to its counterparts from 50 years ago. Wooden stools of that time were rough, but durable. They fit perfectly into the interior of the kitchen, as well as other rooms. Nowadays there is a rich assortment of different types of furniture in stores, but there are also amateurs who want to learn how to make a stool with their own hands. And in our time of abundance of building materials, this will not be difficult at all.
The main parts of a stool are the seat and legs. The legs are tied at the top with drawers, and at the bottom with leggings. Having become familiar with the terms, you can start drawing. First, you need to decide on the sizes. When making a stool, it is better to start from old, but reliable models that can be found in every home. Having measured the height and other parameters, you can begin to develop a diagram. If you don’t have a sample, then for an adult stool the size of the seat side will be 300-450mm, for a child’s stool - 250-280mm. Homemade stools should be even more comfortable than store-bought ones. If only because you can choose the height according to yourself. Usually the size for adults is 420-480mm, for children - 260-280mm. You must have drawings of stools with you, whether it is a diagram from the Internet or drawn up by you. After all, eliminating defects on paper is much easier than redoing the whole job.