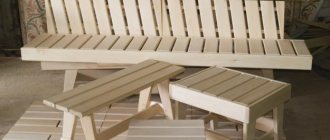
After the construction of a water supply or sewerage system, repair work in a house or country house, consumables are often left behind - metal profiles, polypropylene pipes, fittings. Careless owners throw away excess material, and craftsmen find their own use for each element. For example, they independently develop projects and make durable and beautiful furniture from PVC pipes with their own hands. Tables, chairs, shelves and organizers serve for years, delighting with impeccable functionality and stylish appearance.
In summer, comfortable chairs for children can be used in the country house or playground
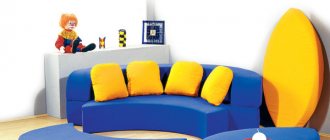
DIY children's chair made of PVC pipes
Children's chair made from scraps of PVC pipes: A – seat frame and backrest, B – legs, C – stands for armrests, D – stands for backrest
Products made from polypropylene are safe, which is why they are used to make playpens, cribs, fences and furniture. One of the options is a comfortable, light and beautiful chair, assembled from modules (self-cut sections and connecting elements). The size of the chair, which is assembled according to the principle of a designer, depends on the size of the fragments. As an example, let's take the instructions for assembling a chair for a 4-5 year old child.
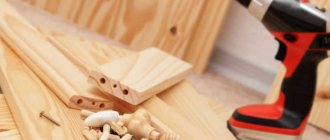
The material you will need is about 3 meters of plastic pipe, 6 T-shaped connecting elements, 8 corner elements, and a piece of durable bright textile. Tools – fine-toothed saw, PVC glue, sewing machine.
Operating procedure:
- cut the pipe into fragments - 7 pcs. 33 cm each (A), 4 pcs. 20 cm each (B), 4 pcs. 13 cm each (C), 2 pcs. 18 cm each (D);
- we assemble the back, then the seat, using connectors, we check the chair for stability;
- we sew a rectangle according to the dimensions of the crossbars, bending the fabric along the edges to form holes for the modules;
- we stretch a piece of fabric over the crossbars so that it sag a little;
- we disassemble the chair frame and reassemble it, but using glue at the joints.
After practicing assembling a chair, try to make a table, tent or cozy house for kids.
Assembly of the structure
In order for the installation process to be simple and not cause much trouble, it is important to draw up an order or, better yet, a diagram for assembling the product. You can do this yourself, but the option of using one or another type of furniture made from standard materials as a sample is also suitable. In addition, there are special construction publications devoted to this topic. The assembly diagram and even drawings are taken from there. Taking a sample of classic furniture as a basis, it is recommended to take into account the properties and characteristics of plumbing systems.
You should start working with pipes with simple products, like shelves. With experience comes skills, and the task becomes more difficult. The variety of options is limitless and depends on the desire and imagination of the author. The reward will be the uniqueness of the piece of furniture and the knowledge that it was created with your own hands.
Office desk on a plastic frame
The range of office tables is large: in the store you can purchase any model - from a simple table top with legs to a complex design with shelves and cabinets. But we will not monitor the nearest markets and spend money on a ready-made table, but will make durable and practical furniture from polypropylene pipes with our own hands.
A large and comfortable table is suitable for lessons, handicrafts, and computer studies.
Video: Laptop stands
Materials and tools
Our goal is to build a strong and stylish table with tabletop dimensions of 915x2030 mm. To make a smaller model, it is necessary to adjust the dimensions of both the top and the frame. To make the table light, despite its large dimensions, it is better to take a hollow tabletop (door leaf) and polypropylene blanks. T-shaped and cross fittings serve as connectors; plugs will also be needed. Make sure that the diameter of the clamps matches the diameter of the crossbars.
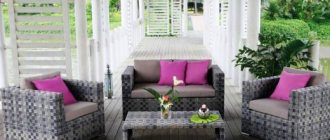
One of the successful options is a small kitchen or country table with legs made of PVC pipes
To make one table you need 12 meters of plastic pipe, cut into pieces:
- 5 pieces of 7.5 cm;
- 4 pieces of 50 cm;
- 10 pieces of 30 cm;
- 4 pieces 75 cm each.
PVC products are sold in construction supermarkets and plumbing stores. In addition to the crossbars for the frame, the following parts are needed:
- 5 flat top end caps;
- 5 caps for cups for table legs;
- 2 crossover (X-shaped) fittings;
- 4 T-fittings;
- 4 four way fittings.
The finished countertop is the canvas for the door, but there are other options. You can order a plastic or glass top, and also create a flat plane of the required dimensions from boards. For assembly you will need fastening materials (screws, self-tapping screws, screws and special PVC glue).
When using connectors, a welding machine is not required. Required tools:
- electric saw or jigsaw;
- fine-toothed hacksaw;
- sharp knife for plastic;
- screwdriver
Prepare all materials and tools in advance, then the assembly work will take less time.
Frame assembly
It is recommended to carry out the first assembly “dry”, that is, without using glue. First, we assemble one by one the sides of the frame on which the tabletop will rest, then the back part connecting the first two. For additional stability and strength, we attach a third leg in the center of the back. We monitor the parallel arrangement of elements.
When all three sides are assembled, we connect them into a single structure. The result should be a frame standing on five legs. After making sure that all the elements are positioned correctly and the frame is level, we disassemble the structure and reassemble it again using glue, special cement or small self-tapping screws.
Tabletop installation
Place the finished table top face down on the floor. We install the frame on top so that the flat plugs fit tightly to the surface. We mark the locations of the plugs and remove the frame. We screw the screws into the designated points and secure the plugs. We turn the structure over, put it on its legs - the office table is ready.
Handmade furniture made from plastic pipes looks more natural if the wooden tabletop is varnished and the legs are painted in a shade that matches the interior.
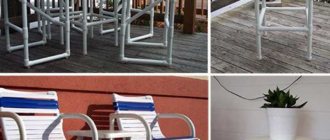
Metal shelving for the garden
A pantry, utility room, boiler room, basement and even a dressing room are suitable for installing a metal rack
Let's try to do without welding and assemble a rack from a galvanized metal profile of a small cross-section, which is more convenient to process. We will need a tape measure for marking, a hacksaw for metal and a screwdriver, instead of which you can use an ordinary screwdriver.
On the shelves of the rack it is convenient to place jars with homemade preparations: compotes, pickles, jams and salads
To simplify the work, we make an exact sketch to which we “transfer” the installation location. We draw a simple diagram indicating the dimensions. Then we calculate how much material – thin profile – is required. If the appearance of the rack is important, we buy a chrome-plated pipe (approximately 22 mm in diameter). For shelves, plywood (10-15 mm thick) is suitable, which we fix with self-tapping screws (8-13 mm).
Use a hacksaw to cut the pipe into fragments. One of the kit options: 4 vertical posts, 8 rear and front crossbars, 8 side crossbars.
We assemble four frames for the shelves, securing the corners with self-tapping screws or additional corner fasteners. Then we fix the frames on the vertical posts - the legs of the rack. We screw the back part of the finished structure to the wall using brackets for stability. We paint the shelving frame (chrome plated is not needed), lay out the shelves, and secure them with self-tapping screws. Convenient for storing things and workpieces, hand-made furniture from a profile pipe is ready.
Design, construction and required materials
To create a product, you need imagination and knowledge of examples of similar products, some skills as a mechanic and carpenter, a supply of the necessary tools and a desire to achieve results.
Forged elements are found everywhere and are distinguished by their individuality. They can be used for benches, gates, display cases, tables.
When building a frame house, it is necessary to pay special attention to the quality of the material, understanding that the supporting structure must be strong and reliable. Therefore, it is advisable to calculate the design or purchase a ready-made project, which details the parameters of profiles and pipes, methods of their connection and treatment, including anti-corrosion.
You can create a lot of useful things for your home from square or rectangular steel pipes.
If a fence is being installed, it is convenient to use profiled pipes as posts, reinforced into the foundation of the fence or driven into the ground with a sledgehammer.
Attaching the crossbars to the posts is possible both by welding and bolts.
It is necessary to select bolts by diameter for optimal fastening of the structure.
It is preferable to attach gate hinges to poles with bolts; welding on pipes will be less reliable.
The frames of small structures that play the role of utility buildings on the estate, such as sheds, greenhouses, garages, poultry houses and others, are optimally made from profile pipes.
At the same time, greenhouses can be made without a foundation and portable from year to year from place to place.
Sports equipment such as racks for basketball hoops and badminton, gaming tables and exercise benches are easily made from profile pipe.
It is reliable, easy to install, and the cost of the material is affordable.
The use of pipes for stairs, balcony railings, and protective grilles for windows requires the use of professional welding work, but is achievable with your own hands if you have the skills.
Do-it-yourself metal structures made from profile pipes have many advantages.
The greatest possibilities for using profile pipes arise when you need to make metal furniture with your own hands, no matter garden or home furniture, racks and shelves in basements, attics, garages, tables, chairs and benches in gazebos near barbecues and many others.
If you correctly calculate the building, it will be durable and reliable.
Bent frames of chairs, sofas, tables, beds, wardrobes and mezzanines, lamps and other objects, which is enough for your imagination.
The profile pipe allows you to ensure the fulfillment of any fantasies in the house and on the estate.
The greatest interest among the possible products is furniture made from profile pipes because some kind of furniture is always required at a dacha or estate, be it a bench or shelf, chair or table, etc.
Therefore, you should always have pipes and simple tools for creating furniture in stock.
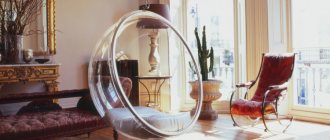
Stylish interior elements made from PVC modules
It’s hard to imagine that amazing golden vases are made from ordinary PVC pipes
Very small fragments of plastic products are useful for decorating the interior and creating objects useful in everyday life. Using holes in the pieces, you can make several types of organizers - for shoes, stationery, toys, cleaning products. 5-15 wide elements, glued together and fixed to the wall, turn into a convenient shelf for bottles. A decorated PVC pipe with a longitudinal cut, hung above the bar counter, is a great place to store empty glasses.
Convenient shoe organizers made from large-diameter plastic pipes
To decorate your interior, you don’t need to buy expensive decor. It is enough to cut a thick plastic pipe into pieces of various lengths, paint the resulting elements in different colors, decorate them with sparkles, shells, pieces of colored glass, and you will get a magnificent set of flower pots. Plastic rings are an excellent material for creating festive compositions in the form of wall panels. Christmas tree decorations, hearts, flowers or Easter figures are placed in its holes, depending on the festive occasion.
Stylish shelves for towels, napkins and household items
An original and convenient organizer for stationery
As you can see, ordinary building pipes in skillful hands become comfortable furniture, useful home equipment, and exquisite decor.
Segment No. 1: decision making
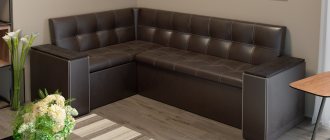
In fact, deciding to spend time and effort on assembling a bed is also not so easy. After all, we get used to working all our lives and using the money we earn to buy things we need at home. And here you need to take actions that go beyond the usual framework. So here are a few reasons that motivated me.
Motivation to help you start building your own
You will get the following benefits from making your own sleeping bed:
- Uniqueness of design
. It will be enough to make small original changes to the original drawing to end up with a bed that you will not find anywhere else. Well, if you wish and have the appropriate skills, you can even get a unique work of art;
- Possibility of realization of any shape and size
. There are tall people whose legs hang from typical models, and there are non-standard rooms where a store-bought copy simply does not fit. All these little things can be easily solved in the situation under consideration;
- Use of high quality materials
. The fact is that many manufacturers, in order to ensure that the price remains acceptable to a wide segment of buyers, resort to the use of low-quality wood chips. This, of course, affects the durability of the product, which, unlike most furniture items, is regularly subjected to dynamic loads; - Saving
. The cost of the final product will be significantly cheaper than store-bought analogues, which will allow you to direct your family budget in a different direction.
Reasons for choosing profile pipes
After I decided to take on the work, I immediately began to think about the most suitable material. And we were not talking about the upholstery, which can be changed if desired even during the product’s operation, but about the frame, which takes on most of the load and sets the shape of the entire bed.
Very quickly the idea of using profile pipes came to me. There are several reasons for this:
- Very high strength indicators
, justified by the presence of stiffening ribs, which absorb all mechanical impacts exerted on the product;
- Ease of use
. Elongated parallelepipeds are very convenient to fold, transport and, what is especially valuable, connect;
- Reasonable price
. Profile pipes are, as a rule, cheaper than their cylindrical counterparts; - Wide range of structural elements
. You can easily select samples with the most suitable section sizes for your case; - Durability
. Steel at home will serve you for decades.
In addition, you can even make a bed from polypropylene pipes with a rectangular cross-section, which will be even cheaper and simpler. But this is only if the design will be used by a child or at least a teenager. Although with such low loads you can get by even with ordinary cylindrical products that are easily soldered together:
For myself, however, I chose more reliable steel.
Features of professional pipes
Corrugated pipe is a material that has a high hardness index, but is easy to process even at home. It has many advantages that allow it to be considered one of the most popular and frequently used. But there are also some disadvantages that must be taken into account when making products from professional pipes with your own hands.
Manufacturing process
Before you start manufacturing any structure, you need to study the production technology of profile pipes. This process is carried out on an industrial scale in specialized enterprises. However, if you have the necessary equipment, you can make a small batch yourself.
This video shows how to make a swing from a profile pipe:
Procedure for creating source material:
- The metal sheet is unwound and leveled.
- A cylindrical product is formed from it.
- After this, the workpiece is welded using a seamless method.
- Once the finished pipe is cooled to a certain temperature, it is given the desired size.
- At the next stage of work, it straightens.
- At the very end, the pipe is cut into pieces of the required length and undergoes heat treatment.
Main advantages
To choose what can be made from a profile pipe, you need to take into account the features of working with it and the main advantages. Thanks to this, you can choose the highest quality material that is suitable for a specific type of product.
The strength of the future structure depends on the quality of the selected profile pipes.
The advantages of a professional pipe include:
- Very high strength values. Thanks to them, it is possible to produce structures that must withstand enormous loads and not deform under their influence.
- Cheapness. Despite the many manufacturing stages, corrugated pipes have a relatively low cost and can be afforded even by financially strapped builders.
- Ease of processing and installation. The easiest way to connect two profile pipes together is by welding. However, they do not require special pre-treatment.
- High reliability. This type of product goes through many stages of heat treatment, so it becomes incredibly strong. Thanks to this, structures made from them are distinguished by their reliability.
- Durability. With proper care and appropriate corrosion protection, this material can last for decades. At the same time, it will remain just as durable and retain all its characteristics.
Profile pipes are protected from corrosion, which makes them a very durable material
Negative sides
In addition to the large number of positive aspects of professional pipes, there are also negative ones. All of them are in one way or another associated with financial costs and difficulties of manufacturing at home. The disadvantages include the following:
- The need to use expensive equipment to create pipes yourself.
- The whole process requires large free areas.
- High weight of finished products.
Section No. 2: preparatory work
Before starting the assembly itself, I did a number of preliminary steps, for which I needed the following supplies:
And here are the steps themselves:
- First of all, I made a drawing with an exact indication of all dimensions
. This will be your guide in all future work, so give it due attention. In addition, if you are not very familiar with descriptive geometry, then keep in mind that the Internet is full of ready-made diagrams that can be used in their original form or after making your own adjustments;
- I purchased pipes
with the following parameters:
- I took a “grinder” and cut the required number of sections from solid pipe pieces
in accordance with the drawn up drawing;
In order for the cuts to be as smooth as possible, I recommend fixing the angle grinder in a special device, as shown in the photo below. Such equipment is sold in construction stores.
- Then I changed the cutting wheel on the grinder to a flap grinder and carefully processed the ends of the created workpieces with it
in order to remove burrs;
- Next, I took acetone, soaked a rag in it and wiped the surface of all the pipes, removing the factory grease. If this is not done, then it will be inconvenient to assemble the structure, and it will not be possible to paint it at all;
- Now I took up the drill and drilled the necessary holes
, also strictly adhering to the drawing diagram. If you plan to cook, then of course this step is eliminated.
Section No. 3: assembly process
Before assembling the bed with my own hands from a profile pipe, I painted all the structural elements in the desired color.
I recommend not saving at this stage and giving the blanks for powder coating. Taking into account the operating conditions of the structure being created, this option for finishing its structural elements can be considered eternal.
To complete further work I needed:
- I took pieces of pipe with a cross section of 60 by 30 mm and assembled them into a rectangular base
, using steel corners to reinforce the connections. In the middle of the resulting rectangle, I installed a longitudinal crossbar, dividing it into two sleeping places; - From the inside of the frame I screwed support legs to it
, the ends of which were sealed with plastic plugs, which in the future will protect the floor from scratches;
- I attached support guides
to the inside of the sidewalls and both sides of the longitudinal crossbar , the role of which was played by fragments of pipes with a cross section of 40 by 20 mm; - Now I screwed wooden slats
in increments of 15 cm, which eventually covered the future sleeping areas.
If your drawing takes into account the back, then it, of course, is also assembled at this stage, and then the frame may look like this:
Making a bed with your own hands
The process of making a bed from a profile pipe includes the required steps:
- determining the dimensions and design of the model;
- drawing up diagrams and drawings;
- preparation of raw materials and equipment in accordance with the production method (welding, forging);
- cutting parts, cutting materials;
- assembly;
- fastening or welding work;
- finishing and decoration.
Drawings and diagrams
The diagram of a metal bed indicates the dimensions and shapes of the structural elements (frame, frame, legs, backrests, connecting parts). The drawing marks the connection points of the elements and types of fastenings in accordance with the design of the model. The dimensions and number of frame jumpers, the number of screws, bolts, and slats are taken into account. The length of the required metal profile is calculated.
When preparing a model with an original headboard, a drawing of an artistic element is made, which can be:
- low or high;
- made of solid steel sheet or with shaped openings;
- with a rigid structure or soft lining;
- standard or with design elements;
- in the shape of a rectangle, square or circle, etc.
Preparing for work
During preparatory work, the metal profile is cut into pieces of the required length. The elements are cleaned of factory lubricant using solvents (acetone). The profiles are ground and treated with anti-corrosion impregnation. Then, using an electric drill, openings are made for self-tapping screws and bolts. When using the welding method, making holes for fasteners is not required.
Furniture made from profile pipes, connected by welding, is characterized by high strength and durability, but cannot be dismantled when moving. Connection using self-tapping screws is universal, easy to implement, allows you to transform and easily move furniture.
Assembly
First you need to make a frame. Work begins with checking the symmetry of the elements. The parts of the rectangular base are butted and connected with bolts and self-tapping screws. After assembling the bed frame with your own hands, the legs are attached to the inside of the frame in the corners. Plastic plugs must be attached to the surfaces of the legs adjacent to the floor.
Fasteners for lamellas are mounted to the outer surface of the frame. It is necessary to treat metal surfaces with varnish and paint in accordance with the project. Then the parts of the orthopedic base are connected in stages, taking into account the symmetrical arrangement.
Section No. 4: sheathing
The steel “skeleton” is certainly very strong and stable, but it cannot be called particularly beautiful. It lacks coziness, and I used particle board to give it to the finished structure. For the purpose of decoration, this material will cope quite well, since the load-bearing functions have been removed from it.
My actions:
- I screwed elongated thin laminated chipboard panels
to the sides of the frame with M6 furniture bolts 7 cm long . At the same time, their finished edges were raised above the structure by several centimeters, due to which small walls were formed; - A wider panel was similarly attached to the front part of the frame in such a way that its lower edge dropped almost to the floor;
- At the back, where the pillows would presumably lie, I installed a wide canvas, which also forms the headboard of the bed;
- placed an orthopedic mattress
in the resulting box , on which all the work on assembling the bed from a profile pipe was completed.
Of course, you can choose other materials for cladding, or even leave the steel uncovered and simply decorate it using other methods. Everything is in your hands, and the manifestation of originality in this case is only welcome.
Advantages of plastic crafts
Is it worth bothering with PVC pipes if you can buy simple furniture in any store? Of course it’s worth it, because it will not only bring satisfaction from working with your own hands, but will also make life easier.
Products made from polypropylene pipes have many advantages:
- Do-it-yourself assembly takes little time and does not require much effort - even a young mother or even a teenager can handle the job.
- Furniture items made from plastic pipes are very light, which will not cause difficulties when rearranging.
- Rigidity – pipes can withstand quite high loads.
- Resistance to aggressive conditions, thanks to which products can be safely placed outdoors.
- Wide scope for design ideas - it’s easy to make simple chairs for a summerhouse, a small wardrobe, a children’s bed or a playhouse for kids from PVC.
- Low cost - if a young family is just getting on its feet, you can avoid spending money on expensive furniture and assemble it yourself from polypropylene water pipes available to everyone.
Labor costs
The whole preparation, assembly and making of the bar stool from pipes with your own hands took about 2 hours.
These days, stores are filled with lots of attention-grabbing furniture and decor. A high price usually deters a purchase. The worst thing is that they are so simple, if you had a lot of free time and ideas, you could make them yourself. Therefore, we have selected 25 ideas for using water pipes that you can easily repeat at home. They are very original and will inspire your creativity.
What will you need to make furniture?
Assembling PVC furniture with your own hands is not at all difficult - you will need a minimum set of tools, basic skills in working with them and a little creativity. The result will definitely be comfortable chairs, armchairs, shelves and even tables - the range of possible products is limited only by your imagination.
The assembly process will take no more than an hour for each item - and this includes design. By the way, in order to quickly figure out how to shape this or that piece of furniture, on our website you can see a variety of photographs of plastic products. For example, the photo above shows a very convenient and stylish rack for books and magazines, and when complemented with flat shelves, other items can be placed on it.
The minimum set of necessary tools is as follows:
- roulette;
- marker;
- hacksaw for metal.
Other items that can be found at any summer resident may also be useful - a file for smoothing cuts of plastic pipes, a drill, a soldering iron. But, for example, a level is not needed - all the parts, as when assembling ordinary water pipes, will be connected with special fittings - it will not be possible to deviate from the desired angle no matter how much you want. Because of this feature of PVC products, separate fasteners - screws or glue - are not needed.
Important: despite the fact that working with products made from polypropylene pipes is very safe, you should use protective equipment - goggles and gloves.
Dimensions of chairs made of plastic pipes
It’s worth immediately making a reservation that for the manufacture of plastic furniture for sitting, chairs, stools, folding models of benches and high chairs, unreinforced polypropylene pipe with a diameter of 20 and 25 mm is used. This greatly simplifies the work, although there is a significant drawback. The rigidity of polypropylene, and even more so polyvinyl chloride pipes, is low. You can easily verify this if you pick it up and try to bend a piece measuring 50-60 cm. An adult can do this without much effort.
You only need to assemble a chair or stool with a soldering iron, no glue, otherwise the polypropylene frame will fall apart
Therefore, when planning the design of your favorite chair model made from polypropylene pipe, you need to take into account some recommendations:
- The height of a standard design chair with single legs should not exceed 40-50 cm for the seat and 70-80 cm for the upper edge of the back;
- The seat is made from pieces no longer than 50 cm, otherwise the entire structure of the seat will not be rigid, and the chair will “play” and deform under the weight of the person sitting;
- When assembling the structure, namely when soldering parts, it is necessary to strictly follow the technique of planting the melted ends of the pipe inside the coupling.
This is far from being a whim of the designer; if soldering is performed strictly in compliance with the alignment of the two parts, then this ensures maximum strength of the connection. If you try to solder at an angle not provided for in the technology, then it is quite possible that in the future such a chair will fall apart at the most inopportune moment.
If you want to make a stool or chair with three legs, like in the photo, think again about whether it’s worth saving and violating the conditions for safe soldering of parts.
You cannot solder polypropylene pipes this way.
Furniture assembly process
In general terms, assembling household items from polypropylene pipes is no different from any other work with this material. You should develop a project for the future product, select PVC pipes of suitable length and diameter, and you can begin assembling it yourself.
Let's look at the technology using the example of assembling a simple chair for a summer house - such as in the photo above. The process will consist of just a few steps:
- Pipes of suitable size are selected; If you don’t find any, you can saw off the excess from plastic elements that are too long.
- Using suitable fittings and a soldering iron, the frame of the product is assembled.
- A soft seat will increase the comfort of using the chair. To make it, you need to take a suitable piece of not too thick plywood, put a square of foam rubber on top of it, which is then covered with thick fabric. It must be larger than the plywood so that the edges can be stapled under the seat.
- The seat is fixed to the frame with self-tapping screws.
- If the furniture is still not comfortable enough, you can make a soft back in the same way.
Of course, the chair can have almost any shape. If you take PVC pipes of larger diameter and bend them with a blowtorch, then attach them to the legs from below, you can get a rocking chair. By extending the seat, you can get a comfortable and waterproof chaise lounge made of plastic pipes that you don’t have to constantly dry.
Other pieces of furniture are assembled in a similar way - clothes dryers, laptop stands, table frames and much more. The design can be very different, and you can improve it a little by painting the resulting product. For this, it is best to use acrylic paint - it looks bright, has many shades and does not deteriorate when cleaning furniture.
Assembling bar stools
So, you have decided what material you will use. Let's look step by step at how you can make several types of chairs yourself.
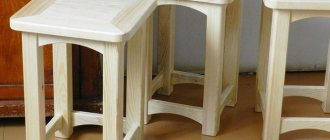
Made from solid wood
When choosing wood for a product, pay attention to the most accessible species - pine and birch. They are great for this kind of work; solid wood can be bought in the store in the form of furniture panels. The required thickness is 20 and 30 mm. You can borrow some details from old chairs.
Cut out 10 pieces:
- part 1 – one circle with a diameter of 36 cm and a thickness of 30 mm;
- part 2 – one circle with a diameter of 26 cm and a thickness of 20 mm;
- part 3 – four legs 30 mm thick;
- part 4 – four stiffening ribs 30 mm thick.
The first part will serve as a seat, the second (small circle) will serve as a backing for the seat.
Chair seat and backing
When cutting out the legs of the future chair, make sure that the structure of the wood in the solid wood is vertical.
The leg of the future chair and a visual drawing for it
Cut out stiffening ribs from 20 mm thick solid wood - they will serve as a footrest.
Stiffening rib
Now start assembling the chair. To do this you will need 3 types of screws:
- 5 X 80 – to screw the legs to the small circle and to each other;
- 5 X 40 – for attaching the seat to a small circle;
- 5 X 20 – for securing the stiffeners.
The ribs are attached to the legs using corners that are placed below, on the floor side.
Bar stool assembly process
The diameter of the holes for self-tapping screws in the plane should be 6 mm, at the end - 3 mm.
All you have to do is tint the chair with stain, dry it and paint it with varnish in 2-3 layers. The bar stool is ready!
Ready bar stool
Second version of a wooden chair
These bar stools are very simple to make and easy to use. Their peculiarity is that the seat can be made straight or bent, and subsequently, if desired, upholstered with fabric.
Solid wood bar stools
- Make a drawing;
Chair drawing
- Look carefully at the second drawing: for simplicity of the image, it does not indicate the two upper crossbars under the seat. Don't forget to add them when assembling;
More visual and detailed drawing
- for chair legs, use beams measuring 38 x 38 mm. You can take poplar wood if there is no pine or birch. The length of the legs will be 71 cm. Make cuts at their ends at an angle of 5 degrees;
Chair legs
- Attach a short crossbar, the so-called chair apron, to the top part. Secure the middle and bottom crossbars in the same way;
Securing the crossbars to the chair legs
- Attach a second crossbar of greater length to the top of the rack on the right side. Also install the lower one - it will act as a step;
Fastening the crossbars
- do the same on the left side. To make it comfortable, set the height of the footrest according to the height of the people who will sit on these chairs;
Fastening the footrests on the other side
- fasten the halves of the chair together.
Assembling the chair body
How to make a recess in a seat? There is a way to do this, although it is not easy. Make several cuts of different depths along the surface and plan out the recess with a chisel.
Recess in the seat
Sand the surface of the seat and attach it to the legs. Fill the holes for the skew screws, sand the entire chair and paint.
The chair is ready, all that remains is to paint it
Note! In the first and second options, you can use plywood or chipboard to make the seat.
Metal bar stool
This chair will become a real exclusive, so you won’t have to regret the time spent and efforts made.
A metal bar stool will become a truly exclusive piece
Surely you have the remains of sheet iron, metal profiles and scraps. All this will come into play.
Sketch with a pencil the shape of the future seat on a flat asbestos sheet for welding. In the photo it is indicated by red lines.
Seat sketch
According to the sketch, cut out blanks from a 25 mm strip. Weld them together.
Workpieces welded together
For the internal layout, cut blanks from the same strip.
Blanks for internal layout
Weld the workpieces and clean them. Round the corners.
Cleaned seat blank
Weld the legs from a 30 X 20 mm profile to the seat. During welding, grab the legs onto one welding point and carefully move them to the desired position.
Weld the legs from the profile
Mark the levels of the foot rest, for example 45 cm from the seat. Be guided by how comfortable this height is for your height.
Footrest level mark
Also make the foot rests from a 30 X 20 profile.
The footrests are made from the same profile
Instead of plastic or rubber plugs for legs made of metal profiles, you can use wooden “heels”. They do not scratch the floor, and you can always sharpen them to the desired size.
Wooden cork blank for metal profile
These plugs do not need to be fastened with screws or fixed with glue - they adhere perfectly to friction. The main thing is to sand them to the size of the legs.
Installed wooden plugs
The chair is ready, all that remains is to paint it. First apply a layer of primer.
Chair primer
After the primer has dried, paint everything below the seat with black paint. Wait for it to dry.
Painting chair legs
Wrap surfaces painted black with film so as not to stain them during further work. Paint the seat red.
Painting the seat
After the chair is dry, you can use it for your pleasure!
Plastic items without fittings
There is no need to make crafts from water pipes in such an industrial style. You can come up with products that will have no less functionality, but for assembly you will not need either fittings or a soldering iron.
So, from scraps of pipes of different diameters you can make a convenient organizer for various small things - office supplies and similar useful things. To do this, PVC pipes are cut at an angle and the cut end is screwed to a board that can be mounted on the wall. You can simply place the pipes on the table surface - in any case, you will get a very convenient device, as in the photo above.
In the same way, you can make design details of almost any piece of furniture. There are excellent options for plastic beds and coffee tables - a large number of polypropylene pipes of the same or different diameters are fastened close to each other, and on top of them a rigid sheet of plywood or other flat material is laid under the mattress, and in the case of a table, you can immediately install a tabletop. One of the options for such a bed is in the photo below.
Using PVC pipes. But greenhouses and sheds are not all that can be made from PVC and aluminum pipes of different diameters. Furniture, decorative items for the home, organizers, shelving, even weapons are beautiful bows of different shapes. People's imagination is constantly being embodied in new PVC forms, and we have made a selection of the most interesting DIY projects for you.
Let's start with homemade furniture made from aluminum and PVC pipes connected with fittings. There is both children's furniture and options for adults, cute designs that will fit into any interior, and shelving with many shelves.
Beautiful bows
You can make a beautiful bow from a PVC pipe - give it to a friend or have fun yourself, testing your accuracy. A practical guide can be read here or here.
If you have already tried making furniture, home decoration or other DIY projects from PVC pipes, please share your experience in the comments.
DIY furniture made from pipes
Low table made of pipes and wood
A table made of pipes and wood.
Here is a detailed video instruction on how to make it.
Dinner table
Dining table
This table made of three planks and metal pipes can be used as a dining table. A note of industrial style in the design of the room. You can see the manufacturing technology.
Large rack made of pipes and wood
Pantry rack
A rack for a spacious pantry or garage is an excellent solution for storing all sorts of things. It's durable and looks cool. Read the assembly manual.
Shelving for the room
Rack for the hall
TV, audio system, souvenirs and books - everything will fit on this homemade rack. Let's see how to make it.
Another rack
Rack made of metal and wood
The shape of this rack is somewhat unusual, as if it was planned for specific items. Looks cool with paintings, figurines and other contents. There is a list of building materials and a story about production.
Coffee table with glass top
Coffee Table
The legs of this table are made from bent and painted PVC pipes. As for the tabletop, it doesn’t have to be made of glass, but it certainly looks cooler. you will find manufacturing instructions.
Aluminum tube bed
Bed with aluminum tube frame
Large bed frame with canopy made of aluminum tubes and fittings. Manufacturing Guide.
A simpler bed made of pipes and wood
Bed made of pipes and wood
This bed looks simpler and is easier to make. You will need pipes, fittings, wooden "ribs" and a manufacturing manual.
Canopy over the crib
Canopy over the crib
Anyone can make this simple canopy from PVC pipes. It turns out a children's bed with a tulle canopy.
Simple towel rack
Towel Dryer
A few PVC pipes and fittings and your towel dryer is ready.
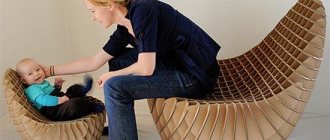
Cute chairs for children
Chairs for Kids
These cute chairs are easy to make yourself. Frame made of PVC pipes and seat woven from threads. You can see how to braid chairs.
Simple Camping Chairs
Outdoor Camping Chairs
Small, comfortable chairs for the patio or outdoor camping. Children will definitely like bright furniture. See how to make such chairs.
Place to play
Place to play
For kids, you can organize a place to play with a PVC frame.
Beach style bar counter
Bar counter
PVC pipes painted to resemble bamboo, various attributes such as exotic masks and a thatched roof - this bar counter will be an excellent reminder of exotic hot countries and beach holidays. Read detailed manufacturing instructions.
A simple and convenient drawing tablet
PVC Tablet
This lightweight drawing tablet is perfect for home practice. There is no need to attach paper to it - the album is placed on a special stand along the bottom edge of the tablet. Read how to make it.
Conclusion
As you can see, pipes are an excellent material for making shelving, and working with them is not at all difficult. But, before making a shelving unit from pipes, we recommend that you spend a few minutes and watch the video in this article, which contains useful information.
Recently, the “industrial” style has become increasingly fashionable: it goes well with the modern style, giving it a rustic and rough flavor and at the same time introducing a certain style break into the appearance of the interior. Water pipes are a cheap material with which you can create an interior in the industrial style. There are pipes of all sizes and shapes, and this allows you to conceive and implement any project of your dreams using them. They are very easy for beginners to work with; The most time consuming part of the job is cutting the pipe (but fear not, the tutorials will help you do this!). Try the DIY water pipe projects below!
Pipe towel racks
This is a very simple project where you will also need to make a wooden base for the hanger.
Want more inspiration for your bathroom? Then pay attention to this shelf with a towel rack made from a water pipe. If you're creative enough, come up with your own similar shelf design!
What do you think of the West Elm style plumbing curtain rod project? Manufacturing instructions can be found on this page.
Great project - a bar table made from black water pipes. It combines industrial, raw wood and modern furniture, giving the interior an unusual, fresh look.
Do you need a coffee table? You might like this one from The Golden Sycamore website. Just look at these two levels!
This firewood holder from The Cavender Diary has an industrial feel but is a rustic piece. The wheels are especially good! For those of you who have a fireplace, this may save you a lot of trips to get firewood in the cold.
You'll find complete plans and tutorials for making this table on the Cafe Cartolina website. This will be your best office desk!
Profile pipes are a universal material for use in private households. The variety of products and price in retail chains determines the popularity of corrugated pipes among builders of dachas and individual buildings.
Profile pipes have amazingly high strength indicators.
The strength and quality of the materials used in the manufacture of pipes, the possibility of using anti-corrosion protection and other attractive factors determine the breadth of their use.
Finished structures will be able to withstand enormous loads, while avoiding even the slightest deformation.
Profile pipes are widely used in the manufacture of household items, the construction of small forms in areas adjacent to houses, installation of the base of barriers, house frames, staircase, balcony and window grilles, for indoors and outdoors, tables, chairs, beds.
If corrosion does not affect the steel, it will serve you for tens or even hundreds of years.
There are many different products made from profile pipes in retail chains, but not all customer desires are taken into account by manufacturers of outdoor and home furniture, stairs, flower bed fencing and other things.
The created structure will not fall apart even for an impressive period of time.
Therefore, when it is possible to individually manufacture objects from profile pipes, they always prefer to create a product according to their own design, with their own hands, which in subsequent years will bring not only joy in use, but also a sense of pride and self-satisfaction.
Making a variety of products from profile pipes with your own hands has recently become increasingly popular.
From a practical standpoint, the advantage of products made from pipes with your own hands is an absolute understanding of all the advantages, disadvantages and maintainability of the product, in contrast to a purchased one, which always stores mysterious application parameters.
Profile pipes are a universal material from which you can create not only outdoor structures, but also stylish interior items.
A product made from a pipe with your own hands always meets the requirements of the manufacturer, who knows how the product can be improved.
Interior decorative items and gifts
Curtain rod
Curtain rod
Nice cornice made of painted PVC pipes and decorative elements. Read more about production.
Dresser decoration
Decorating a chest of drawers
PVC pipes, cut into thin rings, can serve as decoration for furniture.
Creative mirror frame
Frame for the mirror
And again PVC pipes, cut into thin rings. Cut it out, put it in the right order, glue it together and admire the new frame.
Piggy bank
Piggy Bank Pig
This funny piggy with a base made from a scrap of PVC pipe can be given to someone or placed at home as a souvenir. Here
Organizers and shelves
Desk organizer
A simple organizer made from glued and painted PVC pipes looks cool and helps get rid of clutter on your desk.
Bathroom organizer
Toothpaste, brushes, comb - with such an organizer everything will be in its place, and you won’t have to look for anything.
Shoe compartments
With such a budget organizer made from PVC pipes, shoes will not be lying around in the hallway and getting under your feet at the most inopportune moment.