0
36868
When purchasing various interior items, people are faced with the fact that they have a significant cost. Therefore, they prefer to do the work with their own hands. In this case, different materials can be selected. Such a process as DIY plywood furniture is an excellent solution for creating a variety of designs. If you properly process the material and provide it with good care, it can even be used to create kitchen sets.
Features of the material
Before you start working with plywood, it is advisable to have an idea of the features of this unique material - this will allow you to properly make furniture that will last for many years. The advantage of plywood is that it is easy to work with; it does not require the use of expensive special tools for processing.
The main features of plywood include the following:
- Low cost, which allows you to independently produce functional, practical and aesthetically attractive furnishings for little money: children's furniture, shelving and cabinets, cabinets and chests of drawers, kitchen furniture, decorative screens and partitions.
- To make unique furniture from plywood you do not need to have any special skills.
- Plywood is an ideal material for making children's furniture, as it is environmentally friendly and safe.
- Plywood can be decorated in various ways, which significantly expands the range of products.
Natural pattern on the surface of plywood furniture
- The performance characteristics of the material indicate its resistance to mechanical stress and moisture, high strength and durability.
- When treated with modern means, plywood becomes more resistant to fire.
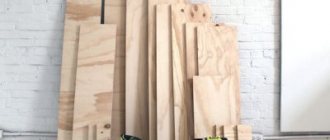
Plywood has different thicknesses, which allows you to choose the required material depending on the purpose of the part
Preparing parts
After all the details are drawn, their contours are transferred to plywood sheets. Marking must be done with strict adherence to dimensions. The tools needed at this stage are a simple pencil, a corner, a compass, and a ruler. A cut is made along the drawn lines.
Review of trendy furniture made from pallets, popular models
At home, it is convenient to cut plywood with a jigsaw with a properly selected file. A carpentry saw with a special blade that ensures minimal tears is also suitable for these purposes. The best option for a table saw is a blade with 80 teeth or more. If it is not possible to select the desired option, use a saw blade.
Before cutting, the file must be cleared of resin, as its presence can lead to tears in the wood.
Another tool suitable for working with plywood is a circular saw. It provides a straight bottom edge without tearing out wood fibers. Tears may only appear on the top side. To reduce them to a minimum, you must use a blade that has at least 80 teeth. A hand saw is also suitable for cutting thin sheets of plywood. To use it to get a clean edge, you should cut the material slowly, without exerting effort and making small cuts. Regardless of the tool used, the edges of the finished workpieces are processed with sandpaper.
What to look for when choosing plywood
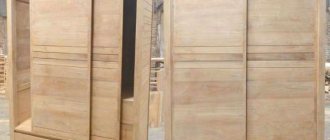
Veneer made from coniferous or birch wood is used to make plywood. Coniferous plywood is characterized by a more attractive appearance and strength. Veneer sheets are glued together at high temperature and pressure, forming a monolithic slab of a given thickness. In this case, each layer is laid perpendicular to the previous one - this makes the plywood resistant to deformation.
Birch plywood
Plywood can be sanded or unsanded, and, depending on its performance properties, is divided into several categories.
Table 1. Plywood categories
| Appearance of material and markings | Description |
FOF | The front layer of this moisture-resistant laminated plywood has a special coating in the form of PVC film, which provides additional protection against moisture. |
FSF | Formaldehyde resins are used for gluing sheets, so this material is not desirable for making furniture, despite the fact that plywood of this brand is highly moisture- and wear-resistant. |
FC | This type of material has a wide range of applications. FC plywood is durable, moisture-resistant and environmentally friendly, therefore it is widely used for interior design and furniture manufacturing. |
FBS | When making bakelite plywood, a varnish composition of the same name is used, with which each sheet of veneer is impregnated, and then all layers of the slab are glued together using it. The material is characterized by unique performance qualities: strength, durability, resistance to deformation, and aggressive substances. This type of plywood is environmentally friendly, so it can be used for making children's furniture. |
| FBA | To glue veneer in the production of this type of plywood, natural albumin-casein glue is used, making the material environmentally friendly and safe. However, the moisture resistance of FBA plywood is low. |
Note! The safest is plywood made in accordance with safety certificates E1 and E0.
The thickness of plywood sheets varies from 1.6 to 76 mm; sheets with a thickness from 6.4 to 19 mm are more often used.
Prices for sheet plywood
Plywood sheets
Project development
In order to make a kitchen set with your own hands, it is not at all necessary to have professional training. To do this, you just need the skills to use basic construction tools.
The first stage of creating a kitchen set with your own hands is design. To begin with, measurements are taken in the kitchen of places to install furniture. A drawing of the project can be made on paper or using a special program on a personal computer. When developing a project, you need to consider the following points:
- Number of cabinets.
- Dimensions of wall-mounted and floor-mounted modules. Average dimensions for wall cabinets: width - 60 cm, depth - 30 cm, height - 70 cm. Average dimensions for floor cabinets - 60x45x85 (WxDxH). The height is taken taking into account the thickness of the table top. The distance between wall-mounted and floor-mounted modules is approximately 50-60 cm.
- Door opening method: horizontal or vertical, hinged or compartment type.
- The number and location of household appliances, especially built-in ones.
- Types and number of boxes.
- Architectural features of the room: niches, protruding corners, as well as uneven floors and walls. All this must be taken into account when developing the project. However, in practice, you usually have to adjust all the parts on site.
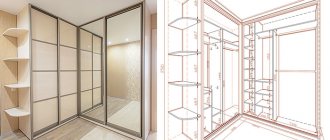
- Ways to cover communications: various pipes, ventilation systems. They can be hidden with sheets of plywood so that they form a single surface with the kitchen cabinets. At the same time, it should be possible to remove this plywood or open it like a cabinet in order to gain access to the pipes in case of emergency or planned repairs.
Advice! You can make hanging boxes more spacious by increasing their height almost to the ceiling. The disadvantage of this idea is that it will be difficult for short people to reach the contents of the upper shelves.
To make cabinet doors, thin plywood, glass, mirror or plastic are used.
Methods for processing plywood
Regardless of your skill in working with wood and materials made from it, it is necessary to study in advance how to cut plywood, since making furniture from it involves cutting parts in accordance with the drawing. The nuance is that the sheet of plywood must be cut without tearing. You can use different tools for this, but most often parts are cut out of plywood using a jigsaw, which is the cheapest available device. A high-quality result largely depends on a correctly selected file.
To reduce the formation of wood dust when cutting material, connect the jigsaw to a vacuum cleaner
To avoid chipping at the cutting site, you can do it in two ways: first cut the line with a stationery knife or stick tape on both sides of the marking and make the cut with a jigsaw.
Method of cutting through tape and the result
If the equipment is equipped with a pendulum stroke, it must be turned off.
The pendulum stroke regulator is set to the value “0”
Prices for popular models of jigsaws
Jigsaw
Cutting results with pendulum stroke turned on and off
Some jigsaws are equipped with an anti-splinter insert. To install it, the jigsaw is unplugged!
Operating principle of an anti-splinter insert for a jigsaw
The design of this attachment is such that the jigsaw file moves inside the limiting slot.
Blade movement when using a stopper
The result of cutting plywood with a jigsaw with an anti-splinter insert
Table 2. Reasons why it is not possible to make a straight cut
| Image | Description |
Reason 1 | The jigsaw sole is not perpendicular. |
| Reason 2 | The material is thick, and the jigsaw is not powerful enough to cut. |
Reason 3 | Initially, the position of the file in an inexpensive jigsaw is crooked. |
Reason 4 | Excessive pressure on the jigsaw during cutting. |
Reason 5 | Dull saw blade. |
Completing the build
We install the assembled kitchen set (excluding the work surface) at its permanent location. And we attach the plywood tabletop right at the installation site. This is the final assembly. Watch the whole process on video
Usually they try to make the tabletop monolithic in order to eliminate as much as possible the presence of seams between the segments, and also adjust it to the curvature of the wall or corner.
U-shaped milling
Finishing option
Finishing option
Finishing option
It’s just a matter of little things: we’ll treat the edge of the table top near the wall with a plastic plinth, protect the gaps between the plate with metal overlays (usually aluminum), and glue the corners to the cuts on the sides.
Preparation for the manufacture of plywood furniture
You can start making furniture from plywood after you have acquired all the necessary tools and materials. During the work you will need the following:
- Plywood sheets. The thickness of the plywood sheets used depends on the upcoming load on the part and its purpose. To make a durable frame and shelves, 18 mm thick material is used. For a façade, a thickness of no more than 12 mm is sufficient. The doors of wall cabinets, which are fixed using stiffening ribs, can be made of plywood 6 mm thick.
- Fasteners To ensure reliable and effective fastening of individual structural parts to each other, special fasteners are used - visible and hidden. Screws are used to fasten individual parts. Using glue or silicone sealant, you can additionally secure individual structural elements.
- An important element of furniture is fittings, which are used to ensure the functionality of the structure and form its decorative appearance. These include: handles, canopies, closers, wheels, limiters.
- Materials for decorative finishing: varnish, stain, film, putty.
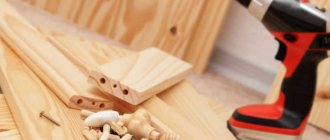
- Tools you will need: jigsaw, measuring tools (tape measure, square), clamp and cross clamp, sandpaper, screwdriver.
Tools
DIY tabletop
A work surface made of laminate looks great. It’s easy to implement an economical option yourself by choosing a coating to match the headset or playing with contrast. The joints of the panels must be coated with sealant to avoid the harmful effects of moisture on the laminate. The front edge is closed with a decorative metal corner.
The high moisture resistance and dimensions of laminated plywood also allow it to be used as a tabletop. The film reliably protects the material from the penetration of liquids, and the edges are impregnated with a moisture-repellent composition.
Step-by-step instructions for making simple furniture items from plywood
It is recommended to start making plywood furniture with the simplest designs, gradually acquiring and improving the skill of working with this material.
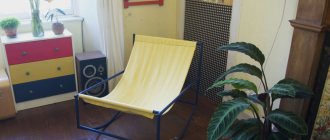
Rocking chair
Making your own rocking chair will be an excellent option to try your hand at carpentry. And you shouldn’t be afraid that the furniture will have some flaws - imperfections can be hidden with the help of painting or decorative textiles.
Table 3. Making a rocking chair
| Illustration | Description |
| Plywood | To make such a chair you will need plywood sheets with a thickness of 15, 10 and 4 mm. |
| Stage 2: making a sketch. | First you need to make patterns for cutting out parts. The pattern drawing is made on thick paper or cardboard on a scale of 1:1. |
| Stage 3: cutting out parts | The patterns are cut out and with their help the contours of the part are transferred to plywood sheets, trying to fit them as economically as possible. |
| Stage 4: preparation for assembly | The parts are cut out using a jigsaw. Holes for fastening are immediately made in the required places. Before you begin assembling the product, all parts must be thoroughly sanded. You will immediately need to prime and paint the parts. |
| Stage 5: making the seat and backrest | To make the back and seat, plywood strips are used, which are fixed with glue on thin sheets of plywood 4 mm thick. |
| Stage 6: frame assembly | First, the frame of the product is assembled. |
| Stage 7: Assembling the seat and backrest | After this, the back and seats are fixed. The attachment points are masked with strips. |
Finished rocking chair
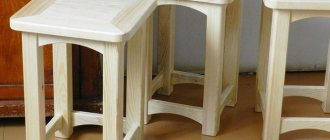
Plywood stool
A stool is an easy-to-make and versatile piece of furniture. To make it from plywood you will need the following.
Table 4. Making a stool
| Illustration | Description |
Step 1: marking | On plywood 20 mm thick, 200 mm wide and 430 mm long, mark the leg of the stool. It is recommended to think through the shape of the legs in advance by completing a sketch drawing. The part is cut out using a jigsaw. It is used as a template for making three more of the same parts. |
Step 2: Cutting | The part is cut out using a jigsaw. It is used as a template for making three more of the same parts. |
Step 3: Sanding | The cut parts are polished. |
Step 4: making the seat | The seat measures 320 x 320 mm. Having cut out a square, use a jigsaw to make the corners rounded. |
Step 5: Sanding the Seat | The seat is sanded on top and at the ends. |
Step 6: Milling the Seat | All parts are processed with a semicircular cutter, which can be replaced with sandpaper. |
Step 7: Milling the Legs | The cutter is also used to process the legs of the future stool. |
Step 8: Preparing for Assembly | Make holes for self-tapping screws. |
Step 9: preparing holes for screws | Then, using a drill of a larger diameter, the holes are countersunk so that the fastener heads are recessed when screwed in. |
| Step 10: Assembling the Product | Start assembling the product. To prevent delamination of the plywood, the parts are drilled with a No. 3 drill and the screws are tightened. |
Step 11: Fixing the Legs | Fastening the legs crosswise is very strong due to the fact that each leg will be held on by 4 screws. |
Step 12: Marking | The legs are installed on the lid and markings are applied so that a hole for a self-tapping screw is located in the center of each leg. |
Step 13: Preparing the Holes | Holes are drilled in the lid according to the markings. The holes are countersunk. |
Step 14: Assembling the Product | The product is assembled using self-tapping screws. |
Step 15: Finishing | After the product is assembled, the holes are puttied and varnished. |
Prices for popular models of screwdrivers
Screwdrivers
Nightstand
A bedside table is considered easy to make. You can do it yourself as follows.
Table 5. Making a bedside table
| Illustration | Description |
Step 1 | The cutting of the material is carried out according to the drawing and the selected dimensions of the parts. To prevent the plywood from cracking when cutting, you can place a couple of sheets of polystyrene foam underneath it. |
Step 2 | For edging the parts, strips cut from 4 mm plywood are used. The protruding excess is removed with a milling cutter. |
Step 3 | Then the edges are sanded. |
Step 4 | To assemble the bedside table, birch furniture dowels 8 x 40 are used. Holes are drilled for them. |
Step 5 | Dowels are driven into the holes. |
Step 6 | Assemble the frame of the cabinet by inserting dowels into the holes, pre-lubricating them with glue. |
Step 7 | When assembling boxes, a tenon joint is used. |
Step 8 | To do this, the workpiece is marked for a tenon joint. |
Step 9 | The holes are cut according to the markings using a jigsaw. |
Step 10 | And then gouge it out using a chisel. To avoid the formation of chips, the inner side is lightly pounded, and the front side is completely knocked out. |
Step 11 | In the place where the bottom is attached from six-millimeter plywood, the part is milled. |
Step 12 | When assembling the box, the grooves are lubricated with glue. |
Step 13 | The façade is secured with self-tapping screws. |
Step 14 | Guides are fixed inside the cabinet and on the sides of the drawer. |
Table 6. Making the base of the cabinet
| Illustration | Description |
Step 1 | To make the base, use 4 parts with edges beveled at 45 degrees. |
Step 2 | The frame parts are fixed with dowels and glued together. |
Step 3 | The end of the part and the dowel inserted into the previously prepared hole are lubricated with glue. |
Step 4 | The structure is pulled together and left to dry. |
Step 5 | The legs are glued and fixed to the base. |
Step 6 | Edges are glued to the ends of the base. |
Step 7 | The edge is smoothed with a router. |
| Step 8 | A chamfer is removed along the perimeter of the base. |
Step 9 | The base is sanded. |
Prices for popular models of eccentric sanders
Random orbital sander
Table 7. Product assembly and painting
| Illustration | Description |
| Step 1 | The boxes are coated with colorless parquet varnish. |
Step 2 | The frame is assembled using dowels and PVA glue. |
| Step 3 | Painting is carried out in two times - the first layer is applied with a brush, the second with a spray. |
Step 4 | At the final stage, the product is coated with oil and hard wax. |
Video - DIY plywood bedside table
Making a dining table
To give your kitchen a finished look, try making your own rectangular shaped plywood dining table with two wide legs.
A plywood table can be made of absolutely any shape
To do this you will need the following supplies:
- Plywood for the tabletop - sheet 80×120 cm, thickness at least 18 mm - 1 pc.
- Horizontal strapping - plywood strip 15×110 cm - 1 pc.
- Tabletop and leg supports - timber with a section of 7.5×20 cm and a length of 68.7 cm - 2 pcs.
- Table leg - timber with a cross section of 7.5×20 cm, length 60.0 cm - 2 pcs.
You will need to work on every detail to make a plywood table.
Supports for table top and legs
The beam is sawn lengthwise, resulting in 4 pieces measuring 7.5x10x68.7 cm. The elements that are adjacent to the floor are shaped into legs. Marks are placed at a distance of 20 cm on each side, between which an arched line is drawn with a maximum height of 5 cm. The outer part of the support for the legs is rounded or left rectangular.
In each tabletop support, a part of a rectangular block is cut out in the center to a depth of 40 mm - the table leg should fit into the recess. The outer edges are rounded.
Table legs, horizontal strapping and table assembly
The legs are left rectangular or given a curly shape. A horizontal strap holds them together, and the part is chamfered.
After sanding the workpieces and treating them with an antiseptic solution, a plywood table is assembled:
- Connect table legs to tabletop supports and floor elements
- Tighten the structure with a horizontal strap, installing it between the legs
- Place the tabletop, tighten it with screws from below through the supports - you will need at least 4 screws on each side
All parts are fastened together with euroscrews, the caps of which are closed with plugs. The table is coated with varnish that dries for 36 hours.
WATCH THE VIDEO
Methods for decorating a plywood surface
Once the product is assembled, you can begin decorating it. In some cases, it is enough to coat the plywood with a protective matte transparent varnish - this will preserve its shade and pattern. In other cases, surface finishing methods are used that change the original shade of the product - oil treatment, painting.
Bright colors highlight the original shape of children's furniture
Bright, rich shades are used when dyeing when the shape and color of the product dominate.
A birdhouse made of plywood is an excellent opportunity to simultaneously take care of birds and practice carpentry. A homemade bird house can decorate the balcony of a multi-storey building or a garden plot. The work process is simple, you just need to follow the rules and recommendations. We will talk about them in a special article.
Set of children's furniture made of plywood
One of the original ways to decorate plywood furniture is the decoupage technique. This method of decoration is relevant for furniture in the style of vintage, Provence, and shabby chic. Using this technology, you can diversify the appearance of furniture with a simple shape.
It is worth noting that the “decoupage” technique is simple to perform and does not require special skills: the base is primed, a pattern is glued on top and varnished.
Decor made using the decoupage technique
Table 8. Decorating a plywood tabletop
| Illustration | Description |
Step 1 | The surface of the table top is sanded using sandpaper. |
Step 2 | Prime the surface using white acrylic paint. The primer must be applied with a brush in two layers. |
Step 3 | When the soil dries, its top layer is leveled by grinding. |
Step 4 | The prepared surface is covered with paint of the selected shade. |
Step 5 | Painting tape is applied around the perimeter of the tabletop to mark borders. |
Step 6 | The borders are painted in the required color and after the paint has dried, the tape is carefully removed. |
Step 7 | The tabletop is covered with lace fabric, which is fixed with clothespins. |
| Step 8 | The tabletop is painted with contrasting spray paint through the lace, which is left on the surface of the tabletop until the paint has completely dried. |
Step 9 | After removing the lace, the tabletop is coated with several layers of transparent varnish. |