Owners of small apartments often opt for cabinets installed in the corner, but before ordering such furniture, you need to have a drawing of a corner cabinet with dimensions on hand. After all, such structures must stand clearly on the wall, without deviating even a degree from the angle.
Corner cabinet drawing with dimensions
Corner cabinets are popular because they are quite ergonomic and allow you to save space in a small room. In addition, you can make a cabinet with your own hands using a drawing and detailed instructions. We will talk about this below.
Designing a corner cabinet according to the drawing
Designs, drawings and photos of corner cabinets
Conventionally, corner cabinets can be divided into two categories: beveled trapezoidal and strictly rectangular, with diagonally and perpendicularly located facades. In both cases, the cabinet can be:
- Symmetrical and asymmetrical.
- With separate mezzanines and without mezzanines.
- Combined filling and allocated exclusively for shelves or hangers.
- With internal or external drawers.
- With a different number of facades (one-door, two-door, three-door).
- In the form of display cases, open shelving and designed for storing clothes.
We will only consider do-it-yourself wardrobe (dressing) corner wardrobe designs.
Corner cabinets with perpendicular doors, most often, represent an attached composition of two ordinary cabinets of a slightly modified design.
In rare cases, there may be cast structures, especially if the front part is sliding, like an accordion. The advantage of trapezoidal corner cabinets is their large capacity and functionality.
For example, the width of the outer sides can be reduced to a minimum and this will not interfere with placing hangers with bulky clothes - after all, the inner part expands towards the center.
Corner cabinet made of plasterboard
Before manufacturing and assembling a plasterboard cabinet, you must prepare the following materials and tools:
- sheets of drywall of the required size;
- metal profiles (racks and guides);
- accessories;
- measuring tape;
- scissors for metal and drywall;
- corners for fixing protrusions;
- self-tapping screws (for drywall);
- set of dowels;
- building level;
- screwdriver;
- putty;
- putty knife;
- sandpaper;
- jigsaw (for cutting sheets);
- additional elements;
- hammer drill (for holes for screws);
- decorative plaster for finishing cladding.
If you have the above materials and tools, you can begin the process of manufacturing the structure.
Prices for popular models of screwdrivers
Screwdrivers
Video - How to make a built-in wardrobe from plasterboard
Frame installation
Step-by-step instruction.
Step 1. It is necessary to apply markings to the walls. At this stage, you should mark the installation locations of the structure to the wall using a pencil. For greater reliability, it is recommended to double-check these values several times.
Marking the walls
Step 2. You need to start attaching metal profiles (guides) to the wall using self-tapping screws. At this stage, accuracy is especially important, so do not rush. Each element must be securely fixed, because the metal frame will carry the entire load. The screws are screwed in increments of no more than 100 millimeters, thanks to which the entire structure will be stable.
Each element must be recorded
Step 3. It is necessary to install the rack profiles into the guides. To do this, use self-tapping screws or Euroscrews. Since this is a corner cabinet, the profiles will need to be given the necessary bend so that they fit into the structure without any obstacles. To do this, a notch is made on the beams with metal scissors. Such actions will allow you to quickly bend any profile.
Installing profiles
Step 4. If you plan to install a large cabinet, then it is recommended to further strengthen the structure of the profiles. This can be done using the remaining profiles from which the jumpers are formed.
Strengthening the structure
Step 5. Before starting the process of covering the structure with sheets of plasterboard, it is necessary to secure the corners. They are made from fragments of the remaining profiles, but if desired, they can be purchased at any hardware store.
Securing corners
Important point! Instead of metal profiles, wooden blocks are sometimes used to make the frame, but this is not the best solution. After all, wood tends to shrink, which means the plasterboard structure can become deformed, causing cracks to appear in the plaster.
Sheathing of the structure
When the frame is completely ready, you can begin the sheathing process. This is quite easy to do if you follow the instructions.
Step-by-step instruction.
Step 1. It is necessary to fix the plasterboard sheet in the inside of the cabinet structure using self-tapping screws. After which, you should completely cover this part with sheets. It is important to remember that the pitch between the screws should be more than 150 millimeters. At the same time, they are deepened into the sheet by 1.5 millimeters so that the fasteners do not show through from the outside. You can read more about how to make fasteners for shelves with your own hands in our article.
Fixing the sheet
Step 2. Then you need to finish the outside of the structure with plasterboard. Such actions should be performed especially carefully to avoid mistakes.
Finishing the outside of the structure
Exterior finishing
When the plasterboard frame is ready, you should begin finishing its exterior using putty.
Large putty manufacturers
Prices for various types of putties
Putties
Step-by-step instruction.
Step 1. First, you need to apply a fairly thick layer of putty to hide the drywall seams and uneven areas. The structure must be left in this form for some time until the putty hardens.
Applying putty
Step 2. You will need to carefully sand the dry surface. This is done in order to remove sagging.
It is necessary to remove sagging with sandpaper
Step 3. The last layer is the final one, so it should be applied especially carefully.
Need to work carefully
Step 4. When the surface has dried, you need to go over it again with sandpaper in order to prepare for decoration.
Preparing for decoration
Step 5. The last stage is decorating the cabinet. Finishing can be done using decorative plaster and various moisture-resistant paints.
Cabinet decoration
Do-it-yourself corner cabinet: deciding on the dimensions
Before wondering how to make a corner cabinet with your own hands, you need to decide on the overall dimensions. Ergonomic shapes attract many, but it is not always possible to achieve what you want if the allotted space for placement is too small.
The smallest dimensions of a corner cabinet with your own hands can be compared to the typical dimensions of a kitchen wall unit. It occupies 600x600mm from the corner. In order for the facade to be of sufficient width (400 mm minimum), the depth of the pillars (sidewalls) is set to no more than 300 mm. Naturally, with such dimensions there is no question of placing the barbell under the hangers. Only shelves or hooks for clothes.
For a corner wardrobe with a compartment for hanging clothes, the distance from the corner, at least on one side, must be at least 800 mm. Then the depth of the stand can be set at 450mm, which is quite enough for hangers with light clothes (for “men’s” and outerwear, 500mm is required). Do-it-yourself corner cabinet diagrams are approximately the same, in the ratio of the depth of the stand and the remaining space for the facade.
With asymmetrical options, it is quite possible to implement your plan with dimensions ranging from an angle of 850x650mm, 800x700mm, etc.
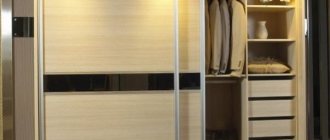
How to make a corner cabinet with your own hands using the example of a drawing
Let's consider a typical symmetrical model, with overall dimensions 2100x900x900mm. A do-it-yourself drawing of a corner cabinet will look like this.
Along one of the sides, the width of the body allows for the placement of shelves; they must be made taking into account the required space for hanging the rod - from 500mm minimum. Drawers can be built into the section with shelves. The only nuance that should be taken into account in the future is the placement of hinges on the facade. The loop should not “get” into either the drawer or the shelf!
The height of the cabinet allows for the placement of two rods under clothes. A distance of 900-1100 mm is sufficient for short jackets and shirts, and the hem of long dresses can simply be “thrown” over the lower rod. Or you can make a shelf at the top or bottom, for hats or shoes.
Sequence of drawing creation
Having received accurate measurements from the installation site, it is time to begin detailed design. When drawing a drawing, they initially depict the external dimensions of the cabinet - these are the dimensions of the box, indicating the width and height. The diagram must contain all the thickness values of the parts (this is the thickness of the chipboard material). After drawing the “rectangle”, they begin to work with its contents: shelves, cabinets. When the product is drawn in the smallest detail, it will become obvious what the finished version will look like, and it will be possible to calculate the amount of necessary materials and accessories.
You should remember about the reliability and decorativeness of the sliding wardrobe. Little things like high-quality fittings and stylish handles also require attention.
The correct drawing requires an image of two main types of product:
- front view,
- side and/or top
Front view
This image should contain measurements of the width and height of the sliding wardrobe, the height of the plinth, the width of the sections and the distances between the shelves (the dimensions are set directly at the attachment points along the length of the side walls). This means that in order to provide shelves or a cabinet with sections at a certain height from the floor or edge, you need to indicate the size from the beginning of the part of the connection points. Initially, it is necessary to decide in what way these elements will be connected, at what distance and from which object to which, remembering the size indication.
Side and top view
Side and top view sketches: this drawing shows the estimated depth of the cabinets and how deep the internal shelves will be.
The depth of the shelves should be at least 10 cm less than the depth of the cabinet. This is an important condition for the subsequent installation of a sliding door system.
This sketch should also contain a display of all roundness and radius shelves with the value of their radius indicated.
When making a diagram or drawing for a sliding wardrobe in the hallway and for other rooms, you must remember to display the opening for installing the sliding system, indicate measurements and places of attachment to the body. This will help you order the right door and system.
Having a finished image of the cabinet in your hands, it’s time to start purchasing materials. The right decision would be to purchase high-quality raw materials, filling and accessories. This will allow you to build a reliable sliding wardrobe with a long service life. During the assembly process, you must be guided by a pre-planned plan, which is best printed on a sheet of paper.
How to calculate the details of a corner cabinet with your own hands
Once you have decided on the dimensions of the corner cabinet with your own hands and the internal contents, you can begin to calculate the details. The simplest option is in the form of a table in the Excel office program.
- We write down all the details in strict accordance with the texture of the drawing, first the length, then the width. If you enter the formula into a tabular form for calculating the square footage of each part, you can sum it up and roughly estimate how much volume the cabinet will “flow into.”
- At the same time, we designate the visible sides that will need to be rolled up with an edge in units. Formulas will also help you pre-calculate the footage of the end tape.
- I recommend highlighting irregularly shaped parts so as not to lose sight of them (for example, as in the table below, in yellow). And also clearly show along which side they will be rolled with an edge.
- How to calculate the size of the fronts for a corner cabinet can be found here. Strictly speaking, the facade part can be made of another material - for example, MDF or solid wood.
- A similar method is considered to be detailing fiberboard.
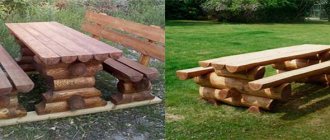
Structural additions for corner cabinets
In order to create a complete look, open modules are installed in the side parts of the corner structure. They are a type of various shelves that are attached to the cabinet or installed end-to-end without fastenings. Thanks to this solution, you can make any large-sized product more interesting. In addition, such shelves are functional elements; they are often made of glass or plastic.
Additional shelves
Quite often LED lamps are built into cabinets. It is important to consider the total number of lighting fixtures in the room. Otherwise, this is a good addition, thanks to which the contents of the cabinet will be clearly visible, especially in five-wall structures.
Lamps in the corner cabinet
DIY corner cabinet cutting cards
The calculated dimensions of parts from Excel are transferred to a special cutting program. Parts for which the direction of the pattern is unimportant (for example, stiffeners, plinths, internal shelves) can be rotated to minimize waste. In our case, there is a reason to make the front part from a different material - the body of the corner cabinet with your own hands economically “lays” on two sheets.
The cutting can be ordered from a third party along with PVC seaming. Typically, such services are provided by all companies selling chipboards. At home, rolling up PVC is quite labor-intensive and is unlikely to be possible accurately. You will have to be content with melamine tape, the only advantage of which is its low cost. The table shows that 28.83 linear meters will be needed. But it’s better to take it with a reserve, + 10-15%.
Corner cabinet made of wood or MDF
To manufacture and assemble the cabinet you will need the following materials and tools:
- processed wood or MDF sheets;
- euroscrews, dowels;
- glue;
- corners or ties;
- accessories;
- drill;
- screwdriver;
- measuring tape;
- level;
- a circular saw;
- hammer.
Construction fasteners
Prices for popular models of jigsaws
Jigsaw
Video - How to assemble a corner wardrobe
Manufacturing of elements
Experts do not recommend cutting the material at home, because there is a high probability of getting crooked parts. It is advisable to contact a furniture shop with your cutting diagram, where specialized equipment is available.
At the same time, some craftsmen prefer to prepare parts for the cabinet themselves. In this case, you must have at least minimal experience in furniture making.
MDF cutting process
Step-by-step instruction.
Step 1. We cut out the parts of the walls, shelves, doors, drawers from the sheet. For such purposes, a circular saw or hacksaw is usually used. In this case, the second option is chosen very rarely, because damage may remain on the parts.
Sawing out wall parts
Step 2. It is necessary to process the edge of each part using polymer tape. It is applied to the edge and then fixed with an iron or hot air.
Edge processing
Step 3. The edge tape will need to be carefully smoothed using a cloth. After that, the remaining pieces of tape must be carefully cut off with a sharp blade.
Smoothing the tape with fabric
Assembly of the structure
When all the parts and tools are ready, you can begin the process of assembling the structure.
Table No. 4. Assembling corner cabinet parts.
| Illustration | Description |
Measurements | You need to double check that the dimensions are correct. Therefore, before starting work, it is necessary to measure the walls. |
Installing the feet | Next, you should install the legs on the bottom of the corner structure. They are fixed using self-tapping screws. Moreover, some models require the presence of a special base at a distance of 5 to 10 centimeters from the floor. In any case, the doors should not touch the floor, so installation of a support is required. |
Support placement | The bottom with support must be placed in the corner. It must be stable, so it should be installed level. To do this, use a building level, which can be used to raise and lower the legs. |
Installation of walls | Installation of the walls of the structure. They are secured with special ties or metal corners. In most cases, the first option is used, because such fasteners securely fix the parts and remain invisible. |
Lower segment fastening | Fastening the subsequent lower segment of the structure. The legs are installed on it, and then it is fixed to the main body. To do this, it should be installed flush against the corner structure of the cabinet and leveled using a building level. |
Side panel installation | Installing the sidewall. It is fixed at the junction of the lower parts. In this case, it is better to install it even before fixing the parts of the bottom. |
Connecting elements | Connecting base elements using furniture ties. To do this, pre-drill holes. |
Wall installation | Installing the next side wall. At this stage it is necessary to install the top panel of the frame. This will give it more stability. Otherwise it may become loose. |
Sidewall fixation | Sidewall fixation. Before securing it with furniture ties, you need to adjust the position according to the level. |
Installation of panels | Other panels of the structure are installed in the same sequence. Their number will depend on the size of the cabinet. It is worth noting that it is much easier to assemble a cabinet with such small fragments. |
Completing the build | It is necessary to complete the assembly of the frame and then check its stability. |
Installation of internal parts and doors
Table No. 5. Stages of installation of internal elements and fastening of doors.
| Illustration | Description |
Installation of vertical elements | Installation of vertical elements and drawers. There are two ways to install shelves. In the first case, they are fixed using metal corners and euroscrews, but then they will be motionless. In the second case, you can install special holders on which shelves are installed on top. Drawers are mounted on guides, thanks to which they will slide out quickly and smoothly. |
Securing the rod | Fastening the figured rod to the brackets. Install it on a shelf, which is then connected to the structure. |
Shelf installation | Installing a shelf with a rod. It should be secured inside the corner structure. In the same way, you need to fix another shelf in another corner. |
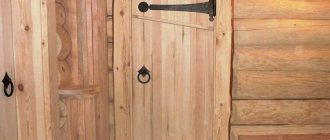
Door installation | Door installation. This process consists of the following stages: 1. Parts of hinges (furniture) are attached to the walls of the frame. 2. After which another part of the hinges is installed on the doors themselves. 3. Then the hinges must be connected and secured with screws. After which you will need to adjust the position of the valves. |
Eliminating the top hole | Next, you need to eliminate the hole between the ceiling and the structure. |
Eliminating the Bottom Hole | The lower hole is covered with a chipboard panel or plinth of the appropriate size. |
Checking the stability of the cabinet | Upon completion of work, it is necessary to check the stability of the cabinet again. If there are no flaws, then the design can be used. |
How to mark cabinet parts for drilling
If you correctly mark and drill all the parts for the corner cabinet with your own hands, then in the end it will be assembled very simply, like a construction set. The most convenient way to do this is in special furniture programs, for example, Basis Furniture Maker.
The principles are simple:
- Furniture is assembled using Euroscrews (confirmats).
- The parts are drilled into the end and from the front side.
- The distance from the edge of the front side part should be the same. For example, 50 mm. Or in the center.
After the fasteners are placed, we number the parts. If there are parts of the same size, but with different fastening principles, we use additional markings (a, b, etc.).
In Basis Furniture Maker you can get specifications for drilling in this form.
But here you need to be careful, clearly understand where the “face” of the corner cabinet part is, and where the “wrong side” is, along the edge-rolled sides. The program does not see this nuance; it places the fasteners from left to right. And during the drilling process, you may come across parts that need to be mirrored. In principle, it is not difficult. Anyway, with the drilling specifications, the whole process will go much faster.
How much will it cost to make a corner cabinet with your own hands?
By correctly drawing up the drawings of a corner cabinet with your own hands, all the design stages, the risks of errors that lead to inevitable additional expenses are reduced to zero. If you make any furniture with your own hands, it always costs less. Actually, nothing prevents you from predicting costs before starting all work. Find out all the prices for materials, fittings and hardware in your city that will be required when making a cabinet with your own hands, and enter it into a simple excel sheet.
The most significant costs will be for the purchase of chipboard and cutting. We took a standard model - changes up or down by 100-200mm will not change the material consumption significantly. It will also take approximately 2-3 sheets depending on the number of shelves and fronts (whether they will be ordered separately or not).