The popularity of Roman blinds is explained by their compactness, practicality and attractive appearance. They do not take up space, protect well from sunlight entering the room, and are easy to use and install. Information on how to hang a Roman blind with your own hands (with step-by-step instructions, photos and a list of necessary tools) will be useful not only for those who decide to install a curtain rod for the first time, but also for experienced craftsmen.
Design features and mechanisms of Roman blinds
When unfolded, a Roman blind is a single piece of fabric that can be gathered upward, forming even horizontal folds. It can be fixed at any required level.
The lifting mechanism consists of rings sewn on the back of the fabric and a system of cords. The evenness of the assembly is given by cords - plates located horizontally. There are special pockets for them.
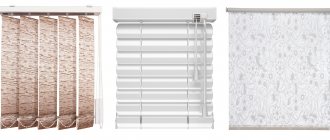
There are 3 types of Roman roller blinds:
- frame;
- frameless;
- cascading.
There are no plates in frameless curtains, so the assemblies formed during lifting have a sagging appearance. And the last type is notable for the fact that folds are formed in any position, even on a completely lowered canvas.
The lower cut of the fabric has a weighting agent that promotes tension in the fabric.
Types of fastening
Depending on the owner’s wishes, Roman curtains can be attached:
- on the sash;
- on the frame;
- into the opening;
- on the wall;
- on the ceiling.
The sash mount leaves the window sill open even when the curtain is closed and allows you to open the window without hindrance.
For fixed windows, mounting on a frame is preferable. In this case, the window sill also remains free.
When installing a lifting curtain in a window opening, the curtain is placed in the same plane as the wall. When lowered, it completely or partially covers the window sill.
A large one-piece curtain is attached to the wall above the window or to the ceiling. In this way, they hide the shortcomings of the window opening - uneven slopes or scratches - and visually increase its volume.
The required number of fasteners is calculated based on the number of sections.
In order not to make a mistake with the size of the curtain for mounting inside the opening, you need to measure the width of the window in 3 places: top, bottom and middle. Then subtract 2-3 mm from the minimum value. This will be the width of the future product. The length of the canvas is calculated by measuring the distance from the intended location of the cornice to the maximum lowering level.
When installing a curtain on a sash, you should take into account the location of the window fittings: the lowered curtain should not touch it.
For wall and ceiling mounting, the canvas should protrude 5-7 cm beyond the boundaries of the window opening.
Using cornices
Often complete with Roman curtains there is a cornice with all the components. In other cases, it is purchased in the same place where the curtains themselves are purchased. The cornice is an aluminum or plastic profile equipped with a control unit and a height adjustment mechanism.
For wall or ceiling mounting, choose models with a length of 1.1 to 2.5 m. If the curtain will be hung on the sash, use a smaller version of the cornice. It can be purchased ready-made or made to order.
According to the type of control, curtain rods are:
- manual, controlled by a cord system;
- mechanical, with a rotary-chain device;
- with automatic regulation.
Electric models are indispensable in rooms with high ceilings or in rooms where access to the window is limited. The electric curtain rod can support curtains of any size and weight, has a silent mode for raising/lowering the curtain, convenient remote control, but its cost is quite high.
Velcro fastening
“Velcro” is a special Velcro adhesive tape, one side of which is attached to the curtain rod, the other to the canvas on the reverse side. The tape is sewn or glued onto the fabric.
The advantage of this type of fastening is the ability to quickly install/dismantle the curtains.
Installation without drilling
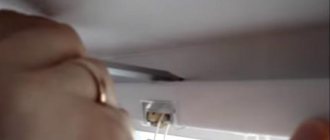
If you want to attach curtains to the sash or frame of a plastic window, you do not need any additional equipment for this. The decision to drill through a PVC profile is fraught with either complete disrepair of the window group or loss of tightness, which will also not make you happy. Therefore, in order to secure ready-made Roman blinds to the windows, you need to use adhesive tape, which must be included with the store kit. If you want to decorate the window with self-sewn curtains, then purchase double-sided tape and hang the product on it. The main thing is that the structure is made of lightweight fabrics, otherwise the adhesive base may not hold up and the blinds will simply fall off.
The method of attaching it with glue is quite simple. You need to glue one piece of adhesive tape to the plastic sash, and sew the second (if the manufacturers have not done so) directly to the blinds. After this, the canvas is leveled and the Velcro is firmly pressed against each other. The blinds are fixed and the whole process took no more than 10 minutes.
Installation without drilling
Fixing to the bar with adhesive tape
Installation Features
There are 2 ways to install cornices:
- by drilling holes for installing holders;
- without drilling, using additional fasteners.
To fasten a short body, 2 holes along the edges are enough; for longer products, drill 1 more hole in the middle of the future structure.
Step-by-step instructions for wall mounting a cornice
Tools and materials used:
- cornice;
- building level;
- roulette;
- pencil;
- drill or hammer drill;
- dowels and screws;
- screwdriver or screwdriver.
Actions step by step:
- Place the cornice in the wall, placing its ends at the same distance from the window, and make marks for future fastenings. Align them by level.
- Drill holes and insert dowels into them.
- Screw the cornice profile. If there are more than 2 screws, then they should be tightened after all fasteners are seated.
- Insert the cornice.
Ceiling mounting is similar to wall mounting. The cornice is placed flush with the top edge of the window or parallel to it. For intra-frame installation, the holes are made closer to the outer corners.
All that remains is to check whether the curtain works correctly: raise, fix and lower.
Further care of the window product consists of periodic dry cleaning, and if it is heavily soiled, it can be washed by first removing the cords. Then the curtain should be collected and dried.
DIY curtain and cornice
If the curtain was sewn yourself, you can hang it on a cornice, also made by yourself. Its manufacture is not difficult.
You need to take a wooden strip of small cross-section, the length of which will be equal to the width of the curtain, and Velcro tape, which ensures that the material sticks to the curtain rod.
The bar can be painted, wrapped in fabric that matches the color and pattern of the curtain material, or a cover can be made for it from wallpaper.
Then it is attached to the wall, and Velcro is glued to the outer part. The second part of the tape is fixed at the upper edge of the cut on the wrong side.
It is easy to care for such products: they can be easily removed, shaken out and hung again on the curtain rod.
Installation instructions
To hang blinds on tape or clips, you don’t need to drill holes, so you can handle the task yourself.
It is important that the brackets do not touch the moving part of the rollers and cords inside the curtain rod. Before installation, be sure to try on the fasteners and, in this form, attach the blinds to the window to mark the installation location of the brackets or clamps.
Installation on tape
You can install regular and cassette blinds using tape, the only difference is in the fastening, the installation technology is identical. It is important to ensure reliable adhesion here, so the surface should be properly prepared:
- be sure to wash the window frame and dry it well so that dust and debris do not get under the tape;
- treat the installation site with a degreaser; according to reviews from experts and home craftsmen, acetone is best suited for this.
To hang a regular model, you need to attach special platforms to the profile. The adhesive tape is already glued to the parts; you just need to remove the protective layer and attach the pad in place to the prepared surface. Next, a holder with grooves is hung on it, onto which the cornice is fastened.
The diagram shows the installation of blinds on tape; the method is suitable for attaching light-weight structures
Horizontal cassette blinds are also installed using double-sided tape. The adhesive strip is located on the inside of the box on the top bar and on the sides. Here it is important to place the cornice evenly against the frame and press it tightly. To avoid distortions, it is recommended to put marks on top, which will serve as guidelines. Hanging blinds with tape with your own hands is very simple, but this method does not leave room for error. If the curtains are installed unevenly, you will have to remove the structure, tear off the tape and re-stick it. Be sure to watch the video tips from the master; he explains all the nuances of installing cassette curtain rods with tape.
How to hang blinds on plastic brackets
Plastic brackets for hanging blinds come in the form of hooks or brackets, it all depends on the design features of the cornice. The hooks are installed on the top of the frame, and brackets are attached to them in grooves, onto which the blinds are placed.
Diagram of how to attach blinds to hook brackets
The clips have a more rigid fixation and are suitable for installing small horizontal blinds, including pleated blinds. The cornice is placed at the installation site, pressed against the sash, and a bracket is placed on top, grasping two surfaces at once, like a paper clip on paper. The clamp should be pressed until there is a characteristic click, which indicates that the edge of the bracket has completely entered the groove of the cornice.
Features of installation on metal brackets
To install a metal bracket, you must first mark the space for the clamp. Then the base part of the bracket and the movable element are put on the sash and pressed on the front side with screws.
The diagram shows detailed instructions for installing horizontal blinds on brackets.
The video below shows how to attach blinds to different types of brackets; you can compare designs and choose the best option for yourself.
Combination of curtains with tulle
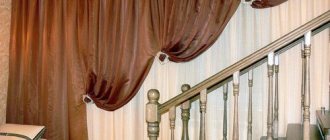
Roman models combine well with tulle. You can use this element of window decoration in any room of the house: in the living room, bedroom, nursery, kitchen and loggia. The photos below demonstrate various options for combining tulle with lifting curtains, differing in color, texture and style.
A double curtain looks interesting, where one sheet protects from the sun, and the other, less dense, serves as tulle. It is better to install such products on a wall or ceiling. When marking the places where the curtain rod is attached for a double curtain, you should take into account its width.
Hanging Roman blinds on a plastic window
In addition to the above examples of installing curtains, there are other ways to attach them.
Mounting options
Option 1 (on the wall above the window).
You can use an existing standard curtain rod and hang a Roman curtain on it with hinges. To do this, a special tape is sewn along its upper edge. If such a fastening seems unaesthetic, it can be decorated with accessories or a lambrequin.
Another way is to use a special frame, which allows you to decorate the window with 2 types of curtains at the same time.
Option 2 (in the opening).
To install the lifting cloth in the window opening, you can use a sliding rod, which is often used in the bathroom. It is threaded through the drawstring of a Roman curtain, thereby completely hiding it from view.
Option 3 (on a movable sash).
The canvas is hung on the movable sash using special brackets. This allows you to avoid drilling, maintain the integrity of the plastic window and easily change the interior in the future without fear of unsightly holes.
Types of holders for installing Roman blinds:
- Self-attaching. Using screws and nuts, the brackets are fixed to the fasteners and connected to the cornice. The structure is then put on the frame using plastic hooks.
- Universal. The installation diagram is similar to the previous one. The difference is that the mounted brackets are secured with mounted screws and closed with caps.
- Self-adhesive. The assembled holder is glued to a previously degreased frame.
Such holders are sold in curtain stores in packs of 2. in a pack, which allows you to hang 1 curtain. If there are several opening doors, it is better to purchase the required number of packages with a reserve. An additional spare part will be useful in case of breakdown or defect.
Option 4 (for a sloping window).
For non-standard or inclined windows, Skos cornices with 2 guides are used. They are installed either in the window opening or on each sash.
Buy roller blinds without drilling
Roller blinds without drilling are gaining immense popularity these days. Their popularity is explained by the ease of operation and maintenance. Roller blinds are easy to install (without drilling) on any plastic windows, and are also suitable for modern wooden windows with double-glazed windows. The roller and curtain are fixed to the window using special fasteners (included in the kit or purchased separately). These curtains are ideal for a rented room or can be installed on a balcony. And a variety of colors and textured fabrics will allow you to choose curtains for any interior.