There are several methods for attaching roller blinds to plastic windows. Each of them has its own advantages and features. You just need to figure out which mechanism and type of roller blinds are suitable for your window. There are two main types of this design - closed and open; the entire subsequent process is based on this fact. Before installation, you need to prepare tools and read the assembly instructions.
A standard set of fabric blinds includes: canvas, brackets, shaft. Additional elements can be: decorative and protective box, guides and others.
You can clearly see what is included in the set of fabric blinds: a shaft with already wound curtain fabric, two brackets, a chain mechanism, self-tapping screws with dowels
In which room is it better to hang roller blinds?
Roller blinds can be hung in absolutely any room, if this is the design idea and the desire of the owners. They look great in the living room, bedroom, and kitchen. Often, such curtains are used on sunny sides, because... They are able to provide reliable protection from bright rays due to the density of the fabric.
It would seem that the spirit of office style accompanies roller curtains, but, lo and behold, here you have an excellent harmony of roller curtains in a bedroom made according to a classic design. You don’t even need additional bulky curtains or curtains here.
Installation instructions
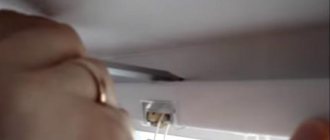
To hang blinds on tape or clips, you don’t need to drill holes, so you can handle the task yourself.
It is important that the brackets do not touch the moving part of the rollers and cords inside the curtain rod. Before installation, be sure to try on the fasteners and, in this form, attach the blinds to the window to mark the installation location of the brackets or clamps.
Installation on tape
You can install regular and cassette blinds using tape, the only difference is in the fastening, the installation technology is identical. It is important to ensure reliable adhesion here, so the surface should be properly prepared:
- be sure to wash the window frame and dry it well so that dust and debris do not get under the tape;
- treat the installation site with a degreaser; according to reviews from experts and home craftsmen, acetone is best suited for this.
To hang a regular model, you need to attach special platforms to the profile. The adhesive tape is already glued to the parts; you just need to remove the protective layer and attach the pad in place to the prepared surface. Next, a holder with grooves is hung on it, onto which the cornice is fastened.
The diagram shows the installation of blinds on tape; the method is suitable for attaching light-weight structures
Horizontal cassette blinds are also installed using double-sided tape. The adhesive strip is located on the inside of the box on the top bar and on the sides. Here it is important to place the cornice evenly against the frame and press it tightly. To avoid distortions, it is recommended to put marks on top, which will serve as guidelines. Hanging blinds with tape with your own hands is very simple, but this method does not leave room for error. If the curtains are installed unevenly, you will have to remove the structure, tear off the tape and re-stick it. Be sure to watch the video tips from the master; he explains all the nuances of installing cassette curtain rods with tape.
How to hang blinds on plastic brackets
Plastic brackets for hanging blinds come in the form of hooks or brackets, it all depends on the design features of the cornice. The hooks are installed on the top of the frame, and brackets are attached to them in grooves, onto which the blinds are placed.
Diagram of how to attach blinds to hook brackets
The clips have a more rigid fixation and are suitable for installing small horizontal blinds, including pleated blinds. The cornice is placed at the installation site, pressed against the sash, and a bracket is placed on top, grasping two surfaces at once, like a paper clip on paper. The clamp should be pressed until there is a characteristic click, which indicates that the edge of the bracket has completely entered the groove of the cornice.
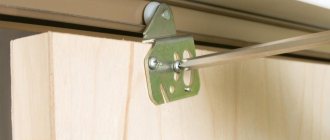
Features of installation on metal brackets
To install a metal bracket, you must first mark the space for the clamp. Then the base part of the bracket and the movable element are put on the sash and pressed on the front side with screws.
The diagram shows detailed instructions for installing horizontal blinds on brackets.
The video below shows how to attach blinds to different types of brackets; you can compare designs and choose the best option for yourself.
Necessary tools and materials for work
To install roller blinds, you should stock up on: a level, a screwdriver, a screwdriver, a pencil, self-tapping screws, and double-sided tape. If the mounting will be done on the wall, then you need to prepare a drill.
The photo shows the work with a screwdriver. A fragment of mounting the holder to the wall is captured. The equipment is positioned strictly parallel to the floor, in order to avoid crooked screwing in of the self-tapping screw.
Types of roller blinds
Installing roller blinds on plastic windows largely depends on their type. The following types of products are distinguished on the curtain market:
- Classic open. The most popular option because it is easy to operate and has an aesthetic appearance. The entire structure is easily attached using corners to the top of the frame, and a regular shaft subsequently performs its function of rolling and unfolding the canvas. Thin guides are installed on the sides of the frame, capable of fixing the unfolded material so that it does not dangle.
- UNI cassette blinds are closed. The cassette box, made to match the color of the main curtain material, ideally hides the working shaft inside itself. everything else is similar to the classic look.
- MINI roller blinds, open and closed. The fastening mechanism (brackets, Velcro) allows them to be connected to the frame without drilling. The bottom of such a work is framed with a magnet, which fixes the open canvas to the window.
A wide range of fabric roller blinds will appeal to any family member. Here is only part of the variety of types and colors that can only be found among roller blinds
The picture clearly conveys the open appearance of roller blinds. Here you can see the composition of the kit and its connection to the window.
Mix system
A newcomer to the market is the Mix system (sometimes called “bottom-up”). This version of roller blinds is significantly different from its predecessors and, thanks to its original approach, has already gained many fans. The key difference is that, unlike others, the Mix system is installed in any part of the window (most often at the bottom), and not just at the top. In fact, the design rotates 180 degrees, and the result looks stylish and functional. The dimensions of the canvas in this case are the distance between the glazing beads. No additional allowances are required.
The design of roller blinds allows you to close the window from both the top and bottom
Installation is carried out as follows:
- the fishing line is cut into equal parts;
- all parts are first threaded through the upper limiter, after which they are tied with several knots;
- limiters are mounted on glazing beads;
- the free parts are threaded through the holes of the protective box, after which they are pulled to the bottom bar, simultaneously securing the top bar;
- After the latches on the roller blind are released, all that remains is to lift the curtain.
Whatever type of roller blinds you choose, we can say with confidence that it will look great on the window. Of course, installation of Roman blinds on plastic windows is most often carried out by a specialist, but independent installation is a task quite feasible even for a non-professional.
Methods for attaching roller curtains
The variety of roller blinds has led to the creation of many fastening mechanisms, the main ones are described below.
Installation of a mini roller blind on an opening window sash
To understand how to install roller blinds on plastic windows from the “mini” series, you should prepare not only standard tools and devices, but also additionally take double-sided tape, and then follow the following steps:
- Degrease the surface of the window frame.
- Degrease the bracket and stick double-sided tape on its inside.
- Connect the brackets to the holders.
- The lifting mechanism with a chain is put on one side of the roller.
- Place the brackets on the frame, onto which hang the roller with the curtain and the chain device.
- Check the operation of the structure.
Here is the finished result of attaching a roller blind to a window with an opening sash. The brackets are attached without drilling and the picture clearly shows how they are connected to the hook holders
“Mini” on a blind window sash
Those who want to know how to attach roller blinds to plastic windows with a fixed sash should know that hook-brackets, which are often used in this area, will not be needed. Here you need to stock up on plates and side brackets and pay attention to the points below:
- Degrease the plates with grooves and glue double-sided tape to them.
- Place the side brackets into the grooves.
- Insert the brackets into the roller and put on the chain.
- Attach the entire mechanism to the degreased frame using tape.
- Check the operation of the entire structure by unfolding and folding the curtains.
Sleek design designed for small windows. The maximum size of such windows usually reaches 150 mm. The fragment shows an already attached mechanism with a curtain for a small window
Mini roller blinds with and without screws: fastening in two ways
The top of such curtains is not covered with a decorative cassette. The entire structure can be adjusted to size yourself by cutting it. You can find out how roller blinds are attached to plastic windows with self-tapping screws by reading the list below:
- Take measurements.
- Screw the brackets to the frame with a screwdriver or screwdriver.
- Place the control gears and latches into the holder pipe.
- Connect the assembled shaft to the brackets.
- Place decorative caps on the brackets, if provided in the kit.
The picture shows that to attach these Mini curtains, you simply need to drill into the wall. Massive canvases are connected to the wall using brackets and self-tapping screws piercing right through the box
Installation of Mini roller blinds without screws involves connection to the window using double-sided tape. The mounting steps are similar to installing the Mini on a blind window sash.
Airy fabric does not require particularly strong fastening, so in this case the box is connected to the frame using tape. The windows do not open, so the adhesive connection will last for a year
Mounting on spring brackets
Such holders can be used only in one case - if the window sash opens. The fastening technology does not differ from the standard stages of connection using self-tapping screws. There is one distinctive feature - the absence of corners is replaced by brackets that should be snapped onto the top of the frame.
Here are standard spring brackets. For greater reliability, they are additionally supplied with double-sided tape that can fix them in one position.
Attaching roller blinds with Velcro
The cassette of fabric blinds is treated with Velcro and factory-issued security paper. How to attach roller blinds to plastic windows using Velcro? This is the simplest solution for installing roller curtains. Installation steps:
- Connect the shaft to the brackets.
- Degrease the area where future curtains will be located.
- Remove the framing paper and press the curtain shaft tightly against the frame. Ready.
It is clearly shown step by step how to connect roller blinds to a window frame. Remove the protective film from the tape, glue one side to the bracket, the other side to the frame, put on the shaft - voila, the structure is assembled!
Installation of cassette roller blinds
The set of cassette blinds includes guides that already have double-sided tape attached. The steps below will tell you in detail how to hang roller blinds on plastic cassette windows:
- This type of curtain is installed with self-tapping screws, which means the frame will have to be drilled. So, we drill holes for self-tapping screws with a diameter of 2 mm on the frame and make the same ones on the cassette right through.
- We attach the cassette to the frame and screw in the screws with the entire structure.
- The side guides can be placed on tape, because they do not have to bear much weight. Before fastening, be sure to degrease the surface of the frame.
The picture combines all the stages with a detailed description of the installation of cassette roller blinds. With this explanation, even a beginner will be able to attach these curtains
Mix system: bottom mount
This non-standard system involves the location of the drive shaft not from above, as we are accustomed to, but from below. Yes, and in general, the mechanism can be mounted on any window sash. Such decoration is usually hung in rooms on the first floors in order to hide from the gaze of passers-by by pulling the curtain halfway up from the bottom, and, at the same time, not to rid yourself of sunlight. You should prepare a level; such curtains cannot be installed without it. Attaching roller blinds to plastic windows on the bottom of the frame:
- Take measurements along the outer edges of the window beads.
- The standard kit includes a fishing line, which should be completely unwound and cut into two equal parts.
- You need to insert the cut fishing line onto the plastic part of the lower fastening into one of the two available holes, as if folding it in half. Tie with a regular double knot. Do the same with the second part of the lower fastening and the second part of the fishing line.
- The finished part with fishing line is connected to the bead in the corner of the window on the right using self-tapping screws and a screwdriver, and the other part is connected to the left.
- Installation of the upper fasteners occurs in the corners of the upper beads.
- Insert the fishing line into the curtain shaft from one side and the other.
- The free edges of the fishing line are connected to the upper fasteners and the lock is not tightened too tightly (4 turns).
- The system is ready for use.
Here is a fragment of the connection of the lower fastening part with the attached fishing line to the frame, and not to the glazing beads. This option is also possible and also effective.
Ready-made view of roller blinds assembled using the Mix method. Easy sliding along the guides does not bring difficulties and gives a chic appearance to the entire room
Mini roller blinds
The most common option today is “Mini” roller blinds. They are a piece of fabric wound on a metal shaft, equipped with a mechanism for raising and lowering the fabric. Experts also call this type boxless (this is due to the fact that the canvas itself is not covered with anything). The advantage of this option is that the canvas can be quickly cut to fit a window of any size . Mini roller shutters are affordable and take up little space, but at the same time they look aesthetically pleasing and do their job perfectly.
In the Mini version, the fabric is located on an open shaft
Measurements
The first thing to do before installation is to carefully measure the opening. This is important not only for Mini, but also for other models of roller shutters. Otherwise, installing a roller blind on a plastic window may result in the curtain, frame or shaft simply not fitting into the opening. The main thing is to do everything clearly and without errors; write down all measurements carefully.
At the first stage of installing roller blinds, measure the dimensions of the window
The first step is to measure the dimensions of the glass without taking into account the parameters of the frame. To the resulting numbers, add 3 cm to the width and 12 cm to the height. Next, you need to decide on which side it is preferable to hang the control chain. The hinge side is preferable so that nothing interferes with the roller shutter.
Self-tapping installation
Installation of “Mini” curtains on self-tapping screws is carried out in several stages.
- The assembled roller blind is applied to the top sash of the window, leveling it.
- Marks are made on the profile for the corners.
- The mounting angles are removed from the main shaft and attached with screws to the marked places.
- The structure is assembled and pressed on top with a side plate.
- The chain should be threaded through the hole on the side, it should hang down by 10-15 cm.
- The curtain is mounted in the corners, after which it is fixed on both sides.
- The clamps are installed, the weight is hung on the chain.
Important: if the installation was carried out correctly, the installation of the shaft should be accompanied by a distinct click. The complete decorative cover should be installed last after testing the structure for strength.
Mounting on spring brackets
This method is somewhat simpler and has only one, but very important nuance: spring brackets can be attached to the opening sash and only to it. In general, the technology of installing mini roller shutters on spring brackets is no different from the version with self-tapping screws. The only difference is that instead of attaching the corners, you will need to snap the brackets onto the top of the sash at a given distance.
Velcro mounting
The third installation option is with Velcro. Most often, they come already included and, despite the visible fragility, are able to provide a fairly reliable attachment to the frame. An additional advantage is that such installation of roller blinds does not imply any damage to the window, and if necessary, the Velcro can be removed quickly enough.
Attaching the roller blind with double-sided tape eliminates the need for drilling plastic.
The process of installing roller blinds on a window is simple:
- The surface of the frame at the attachment points is degreased to ensure maximum adhesion.
- The installation site is heated with a household hairdryer.
- The fasteners are attached to the frame.
- The curtain structure is mounted in fastenings.
Important: Regardless of the type of fastening, it must be remembered that the uncovered section of the chain mechanism must face down. If you compromise this rule, the roller shutter simply will not work .
Useful tips and tricks for installing roller blinds
1. When taking measurements, you need to take into account that the finished structure with brackets will be 1-4 cm wider than the main fabric. 2. When using a Velcro fastening mechanism, the joints must be degreased. Do not use acetone! 3. The chain mechanism must point downwards, regardless of the type of attachment. 4. When choosing glue for attaching brackets, exclude the option called “Second” - it is short-lived.
The diagram shows the correctness of the measurements. Thanks to the visual drawing, even the most incomprehensible person will understand “where to start measuring” and “what to measure”
Installation (installation) of blinds - how to hang and how to attach to plastic windows
It is not always convenient to use curtains. In some cases, blinds are more practical and convenient. They make it possible not only to protect yourself from immodest glances in the evenings, but also to regulate the level of illumination during the day by turning the slats (plates). We will talk about how to install blinds on plastic windows in this publication.
Designs and installation methods
There are two types of blinds for windows - vertical and horizontal. Vertical slats are usually made of plastic or special dense fabric, cut into strips 10-15 cm wide. Less commonly, you can find slats made of aluminum or synthetic threads.
Vertical blinds can be used not only for windows, but also for plastic doors with full glazing
The slats of horizontal blinds come in plastic, wood and metal. Regardless of the type and material, they consist of a cornice and slats. Cornice is a plastic or aluminum U-shaped profile in which the controls are located and from which the lamellas are suspended. Lamels are horizontal or vertical stripes/plates that actually cover the opening. In order to be able to open and close the blinds, there are controls - chains or threads.
The design of horizontal blinds includes a large number of threads
In horizontal models there is also a control rod connected to a rotating mechanism. By rotating the rod, the angle of inclination of the lamellas is changed. This is how you can change the amount of light and the “degree of transparency” of the window. If the slats are placed vertically (almost), they completely block the view. When positioned horizontally, they hardly interfere with the view, but there are many other positions.
Installation of horizontal and vertical blinds
When installing blinds, you need to attach the cornice. To fix it, the kit includes specially designed brackets. These brackets are attached to the window or wall, and the cornice is simply put on them (until it clicks).
There are several ways to install blinds on sash windows:
- Directly on each window sash. This installation method will allow you to use the window sill at any time. The only limitation is that you cannot place objects close to the frame. Many people are afraid of the need to make holes in the PVC profile with this installation method. The presence of several additional holes in the plastic does not affect the properties of the window. In addition, blinds can be attached to an opening window sash without drilling .
- Secure it in the opening so that only the window is covered, but not the adjacent walls. With this installation method, the cornice is attached to the upper slope.
- Attach to the ceiling. In this case, there should be enough space to open the sash (at least 5 cm).
- On the wall. Attach the curtain rod directly to the wall above the window.
- Install on additional long brackets. This option is suitable for shallow window openings, when blinds hanging close to the wall do not allow the sash to be opened.
How to install blinds on plastic windows: installation methods
You will have to decide on the method of installing the blinds before purchasing: the size of the canvas depends on this. So the type of installation must be chosen before taking measurements.
We take measurements
You need to decide on the type of blinds (horizontal, vertical) and the method of installing them (on a wall, on a ceiling, in a sash window, in a window opening) before purchasing. And even before you start measuring. Because different installation methods require different sizes. Only with correct measurements will it be easy to install blinds on plastic windows.
For everything to work well, you need to take the measurements correctly.
Another important point: you need to measure each window separately . Sometimes it just seems like they are absolutely the same. Believe me, there is a difference. You also need to write down the measurement results and sign which specific window you measured and which sash it is. Accurate and detailed records will help avoid confusion during purchase and installation.
In the window opening
Although the appearance of the products is different, when measuring there is no difference between horizontal and vertical models. If you are going to install blinds in a window opening, you need to subtract 2 cm from its width on each side. You can subtract 1-3 cm from the height of the opening. Such gaps are needed so that the canvas hangs freely in the opening and the lower edge of the slats does not rub against the window sill.
How to measure when installing in a window opening
Please note that you can install blinds on plastic windows “in the opening” not flush with the edge of the opening, but deeper - near the glass itself or by stepping back 5 or more centimeters from the edge. If the opening has a trapezoidal shape, the height/width of the opening will be smaller for the glass, so we take careful measurements. And also, in this case, it is better to put marks for installation when measuring. Then you will know exactly where you will need to install blinds on plastic windows so that their dimensions fit perfectly.
On the ceiling or wall
Here the measurements depend on your desires. The length of the blinds can be up to the floor or just up to the window sill. Moreover, depending on the type of installation chosen, the slats can cover the window sill or not. So the length is whatever you like.
This is wall mounting. When mounted on the ceiling, the length will increase, but how much is up to you
The width of the blinds with this installation method is wider than the window opening. How much wider depends on your desire, but the minimum offset is 5 cm on each side. But if the window is in the same plane as the wall surface, you will need additional brackets, which are not included in the package: the slats must be placed at a distance of at least 5 cm from the glass surface so that they do not interfere with opening the doors for ventilation.
On the doors
When installing blinds on a multi-leaf window, there are two options - install one device on each sash or order one long one for the entire window. Usually the first option is chosen - it makes it possible to open and close the shutters with the blinds lowered. If you choose this installation method, you will need to measure each sash and record the results. The doors may be different, so be careful.
The option on the right is more convenient
The width of the blinds when installed on the shutters is taken to be 3 cm wider than the glass. When hanging, the lamellas overlap the profile by 1.5 cm. This is convenient and does not interfere with opening/closing windows. The length depends on the location of the fastener, but usually it is 5 cm longer than the height of the glass.
Once again we draw your attention: we measure each sash!
How to install blinds on plastic windows: attach to a wall or window opening
The first step is to apply markings. We install brackets in the cornice. We place them on the right and left so that they do not interfere with the operation of the blinds. The installation height depends on the selected product length.
We attach the curtains, mark with a pencil on the wall the places for installing fasteners in the brackets. If we are installing horizontal blinds (they are light and create almost no load), it is enough to install one screw/dowel. Vertical ones are heavier, so you need to install all the fasteners from the kit.
Installing blinds on the ceiling and walls is the same. Only the mounting location of the bracket changes
There is a second way. At the selected level, use a building level to draw a horizontal line, try to avoid tilting - this will affect the blinds (skew). Place the bottom of the bracket against this line and use a pencil to mark the holes for drilling. If the length of the cornice is more than 2 m, an additional bracket is required to increase the rigidity of the structure, which is attached in the middle.
This is what vertical blinds look like installed in a window opening
When attaching to brick or concrete, drill holes in the wall or ceiling at the marked points. A drill or a hammer drill - whoever has what is available. The diameter of the drill depends on the size of the dowels. They usually come included, but you can supply your own.
We insert spacer dowels into the finished holes and carefully hammer them in with a hammer. We install the brackets, fasten them with screws or nails (if dowel-nails are used). We install the cornice on the brackets and insert the plugs on the sides. For horizontal blinds, attach a rod (handle) to control the swing mechanism. To do this, install a special hook (included) directly into the mechanism itself, and attach the tip of the rod to this hook.
Installation of horizontal blinds on PVC window sashes
With this installation method, the blinds are attached with small self-tapping screws (included in the kit) to the window profile. They must be installed so that they do not interfere with the handle turning. Be careful: if you drill too close to the bead, you can damage the glass unit. Therefore, in this case, correct measurements are very important.
Installation of blinds on a PVC window
Installation step by step
The procedure is as follows:
- We install the fasteners on the cornice so that they do not interfere with the moving parts inside.
- Let's try the product on the frame. We set it so that the slats overlap the drain frame and the right at the same distance.
- Mark with a pencil or marker the place where the fasteners should be located. During this operation, you need to keep the cornice as level as possible. You can follow the contours of the window frame or use a level.
- Although the plastic is quite soft and you can immediately screw self-tapping screws into it to prevent the frame from cracking, it is better to pre-drill the holes. The diameter of the drill is slightly smaller than the diameter of the screws. Usually the kit comes with self-tapping screws with a diameter of 3 mm, so you need to take a 2 mm or 2.5 mm drill.
- We take the brackets and fasten them to the frame with self-tapping screws.
We screw in the screws - Insert the blind rod, pressing until it clicks.
- We close the ends with the plugs that come with the kit.
Having to drill holes in a window frame can be intimidating, but it's no big deal. In case of incorrectly made holes, the unsuccessful ones can be filled with sealant. White silicone, not acrylic (acrylic quickly turns yellow). The performance of the windows will not be affected. What can be dangerous is getting into a double glazed window. Then it may crack. But this is not fatal either - it can be replaced, although it will not be cheap.
We install the lower clamps
But that is not all. To finally install horizontal blinds on plastic windows, you need to drill a couple more holes - for the clamps (also called anti-wind). These are additional fastenings at the bottom of the opening window sash. The lower edge of the blinds is tucked into them. They do this so that when ventilating, the blinds do not hang down, dangle in the wind, or knock over objects on the windowsill.
Don't hang out...
We install the clamps like this: we try them on, pulling the blinds down a little, mark the fastening points, drill holes, and install them. We tuck the bottom bar into the installed clamps. Now, even with a draft or an open shutter, the blinds will not dangle. The only thing you need to watch out for during installation is not to get caught in the glazing bead (this is a long strip that runs along the glass unit and holds it in place). It is necessary to drill a hole in the frame itself, stepping back at least 1 cm from the edge. Otherwise there are no problems.
No drilling
There is also a way to install blinds on plastic windows without drilling the frame. This method is only available for those blinds that are hung on opening sashes. In this case, they are simply hung on plastic mounts/brackets, which are placed on the frame from above. To prevent them from moving, a strip of double-sided tape is attached to the back of the bracket. After removing the protective film, you can glue it (but you don’t have to fix it).
The shape of the plastic fasteners depends on the type of cornice. So you need to select it specifically for each
These L-shaped plastic brackets are not included, but can be purchased at a store or company that sells horizontal blinds. This method is convenient by simply dismantling the blinds, which is convenient if they need to be repaired or washed.
Assembly of vertical blinds
Vertical blinds are installed exactly as described above. The difference is that the slats are installed after the cornice (the guide along which the runners move) has been secured. For convenience, before attaching the slats, you can use an adjustment cord to turn the sliders so that the slots in them are perpendicular to the cornice. Next, we simply snap the slats into the runners, inserting the strip until it clicks. So, we fasten all the slats one by one.
Fastening plastic vertical slats
If the slats are made of fabric, then after installing them do not forget to insert the lower weight. Next, we attach the lower connecting chain to the lamellas.
How to assemble vertical blinds
The installation of vertical blinds is complete.
How to care for a roll structure
An unusual curtain requires special care, different from the care of a standard curtain.
Cleaning. It is better to clean curtains frequently using a dry method, namely with a vacuum cleaner. Wet cleaning of dust is carried out as it gets dirty (usually once a month) and for this use a standard sponge slightly moistened. Do not wash or soak the fabric in water, as this procedure will lead to damage. If there is a stain on the curtain, it should be treated with a stain remover spray and only then carefully remove the remaining spray using a damp sponge.
Drying. After wet processing, the curtain fabric does not need to be rolled onto a roller, but wait until it dries completely unrolled.
Exploitation. The process of folding the panel must be done slowly to avoid the formation of folds and creases. When preparing food, it is advisable to raise the curtains so that they do not absorb fat and food aromas.
Even such dense fabric as polyester with cotton can wrinkle somewhere when rolled up. Rolling must be done carefully and carefully
Roller blinds will help bring the spirit of modernity. They are varied in color, print, structure and method of fastening, so you can definitely choose a roller blind to suit your taste.
An incomparable solution for anchor windows is to decorate them with roller blinds. They perfectly take their place clearly on the window, do not hang loosely on the eaves, and most importantly fulfill their purpose - they darken the room
Here is a popular type of roller curtains called “day-night” or in common parlance – zebra. By adjusting the dark and light stripes, you can direct the flow of light in the desired direction
Here is another example when a solid sheet of fabric blinds is wide in size and can outshine three functioning doors at once. The appearance is attractive and does not interfere with the passage
An extravagant combination of open-type roller curtains with screws and regular curtains with grommets. This mix can fit into any room
Installing blinds on a window block
There are several ways to install lamella blinds and fabric roller blinds on plastic windows without compromising the integrity of the frame elements, which differ in the design of the mounted device and the method of fixing it on the window.
Blinds can be installed without drilling on both fixed frames and opening sashes.
Roller blinds: on the left - on a fixed sash, on the right - on a movable sash
Depending on the functionality of its sashes, not only open or closed roller blinds are suitable for installation directly on a window unit, but also devices with horizontal or vertical lamellas. It is important to choose the accessory correctly, in accordance with the design location - on the frame or sash.
Fastening with double-sided tape
This technology is a type of adhesive installation of roller blinds or light blinds on plastic windows, which ensures easy dismantling of the device if necessary for reuse in another place and sufficient fastening strength without making technological holes or slits in the binding.
Manufacturers offer models of roller blinds that are standardly equipped with self-adhesive brackets or casing edges.
To install such an accessory, you need to attach it to the design location, optimally orient it relative to the sash, taking into account the location of the handles on it, and use a pencil to trace the outline of the adhesive elements - brackets or edges.
Markings on the seat sash and degreasing agent
Then the seat on the binding is degreased (without using abrasives), the protective film is removed from the adhesive surfaces, and the device or bracket is tightly pressed with the entire contact area to the base according to the markings.
Important! Blinds or roller blinds, fixed to the frame using self-adhesive brackets or casings with adhesive edges, can be installed both on movable sashes and solid frames, since they do not require technological grooves or protrusions for fixation - they are held on a smooth surface due to the adhesion of the adhesive.
Installing roller blinds in this way, provided that the manufacturer’s recommendations are followed, is reliable and durable.
When dismantling and transferring roller blinds or blinds to another window unit, the contact areas are cleared of old adhesive, after which new tape is glued, and the product is installed in the designed location.
Removing the protective film from the double-sided tape on the adhesive edges of the curtain body and fixing the accessory to the binding
A type of roller blind is a cassette device, which has two guides located below the casing on both sides and designed to fix the side edges of the curtain. This design allows the canvas not to sag when the sash of the window unit is tilted. You can also secure a cassette roller blind to the sash using double-sided tape, using it both to secure the casing and to secure the guides to the binding.
Cassette roller blinds with movable sashes
Installation with double-sided tape can also be applied to some models of lightweight blinds and roller blinds designed for fastening with self-tapping screws. To do this, choose an accessory whose casing design has surfaces or brackets with a sufficient contact area from the back to the base. The areas in contact with the base are covered with double-sided tape, and the device is mounted on the frame of the window block or sash.
To get a more visual understanding of the use of double-sided tape in installing curtains, watch this video:
Important! Double-sided tape is available in four types: foam, paper, polypropylene, fabric and paper. All types are suitable for fastening blinds and roller blinds, except paper, but there are varieties of reinforced fixation.
Double-sided tape: from left to right - on fabric, polypropylene and foam base
High-quality adhesive tape and proper preparation of the base for installation are the key to reliable fixation of the accessory on the plastic binding.
On a note. After dismantling, re-attaching roller blinds and roller blinds to plastic windows can be successfully done using silicone sealant labeled “for aquarium”, which has a high degree of adhesion to smooth substrates, having thoroughly cleaned the contact surfaces of old glue.
Fixation with hanging brackets
If the sash is movable, on hinges, then equipping it with a curtain can be even easier. The inward-opening sash, even in the closed position, protrudes beyond the plane of the window frame, which allows you to hang the roller blind casing or the upper curtain rod on its upper edge using special hook brackets.
Placement of removable hook-brackets on the sash
Installation is simple, since the design of these devices provides exactly this method of fastening, that is, hooks are included in the standard equipment of the device, and the base does not require preliminary preparation.
Hook-brackets may differ in size and profile, but the principle of their operation is the same - the upper part is put on the horizontal protruding strip of the sash over the sealing rubber, and the lower part has the appropriate devices for inserting an axis with a casing or an upper cornice with a blinds control mechanism.
Roller blinds and blinds suspended on restraining brackets
The device is purchased in accordance with the dimensions of the sash being equipped; if necessary, it can be easily dismantled and transferred to another window unit.
This video will help you learn the described method: