Using clinker tiles you can create a high-quality imitation of stone, brick and even wood. Clinker is not inferior to them in terms of characteristics. Therefore, tiles are successfully used for interior decorative finishing, creating aesthetic and practical interiors in different styles.
To make the tiles themselves, shale and peat clays are used. They are carefully compacted so that no air cavities remain. And then fired at high temperature (1200-1500°C) for 36 hours.
Characteristics of clinker tiles for interior work
Any clinker can be used on the facade, indoors, and for decorating fireplaces and stoves. This material is not divided into categories “for external use” and “for internal use”. This is due to a specific and constant manufacturing technology and high-quality natural raw materials.
During the production process, the tiles are pressed and fired at high temperatures, therefore they are resistant to such types of loads as:
- folds;
- compression;
- abrasion;
- long static.
Clinker can withstand 400-800 kg of force per square centimeter. But for brick this figure is no higher than 250.
Clinker tiles are resistant not only to mechanical loads, but also to the influence of chemicals (acids, alkalis). Ultraviolet rays do not affect it either. Therefore, the finish will not fade over time and will retain its color.
Clinker tiles have a low water absorption rate - about 2-3%. It is used in rooms with high humidity. The clinker does not slip even when wet, and mold and fungi do not grow on the surface.
If frequent direct contact with water is expected, it is recommended to choose glazed products. They do not allow liquid to pass through at all, so they are even placed in swimming pools.
In addition, due to water resistance, frost resistance increases. This cladding can withstand more than 100 freezing and thawing cycles. Therefore, balconies, unheated entrances and vestibules, country houses, etc. are finished with clinker.
The tile also tolerates high temperatures well: it does not burn, does not deform, does not emit harmful substances and, accordingly, is well suited for decorating stoves and walls near them.
Clinker is a rather dense and therefore heavy material. For interior decoration, it is recommended to choose thinner formats so that the load on the supporting structures is less.
Another advantage is the variety of colors, textures and dimensions. Thanks to this, clinker fits into the interior of different styles and purposes.
Technology of laying clinker tiles
The entire technological process for laying clay tiles can be divided into three stages:
- Preparing walls for laying.
- Dilution of the adhesive base.
- Directly the installation itself.
Below you will find step-by-step instructions for each stage.
Preparing wall surfaces
Of course, you need to thoroughly prepare the walls for laying clinker tiles.
- First, it is necessary to check the surface for evenness with a building level or level. If at least some differences and bumps are found, the walls are first leveled with plaster and covered with putty on top.
- After the surface has completely dried, it is primed 3 times and the composition is allowed to dry.
- Next, marking work begins. To do this, draw a straight horizontal line along the entire wall. It serves as a guide for the reference lines. They are carried out every 2 rows of tiles. At the same time, you must not forget that there will still be small seams between the tiles.
If the wall is lined with plasterboard, there is no need to level it. But if the walls are concrete, you need to prime them with a special solution called “concrete contact”.
First, it is necessary to check the surface for evenness with a building level or level.
Glue preparation
When the surface preparation is completely completed, it is necessary to mix the glue. It is usually sold dry. It must be stirred strictly according to the instructions printed on the glue container. At the end it should resemble the consistency of thick sour cream.
It is important that the volume of the adhesive solution is not too large. It is determined by eye how much glue the master will spend in 30-40 minutes of working time. After all, during this time the composition begins to become covered with a film, and then completely harden. But it will no longer be possible to dilute it with water.
At the end, the glue should resemble the consistency of thick sour cream.
Laying
The installation itself takes place in the following stages:
- First, an adhesive solution is applied to the wall using a notched trowel. If the master is a beginner, then a section of wall with 6 tiles will be enough for him.
- The tiles begin to be laid from the far bottom corner and gradually move down. It is pressed tightly against the wall and immediately adjusted using a rubber hammer. If a lot of glue has come out of the seams, they are carefully cleaned off with a wet sponge material and care is taken that the composition does not get on the cladding.
- Having finished each row, you must check it for evenness with a regular level.
- Plastic crosses are inserted between the material and the seam, which are removed after the glue has completely set.
- If this is necessary, the tiles are cut using a grinder and a special cutting disc. The use of a tile cutter is unacceptable here.
There is no point in applying glue to the front surface of the clinker. After all, before laying the walls are well leveled. Additional excess glue will only interfere and stain the material.
Having finished each row, you must check it for evenness with a regular level.
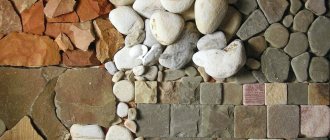
Types and sizes of clinker tiles
The texture is:
- smooth;
- rough;
- rustic (“stone-like”, often aged);
- glazed.
Clinker is made in different colors: white, black, red (“brick-like”), beige and brown, etc. Only blue and green tones are not found. This happens because only natural dyes are added to the clay before firing. But the blue and green tones are not preserved during the process. But if the tile is covered with glaze, the color can be any.
The imitation of natural stone is deliberately made to be non-uniform in tone. To do this, the dyes are mixed unevenly in the clay. And when firing clinker “like a brick”, mobile burners are sometimes used. As a result, the tiles also turn out uneven in color, from paler to almost black. Such firing is usually combined with the texture of old brick.
The format of clinker can be different, the most common is European. The size is indicated in millimeters or by letter:
- WF - 210 x 50 mm.
- WDF - 215 x 65 mm.
- DF - 240 x 52 mm.
- RF - 240 x 65 mm.
- NF - 240 x 71 mm.
- 2DF - 240 x 113 mm.
- LNF 295 x 71 mm.
Thickness - from 5 to 15 mm. To frame columns and arches, special corner tiles are produced. The second part, as a rule, is made longer - 115 mm.
Types and features
As a material for wall decoration, tiles have long been used not only in bathrooms, but also in other rooms. Currently, a huge variety of attractive finishing materials are produced, which are very popular among designers, craftsmen and renovation customers. Walls lined with high-quality tiles are not inferior in strength to concrete, and retain their impeccable appearance for a long time. These properties are achieved by manufacturing the finishing material using high temperatures.
The material has a high density, which gives it increased moisture resistance and frost resistance.
There are two classes by which piece tiles are made:
- Class A - manufactured using a special technology, characterized by a smooth, flat surface and clear, correctly defined edges.
- Class B - formed under pressure and has not entirely clear dimensions and shapes.
The finishing material differs in its ability to absorb water.
According to this indicator, tiles are divided into 4 classes:
- Class I – less than 3%.
- II A class – 3-6%.
- II B class – 6-10%.
- III class – more than 10%.
You can read all this data on the packaging of the material. To wash finishing materials, various synthetic products are used, which can be aggressive and damage the tiles. To determine its stability, the material is marked with the letters: A, AA, B, C, D. The degree of stability varies from the most resistant (A) to the most unstable (D).
Special marks are applied to the packages: wall tiles differ from floor tiles by the image of a hand on them.
Tiles differ in surface type:
- Glossy - with a smooth surface that perfectly reflects light. Caring for such tiles should be regular due to the fact that dust and stains are clearly visible on them;
- Matte - easier to clean and gives the room more comfort and warmth;
- Embossed - can have either a glossy or matte appearance and is complemented by an embossed pattern.
Designer tips for choosing clinker
The entire room and only part of the wall are tiled. The first option is suitable for large rooms, since such decoration visually reduces the size.
In the second option, clinker covers one wall or part - a column, a niche, a portal around a door or an arch. This solution highlights an accent wall or is used to zone a space. Interior tiles are selected to match other finishing materials and furniture in color and style.
It is better to leave a larger format for large rooms, and use a small one in modest-sized ones. Light colors, especially white, visually enlarge the room or “pull back” a decorated wall.
The tiles in individual batches are slightly different in tone, since the composition and firing conditions cannot be repeated with absolute accuracy. Therefore, it is better to mix clinker from different boxes. You can also combine tiles of contrasting or similar colors (but matching in size and texture). This gives an interesting effect.
There is one trick when installing aged tiles. There are folds on the surface. They need to be placed so that the concave line faces the floor. Imagine that the clinker should “smile” and not “sad”. Then the wall is perceived better.
Corner tiles are several times more expensive than straight tiles. In this regard, it will be cheaper to build a new brick column than to decorate the old one. But you can also use regular tiles. To do this, the edges are filed at an angle of 45°.
The appearance of the room greatly depends on the grout you choose. It can be close in tone to clinker and then the wall looks more uniform. And with contrasting colors, individual tiles stand out. Most often, gray and cream tones of grout are chosen to achieve an identity with brick or stone masonry.
Dovetail clinker is produced for industrial workshops and high-rise buildings. But in an apartment or private house there is no such destructive impact on the walls, so it is not needed.
Interesting fact: sometimes manufacturers produce double tiles, which are split along the seam before facing. Inexperienced workers often do not know this and may think that they brought the wrong format.
Clinker tiles have their qualities only if the production technology is followed. Therefore, you need to carefully consider the choice of manufacturer. Without a doubt, the best of the best today are:
- Feldhaus Klinker;
- Roben;
- Stroher;
- ABC Klinkergroup;
- Sierragres;
- Ceramika Paradyz;
- Houseon;
- Eco-clinker.
What should you do before installation?
When starting to lay ceramic tiles under brick, do not neglect competent preparatory work. The quality and durability of the cladding will largely depend on these simple steps:
- Before starting work, experts recommend sketching a schematic sketch of the future decor. The drawing should contain the most important characteristics of the room and the nuances of the planned design. This will allow you to accurately calculate the amount of materials needed and determine in advance their color, texture, size and consistency with each other.
- It is best to think over the method of laying tiles, experimenting with all possible options in advance.
- The next step will be mandatory surface preparation (smoothing out defects and unevenness, removing dirt and grease).
- Prime the surface with special compounds to improve adhesion.
- Preliminary adjustment of tiles in size and color (the main indicators here will be: compliance with the chosen style and taste preferences of the owner).
Only after this should you start cladding.
Having calculated the required amount of tiles, it is advisable to add another 10% to it. This reserve will be useful in case of cutting or damage to the material. Otherwise, when purchasing the missing tiles next time, you can purchase materials from a different batch, which will be slightly different in color and other characteristics.
Clinker tiles in the kitchen interior
The area of the apron and around the sink is exposed to high temperature, water and cleaning products to remove greasy stains. For such conditions, clinker tiles with a smooth or glazed surface are better suited. And rough and aged ones collect dirt and grease.
If the main element of the interior is an apron made of clinker “like old brick” or “natural stone”, then skins are installed on top of the masonry. This is tempered glass protection, which can be transparent or with a pattern.
Another option is to decorate the wall and focus attention on the dining area. This will not only emphasize the functional division, but also give the whole room a cozy feel.
Sometimes I leave the opening to the kitchen open to visually unify the space. In other cases, a door is installed that will cut off unnecessary odors from the living area. Clinker finishing is combined with both options.
Area of application of clinker tiles
It is almost universally used for cladding facade walls of residential and public buildings and their plinths. Indoors, such tiles are also used for finishing walls or highlighting individual zones, decorating window and door openings, fireplaces, and stairs. Clinker tiles are great for finishing bathrooms, swimming pools and even saunas, due to their moisture resistance. Regardless of the area of application, it retains its properties for a long time, practically does not attract dirt, can be easily cleaned with any household products, while remaining like new for a long time.
Clinker tiles in the hallway and corridor
Dirt and dust from the street enter these rooms, so easy-to-clean materials are needed. These include clinker.
In a corridor or hallway, tiles, as a rule, are not laid on all walls. For example, they designate an area at the entrance where they undress and leave their outdoor items. In a narrow corridor, you can put white clinker on a long wall. This will make it seem like there is more space. The impression will be enhanced by a mirrored wardrobe.
Sometimes the lower part of the wall, which gets more dirty, is decorated this way. You can also decorate the door frame.
Porcelain tiles are often placed on the floor in hallways. If you choose it from the same collection as clinker, it will turn out stylish and impressive.
Photo gallery
Clinker tiles are not just a finishing material, but a real aesthetic element that allows you to achieve a practical and unique design.
The floors in the hallway are constantly exposed to water, dirt, and sand. In addition, the floor must withstand the impact of sharp heels and hard shoe soles, so the coating must be strong, reliable and durable.
Finishing the floor with tiles in the hallway is the best option for both a private house and an apartment.
Ceramic tiles do an excellent job of both durability and aesthetics.
Living room decoration
A wall finished with clinker tiles will serve as an excellent backdrop for paintings, photos, antique furniture or other works of art. Sometimes they highlight the surface behind the sofa or, conversely, the TV.
They decorate not only door openings, but also window openings. If the masonry imitates old brick, it creates the feeling of a house with history.
In the living rooms of country houses, stoves are decorated with clinker. And in the apartment you can make an imitation - an electric fireplace or just a portal.
Decorating with clinker is combined with parquet, classic-style wallpaper and heavy curtains, such as velvet. The interior will be complemented by gypsum stucco molding placed on the ceiling.
Examples of bedroom interior decoration
In this room, clinker tiles decorate the wall near the head of the bed. Antique clinker creates a special atmosphere that helps you relax and unwind. And thanks to the finishing that imitates natural stone, a romantic atmosphere arises.
Colors can be any. With white the room looks more modern, and with dark it looks intimate and cozy.
People sleep and relax here, which is why the environmental friendliness of clinker is important.
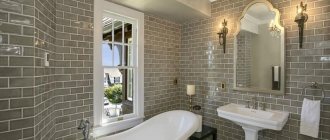
Bathroom design
Glazed tiles are used in this room. This surface better tolerates constant contact with water.
It is not necessary to cover all the walls; the finishing of the lower part looks interesting. You can only decorate the surface to which the bathtub is adjacent. Other walls are covered with waterproof paint.
Traditional colors for decoration are white, blue and beige. The decor looks interesting using contrasting tiles that are laid in a certain order or randomly. Sometimes clinker of different colors is mounted on adjacent or opposite walls.
Children's interior with clinker tiles
There are special requirements for materials for children. No harmful substances should be released. In addition, kids draw or accidentally stain the walls in the children's room. Therefore, we need surfaces that can withstand frequent washing. Clinker tiles have these qualities.
With its help you can create the atmosphere of an ancient castle. This will appeal to both knights and little princesses.
It is better to choose calm, dim colors that will go well with children's furniture, drawings and even photo wallpaper. And when the child grows up, it will be easy to change the interior to a more adult one.
How to choose clinker tiles?
When choosing clinker tiles, it is important to pay attention to the following characteristics:
Shade of the material. It should be harmoniously combined with other types of decoration in the house, complemented by flooring, the color of walls or doors.
Texture. You can choose a completely smooth, rough or rustic variety. This largely depends on the desired effect.
Form. Tiles can be large or small, which makes it possible to create surfaces with different perceptions.
Heat resistance. This characteristic is only relevant if tiles are used to decorate a fireplace, hearth or stove.
High frost resistance is not important when finishing interior heated rooms. It is worth paying attention to the level of water absorption if you plan to use it in finishing a bathhouse, sauna or bathroom, where there is a high concentration of humidity.
MnogoPlitki.ru will help you choose the optimal solution. Our specialists are ready to give detailed advice by phone or via the contact form on the website and choose an option to suit your taste.
Finishing balconies with clinker
This decor is suitable for both open and glazed types (loggias). Tiles are used to decorate all the walls or just one (next to the balcony door or adjacent) and place them on the floor. Clinker can also be combined with other floor coverings - large-format tiles, terrace boards, etc.
Forged and wooden furniture, as well as flowers, look good against the background of walls finished with clinker. If you choose a light stone-like finish, you will get a Mediterranean design.
A practical flooring option for the hallway.
Until recently, ceramic tiles did not have an attractive appearance, and owners of residential spaces preferred parquet, laminate and linoleum.
Now that there is a huge variety of floor tiles on display in store windows, it is not rational to make a choice in favor of a different covering for the corridor.
Not a single type of parquet board or laminate has the same qualities as tiles. The tiles in the hallway look quite appropriate and do not lose their properties for a long time.
Take a look at the photo of the tiles in the hallway and see that such a floor makes the interior of the house richer and more attractive.
Of course, like any coating, tiles also have disadvantages. Tiled floors are cold, hard and can have a gloomy appearance.
To add warmth and comfort to the interior, you can combine tiles with other materials. For example, tile only that area of the floor that is most exposed to aggressive dirt, sand and salts.
By combining different floor coverings, you can divide the room into zones. The hallway area will be effectively separated from the rest of the apartment. It is important here that the color of the tiles and their design differ from the flooring in other rooms.
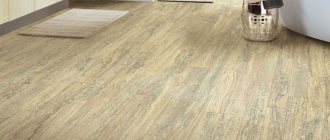
If combining materials and zoning is not to your liking, then give preference to tiles with a wood pattern. This way the hallway will look much more comfortable.
Clinker tiles in different interior styles
Let's look at examples of interior wall decoration in the most common interior trends.
Country
American country houses were created in this direction. It is characterized by the use of natural stone with wood inserts, as well as fireplaces. City apartments are also decorated in country style, filling them with an atmosphere of calm and relaxation in nature.
The concept includes decorating the walls with clinker tiles in warm colors to resemble stone or wood. The fireplace or its imitation is being finished. In terms of texture, rough or “antique” is more suitable. If the room allows, it is better to use larger dimensions. These tiles go well with rough wooden furniture and ceiling beams.
High-tech and minimalism
The high-tech style has a lot of metal, glass and high-tech appliances. The facing tiles will highlight them well. The color can be any, but white, gray and black are most often used. The surface is preferably smooth and even glazed.
Textured rough masonry will enliven the interior in a minimalist style. Mostly, facing tiles imitating brick are used. The colors are chosen in the same range - red-brown. But white also looks interesting.
Loft
This is an industrial style that imitates former industrial premises. In them, the walls were left unfinished and therefore bare concrete and brickwork were visible. The loft is characterized by “antique” clinker, with unevenness and chips. Colors are red and brown. It is desirable that the walls be uneven in tone.
White glazed tiles also fit into it. This is a “reference” to the European metro - stations were often decorated this way.
Gothic and neo-Gothic
The Gothic style is reminiscent of the decoration of medieval castles, which were built of stone. That’s why clinker is placed with this imitation. It is better to choose an aged texture.
Neo-Gothic is characterized by a contrast between the ancient and the more modern, luxurious. Clinker tiles highlight a wall, niche or arch.
Provence
Another country style, this time from the southern French province. The interiors are distinguished by the texture of stone and wood, which is imitated with clinker. The colors chosen are calm, pastel: cream, light gray, blue, lavender, etc. A combination is possible, as well as the use of clinker of different sizes and textures.
By what criteria to choose
Now let's look at how to choose clinker tiles. As for quality, we have already figured it out, now let’s touch on design techniques.
Tile size
Tile size may vary significantly
The type of interior decoration has a significant impact on the visual perception of the room, but the use of clinker tiles makes the wall more expressive and visually brings it closer. So, if you completely cover a small room, it will seem tiny, so it is better to finish one wall. A large room can be completely lined with clinker, and it will not seem small.
The size of the tiles used is also important. For small rooms, you can purchase clinker the size of a brick, while in larger rooms it is better to use a larger cladding material.
When choosing, you need to take into account the style being created
The clinker tiles in the interior of this room were chosen tastefully
In order for clinker tiles in the interior of a room to look original, in addition to size, you need to take into account its color, area of application and the chosen interior style.
Loft . This style is very specific, reminiscent of a room in which it had long been necessary to plaster the walls and hide communications - this is exactly what abandoned enterprises and warehouses that received a second life looked like at one time. This is exactly the effect that is achieved when one or all walls look as if the renovation had not yet begun. If you use clinker that is too dark, the situation may turn out to be oppressive, and even very good lighting will not correct the situation.
Techno . In the techno style, tiles play the same role, but the surface of the facing material must be smooth, the color varied, and the shape geometrically correct.
Rustic or country style . This is a generalized concept, because each country has its own concepts of the village, and the villages themselves are different. For example, in the English style, natural color is welcomed, but to create a German and Dutch style, you will need to purchase bright red clinker tiles.
The house can be not only a rustic one, but also a hunting one. Such houses usually have a fireplace. When the style was transferred to city apartments, false fireplaces began to be installed, and the use of clinker made it possible to create original cladding. This style must have a combination of brick walls and natural wood.
Aged clinker will not look good in every room
Rustic . The style involves the use of large, rough-hewn tiles in a large room. Aged clinker is very suitable for this purpose, but it is better if the tiles are of different shades.
High tech . In this style, preference is given to smooth surfaces, so tiles are rarely used. If you want to highlight a certain fragment, then you should select a clinker that emphasizes the overall background.
Gothic tiles go well with black grout
Gothic . This style is characterized by black and dark tones, so fine brickwork (in combination with black grout for joints) can emphasize the preferences and tastes of the owner.
Minimalism . Clinker is used to highlight the area and helps to focus attention on the planes. Any tile can be used.