Every owner of a country property tries to create the most comfortable living conditions on his or her plot. Many people make gazebos, create alpine slides and pave garden paths.
One of the most original solutions will be a table made of logs, because it is ideal for installation in a gazebo or any other place. Making and decorating a table from a log of wood is not difficult.
Types of log tables
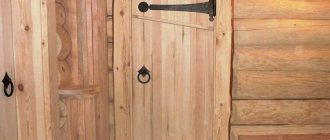
Furniture made from logs will ideally fit into the design of any garden plot of a country house. The table can be placed on the veranda of the house, under a canopy or in a gazebo. It will look cozy against the background of a log house.
Based on the shape of the tabletop, furniture can be divided into several types:
- rectangular structures are very convenient and functional, as a rule, they have enough area to freely accommodate all family members;
- furniture with rounded edges will suit the original interior of a room with interior decoration made of natural wood;
- a table made of rounded square logs is perfect for a small gazebo.
The size of the table will depend on its location and the maximum number of users. The main feature of the design is the original shape of the legs. They are usually made from halves or whole logs. Furniture is made from wood of various species. Such material remains after the construction of a private house, garden buildings, and auxiliary buildings.
Fantasies on the topic: how to make a table from logs with the least amount of time, effort and money
The comfort of vacationers largely depends on the furniture standing in the recreation area - it must be stable, comfortable and of good quality in order to withstand both atmospheric phenomena (wind, hail, rain and even snow) and various human factors.
Purchasing high-quality furniture with such properties is not a cheap pleasure. In addition, factory-made garden furniture deprives the recreation area of individuality and does not always fit organically into the surrounding landscape, and designer furniture is not available to everyone.
The most optimal solution in such cases is to make garden furniture from logs with your own hands: there are a great many options for making tables, chairs or benches, and they are quite easy to make. In addition, the decision on how to make a table from logs is dictated by the location of the recreation area, the number of family members and the degree of hospitality of the owners. The exclusivity of such a table is guaranteed: no matter what principle it is made on, no one will have exactly the same one, because each product is individual.
The simplest way to make a table from logs is to use a suitable stump from a cut tree (if it is located in the intended recreation area). In this case, the stump is not even uprooted - boards are stuffed onto the cut, or a round shield from a reel of cable products is attached (its end part is ideal for a round table). This shield can be used for another option: any log of suitable height (usually 70 - 90 cm) is equipped with crosses (as shown in Fig. 1), a shield is nailed to the upper end, its surface is painted or covered with oilcloth using a construction stapler.
However, such furniture does not fit into every recreation area: the natural style is perfect for a garden or the edge of a forest - there it will be organic and appropriate.
Create a drawing
Before you begin installing the table, you need to make a drawing on a sheet of paper. Here the dimensions of the structure are plotted and a log layout diagram is selected. You can make a drawing on paper in several projections.
A three-dimensional drawing made in computer programs is considered more convenient. You can examine a piece of furniture from all sides, select dimensions, and also determine how a particular type of wood will look. The table, which is designed with a special program, can be adjusted to suit the specific interior of the room.
Photo
Wood is a natural material that fits naturally into. Garden furniture made from logs is an inexpensive option for arranging a site.
It is necessary to try to preserve the original shape of trees and knots, to emphasize the elegance of the structure of the material
To make, you need skills in working with power tools, desire and imagination. The material can be found everywhere, it can be an old tree on the site, or in a forest area near the house.
A good addition to a massive log will be unusually shaped driftwood; you can look for them on the shores of reservoirs. They will enliven the furniture composition and add a touch of originality.
The advantages of wooden furniture include:
- It can be made from available materials, low cost.
- The aesthetic appeal of wood, the originality of garden sets.
- Durability of log furniture, provided the wood is properly processed.
- Fits naturally into the natural landscape.
Depending on the source material and its size, different options for garden furniture are obtained.
Preparation of logs
At the initial stage of making a table from logs with your own hands, you will need to prepare raw materials. All products are selected in accordance with the dimensions indicated in the drawing. You can make furniture from materials without preliminary surface preparation, but it will look rough.
To make a beautiful wooden table, you will have to work hard and spend a lot of time preparing the raw material. All bark is removed from the wood using an ax or a hammer with a chisel. You need to act with special care so that there are no chips or cracks left on the surface of the logs; it should be even and smooth.
Important! If it is necessary to make a tabletop from log halves, it is recommended to use the services of sawmills. You can make the cut yourself using a chainsaw, but it will take longer to prepare the surface.
To connect the workpieces into a single structure, special grooves are made on each of the parts. You can do without this. In this case, a perfectly flat surface is made at the joints of the parts using a plane, but the width of the plane should not exceed 3 centimeters.
To create beautifully shaped furniture for a summer house, the edges of the log (top, bottom) are cut at an angle of 45 degrees. All end parts are cleaned with a file and then with sandpaper until a completely flat surface is obtained. Then they take a drill with a drill that matches the diameter of the reinforcement used and drill holes in the parts for their reliable connection. The holes are made at an angle of 90 degrees (straight) in the right places opposite each other. Afterwards, you need to carefully sand all the edges of the wood.
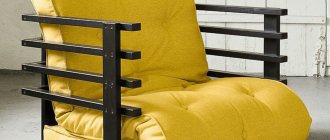
Furniture made from rounded logs
Calibrated logs of different diameters are used for “light” furniture - lighter in comparison with designer products made from large-diameter logs and unbarked logs. Sawn logs are used for children's furniture, you can make small bedside tables and tables from rounds and slabs, use whole log stands or sawn halves - the classic design of a table and bench.
Rustic furniture is usually made from unbarked logs, combined with branches, driftwood, and sometimes in fancy shapes. Wooden materials have personality and this can be used to enhance the effect.
Tools
Before carrying out the main work, it is necessary to prepare the following list of tools and equipment:
- Special impregnation for wood improves the appearance of the material and protects its surface from the appearance of fungus and mold. This is especially true if the table will be used outside in the garden. There is no point in saving on the solution; it is better to take it with a reserve.
- A hacksaw with fine teeth allows for accurate cuts of workpieces.
- An ax and a chisel with a hammer are used for removing bark from logs and some other work (grinding grooves and finishing small recesses).
- A chainsaw is considered one of the main tools when working with wood. With its help, you can cut logs both longitudinally and transversely.
- A screwdriver allows you to carry out work far from a power source.
Additional consumables you will need are self-tapping screws for fastening the parts into a single structure and transparent varnish to create a protective layer on the surface of the furniture.
Nuances of choice
Log furniture has a number of advantages. However, this rule applies only to those pieces of furniture that are made strictly according to technology using high-quality fittings and fasteners. Saving on components or protective coatings for logs can have a detrimental effect on the durability of structures and will reduce their resistance to the negative influence of external factors. Therefore, you need to choose such interior items carefully, without haste, weighing all the pros and cons.
Let us describe the main factors that cannot be ignored when choosing wooden furniture:
- cost - the process of creating furniture from logs is quite complex, painstaking and cannot be rushed. Only if this condition is met can it be said that the log bed will serve for several decades in a row. That is why interior items of this kind cannot be cheap. A low price should alert the buyer, force him to carefully inspect the design for defects, read the accompanying documentation for the product (quality certificate, passport, assembly and maintenance instructions);
- sizes - log interior items often have impressive dimensions, so they should not be selected for narrow spaces with poor lighting. In small rooms they will look overly bulky and will weigh down the space. And for large spaces, such furniture is simply a godsend;
- surface aesthetics - the logs used in the manufacturing process of the furniture structure should not contain knots, chips of the interlayer in the wood mass, and the annual rings should be located as close as possible. These factors will indicate the high quality of the material used. If the bed does have such shortcomings, its price should be significantly reduced.
Taking these factors into account, you can choose successful models of tables, chairs, beds or cabinets made from rounded logs and profiled logs for your home or cottage.
Assembly
Step-by-step instructions for assembling a garden table are as follows:
- Marking lines are applied on the log and sawed with a chainsaw (when making parts for the table top, it is better to use the services of sawmill workers).
- The parts are cleared of bark using a sharp ax or a chisel and hammer.
- Clean the surfaces with a grinding machine.
- The parts are assembled into a single structure.
- Self-tapping screws are used to connect products; they are screwed into the workpieces using a screwdriver.
After making the frame of the stand, they begin to secure the table top.
Fastening the table top
In practice, there are two options for securing the table top. In small-sized furniture with minimal load on the upper part, the frame is covered with a sheet of chipboard and the element is secured with self-tapping screws. The tabletop is covered with self-adhesive paper. The lid fastening option is suitable for furniture with top dimensions of no more than 1 x 1 meter.
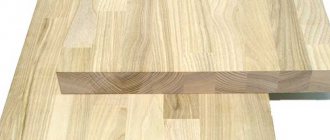
In another case, longitudinal cuts of logs or wooden beams are used to make the tabletop. It is necessary to carefully process the front surface with a plane so that all parts acquire a uniform structure.
Important! Make the surface of the tabletop as smooth as possible, which will prevent injury when using the furniture.
Table finishing
After assembling the furniture, they begin to coat the structure with protective compounds. It should be remembered that the working solution must be applied to a surface that has been previously cleaned of debris and dust. When the protective layer is completely dry, the table is covered with transparent varnish.
Manufacturing technology of a standard bed
Making a solid wood bed with your own hands is carried out in several successive steps:
- Preparation of necessary tools and materials.
- Carrying out calculations of the quantity of required consumables and their sizes.
- Pre-treatment of lumber.
- Making the frame.
- Assembling and installing the back and legs.
The final stage of work is treating the finished product with protective solutions, as well as decorating the bed.
Installation tools
To create a bed from logs, you will need the following tools:
- Roulette;
- Pencil;
- Construction corner;
- Level;
- Screwdriver;
- Axe;
- Plane;
- Bit;
- Grinder machine. The tool can be replaced with sandpaper of various grain sizes;
- Chisel;
- Mallet;
- tongue and groove;
- Hex key;
- Jigsaw;
- Electric drill.
To make a bed from logs you will need a jigsaw.
Also, to work with boards you will need a hacksaw.
Calculations
To calculate the required amount of consumables, as well as the dimensions of lumber, it is necessary to draw up a drawing of the future structure. In this case, a ready-made detailed bed diagram can be used. Using it, the parameters of the product can be easily changed proportionally, thus achieving the required dimensions of the bed.
The diagram must indicate not only the dimensions of the future bed made of rounded or chopped logs, but also the attachment points of the combined elements. For complex structures, it is recommended to create drawings of the future product in different projections.
To calculate the dimensions of the bed, you can focus on the dimensions of the existing mattress. It should be taken into account that a comfortable sleeping place is one that fully accommodates the width of a person with his hands clasped in the abdominal area, and at the same time there is a margin of 20-25 cm from the elbows to the edge of the bed or sleeping place.
Material pre-treatment
Before starting work on creating a bed from chopped solid wood, the lumber must be additionally processed. Pre-finishing of the material consists of the following procedures:
- When purchasing solid logs, the bark must be removed from the lumber. This is done using a mallet and chisel or an ax. The bark can be left only in cases where it shows no signs of damage. Such logs cannot be sanded, but are only thoroughly impregnated with stain in 3-4 layers and covered with varnish. However, the use of beds made from bark logs often results in injuries. Therefore, it is still better to remove the top layer of wood.
- Sand the logs using medium-grit sandpaper. In this way, the top layer of wood is removed, renewing it after storage in warehouses. This stage also allows you to further smooth out the unevenness of the lumber and prepare the wood for deep impregnation.
- Impregnation of lumber with stain. When using the solution, not only the wood is painted in the desired shade, but also its additional disinfection.
Be sure to remove the bark from whole logs.
You can use both rounded and chopped logs when making a bed. Boards are used as additional lumber when creating beds from solid wood.
At the end of the preparatory stage, the logs are trimmed to the required dimensions. If you plan to make a massive bed from beams, semicircular cuts are made at the ends of the logs, allowing the rounded elements to be tightly placed on top of each other.
Frame making
When creating the frame of a classic standard bed 2x1.6 m from solid wood, you will need logs 2.2-2.4 m long, with a trunk diameter of at least 20 cm. You will also need boards 10 cm wide and 2.5-cm thick. 3 cm. The boards must be cut to a length of 1.6 m. They will be needed to create support for the mattress.
To install a support under the frame, you will need beams that will be attached along the inner perimeter of the frame, and one supporting central board.
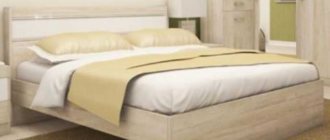
An example of a log bed frame
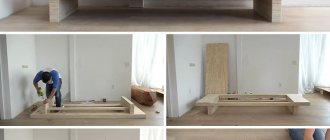
The assembly of the frame from the beams occurs in the following sequence:
- On a hard surface, 4 logs are laid out in the shape of a rectangle of a suitable size, 2 of which have cuts. The elements are connected to each other with dowels or self-tapping screws.
- Along the inner perimeter of the logs, at the same level in the middle, a support beam is fixed using self-tapping screws.
- In the middle of the frame, at the same level, parallel to the side logs, a support board is fixed.
- Perpendicular to the sidewalls, boards are laid on the supports, which will serve as lamellas. They are fixed to the supports using self-tapping screws.
The optimal distance between the lamella boards is 4 cm. Instead of boards, you can also use a solid sheet of plywood. However, in this case the structure will be much weaker.
Attaching the back and legs
The backs and legs can be attached to a bed made of logs as separate elements, or built onto a frame. To make the backs and legs separately, a pair of logs are placed vertically at a distance of 1.6 m from each other. From above and 10-20 cm from the floor they are connected to each other perpendicularly by beams or logs. The elements are fixed using self-tapping screws.
For greater structural strength, the perpendicular elements of the backrest can be additionally equipped with stiffening ribs, in the form of thin beams or rounded logs. The second headboard is made using the same principle. If desired, it can be built of the same or less height. The backs with legs are attached to the frame using self-tapping screws in several places.
When adding the back and legs to the bed body, 2-4 logs are used as the lower support and 1-3 elements for constructing the frame. To extend the legs, 2 logs are connected using dowels. The bed frame is turned upside down and connected logs are fixed along its edges. After this, the structure is turned over to its normal position. At the same time, the legs extended along the edges should look like a continuation of the frame.
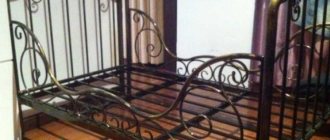
Finished log bed with legs and headboard
The back is made according to the same principle. Holes for dowels are made in the logs in the legs and at the head, and additional logs are fixed on top of them. For strength, such connections are additionally fixed with wood glue, which fills all the seams of the structure.
After assembly, the structure must stand until the glue completely hardens. Only after this can you begin the final finishing of the bed.
The final stage
After assembling the entire structure, the logs must be sanded with medium or fine-grained sandpaper. A grinder with an abrasive wheel of 140-220 microns is also suitable for this work. After processing, the wood is impregnated with a colorless or tinted stain. When it dries, the product is coated with varnish.
You can add shine to your bed in another way. The wood is coated with teak oil in several layers, and then treated with furniture wax and carefully rubbed with a leather grinding wheel. With this treatment, the tactile sensations when touching the bed will be much more pleasant.
Labor and cost
Preparing wood, sawing logs, making grooves and other operations is a rather complex process that requires maximum care and experience from the performer. For professionals, it will take at least 2 hours to complete all operations, for inexperienced users – much more.
The cost of furniture will depend on the type of wood (if the material needs to be purchased) and the price of consumables. For example, one self-tapping screw costs at least 5 rubles, plus additional funds for protective compounds: the price of 200 milliliters of varnish is about 200 rubles, a can of protective impregnation will cost at least 600 rubles.