When spending a long time at the dacha, many city residents strive to plant not only ornamental plants and fruit trees, but also vegetable crops. For this purpose, a vegetable garden is planted on the site. In such a situation, there is a need for proper arrangement of beds.
Beds with high wooden sides are very practical and convenient
When creating them using a variety of shapes and fencing, it is possible to obtain non-standard decorative solutions that turn the garden corner into the highlight of the entire summer cottage.
Wood is an environmentally friendly natural material that is ideal for building beds
Preparation stage
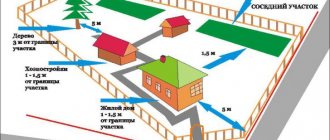
When choosing a place for beds, they are guided by the degree of shade tolerance of a particular type of vegetable and green crops. Usually good lighting is required, so choose a sunny place, away from tall trees and country buildings.
In this case, it is advisable to avoid lowlands with close ground aquifers, since constant stagnation of moisture has a detrimental effect on the root system.
To get a good harvest from your beds, you should use high-quality fertile soil, preferably peat-based
It is not recommended to arrange ridges on slopes, as they do not retain water, and the plants will constantly experience moisture deficiency. Their optimal placement is from south to north, which will ensure uniform lighting and heating of the surface throughout the day.
Board beds are assembled very easily and quickly
Before calculating the area of the future vegetable garden, think through the main dimensions of the beds. There are several varieties:
- Classic option . For standard rectangular beds, it is recommended to have a width of 0.8-1.0 m and a height of 50 cm. The minimum length is 1.5 m. Leave row spacing of about 40 cm.
- Large ridges . They are made for unpretentious crops that do not need frequent weeding, such as pumpkin, zucchini, beans or potatoes. The shape can be square or rectangular with an optimal area of 12 m2.
- Knollikovye . High (85-100 cm) elongated mounds are poured. Their length is not regulated, limited by the dimensions of the garden. The top surface is made flat. To retain moisture, several depressions are made.
- Tall . Ridges up to 1.5 m high must have a fence. In the standard version, a box of the desired shape is constructed, at the bottom of which a metal mesh is placed to prevent rodents and a crushed stone drainage layer is poured. Then fill with soil mixture, not reaching 50 mm to the top cut. Plants on such structures will need more frequent watering than usual.
- Deep . Pre-dig a trench. Fill it with rotted manure, compost with the addition of peat. Pour soil up to 25 cm high.
- Narrow . The width for such beds is selected in such a way as to plant vegetables or herbs in one row. They are often built in greenhouses or small areas.
Important! When planning a specific version of the beds, the characteristics of the plants are taken into account. For example, high or hilly ridges are not suitable for moisture-loving plants. Heat-loving pumpkins, cucumbers and zucchini will develop well here. The configuration can be not only the standard rectangular one. Triangular, trapezoidal, diamond-shaped, oval and even round mounds for vegetables look original.
Unusual decoration of beds with flower arrangements
Vegetable garden layout
With the right approach, a vegetable garden can become not just a place for growing vegetables, but also turn into a stylish landscape design object. Experts in this field have developed many recommendations in this regard.
How to design beautiful beds for the lazy, tall and smart beds - this is what a gardener needs to know.
- When planning a garden arrangement, pay attention to the fertility and illumination of the area for the beds.
- Prioritize the quality of the beds, not their quantity. A few neat garden beds will look much better than a large garden overgrown with weeds.
- To save space, use multi-level designs.
- Framing the edges will help improve the harvest and give the beds an aesthetic appearance. Stone, paving stones, colored slate, and plastic fences are perfect for this purpose.
- The optimal width of paths between beds is considered to be 70 cm.
- To ensure that plants do not obscure each other, place them from north to south on a flat area, and on an area with a slope - perpendicular to it. At the same time, the southern slope is preferable for vegetable crops, and the northern one for garden crops.
- Don't limit yourself to rectangular shapes. The beds can be made in an arc or in the form of various geometric shapes, arranged in groups or create a single composition.
Summer residents grow many crops that have similar cultivation characteristics or, conversely, contradict each other.
Multi-level beds
To achieve rational placement of vegetable crops in small areas, as well as to obtain a decorative effect, multi-level structures are created. The number of such structures is usually limited, since it is more difficult to care for plants. For planting, crops with a shallow, underdeveloped root system are selected.
Parsley, lettuce, and dill adapt well in such conditions. Low-growing compact tomato bushes can be placed. Strawberries are often grown in multi-level structures, allowing the ripening berries to be prevented from coming into contact with the soil, which contributes to their excellent presentation and good preservation.
Harvesting from multi-level beds is a pleasure
To create multi-tiered beds, wood is often used, from which special pallets and racks are assembled. It is not advisable to use metal parts, as they quickly heat up under sunlight. The soil in such structures quickly loses moisture. If you decide to install metal multi-tiered beds, you should paint the parts with light paint.
For vertical beds, available components are also used: containers, boxes, racks, shelves, installed in various compositions. You can even adapt a chest of drawers, pots of various configurations and sizes, pipe trimmings, and tires.
A wooden rack with several levels is perfect for growing seedlings
Types of raised beds and their features
To create a bed raised above the ground, just choose one of the designs developed by vegetable growers. To do this, you need to take into account the climate by choosing one of the following beds:
- Garden bed without fencing. Height – 0.3-0.7 meters, width – 1 meter. Typically used in areas with close groundwater and a low fertile layer.
- A vegetable container is the same as a garden bed, but with a fence made from scrap materials (metal, stone, wood or plastic). Externally, such beds are more attractive and are often used as a decorative element. In some cases, they are equipped with a polycarbonate roof, protecting vegetable crops from external factors.
- Boxes are stationary high beds fenced with wood or slate. Width – about one meter, height – up to 20 centimeters.
- Narrow beds, the width of which is about 50 centimeters. In such containers, vegetables are planted along the sides in two rows, thanks to which they receive maximum light and space.
Fencing beds
In an effort to create an aesthetically pleasing decorative overall appearance in your country garden, when arranging the beds you need to think about their shape, size, and framing. The material selected for the tracks also plays a role.
Advantages of fencing for garden beds
- Gives the area a neat appearance;
- There is an opportunity to dream up and use non-standard solutions;
- Available materials are used, which makes the arrangement of fencing economically profitable;
- Weeding is simplified;
- The beds do not crumble, which allows for better moisture retention;
- The advantages include the ability to choose color combinations that harmoniously fit into the landscape and create a certain thoughtful composition.
Important! For fencing beds, you should select a safe material that does not emit toxic compounds during operation.
Metal fencing
Wooden box beds
Board fencing
Slate fencing
Plastic fencing
Edged board fencing
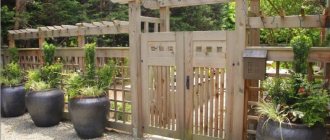
Wooden fencing
Wood attracts with ease of processing and simple installation. But this material is short-lived. The prepared parts should first be treated with impregnation to prevent rotting.
To make your own garden beds with wooden fencing, you use various parts. These can be vertically dug narrow dies, pegs, or cuttings of logs. If the latter have a large diameter, they should first be sawed along the longitudinal center line. Unsanded birch logs look great.
Ridges made of wooden beams
You can weave a fence from willow twigs. Convenient to use are boards made from floor slats, slabs, planks, clapboards, and picket fences. They are easy to install, secured with stakes. If necessary, the fence can be quickly dismantled and moved.
Advice! If you plan to use the garden beds for more than one season, it is better to use high-quality wood material: dry bars, wide wooden panels, edged boards, block house, thick lining.
Making garden beds at your dacha with your own hands is not difficult if you have at least minimal carpentry skills
To connect the boards to each other at right angles, use a special metal fastener
Using slate
You can quickly create a neat frame for a bed of any configuration using flat slate. This is an inexpensive and durable material. Its fragility must be taken into account.
- First, mark and level the perimeter of the bed, making straight lines. It is advisable to check the joints using a square and control all dimensions.
- Cut slate sheets into strips and dig a trench so that its depth is equal to half the width of the prepared material.
- The slate panels are installed strictly vertically, fixing them together with metal corners with a protective anti-corrosion layer.
- Gently sprinkle with soil, compacting each layer. Metal pegs are installed in several places on both sides of the slate fence, securing the structure.
- All that remains is to fill the internal space with fertile soil, and a neat, aesthetically pleasing garden bed is ready.
Sheets of wavy slate, which give an interesting sound, are no less successfully used to make fences. The combination of two types of slate – flat and wavy – will diversify the decor.
The use of slate as an enclosing structure for beds
Despite the fact that slate is a rather fragile material, it is quite suitable for arranging beds in a summer cottage
Metal fences
Fences made of metal parts have a long service life. It is necessary to select options with corrosion protection.
A good option is an aesthetically pleasing profiled sheet of galvanized steel with a polymer surface coating. These types of fencing for garden beds will be quite expensive, but their cost will be offset by durability. The advantages of corrugated sheets include reliable protection against corrosion, a wide range of colors, and light weight.
Metal beds are considered the most durable and durable
Longitudinal ribs give the metal special rigidity, so it is excellent for making garden beds
Stone fencing
The beds, framed with stones of various sizes and shapes, look static and very decorative. This is a durable option. During installation, certain skills in laying such material are required if it is decided to use cement-sand mortar as a binding material.
A simpler option is to fill stones between metal gratings, which are strengthened along the perimeter of the ridges at the preparatory stage. Such pergons look noble, introducing an innovative sound even into an ordinary landscape.
Using stones as a fence, you can create beds of unusual shapes
Garden beds made of stone can easily withstand any external influences, are durable, and allow you to create any configuration and shape.
Natural stone fits perfectly into the garden landscape
Border tape
Plastic curb tape is easy to install without requiring any special skills. Considering the variety of colors, this material looks very decent. Thanks to its flexibility, it allows you to frame beds of any configuration.
This material is frost-resistant and durable. Withstands shock loads and does not fade for a long time. To ensure the strength of such a fence, the tape is installed in a shallow trench, soil is sprinkled, compacted with palms, and plastic pegs are installed on both sides.
Border tape is the easiest and fastest option for organizing beds in a summer cottage
You can organize a small bed from a border strip anywhere
Concrete frames
For a static ridge that does not require transfer, it is advisable to create a concrete fence. The surface of the site is leveled, a ridge is marked and formwork is made. If desired, you can deepen it a little by digging a trench 10-15 cm deep.
Typically, boards or plywood scraps are used for formwork. The optimal width of the future fence is 15 cm. Pour cement-sand mortar and immerse the reinforcement in it. They wait a few days. When the concrete dries, remove the formwork and fill the interior space with soil.
Concrete beds can be an excellent help in decorating a garden.
Making vertical beds with your own hands: photos and technologies
Vertical beds are used for growing spices and berries. The advantages of such structures are associated with a decorative appearance, saving space and protecting crops from birds and various pests.
Warm, high beds speed up the growing of plants, as the soil warms up better and seedlings can be planted earlier
The construction of vertical beds will be an excellent solution for planting crops that require a lot of space on the site. These structures are ideal for growing herbs, wild strawberries, flowers, and strawberries. Moreover, owners of summer cottages can not only build them themselves, but also buy ready-made vertical beds in one of the specialized stores.
Why is it profitable to create or buy a vertical bed for strawberries?
There are many design options for vertical beds, but their main advantage is their compact size. Moreover, this advantage of the products will be beneficial not only to owners of small summer cottages, but also to people who want to grow herbs or berries on their balcony. A lightweight bed made from plastic bottles is best suited for these purposes.
A tall garden is convenient to dig up, weed, fertilize and harvest from it
Vertically installed beds do not require complex care. The plantings are at a sufficient height to allow weeding or harvesting to be carried out in comfortable conditions. To do this, you do not need to bend low and endure back pain. In this case, the plants and their roots are raised high above the ground, out of reach of rodents and small pests. Pyramid or cylinder-shaped beds make it difficult for birds to land comfortably to eat the berries.
Prices for ready-made structures:
| product name | price, rub. |
| Agrotextile bed | 150 |
| Plastic mesh bed | 490 |
| Pipe with holes | 1500 |
| Pipe with holes | 3200 |
| Vertical ladder | 4700 |
Making a pyramid bed for strawberries with your own hands: dimensions and technology
For work you will need the following tools and materials:
- jigsaw or hacksaw;
- edged board size 40×5×20 cm (11 pcs.);
A vertical bed is an ideal solution for a small garden plot
- screwdriver and set of screws;
- pencil and tape measure;
- seedlings and soil.
To create the base, 4 support boards are used. To make them, you can cut a board 2 m long. It is recommended to make cuts at an acute angle so that it is convenient to connect the pieces later.
Helpful advice! To increase the rigidity of the structure, an additional pillar should be placed in the central part of the pyramidal bed to act as a support.
Vertical structures save space and are suitable for growing flowers, strawberries, herbs, and vegetables
After this, a pair of boards 2 m long, with an angular cut at the edges, are laid on a horizontal plane and connected to each other. A rail is mounted into the base to organize the future bed and is fixed on both sides. The dimensions of this element are 5x40x5 cm. The resulting side of the pyramid should be installed vertically and the second and third sides should be secured to it. They are made in a similar way.
When the frame part of the pyramid is ready, use a tape measure to measure the length of the slats intended for making beds. They should be placed in increments of 25-30 cm. To secure the slats, you will need to cut the ends at an angle of 30° to make the shelf raised. Upon completion of assembly, the structure is filled with soil, which should be compacted. The products can also be successfully used for growing vegetables and herbs.
Strawberries have shallow roots, making them very easy to grow in pots
Technology for making vertical beds for strawberries from plastic pipes
This design option is great not only for growing strawberries, but also for greens.
List of required tools and materials:
- plastic pipes of the required length with a large diameter;
- steel cable (can be replaced with thick fishing line);
- construction knife for cutting pipes.
Strawberries can be grown in plastic pipes intended for arranging a sewer or drainage system
The large diameter of the pipes is necessary so that the pipe cut in half can accommodate the amount of soil required for growing plants. The product is cut lengthwise. To fix the beds in a vertical position, holes should be made on both sides of each half. A steel cable or thick fishing line is passed through them. The halves are placed one above the other according to the principle of a ladder. The number of such half-levels can be unlimited.
Note! Since the structure can swing when suspended, it is recommended to install the bed in places protected from the wind.
An excellent vertical bed with an original irrigation system can be made from ordinary plastic pipes
Do-it-yourself construction of vertical beds from construction mesh
Small vegetable gardens created on the basis of a building grid are suitable for growing strawberries, flowers, herbs or potatoes. To work you will need:
- construction metal mesh;
- the soil;
- straw;
- tool for cutting metal wire.
Vertical bed for cucumbers built using a mesh
To create a bed, you will need to bend a rectangular piece of mesh into the shape of a pipe, the diameter of which is 0.9 m. Using wire or other devices, the edges of the section must be fastened in this position. Straw is placed on the sides inside the structure. Thanks to this, the soil will not spill out. The free space is filled with compost.
If you intend to grow potatoes, the first level of plants should be located at a height of 50 cm from the ground. Approximately 10 cm should be left between crops. After this, the first layer is shed, 50 cm of soil is laid again and the plants are planted. A tower bed can have any height. To give a vertical bed a more attractive appearance, you can use black film instead of straw.
In order for the fruits to be large, you need to thin the strawberries, leaving up to 40 centimeters between the rows
Technologies for making vertical beds for strawberries with your own hands from pots
Flower pots can be used successfully to grow strawberries. Such designs have a decorative appearance. Clay or plastic products are suitable for work. The result is a multi-level design. The number of such levels is limited only by personal wishes. Pots are selected so that each subsequent one has a smaller diameter than the previous one. It is desirable that the difference in size between each pair of pots be approximately the same.
The largest pot is placed in the chosen location and filled with soil. After this, a smaller pot is placed in it, etc. When the structure is ready, plants are planted in the soil and watered.
Strawberries grown in pots need to be fertilized every two weeks.
The next option is based on pots of the same diameter. Only one of them should be large. It will be installed at the very base of the structure. A metal rod or wooden stick should be placed inside a large pot.
Note! The size of the rod must be selected so that its diameter is slightly smaller than the diameter of the hole located at the base of the pot.
A garden with raised beds can look beautiful, be comfortable and reward you with a generous harvest.
The pot is filled with soil. The remaining products are strung one by one onto a rod through a hole at the bottom. The result is a multi-tiered structure with pots that seem to balance on top of each other. They are filled with soil, where plants are then planted.
If there is a tall stump or pole on the site, the pots can be fixed to it. Under no circumstances should this be done on a living tree. Products are fixed around the circumference in any order. The spiral looks beautiful from the outside. You can also use the technique of placing pots in a checkerboard pattern. The only drawback of this garden bed is the inconvenient watering system.
Manufacturing technology and photos of vertical beds for strawberries made from tires with your own hands
A tower made from car tires is made in the same way as a structure made from flower pots. Tires of different diameters are selected for construction. This material has a significant drawback. Old car tires are not environmentally friendly. Therefore, it is recommended to create such beds for one-time use, and after a year to build new ones from other tires.
If you have any old car tires left, you can use them to grow strawberries vertically.
Before starting work, car tires need to be prepared:
- thoroughly clean them of dirt and stones;
- dry;
- paint if necessary.
After this, the largest tire should be laid on one side. On the other hand, the side part with the hole for the disk is cut off. The finished element is filled with soil and planted with plants. You should do the same with other tires and install them one on top of the other so that the size of each next one is smaller than the size of the previous one.
To make your tires more attractive, simply cover them with paint.
Helpful advice! Car tires can be beautifully decorated, as is usually done with flower beds made from this material. For these purposes, you can use bright colors, patterns, or make decorative cuts.
Making your own raised beds for strawberries from scrap materials
Plants will look great in a bed made from a bag. This design can be conveniently placed on a fence, wall of a gazebo, house, barn or any other permanent building. To work, you will need a bag made of plastic or natural fabric. Burlap is much better in terms of performance. It is environmentally friendly and, unlike plastic, is reusable. The fact is that artificial materials undergo rapid destruction under the influence of the sun.
Vertical beds do not take up much space and, if you put the structure on wheels, they allow you to move it
On the other hand, burlap has good throughput, providing air access to the plants. To prevent the bottom and sides of the bag from breaking through over time under the influence of gravity, it is recommended to stitch them several times. A loop is made at the top of the product for hanging. On one side of the bag there are holes for planting plants. After this, the bed can be filled with soil and planted.
Multi-tier structures can be made from wooden or plastic boxes of different sizes. They are stacked one on top of the other with a gradual decrease in dimensional parameters. This ladder of boxes can be painted in a bright color and laid around a tree or pole.
Original vertical bed from an old table
Helpful advice! You can use an old chest of drawers to create a garden bed by pulling out its drawers and filling them with soil. Other unnecessary furniture will also be suitable for these purposes.
Recommendations for creating vertical beds for strawberries
Before you start making a vegetable garden, it would be useful to take into account some tips for the optimal construction of structures:
- if the bed is large, assembly must be carried out directly at the site of its installation, otherwise problems with transportation may arise, during which the product can be damaged;
Growing strawberries in a barrel using the vertical bed method
- a decorative garden with berries should be placed strictly in the sun. If the vertical bed will be used for growing herbs, then its structure can be located not far from the kitchen;
- The soil for filling the beds should be prepared in advance. For berries, sandy loam soil mixed with peat, fertilizer and hydrogel is suitable. Quail compost is optimal as a feed;
- You need to think in advance about a system that will protect the beds from frost in the winter. Will the structure be covered or brought indoors;
- It is recommended to locate the garden closer to the water source to make it more convenient to regularly water the plants.
Excellent compact vertical beds from old pallets and burlap
Note! The construction of vertical beds for cucumbers is also welcomed by many summer residents. Most of the designs are made by analogy with products for strawberries. Since cucumbers belong to the category of climbing crops, the bed should be supplemented with supports to which the plants will cling.
What can you use to make garden beds at your dacha (ideas, photos)
Summer residents use other materials for fencing ridges. This can be brick laid in various ways. It can be used in one piece, installed on an edge along a rectangular or square embankment. The bricks divided in half look interesting and are installed with the corners up, creating a dynamic design.
A budget option is plastic bottles that are dug vertically around the embankment with their necks up. Select different color variations. This can be a single-color fence or a frame made up of bottles with rolls of different shades. An interesting look is obtained if you lay them horizontally.
If you have scraps of picket fence, it’s easy to build a small decorative fence. Foam blocks are also used as fencing.
Beautiful and well-kept wooden container beds
Design of paths
Paths between the beds play a role in creating a decorative ambiance for the vegetable garden. They can be loosened, weeded and compacted. Gravel and small stones are used for sprinkling. This option allows you to save the area from the spread of weeds.
Advice! If the material is pre-painted, an interesting composition is created. The vegetable garden becomes one of the central decorative corners of the surrounding dacha landscape.
Paving slabs, metal sheets, wood flooring or self-cast concrete panels are also used for paths.
Metal coating of tracks is considered the most reliable and durable
Arranging beds in a greenhouse
There are many options for placing beds inside a greenhouse. The classic method is to fill two large side ridges. They are separated by a central longitudinal and two transverse passages. This solution does not always provide enough space for plants, but it does provide access for care.
You can create three narrower mounds parallel to the long side of the greenhouse. With a small width of the beds, weeding, pinching, pruning and other plant care methods are easier to perform.
Arranging beds in a greenhouse is an excellent solution for getting a rich harvest from them every year
A convenient option is to make a wide ridge in the center. In this case, narrow embankments are left along the walls. If the greenhouse has sloping side surfaces, then tall crops are planted in the center, and compact bushes are placed on narrow beds.
The paths can be covered with a thick film, scraps of roofing felt, plywood, which prevents the germination of weeds. To prevent the ridges from crumbling, provide fencing for them.
Wooden flooring for covering paths will last a very long time if they are treated with a special solution that protects the wood from mold and mildew
A non-standard decorative vegetable garden, with a creative approach, can decorate a summer cottage. The size and configuration of the beds play a role. When designing, the materials used to make the fences are of decisive importance. They bring an important note to the creation of an overall harmonious and decorative appearance of the paths, which, if desired, can be made of color, wood, concrete, or slabs.
Author of the article: Brilevskaya Galina Stepanovna
Tags: beds, vegetable garden
- Related Posts
- How to arrange a Japanese garden on your site - landscape tricks, planning tips (photos)
- What affects Phalaenopsis orchids: dangerous pests and measures to combat them
- Secrets of growing cucumbers: planting, feeding, care
« Previous entry
How to water raised beds?
Watering beds raised above ground level should be done 1-2 times a week using a watering can or hose. It is worth noting that high water pressure can destroy the structure of the top layer of soil; in addition, the soil becomes compacted, as a result of which it is necessary to loosen it. These problems can be avoided by organizing automatic or semi-automatic watering using one of the proposed methods:
- Eggplant watering of beds.
- Watering with a wick.
- Watering using old hoses with holes laid on the ground.
- Drip irrigation using tapes or polypropylene pipes with holes.