Restoration
Restoration is the longest and most boring stage, but at the same time the most important. You won’t do the splits without first warming up your muscles, will you? So the chest of drawers needs to be carefully prepared for the upcoming changes. Don't be alarmed - we have prepared step-by-step instructions for this process.
Stage 1. Internal examination of the chest of drawers. We remove and measure damaged boxes and parts in order to buy/make new ones.
Tip: take a close look at the handles and legs of the chest of drawers. If they vary slightly in shape or size, there's a good chance they were handmade. In this case, it is better to change all the fittings.
Step 2: Clean the surface with soapy water. For hard-to-reach areas, use an old toothbrush.
Stage 3. Remove the top layer of paint or varnish. To do this, apply acetone to the prepared surface and cover the chest of drawers with film or oilcloth for an hour to enhance the effect.
Stage 4. Remove any remaining paint or varnish with a spatula and carefully sand the surface with a sander. For small parts we use sandpaper or a sanding sponge.
Stage 5. Cover chips and scratches with wood putty.
Stage 6. Final. Cover the chest of drawers with paint or stain using a brush/roller. Then we coat it with varnish, and then apply one or two more layers of paint. The final coat of varnish remains until the bitter end. Then fanfare sounds and fireworks are heard.
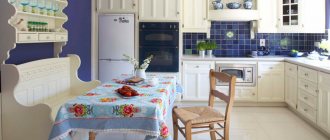
Tip: when choosing a color, be guided by the style and color scheme of the interior. Muted shades and pastel colors are suitable for the bedroom.
Restoring an old chest of drawers: pros and cons
The processes of repair and restoration are similar, but have several significant differences. When repairing old furniture, we simply transform it most often: we remove peeling paint, sand it, apply a new layer, and fasten loose elements. Restoration is a deeper work that goes significantly beyond the boundaries of cosmetic repairs. In addition, a restored chest of drawers can become more valuable if it was originally a fairly original, exclusive product.
Before deciding to restore an old chest of drawers, conduct a thorough assessment of its value. Inspect the item for tags or stamps indicating the name of the craftsman and time of manufacture. It may turn out that your chest of drawers is an antique piece of furniture art, and by starting to process it, you will lose a truly valuable item.
An old chest of drawers may have antique value
Signs of antiquity may be as follows:
- sharpening of the internal corners as a result of long-term use of the chest of drawers;
- uneven notch on the fastening screws;
- different distances between notch turns.
The last two signs may indicate that the fasteners were made by hand and not industrially.
All of the above can be detected with the naked eye. A more in-depth analysis will be carried out by a specialist whom you invite to evaluate the product. It is not recommended to begin restoration or repair work until the final conclusion.
Dresser decor for the bedroom
After restoration, you can safely begin decorating. For decoration, everything is used: from beads, coffee beans and old newspapers to nails, apartment numbers and plastic figures. The only limit is your imagination (well, you shouldn’t take away your children’s favorite toys). To know where to start, we’ll introduce you to a couple of ready-made techniques and inspiring ideas.
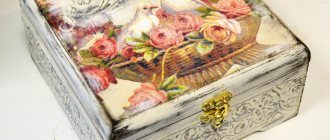
Decoupage
Necessary materials : pictures for decoupage, scissors, PVA glue, roller/brush for painting, varnish.
According to Wikipedia, decoupage is the decoration of objects using napkins, pictures, fabric or photographs. The technique is suitable for beginners. All you need is to cut out the illustration you like along the contour (you can use decoupage cards, ordinary three-layer napkins, postcards) and glue it to the selected area with PVA glue. Mix 2 parts glue with 3 parts water and cover the picture with the finished mixture. A final coat of varnish, and an ordinary chest of drawers turns into a work of art.
Stencils
Necessary materials : stencil (or lace napkin/old tulle), tape, acrylic paints, sponge/brush, varnish.
Another simple but effective technique. We fix the stencil on the surface with tape and carefully apply paint of the desired color. Afterwards, carefully remove the stencil and wash it. To make the result pleasing for as long as possible, cover the resulting pattern with matte varnish.
You can use old lace doilies or unnecessary tulle as a stencil. The principle of operation is the same, but it is better to replace acrylic paints with spray paint - the pattern will be clearer. The end result will be original furniture that will fit perfectly into a romantic girl’s bedroom.
The restoration process from start to finish
Restoring a chest of drawers with your own hands at home consists of several main processes - cleaning the wood from the old coating, eliminating chips and other severe damage, priming and painting, decorating, and varnishing.
For beginners, you will need step-by-step restoration instructions indicating a list of necessary materials and tools, a preliminary sketch with a design drawing (if one is provided) and color determination.
Tools and materials for work
Before starting work, you need to purchase a special solvent for removing paintwork, acrylic paint of the required color (or even several), acrylic varnish, wood putty, several wooden blocks, and PVA glue.
Tools you will need:
- electric grinder;
- spatulas of different widths, an awl, sandpaper of various grain sizes, needle files;
- jigsaw or hand saw for wood;
- ruler, pencil or marker;
- brushes or roller for applying paint and varnish;
- screwdriver, nails, hammer.
Cleaning the product
For any old chest of drawers, restoration begins with completely removing the coating from the product. Apply a solvent with a large amount of acetone to the entire surface and leave for some time (it is indicated on the package) until the varnish and paint separate. Then carefully remove the swollen coating with a spatula. All smooth areas are treated with a grinding machine with a medium-grain disc. Then sanded with felt.
If the chest of drawers is decorated with carvings, hard-to-reach areas should be cleaned using an awl and fine-grained sandpaper folded in half.
Preliminary preparation
Once all the paint is removed, imperfections in the wood become visible. To eliminate defects, wood putty is used to fill cracks, holes from the activity of wood bugs, etc. If the edges are severely chipped, you can restore the shape by gluing wooden planks and sanding them to the desired shape using sandpaper; small flaws are formed with putty.
Often you have to restore a chest of drawers that was stored in a damp place. For this reason, the legs deteriorate, and the slats that act as runners for drawers come off or become unusable.
To restore functionality, the strips are glued and tightened with screws or replaced. Hardwoods hold up better on nail joints.
The legs can be trimmed down to whole wood or removed completely. Then replace it with aged metal elements.
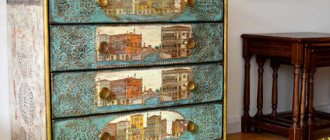
Decoupage chest of drawers
Today, it has become fashionable to restore an old chest of drawers with your own hands using the decoupage technique. The method involves decorating with elements cut from special cards, napkins, other paper products, pasting with wallpaper and even fabric.
The decoupage process itself is simple, requiring the use of available tools, and a wide stylistic choice of materials will allow you to decorate the chest of drawers to suit any interior.
A master class from specialists in this type of needlework will help you carefully familiarize yourself with the stages of decoupage and the precise technique of its execution.
Painting work
Before you start painting your chest of drawers yourself, you need to coat the piece with a clear wood primer and let it dry completely. Only after this, all the drawers, sides, and top are painted with a brush or roller. Carved areas are treated with special care.
If you are considering aging options with worn areas, you need to use two different shades - first a darker one, then a background color. Before applying the second layer, areas of abrasions are rubbed with paraffin, which will make it easier to remove after drying. Often, stain is used instead of paint to preserve the structure and color of wood.
The final stage is opening with varnish. Depending on preference, it can be glossy, matte, or craquelure. The minimum number of layers is 4. Each subsequent one is applied after the previous one has completely dried, sanding the raised fibers.
Antique decor
Required materials : acrylic paint, roller or brush for painting, sandpaper, gold leaf, glue, varnish.
An antique decorated chest of drawers is suitable for a bedroom in country or Provence style. It's funny that even the marks of time have to look stylish, so you have to work a little. On the prepared surface (5th stage of our list) we apply two layers of acrylic paint in contrasting colors. After the paint has completely dried, we sand the corners and protruding areas with sandpaper.
If you want to give your chest of drawers a feeling of former luxury, additionally use thin foil called gold leaf. Apply glue to the selected areas, and then place the gold leaf on top. Give it at least two hours to dry and remove any excess. The final stage of work, as you probably already guessed, is varnishing.
Stylish DIY furniture
Long-term use of wooden furniture leads to damage to the paintwork and weakening of adhesive and metal fasteners. The influence of moisture and wood bugs disrupts the integrity of the structure. Some parts, especially the legs, may rot and delaminate.
Restoring an antique chest of drawers can cope with even the most severe damage. There is an option to turn to specialists and fully rely on their professionalism. However, carrying out repair work with your own hands will not only save a lot of money, but also decorate the interior as a source of pride for the owner.
The repair process is not easy. It requires a number of skills, patience and knowledge on how to restore an old chest of drawers, with a clear sequence of actions - from cleaning the surface to decorating and varnishing.
The importance of each stage cannot be overestimated. Especially if you are restoring Soviet furniture with carved elements and inserts, specific fittings and many component parts.
Volumetric decor
Materials needed : stencil, masking tape, acrylic putty or volumetric paste, spatula, acrylic paint, brush/sponge, sandpaper.
The stencil comes into play again. The first step is to attach the stencil to the surface. Next, apply putty and level it with a spatula. After we remove the stencil, we patiently wait for it to dry completely.
In the finale, there are two ways to develop the scenario: either we cover the chest of drawers with acrylic paint, or we create the already familiar scuffed effect. To do this, paint the surface with one color, then rub the three-dimensional pattern with a candle and cover everything with paint of a different shade. After drying, sand it with sandpaper. Done, you are amazing!
We paint the chest of drawers in an original way
Required materials : paints (acrylic, slate, marker board paints), masking tape, varnish.
Play with color: paint drawers or dresser legs in different tones, or use today's popular ombre effect (when the color fades to a lighter or darker shade). This can be achieved by mixing the selected tone with white paint. For each subsequent shade, increase the amount of white. Number of shades = number of boxes.
Do you prefer straight lines and clear shapes? Then cover the chest of drawers with stripes or geometric designs. To do this, you will have to make friends with masking tape: apply a base color, stick the tape with the desired pattern, and then cover the surface with a different color. Your new striped friend is ready!
Chalkboard or dry erase paint can transform an ordinary dresser into a space for love messages, tic-tac-toe games, and drawing. Write down dreams, inspirational quotes, or simply create a menu for the day here. Beautiful and functional – everything we love.
Painting work
One of the easiest ways to bring back the beauty of an old chest of drawers is to repaint it. Almost always there is a radical transformation - the design becomes more attractive. Painting is usually carried out in several stages. The master class looks like this:
- surfaces are polished, cracks are puttied, priming is carried out;
- Using a brush, the restorer applies paint to hard-to-reach places and corners;
- the smooth surfaces of the chest of drawers are painted with a paint roller;
- after the first layer has dried, re-painting is carried out followed by drying;
- the transformed chest of drawers is treated with an additional layer of varnish or paint. The top layer should take the longest to dry.
To get the lightest color possible (when using white paint), you need to apply at least two layers step by step.
For oak veneer, it is necessary to allocate quite a lot of time so that the first layer of paint penetrates through the cracks that somehow exist on the surface.
If the structure is equipped with drawers, it is necessary to remove them in order to paint them separately. If staining is required, the items will have to be kept separately for several days. Otherwise, the antique veneer effect will not be clear. And if you have to restore a dark-colored oak grandma’s chest of drawers, all the imperfections of improper painting will be clearly visible on the matte surface.
Place your hand on the dresser handles
Materials needed : replacement handles (toys, ropes, wine corks), drill, bolt, washer and nut, glue, marker.
If you're tired of the look of your dresser, you don't have to bother with spatulas, sanders and paints. Just replace old handles with children's toys, ropes, keys, branches, wine corks. Yes, yes, you heard right. This is one of the simplest and most original ways to upgrade. We have detailed instructions on how to do this.
Turning a chest of drawers into an open storage system
Materials needed : replacement for boxes (wicker baskets, suitcases, wooden boxes).
Another way for those who don’t want to bother. To turn a chest of drawers into an open storage system, simply remove the drawers and replace them with something more original. For example, wicker baskets or old suitcases. Just. And how impressive!
You don't have to have an art education to give furniture a second life. It is enough to arm yourself with the necessary materials, discard ideas about right/wrong and simply allow your inner child to express itself.
If the number of options makes you dizzy, take our style preference test. At the same time, you will learn something new about your inner designer.
Solutions for children's furniture
Children's chests of drawers have their own specific materials, design, and safety requirements. If the restored chest of drawers is intended for a children's room, its elements must be made of natural wood. The maximum height of furniture is 95 centimeters. For the safety of the child, legs are not used in the structures. The chest of drawers rests on the floor along its entire perimeter. The drawer guides are equipped with reliable latches to prevent them from being pulled out.
The functions of the chest of drawers combine:
- storage of linen and diapers;
- of things;
- toys.
Furniture design takes into account the child’s age and the purpose of the interior element. The general background of the room should have a calming effect on a small child. The predominant colors are pastel. Growing children are encouraged to be creative with lemon yellow paints. The coloring of the chest of drawers should take into account the gender of the child. Boys prefer blue, brown, and green colors. For girls - pink, combinations of white with red, green, beige.
Decoupage of the facade in the form of a collage of plot pictures from cartoons and favorite fairy tales will decorate the room. Magnetic paint on the chest of drawers is useful for reminding the student about important things to do.