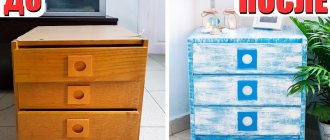
In what cases should chipboard be painted?
The main reason for decorating a board made of shavings is its unpresentable appearance. Untreated products look rough, and sawdust is not visible under the paint.
Expert opinion
Zakharova Irina Yurievna
Cleaning professional with 15 years of experience. Our best expert.
Ask a Question
Particle boards quickly become covered with chips and chips. The paint protects the surface from mechanical damage, increases its resistance to moisture and prevents the evaporation of formaldehyde.
Furniture doors and drawers made from unfinished chipboard will warp over time. Painted boards are less susceptible to warping, especially if they are additionally coated with varnish.
How to paint chipboard
Painting chipboard furniture includes two main stages:
- preparatory stage;
- painting work.
On a note! When deciding to paint laminated chipboard, it is worth considering that the end result, even if all the nuances are observed, does not always meet expectations.
It is convenient to paint chipboard from an aerosol can, especially if you need to make a pattern using a stencil
Tool selection
Various tools can be used for work:
- Spray gun. Due to the fact that furniture parts made of wood-based material have a flat base, this particular device is the best option. When spraying, the paint can be applied more evenly. The main problem with using such a tool is the correct selection of the distance. In case of erroneous calculations, drips and sagging are formed.
- Roller. This device is most often used at home. Painting with a roller is not always easy, since the applied layer must have a small thickness, otherwise sagging will become noticeable. To paint furniture, use tools with a medium-length fur coat.
- Foam sponge. Suitable for tinting and painting well-primed elements, it allows you to obtain a uniform coating, but subject to extreme care.
When restoring old furniture, you can get by with an affordable tool.
Brushes are rarely used for this process; their main purpose is decoration. They allow you to create an antique effect, but if a base layer was previously applied to hide the base.
On a note! When repainting an old table or chest of drawers, the joining of parts is taken into account: the new layer should not lead to the appearance of distortions and protruding areas.
Preparing the base
Step-by-step preparation instructions:
- Furniture is disassembled or only parts that need to be repainted are removed. It is problematic to carry out high-quality painting of parts without removing them. If you have no assembly experience, it is better to number the elements on the reverse side and draw up a diagram.
- The fittings are carefully removed, even if they are not located on the side to be painted. Its elements will complicate the process.
- The work site is prepared, everything unnecessary is removed.
If you don’t have a sander at hand, you can get by with sandpaper on a wooden block - The part is placed on a flat area. The front side is treated with sandpaper; for this you can use a hand block. Power tools are used very carefully. It is necessary to remove a small layer and create roughness on the surface to improve adhesion. Care must be taken, as chipboard is easily damaged.
- Dust and dirt are removed.
All details are processed in this way.
If it is not possible to completely disassemble the old furniture, then before painting the floor is covered with polyethylene
Repainting
Coating of fragments with paint is carried out according to the scheme:
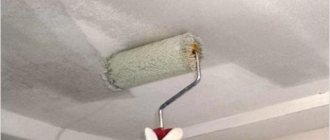
- A primer is applied to the element. It is recommended to perform at least two treatments, each time waiting until the product is completely dry.
- The coloring composition is being prepared. It is stirred well and tinted if necessary.
- The mixture is poured into a convenient roller container. The instrument is soaked in the solution and the excess is squeezed out.
- Painting starts from the middle. The mixture rolls out well over the base, the movements should be parallel, and a thick layer should not be allowed to be created. The first layer is the base; you need to wait until it dries completely.
- Then the main coating is applied according to the previous principle.
- When using a spray gun, you will need to dilute the composition used. To select the optimal distance, training staining is carried out.
Regardless of the type of composition, the surface is painted in 2 - 3 layers.
If the part will experience constant exposure, then an additional layer of varnish is applied.
Rules for choosing the right paint
When planning the painting result, consider the following points:
- ease of use;
- area to be painted;
- desired color.
Small chipboard products are easy to paint with a spray can and brush, so aerosol or can paint is suitable for the job. It is convenient to go over large surfaces with a roller. In addition to color, you need to choose what the surface should be like:
- glossy;
- matte;
- tinted.
The color can be single or combined. For multi-colored dyeing, you should choose a harmonious combination of shades, look for colors in the line of one manufacturer, or choose a tone for coloring. When choosing a primer and paint, it is better to choose formulations of the same brand and on the same base - water-based, latex, acrylic.
Stages of dyeing at home
In order for the coating to last for a long time, it is important to properly prepare the surface of the particle board.
Required tools and materials
To work you will need:
- narrow brush - for painting corners and ends;
- foam rollers - for priming and painting facades;
- masking tape - to protect permanent fittings and elements painted in a different color;
- sandpaper - coarse and fine.
When painting chipboard, it is recommended to pour the paint into a ditch for rolling out the roller for better absorption of the composition. As a result, the color will be even and the coating will have no gaps.
In addition to paint, the following materials are used in the work:
- primer;
- alcohol;
- solvent;
- varnish
Use a solvent to remove old paint, and degrease the surface with alcohol. You may also need putty to cover deep chips and a spatula.
Surface preparation steps
Chipboard furniture is disassembled before painting. The fittings are removed, and the stationary parts are sealed with masking tape. The surface is then prepared for painting.
Alignment
The relief surface is smoothed with coarse sandpaper. The rough sheet is moved sweepingly along the fibers. Use the same method to remove old paint. Rubbing with sandpaper will cause the surface to become covered with dust. Small particles are brushed off with a dry paint brush. Wood dust cannot be removed with a damp cloth. Debris will stick to the wet board. It will be impossible to remove it, and the surface will have to be leveled again.
Skinning
At the next stage, the board is sanded with fine-grained sandpaper. Dust is also cleaned off with a dry brush.
Cleaning and degreasing
A smooth, sanded board without dust is wiped with a damp cloth and then dried with a dry cloth.
For better adhesion to the primer, the surface is degreased and wiped with alcohol.
Surface priming
Damaged boards with cracks are repaired with putty. The primer is applied with a roller or brush in a thin layer. Before painting the product in dark colors, you need to apply primer in two layers. The completely dry board is ready for painting.
Chipboard painting technology: step-by-step instructions
How to repaint old furniture:
- to take apart;
- remove the fittings;
- cover the permanent decor with masking tape;
- remove old paint with a sanding machine or solvent;
- prepare the surface by leveling, sanding and priming;
- Apply paint with a roller or brush.
See also
If acrylic paint has dried, how to dilute it and suitable solvents
It is recommended to lay the board horizontally, since in a vertical position the composition will spread. Particleboard partitions begin to be painted on top. You need to paint in at least 2 layers. New chipboards are painted in the same way, skipping the removal of the old paint.
To give the surface texture, rollers with synthetic long pile are used. Applying the paint with a short-haired roller will result in a smooth surface.
Before final painting with acrylic paint, it is recommended to practice on a “draft”—trimming the board. The sample is prepared in the same way as the main surface and the tone is applied. The inspection will help you evaluate the color and appearance of the paint on the furniture.
The nuances of repainting furniture chipboard
Painting old furniture with your own hands is considered a difficult and risky procedure. The fact is that for the manufacture of interior items (cabinets, chests of drawers, kitchen modules) processed materials with a decorative layer are used. Therefore, it is necessary to correctly determine the type of coating in order to draw up a work plan.
Chipboards used in furniture production can be of the following types:
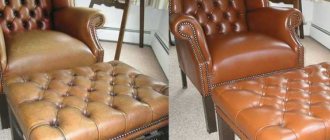
- Lacquered. Wardrobes, beds and dressing tables made more than 30 years ago are made from this material. Now this furniture is being produced again. The manufacturing technology is that several layers of varnish are applied to the decorative base. Parts processed in this way are used for facades or visible parts of the body. It is very difficult to repaint varnished products; it is much easier to polish if there is damage.
Lacquered products are the hardest to repaint - Laminated. This is a modern option that is used everywhere; furniture made from chipboard is very popular. The principle of obtaining such a surface is that the film is rolled onto a chipboard base and, under the influence of a heat press, creates a reliable and durable layer. It is difficult to repaint such material due to the fact that it is impossible to completely remove the coating, because it has adhesion to the base. This must be taken into account so as not to damage the parts being processed.
Laminated boards are coated with a polymer on top, which complicates the restoration process - Laminated. Such products are created by gluing decorative paper onto a chipboard, so the coating is unreliable. It is recommended that such elements be allowed to be repainted only after the top layer has been removed and a significant part of the glue has been cleaned off.
The paper coating can be easily peeled off the plate, after which the product is ready to apply a new decor - Veneered. The basis of the material is chipboard; veneer is glued onto it under pressure. Painting of such interior items is carried out using a limited number of compositions - these are stains and varnish. The veneer surface must be prepared carefully so as not to damage the decorative layer.
Furniture covered with natural wood veneer belongs to the elite class
There are other types of slabs, but they are not as common.
Rules for applying varnish with your own hands
Wood chips and resin have different absorbent properties. When decorative compounds are applied to clean chipboard, a non-uniform color is obtained. The primer promotes uniform distribution of the coating. Therefore, the main rule for varnishing particle boards is mandatory priming.
How to varnish chipboard:
- the cleaned surface is coated with a primer;
- polish;
- apply the first layer of varnish;
- after complete drying, sand again;
- coated with a second layer of varnish;
- finally level the dried surface.
The varnish is applied with a brush, and for a more uniform coating, a cotton swab with cotton filler is used. When applied with a swab, the composition saturates the surface well.
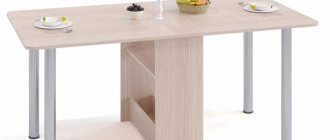
Options for subsequent decoration
Original ways to design furniture from chipboard:
- two-color painting: front surfaces white, and side surfaces black, light green, yellow, red;
- antique effect: add a darker, well-diluted shade to the painted surface;
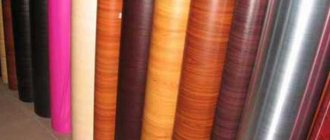
- pasting with colored film: decorate the doors of a cabinet or chest of drawers with a floral pattern, an abstract pattern;
- drawings using stencils: ornaments and flowers are applied on top of the main tone in a contrasting color.
Aerosol paint is also used for decoration. With their help, they create the effect of ombre and chrome plating. Walls and partitions are covered with wallpaper over paint.
Aftercare rules
How to extend the service life of painted furniture and chipboard structures:
- do not install in direct sunlight or near heating devices;
- do not place dishes with hot drinks and dishes on the countertop, use mats;
- before transportation, pack in cardboard boxes, wrap the corners with newspaper;
- clean surfaces from dirt with a slightly damp cloth, you can use a soap solution;
- do not rub with a hard brush or metal sponge;
- Do not clean with abrasives or household chemicals containing chlorine.
If the coating is cracked, do not allow moisture to enter the crack.
Varnish coating
Used to give an elegant look to products. There are several types of it. Using stain, you can change the color of the varnish, giving it the desired shade. The drying time of this substance is not long. Care should be taken when carrying out work. What are the advantages of varnish:
- protects furniture from wear;
- gives the paint a deeper shade;
- enhances gloss and matte finish;
- the design becomes pleasant to the touch and looks aesthetically pleasing;
- creates shine.
Pay attention to: How to remove paint from furniture at home: recommendations for beginners
You can apply varnish only when the paint is completely dry. Apply at least two layers (in some cases three), using a brush. The walls and bases of the cabinet, varnished furniture, wear out less and do not become damp.
Attention! A pattern or ornament on the surface is prepared in advance. Immediately before applying the varnish coating.
The varnish coating will protect the surface from damage