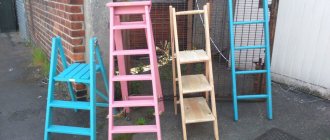
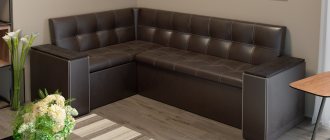
One of the popular greenhouses (or as it is sometimes mistakenly called a small greenhouse) is the “breadbox,” which was so named because of the mechanism for opening the top. Thanks to this design, you can have a free approach to the plants. The greenhouse is perfectly placed in the country house. The simple construction of the foundation and small dimensions make it possible to build a “breadbox” greenhouse with your own hands.
Advantages and disadvantages of the “breadbox” greenhouse + description
The “breadbox” consists of a light rectangular frame, sides and a roof (one or two doors). A favorable microclimate is created thanks to the arched shape. The size of the arches or its halves with two doors is made such that they do not interfere with each other and join at an angle of 90 ° C. They are opened using a special hinge mechanism.
Advantages of a greenhouse:
- the interior space is completely working;
- installation - simple;
- ventilation - especially convenient with 2 doors;
- size - allows you not to step on the beds;
- weight – small;
- moving is easy, even after installation;
- disassembly for the winter - not required;
- repair is not difficult;
- service life - long;
- cleaning - attach the brush to the top of the frame, the non-opening side, will occur automatically;
- the price is reasonable.
In addition to the many advantages of a greenhouse, it also has disadvantages:
- Tall and climbing plants should not be planted;
- the mechanism needs to be lubricated regularly;
- in the place where the valves move, if the quality of the material is poor, it wears out quickly.
Specifics of the “breadbox” greenhouse – pros and cons
The main difference that gives this type of greenhouse its name is a kind of roof, which opens for ventilation in a similar way to the kitchen utensils of the same name. The structure consists of a base, an arched roof, and blank end walls. The roof, depending on the size of the greenhouse, can be opened in one of three ways:
- half of the roof is shifted to the opposite side - mounted on hinges;
- half of the roof is raised on a support - secured on hinges;
- The entire roof is raised on a support on one side.
The second important feature of such a greenhouse is its small size. To service the beds, you do not need to go inside; to do this, just open the roof from the desired side. More convenient are “breadboxes”, in which both halves of the roof open, but there are single-leaf ones - “snails” and “shells”. If both halves of the roof can be raised simultaneously on supports, then it will already be a “butterfly”.
Important!
When opening the sash for ventilation or caring for plants, you must secure it firmly, supporting it with a wooden block. This will help avoid sudden injuries and accidents.
The advantages of “breadboxes” are obvious and significantly outweigh the disadvantages.
- Light weight regardless of the material of the frame and shelter. To install a greenhouse, you do not need a massive foundation; it is easy to install, dismantle, and completely move to a new location.
- There is no need to dismantle it for the winter - the snow slides off the sloping roof itself.
- The coating is easy to replace. Even a greenhouse covered with film will last ten years or more if handled carefully.
- Low price in terms of service life.
- Inside, a favorable microclimate is created for plants - the light is gently diffused, and when ventilated, the air is replaced without drafts, gradually and evenly.
- Maintenance paths do not reduce the area of the beds.
- It looks elegant on the site, not bulky.
The disadvantages are conditional and easily overcome:
- due to its light weight, the greenhouse can be overturned by a gust of strong wind if it is poorly secured;
- maintenance of moving elements is required - it is enough to lubricate them with machine oil when creaking or jamming occurs;
- not suitable for growing tall climbing or hanging plants.
Place for a greenhouse “breadbox”
To build a “bread bin,” you must first decide on a location.
This is an important point, because The amount of harvest obtained depends on it.
Recommendations for distance to other buildings:
- buildings - at least 5 m;
- bathhouse, sauna, summer shower - from 8 m;
- autonomous sewerage (septic tank) - 25 m.
The site for the greenhouse must be leveled - checked with a building level. The building must be positioned in relation to the cardinal directions so that the plants receive maximum sunlight throughout the day.
Usually placed from east to west, in this case the plants receive more heat before noon, and this is beneficial for photosynthesis.
When ventilating, it is better to open the windows on the south side.
Bushes and trees should be located at a distance so that the falling shadow does not obscure the light.
Design Features
There are several varieties of mini-greenhouses of the “breadbox” type made of polycarbonate. Models differ in the design of the upper moving part. It happens:
- With one blind and second opening door;
- With two opening doors.
Polycarbonate models also differ from each other in the ground part and type of attachment to the ground:
- The first option consists of moving elements and a foundation to which they are attached.
- The second is made up of moving elements, the ground part of the frame (sidewalls) and the foundation.
- Third, a ground-based mini-greenhouse is made without a foundation. Metal posts about 50 cm long are used as fastenings. They are placed in the corners of the frame, in 2-3 places around the perimeter (depending on the length of the side profile) and buried in the ground. To create warmth and a favorable environment, manure is placed on the bed in a polycarbonate “breadbox”.
The second type has a more complex design, but provides some operational advantages. Thus, it is possible to build a tall greenhouse without increasing the diameter of the doors themselves. The larger the opening radius, the larger and heavier the doors, and this will create certain difficulties in the process of caring for plants (“the bread bin” will be difficult to open and secure the doors in the desired position). You can also grow more crops in a tall greenhouse.
For the second and third options of polycarbonate greenhouses, one drawing is suitable.
Plants that can be grown in breadbox greenhouses
The following people feel most comfortable in such a greenhouse:
- any types of greens - lettuce, green onions, dill, parsley, etc.;
- low crops - carrots, beets and others;
- garden strawberry (this is the correct name of the plant we all know as strawberry);
- tomatoes are low-growing or they are transplanted as they grow, .
Heating can be installed, then crops can be grown and harvested in cold weather.
Characteristics and dimensions of the “breadbox” greenhouse
The “bread box” does not have strict dimensions - we select it so that it is convenient to open the doors.
Classic:
- length - 2 m minimum, 4 m maximum, otherwise mechanisms will be required to lift the roof;
- height - 0.5-1.3 m, we select it according to your height: if it is low, it will be inconvenient to maintain, if it is high, the weight of the structure becomes greater;
- the width is such that it is convenient to reach the opposite side: 1.3 m - one leaf, 2 m - two.
The shape is an arched frame, most often made from a profile pipe. Polycarbonate is usually used for covering. It is stronger than film and bends well, protects from ultraviolet rays, and retains heat better. Service life - 10 seasons. Film is used less often, because it is more difficult to secure and needs to be replaced every 1-2 years. The center of the turning line of the valves is located on the lower base or at the end of the vertical column (in the middle).
Characteristics, dimensions and drawings of the “bread box”
The size of the greenhouse is largely determined by the available free space and its configuration. As a rule, the length of such a greenhouse is from two to four meters. The height is essentially limited by the very essence of the design - the sash open for ventilation should not be too large, otherwise the whole idea with a greenhouse will lose its meaning. Therefore, for all “bread bins” it is standard and does not exceed 1 – 1.25 m.
The ease of maintenance of the internal space is largely influenced by the width of the structure - it is desirable for the gardener to have access to all the plants without moving inside. Therefore, the width is directly determined by the way the roof is opened. If the “bread box” opens only on one side, then making it wider than 1.3 m will not be practical. If the roof rises on both sides, then a width of 2 - 2.5 m is quite acceptable.
When drawing up your own drawing, you should take into account the thickness of the covering material. The doors entering one another will differ by this amount. Careful careful calculation of details and precise adherence to dimensions is the only way to minimize the gaps between the sashes in the closed position and ensure thermal insulation.
Drawings of a greenhouse “breadbox”
They begin the independent construction of a “bread bin” by preparing a drawing with dimensions.
We offer you several options: by clicking on the picture, you can enlarge it, and by right-clicking you can save it and print it later. At the top is a greenhouse of one and two sections. Below there are three sections.
A more detailed drawing for a greenhouse measuring 4 by 1.5 m
You can click on the drawing to enlarge it.
It is not necessary to make legs.
Possible sizes
There is no point in building a 6-meter “bread bin”; its advantage lies in its compactness.
Attention! The “snail” flaps also serve for ventilation. The modest size of the greenhouse will not prevent you from making automatic ventilation to open the doors using a hydraulic cylinder. It takes up very little space, but provides tangible benefits.
The most common sizes are from 2 to 4 m in length and 1 m in height. The width is determined by the design features. If you are planning one sash, then a size of 1.3 m - 1.5 m will be optimal. If the roof will swing open on both sides, then a distance of 2 m must be provided.
Choosing material for a “breadbox” greenhouse
Supporting elements are made from the following materials:
- metal pipes - the best option is 1.5-3 mm thick;
- polypropylene - choose the correct diameter: thin ones do not give rigidity, and thick ones are difficult to bend;
- wooden blocks - the resulting structure will be heavy, bulky, and will need to be constantly maintained.
It is necessary to purchase additional tools for construction, the set of which determines the frame material:
- metal - hacksaw, welding machine, etc.;
- wood - saw, screwdriver, etc.
Choose a covering material - thick PVC film, spunbond (or other covering material) or polycarbonate. Purchase additional materials: hinges, bolts, nuts, self-tapping screws (with thermal washers for polycarbonate).
Planning work
It’s easier to make a greenhouse-bread bin with your own hands if you have a professionally made drawing with dimensions in front of you and follow the sequence of work. There are six main stages:
- Choosing a location;
- Selection of materials;
- Pouring the foundation;
- Making drawings, cutting materials;
- Assembly;
- Foundation installation.
The best place on the site for a greenhouse
A place for a greenhouse-bread bin is selected according to general criteria:
| Landscape | A level place without holes or hillocks. If you place the structure on a slope, the soil will slide over time and the soil will warm up unevenly. |
| Distance to communications | It is easier to work if the source of water for irrigation is nearby, but given the small size of the structure, this criterion is not so important. Pay attention to the presence of free space around. It is much more important to provide free access to the greenhouse for the gardener with a wheelbarrow and buckets. |
| Illumination (depends on two factors: the proximity of trees, buildings and location relative to the cardinal points) | Do not shade plants in the morning. As for the installation relative to parts of the world, it all depends on the region: for the northern parts, north-south is optimal, for the southern ones - so that the greenhouse is illuminated by the sun until lunchtime, and then a shadow falls on it |
| Wind direction (important for northern regions) | The optimal location is close to a permanent structure on the leeward side. If this is not the case, try installing a protective screen. |
To all other:
- Step back at least 8 m from the pool, shower, bathhouse;
- The distance to the bathroom must be at least 25 m;
- Do not place the greenhouse near tall buildings or fences, so as not to damage the polycarbonate from falling snow from a great height.
Preparation of materials and tools
What materials should I buy to build a greenhouse-bread bin according to the drawings with my own hands? This depends on the size of the budget and on the expected life of the structure: it is needed for many years or you need to allocate a small area for closed ground for one season.
Economy option for the season:
- Frame made of polypropylene pipes.
- Covering: polyethylene film.
Greenhouse for long-term use:
- For the frame - profiled metal pipes with a wall thickness of 1.5 mm and a side of 2 cm.
- Polycarbonate with UV protection, able to retain heat inside for a longer time.
Basic tools:
- To assemble a metal frame: pipe bender, welding machine, hacksaw, drill, grinder. In order not to buy a machine for bending pipes, you can take the material to a specialized workshop, order the service and receive a ready-made profile in the shape of a semi-arc.
- For working with wood: saw, hammer, screwdriver, knife.
Also prepare a two-meter level, self-tapping screws with rubber washers, and hinges.
Making drawings and cutting materials
Experts do not have strict guidelines regarding the size of a polycarbonate greenhouse. The parameters may vary depending on the available space and the required height, which in turn is chosen taking into account the type of crop to be grown. Some recommendations regarding dimensions still exist:
| Height | Up to 1.5 m when open |
| Length (*) | From 2.10 to 4 or more meters |
| Width | No more than 2 m if both doors are opening. If you do more, it will be difficult to access the plants in the center |
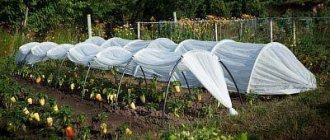
(*) To speed up the installation process, without cutting sheets and not having to join seams, we make the length of the “breadbox” 2.10, corresponding to the width of the polycarbonate sheet. If you need a large greenhouse, we make several sections, as in the photo:
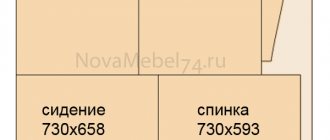
Calculation of material for a greenhouse 4 m×1 m×0.5 m
Take, for example, a small greenhouse with the following dimensions:
- Length – 400 cm;
- Width – 100 cm;
- Height – 50 cm.
To make a greenhouse according to the specified parameters you will need:
- Profile pipe with a cross section of 20 by 20 mm, with a wall thickness of 1.5 mm: two parts of 4 m each, two parts of 1.6 m each, three parts of 3.96 m each, 8 parts of 1 m each.
- Hinges (for attaching opening doors to the frame) – 2 pcs.
- Bolts, self-tapping screws.
- Metal paint.
For cladding you will need a polycarbonate sheet:
- Width 2.1 m (standard size);
- Length 60 cm;
- 6 or 8 mm thick.
Detailed step-by-step instructions on how to make a polycarbonate breadbox greenhouse with your own hands
After a location has been chosen, a drawing has been selected, the necessary materials have been determined, costs have been calculated, and construction of the greenhouse begins.
So, suppose we want to make a “breadbox” greenhouse that opens on one side, with a length of 4 m, a width of 1 m, and a height of 0.5 m.
Materials
- Profile pipes 20*20*1.5: 2 pcs. 4 m long, 2 pcs. – 1.6 m, 3 pcs. – 3.96 m, 8 pcs. - 1m;
- 2 sheets of polycarbonate 2.1 * 6 m (6-8 mm thickness);
- Materials for the foundation (depending on the selected type, see below);
- 2 hinges, self-tapping screws, bolts, nuts, self-tapping screws with thermal washers for fastening;
- Metal paint.
Tools
- hacksaw for metal;
- grinder or jigsaw;
- drill;
- a screwdriver or screwdriver for screwing in self-tapping screws;
- welding machine.
Foundation
To build the foundation you will need timber, sleepers, bricks and concrete.
Step by step steps:
| Process | Illustration |
| Dig a trench 20-30 cm wide and 30-40 cm deep. | |
| Make a pillow 10-15 cm high from crushed stone and sand. | |
| Next, you need to lay bricks using mortar around the perimeter or make formwork. | |
| Pour the concrete and wait until it dries completely. Remove boards. |
Please note that the size of the lower frame of the greenhouse must exactly match the dimensions of the foundation, so do everything according to the drawing.
You can also build a foundation out of wood. In this case, it can be easily dismantled and moved to another place on your site.
With the first method, as you yourself understand, this will not work. So, for such a foundation you need 150*150 bars, we lay them around the perimeter of the future greenhouse, deepening them into the ground by 5-10 cm, or placing them on recessed bricks. We fasten with corners and bolts.
On a note! You can naturally heat the greenhouse by filling it with organic matter on both sides (mown grass, dry leaves, manure).
Frame
Briefly:
We mount the arches, reinforce them with guides, and connect them with bolts. The distance between the arches is a maximum of 0.5 m. We position the long side so that it faces south. We drill holes for fasteners at a distance of 0.1 cm from the edge. We weld the bottom frame, then attach the side frames to it. We clean the seams thoroughly. We make holes for the hinges on the outside.
More detailed step-by-step instructions:
- You will need two 1 m long arcs for the moving part of the greenhouse and 2 1.6 m long arcs for the side parts of the frame. We bend them from profile pipes using a pipe bender. The diameter of the circle is 1 m. We mark the middle on the side parts with a marker.
- We assemble the lower frame from two pipes 3.96 m long and two-meter parts, welding them together at the corners. Don't forget to clean the seams.
- Then, using a welding machine, we weld the side parts to the lower frame.
- Then we fix the end posts in the middle of the side and bottom elements.
- The holes for the hinges should be on the outside. We weld a 3.96 m pipe blank to the marked middle of the sidewalls.
Installation
Comparing the frame and foundation. If they match, tighten and attach with self-tapping screws or pins at several points. In a wooden structure, additional bolting must be done to strengthen the connection and extend the service life.
Polycarbonate fastening
First cut the polycarbonate with a sharp knife, jigsaw or grinder.
You need 4 parts for the sides, 1 part for the blind and 1 part for the moving sash. We fasten the material to the frame with self-tapping screws and thermal washers.
We carefully place each part on the frame and fix it with self-tapping screws, first in the corners and then in the middle. We overlap the sheets.
We glue the joints with construction tape for tightness.
The roof is a moving part on hinges. We hang it up and check for proper movement.
Making a “breadbox” yourself is not that difficult, but you can also buy a ready-made structure and assemble it according to the instructions. The price will not differ much from the homemade version.
Do-it-yourself greenhouse bread box: drawings, dimensions, manufacturing instructions
The first thing you need to create a breadbox greenhouse is a drawing. But construction work begins with preparing the foundation. This will require wood (timber and sleepers), bricks and concrete. You need to start by determining the desired size and marking of the beds. The trench is dug to a width of 20-30 cm and a depth of 40-50 cm. You need to make a cushion about 10-15 cm high from sand and crushed stone.
The next stage is laying bricks using mortar around the perimeter or creating formwork. Then concrete is poured inside and given time to dry. After this, the boards must be removed and any mortar drips from the masonry must be cleaned. Next, you can proceed to installing and securing the greenhouse. It is important that the size of the foundation exactly matches the size of the bottom frame of the greenhouse. To do this you need to use a drawing with dimensions. In this case, the Breadbox greenhouse will be strong and stable.
Installing a greenhouse on a site begins with preparing the foundation.
Another option for creating a base for a greenhouse is a wooden foundation. This option is good because it can be easily dismantled and, if necessary, moved to another location. To build it, you will need 150x150 bars, which need to be laid around the perimeter of the bed, deepening them into the soil by 5-10 cm and fastening the corners with bolts. A greenhouse is installed on top and secured in several places.
On a note! To create a natural heating of the greenhouse, you can fill it with organic debris on both sides. Prey, dry leaves, grass and manure will generate heat, naturally warming the soil.
The best purchased greenhouse projects “breadbox”
- “Breadbox” - made of cellular polycarbonate and galvanized profile (20x20 mm). Dimensions 2x1.2x0.8 m, the gap between the arcs is 1 m, the top has a double-sided opening. Price — 5440 rub. Assembly service – 2500 rub. The base is made of timber treated with an antiseptic – 2000 rubles.
- The snail (shell) is a convenient design with a hinged lid (one flap) made of a square profile pipe. Dimensions 2.1 x 1.1 x 0.75 m. Easy to assemble. Convenient transport sizes. Cost - 5700 rub. There are options with two doors.
A purchased greenhouse sometimes has additional features: legs that allow you to go deeper into the ground or borders that add protection to the plants.
Greenhouse-breadbox and its features
For lovers of early vegetables, compact greenhouses can be a good help. The variety of their types allows you to choose the option that best meets the needs of the summer resident. A greenhouse in the shape of a kitchen breadbox, or a snail, attracts with its interesting configuration. Its roof is made in the form of wings on hinges and can easily be moved in one or two directions. This makes caring for seedlings or vegetables easier. It is enough to move the sash, and all the seedlings are in full view.
Greenhouse-breadbox
Advantages of a greenhouse-bread bin:
- A compact greenhouse can be installed in any convenient place.
- The structure can be easily moved to one or another point in the garden or vegetable garden.
- The usable area is used as efficiently as possible; plants are planted throughout the interior space. Despite the small size of the structure, a lot of seedlings fit in the greenhouse.
- For watering and weeding, you just need to lift the sash.
- Due to its low height, the “breadbox” does not react to winds. There is no need to dismantle it for the winter; the polycarbonate roof can withstand snow.
- Cellular polycarbonate provides the lighting the plants need and protects them from ultraviolet radiation.
- The ventilation mode has been thought out. It is enough just to open the sash slightly and place a support under it. The doors close tightly, which protects the seedlings from drafts.
- You can buy a greenhouse or assemble it yourself. Installation work will not take much time; it does not require special tools.
Greenhouse-breadbox
Minus of the greenhouse:
- Tall plants such as cucumbers and tomatoes are not grown in the bread bin.
Differences between a “breadbox” and a “butterfly” greenhouse, which is better
Sometimes a “breadbox” is compared to a “butterfly”. They are similar, the main difference is that the doors of the latter open along a horizontal axis, resembling the wings of an insect. In addition, it is more difficult to assemble, it has more weight, and the sashes require supports when opening.
Greenhouse “butterfly”
The cost is higher - 6300-10982 rubles. There are various reviews about it, some of them are a terrible greenhouse, so the “butterfly” is less often installed on sites.
The “breadbox” model is easy to assemble and install, performs its functions well, and is not inferior in efficiency to similar greenhouses.
Drawing of a greenhouse-breadbox with dimensions
The finished drawing will help you make the design yourself. Dimensions can be calculated at your discretion.
Advice! On a long greenhouse, it is more convenient to provide two small doors on one side instead of one huge one. They are easier to open and reduce the risk of deformation.
Bread bin + warm bed
The “breadbox” greenhouse is a good helper, but its qualities can be improved. One option is to use the warm bed method, which will allow you to harvest even earlier and enhance the taste of the crop.
Procedure:
- Before assembly, dig a hole measuring 50*70 cm.
- Along its border we lay out a base made of suitable materials that do not allow the edges to crumble.
- We put cardboard on the bottom, this will protect against weeds and pests. You can add leaves, plant remains, and manure. You cannot use uprooted weeds, especially perennial ones.
- We fill the top with soil.
- We begin assembling the “bread box”.
A properly assembled greenhouse will allow you to retain heat, which will be released by the compost during rotting, which will allow the seedlings to feel comfortable.
Why a greenhouse-bread bin and not another design?
The reasons to make a polycarbonate greenhouse with your own hands, rather than another design, are reflected in reviews from real users. Gardeners loved it for several reasons:
- If you have a drawing with dimensions, even a beginner can independently assemble a “Breadbox” greenhouse from polycarbonate.
- Maintainability: almost all parts and assemblies of the assembled product are replaceable and can be updated as they fail.
- Ease of use: in functional terms, the “bread box” is superior to designs with blank walls. When closed, the doors fit tightly to each other. Hinged parts open easily and quickly. Reliably protect plants from drafts and cold. Simply set the product to ventilation mode, leaving a small gap.
- It weighs little and does not create excessive load on the foundation. Accordingly, it does not require reinforcement and reduces costs.
- Inexpensive: the price of a polycarbonate greenhouse-breadbox, if assembled according to the drawings with your own hands, is equal to the cost of materials and amounts to 4-5 thousand rubles.