79368
In the comfortable arrangement of a kitchen, it is not so much the square meters that are of great importance, but the correct arrangement of furniture according to a well-thought-out scheme, and the right choice of built-in appliances. The kitchen in a standard apartment is usually not large in size, so the stove, washing machine, and microwave must correspond to the dimensions of the room. The housewife works in the kitchen most of the time at home, so the main principle is convenience. Everything should be at hand, the design of the furnishings and accessories should give a good mood. Even the smallest kitchen should have space to move freely. A large kitchen is sometimes combined with a living room. Before decorating the space, you should learn how to arrange furniture in the kitchen and do it correctly.
Main settings
Kitchen furniture is manufactured to standards that depend on the parameters that determine the height of the cabinet you are going to assemble.
We list the main indicators that will be taken into account in the process of creating a corner cabinet:
- The width of the base - this indicator ranges from 10 to 12 cm, while its value is not affected by what type of stand will be used - solid or legs.
- The height of the cabinet is usually 70cm if you are not going to equip the cabinet with a sink. In this case, you need to make it slightly lower than the level of all other cabinets. This is done for convenience when washing dishes.
- Tabletop height varies from 2 to 4 cm. Depends on the material used, primarily on its structure.
- After all measurements, the height of the corner cabinet is usually about 84-85cm.
- The most common parameters for a cabinet are 90x90cm. Of course, the dimensions primarily depend on the parameters of other parts of the headset.
It is important to know: the distance between the tiers of the set is usually 60cm, while the standard height of a wall-mounted corner cabinet, which makes it possible for people of average height to use it comfortably, is 70cm.
The kitchen was brought
When the movers start bringing parts of the future kitchen into your apartment, count the goods: even if several items are in a bundle, their quantity is signed. If something is mixed up, you can issue an exchange or return, but if parts are missing after the movers leave, IKEA warns that it will not be held liable. I decided not to count units of goods at my own peril and risk, there were a lot of them - it’s worth giving credit to the IKEA delivery service, everything turned out to be in place and in the right quantity.
Which product shape should I choose?
Trapezoidal shape corner kitchen cabinet Attached shape corner kitchen cabinet L shape corner kitchen cabinet
Once you decide on the dimensions, it’s time to think about what shape of the product you would like to fit into your kitchen space. We list the three most important varieties:
L-shaped cabinet - this form of cabinet is distinguished by the fact that the best door shape for it is folding, like the one used in trolleybuses. This way you can view the internal space to the maximum, which, by the way, can be turned from ordinary shelves into a carousel with the best angle of rotation.
A wall cabinet of this shape will serve as an excellent space saver. The cabinet itself is also good because it can successfully accommodate a sink. Since in Soviet apartments water supply and sewerage communications are usually located in the corners, you do not have to extend the pipes.
The attached design is a less convenient option for locating the cabinet. A small cabinet with a door at an angle of 90 degrees is added to the blank cabinet located in the corner. The problem is that with this arrangement you only have access to the interior of the smaller cabinet. This design also allows you to place a sink, but the plumbing fixtures are placed in a blind module, and space for dishes and kitchen utensils is provided in an accessible one.
Remember that when placing the sink in a blind section, you significantly complicate access for a plumbing specialist in case of need for repair work, and if the sink is removed from the blind cabinet, it will remain empty and useless.
However, practice shows that it is better to place the sink in another place, and equip the empty cabinet into a place for cooking or put a microwave oven there.
The space in the accessible module can be equipped with a carousel with a slight rotation angle or pull-out baskets.
A cabinet in the shape of a trapezoid is an original and stylish option, which however has its drawbacks. This form has one door, and sections of the kitchen unit are adjacent to it on the sides. The trapezoidal cabinet looks quite solid, especially in kitchens with a large area, but it is not entirely rational.
Firstly, the straight door makes it difficult to access some areas of the cabinet, especially near the wall. And secondly, it is better to avoid installing a carousel and a sink at the same time in such a cabinet at the same time, since the first, due to the force of friction, will constantly damage the second. So it’s better to put a microwave or other equipment on the cabinet.
Ready-made corner kitchen cabinet
Typical furniture arrangement options in standard kitchens
High-rise apartments are built according to standard designs, so specialists carry out the kitchen design with furniture arrangement using tested materials. The style and color scheme may be different for each client, but the correct arrangement of furniture is not an easy task.
There are several options for the arrangement of kitchen furniture:
- in one line;
- in two lines;
- G figuratively;
- U figuratively;
- G-shaped;
- peninsula;
- island.
In one line
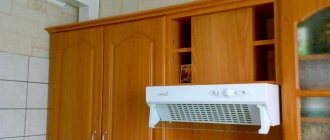
How to arrange furniture in the kitchen in a small apartment for 2-3 people. It is convenient to place a refrigerator and a sink to the left of the desktop, and a hob to the right. When placing the table, remember that it must have a length of at least 1-1.2 m. It must accommodate kitchen utensils that are constantly needed for cooking. You will also have to put a microwave here.
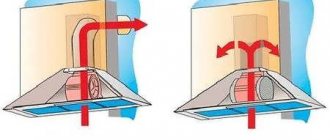
Everything else will be placed in wall cabinets. It is necessary to install a hood above the stove, and its socket must be brought out into the ventilation hole; a bulky pipe that stretches across the entire wall will look ugly. Such an arrangement in a narrow kitchen will allow you to rationally use the space and not have to turn around with pots from the table to the stove. All surfaces are on the same line, side by side.
A dining table with stools can be placed parallel to the work area on the opposite wall. If the kitchen is elongated, you can move it closer to the window.
In two lines
How to properly arrange furniture in a kitchen with a small area? Tables, cabinets and household appliances are located on opposite walls, and the table for eating is placed between them, in the center. This layout is possible in a spacious kitchen.
The sink and cooking device are located on one side, and storage areas for food and utensils are on the other. A convenient option is a small work desk on wheels. But at the same time, you need to make a small space at the sink to display dishes, vegetables and fruits. The dining area is arranged not only in the center of the kitchen, but also nearby by the window, if the length of the area allows.
L-shaped
If you have a small square kitchen, this plan for placing kitchen furniture can be considered ideal. Refrigerator - sink - stove make up its sides. Sufficient space is freed up for the dining area, and the hostess, when manipulating the hob and work table, does not hurt anyone. In this case, additional appliances such as a multicooker or microwave oven can be placed on a small cabinet behind the stove. You can store large pots and pans in it, things that are not needed every day.
U shaped space
If the area of the room is more than 12 sq. m, then arranging the kitchen furniture in this option is quite suitable. All furniture and appliances should be placed along three walls opposite the door. This plan visually increases the space. The kitchen should be spacious enough, preferably square in shape. The width of the surface of the tables, sinks, and cooking devices is approximately 70-80 cm, which means it will take approximately 1.5 m. For free movement around the kitchen area, another 1.5-2 m is needed. After all, the cabinet doors in the lower tier and the oven must open freely.
Often the window is located in the end wall of a small kitchenette. It fits right under the window. Housewives like to set up a work desk or sink here. Indeed, this is the brightest place, so working here is convenient and pleasant. While cooking, you can see the panorama outside the window or watch the children walking.
In a U-shaped arrangement, you should not hang the upper tier cabinets on opposite walls. This compresses the space, and it is not very comfortable to be in it. Hang them on one wall, and the remaining 2 sectors will be single-tiered. It is good to install a washing machine opposite the cabinets, and a separate oven a little higher above them. These large devices will not interfere with the housewife’s movements at her desk.
G-shaped
The work surface, stove, refrigerator, sink, washing machine and dishwasher are placed in one row against a long wall. Cabinets for storing dishes and food should be hung above them. The desktop has an angular shape. This is very convenient - there is enough space in the corner where we place a small TV, microwave or multicooker. These devices always take up a lot of space, but in a corner they won’t get in the way. Adjacent to this edge of the table is a bar counter that runs almost the entire length of the opposite wall.
On the other hand, it is equipped with a rounded surface with a vertical tube on which you can hang several holders for fruit baskets, mugs, wine glasses, and so on. Between the counter and the free wall you need to leave space to enter the kitchen.
You can combine the functions of a living room - dining room - kitchen in a large room. If space allows, you can place a sofa behind the bar counter, and hang a plasma TV and shelves for books and musical equipment on the wall. Next, we will present several options for arranging furniture in the kitchen for large rooms, more than 10 sq. m.
Peninsula
The kitchen is a place where the family spends a lot of time, and the mood and appetite of the household depends on how cozy and conveniently it is equipped. If possible, the standard parameters of the room can be expanded through redevelopment. We must try to make it comfortable and pleasant for the housewife to work here, preparing delicious food, and for family members to gather for home-cooked dinners.
You should draw up a plan and divide the large room into dining and work areas. The border between them will be a “peninsula” on which a work table, stove and sink will be located. A difficulty in this option can be caused by installing a hood above the hob in the central part of the ceiling.
The refrigerator should be placed close to the hostess’s table so that she does not rush around the kitchen for every product. Install a dishwasher next to it, and, if necessary, a washing machine. Cabinets are placed on the side wall. They should not protrude forward so as not to interfere with movement. The narrow surface underneath plays the role of a shelf for kitchen utensils.
Island
If you are lucky enough to buy an apartment with a kitchen of twelve or more square meters, then it will be spacious, even if you move the main furniture components to the center of the room. It will be convenient for the housewife if she places a large work table in the middle and arranges a sink right there. But she will cook on the stove near the wall through the passage from the end of the “island”. It's safe, no one will get burned on hot pots or a turned on oven. And there will be a ventilation hole in the wall nearby, no need to be tricky with the hood.
Options for arranging furniture in this case can be varied and unusual. Hanging shelves and cabinets can be placed on the side of the window. The width of the central part of the headset should be at least 1 meter. Length – according to room availability. At the opposite end of the “island” a small semicircular bar counter with high stools will look very stylish. Then you can avoid buying a separate dining table. You can eat and have tea without leaving your workplace. This is one of the dining space options.
Getting ready for assembly
Drawing of an attached corner kitchen cabinet Drawing of a trapezoidal corner kitchen cabinet Drawing of a trapezoidal corner kitchen cabinet with sink placement
Any product must be designed before assembly. This process can be divided into several stages:
- Determine the intended purpose of the cabinet - whether it is designed for washing, preparing food, or whether you want to install kitchen appliances on it.
- You should have before your eyes the general dimensions of both the cabinet itself and its components.
- Decide on the inside of the cabinet - whether it will be regular shelves, a carousel or pull-out baskets. It is important to calculate the convenient distance between the shelves and their number.
- Think about the design and color scheme.
- Determine the material from which you will make the cabinet or cabinet.
- Create a drawing that will clearly show what is where and how it is attached.
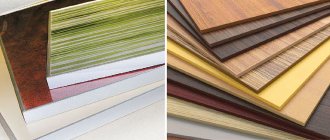
The best materials are chipboard or laminated chipboard, which is strong enough, resists moisture and, with the necessary processing, looks very attractive, while at the same time having a low price.
Ikea kitchen assembly fun
The fact that assembling an Ikea kitchen is a pleasure is clear. Even a non-professional can do this work. All you need to do is take a hammer and a screwdriver, and detailed instructions will be included with each product. The only question is how long it will take to assemble an Ikea kitchen and how well everything will turn out. I would like to tell you about one case from practice. The client ordered the assembly of four double-leaf cabinets from Ikea. During our work, two girls also wanted to assemble a small 40cm cabinet, deciding that they could handle it easily and quickly. While we had done everything and were about to leave, they were not finished yet. This confirms that everyone must do their part. So furniture assembly should be done by professionals, not amateurs.
DIY corner module
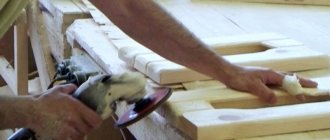
Working with a jigsaw
The next stage of work will be the preparation of the main parts for the future cabinet. They will have to be cut out from solid chipboard slabs, so you will need maximum care and precision. However, this does not guarantee good quality of work. At least at home, certain factors can prevent this.
If you use a power tool for sawing, keep in mind that it chops laminate well. And in general, a high level of vibration may simply prevent you from fulfilling your plans with good accuracy.
To make your life easier, contact a company that can cut and even trim fragments of the future cabinet based on your project.
A little about assembling a Leroy Merlin kitchen
I would like to quote Leroy Merlin: “God forbid you order assembly of a Leroy Merlin kitchen in the store itself when purchasing a kitchen.” Also, it is advisable not to fall for the trick that promises free kitchen assembly. It is worth saying that there are no qualified assemblers in the Leroy store. You will be offered the services of non-professionals, perhaps even your friends who need hack work. Our specialists had to deal with the results of such work. Unfortunately, we cannot leave positive reviews about her. There should be a separate conversation about the furniture produced by the Borovichi Furniture factory, although, to be honest, I don’t particularly want to talk about it. It’s just not clear in what condition the factory workers produce it. The only way to justify this is that furniture from Borovichi has a low cost.
Assembling the cabinet
Now directly about the assembly process itself:
- Make blind holes and insert dowels into them to pre-fix the components of the cabinet. This way you can level the frame and increase the strength of the future product. The chops are pre-coated with glue.
- Once you insert the dowel into one piece, insert its end into the hole of the other and press the two pieces of the cabinet tightly together.
- Before completely installing the future product, check all its parts for evenness.
- Now the confirmations will be screwed into the dowels. This is done using a hex key.
- If your design included legs, it’s time to mount them to the main structure and adjust the height.
- Make holes in the sides of the future cabinet and insert cross-shaped fastenings for the doors into them using two self-tapping screws.
- On the side walls, build fastenings for the rails along which the drawers will slide out, and fix the rails themselves.
- Once the frame is created, attach a fiberboard sheet to its back wall.
- In the case of a wall cabinet, you need to attach fittings to it, with which it will be attached to the wall. Adjustable hangers will do this role perfectly.
The process of assembling a corner kitchen cabinet with your own hands
Avoid damaging furniture
It is recommended to avoid mechanical damage to kitchen furniture. When working with electrical appliances and built-in equipment, the operating instructions must be strictly followed. All devices may only be used for their intended purpose.
In case of unreasonable, inappropriate or incorrect use of lighting, electrical and gas appliances, all responsibility for possible consequences falls on the user. Children under the age of majority must be explained all the rules for using built-in equipment and the negative consequences if they are not followed properly.
If any kind of malfunction of the built-in equipment occurs, it is necessary to turn it off and invite a service center employee, gas service or communications specialist. You should completely exclude the use of faulty equipment when assembling a kitchen, and especially not try to carry out repairs on your own.
How to assemble boxes
- The walls for the boxes are tightened with screws. As soon as you assemble three walls, insert pieces of fiberboard into their bottom, which were created according to the parameters of these walls.
- The fronts of the drawers must be secured using eccentric ties. In this case, the screws are screwed into the facade, then the side with the head is inserted into the bushings located on the sides of the drawers. The main thing is to make nests in them first. Once the bushings are in the holes, rotate them until they engage the screw heads.
- If we are talking about a corner cabinet, you need to screw guides for rollers onto the lower corners of the drawers.
If we are talking about assembling an oven, the last stage is excluded due to the lack of drawers in this type of cabinet.
Model range, furniture design Ikea
The model range of the “Method” line includes several items, each of which has its own design, differs in some features of individual modules and has its own cost. Among these headsets, there are several of the most popular and widespread models.
The main feature of this furniture is ergonomics: in this set, every centimeter of both internal and external surfaces will “work”.
Thus, among Russian consumers in terms of the number of copies sold, one of the leaders is Ikea Faktum. This kitchen is designed to be complemented with various household appliances. Faktum is designed for small and medium-sized kitchens.
Faktum kitchens are elegant and laconic
Not so practical, but more attractive from the point of view of creating a cozy atmosphere in the kitchen, the “Lidingo” model. And despite the fact that the cost of this headset is slightly higher than most other standard models, Lidingo has its advantages. This is a compact set, which as standard fits perfectly even in kitchens with an area of five square meters, and if necessary and if there is free space, it can be filled with other modules.
“Lidingo” kitchens are cozy and stylish
The “Abstract” model can be called a “champion” in terms of performance, reliability and durability. The facades of such a set are made of high-quality MDF panels, and the back walls of cabinets and tables are made not of thin fiberboard, but of laminated chipboard, which ensures structural rigidity. The design of this model clearly shows not classical, but modern features, and the kitchen facades can be either matte or glossy at the request of the client.
Kitchens “Abstract” are modern and elegant
If we’re not talking about small city apartments, but about spacious cottages, the “Rokhammar” model is perfect for such kitchens. Firstly, the color scheme of this set is focused on natural wood of dark facades - this style with a claim to “naturalness” is ideal for private houses, which in most cases are decorated in a classic style. Secondly, “Rokhammara” modules are presented in the widest range, and all the necessary ones can easily fit in the spacious kitchen of a private home, and this model is more economical in cost than other sets in the line.
Kitchen method Ikea how to choose:
How to install modules and embed a sink
Hole cut out for sink in countertop
At this stage, the finished product is placed in a corner. If we are dealing with an attached lower module, then first we should install a cabinet with a sink with a ready-made hole for the pipes. Only then do you need to install a cabinet with a door.
You will need furniture intersection links when the time comes to connect cabinets to each other. A total of four fasteners are required.
If we are talking about a corner kitchen cabinet in which a sink will be installed, under this sink you will first need to make a hole in which the sink will be placed.
To make a cutout for the sink, attach it to the countertop and create a marking with a pencil, and then at the edge of this marking line, drill a hole of such a diameter that a jigsaw file can easily fit into it.
Once the socket is cut, the sink is inserted into it and screwed using the special fastener supplied in the kit. The cut line after this operation is treated with sealant.
Disadvantages of assembling an Ikea kitchen
What can be attributed to the disadvantages of assembling Ikea kitchen furniture?
Firstly, it is a fairly simple, minimalist design. Although, a lot is said about their large staff of designers developing new and original models, but for some reason I have not seen them.
Secondly, I would like to say something about the assembly of headsets.
The disadvantages include the fact that this manufacturer’s assortment includes only standard modules (30,40,60,80, etc.), which is very different from a kitchen that can be made to order. For example, if you have a dishwasher with a width of 45 cm, then you will only select a front of 50 cm, since they do not provide 45 cm. More precisely, they are on sale, but only metal ones. This option can greatly distort the overall style of the kitchen. So, you made all the facades red, and because of the required size, you took one and installed it in metal. Will it look nice? A very controversial issue.
This solution, at the end of the kitchen, a built-in dishwasher 45cm wide is located in a cabinet with a metal front, while others have a brown tone. So the customer has to rack his brain about how best to place the modules so that all the “non-standards” of a tiny Russian kitchen space with ventilation ducts or water pipes sticking out of the wall are taken into account.
In my opinion, the lack of normal wall panels can also be considered a drawback in the Ikea assembly range. Often, when collectors come to the client, they do not find them at all, or they see them purchased in Leroy Merlin or Castorama. As it turns out, Ikea doesn’t sell them of the quality we would like to see. These are small 60x50 pieces, made of very thin plastic and inconvenient to install. One more nuance. In my practice, I have never seen end strips for countertops from this company. So, if you have to tear it apart to install an electric stove, then the ends can be formed only by using connecting strips. The Ikea hem made for it is also incomprehensible. It is much thinner than necessary and is also not self-adhesive. For example, we will take a beautiful Ikea countertop and cut it with a jigsaw to the length we need. If you pay attention, it is covered with an ABS edge around the perimeter, the thickness of which is 2mm. For gluing the sawn-off side, we are offered an edge 0.4 mm thick. Wouldn't it seem strange to you that one end would be different from the other?
Required Tools
It is impossible to assemble furniture without the proper equipment. To work you will need:
- hammer drill or drill to make holes for fasteners;
- screwdriver;
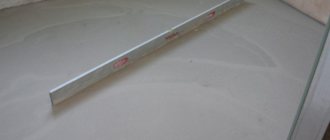
- building level for marking and leveling;
- measuring tape, pencil;
- square;
- furniture stapler;
- small hammer;
- jigsaw or hacksaw to fit the table top.
A hex wrench is usually included with the mounting hardware. Caulk may be required to install the cabinet under the sink.
Just in case, it is advisable to keep pliers on hand, but with the correct configuration and proper assembly, they are not needed. If you need this tool, it means something went wrong during installation.
Making a classic table with 4 legs
This table option is suitable for both large and small kitchens. It is necessary to first complete the drawing, decide on the dimensions, and only then begin manufacturing. Thanks to the right finishing, the product can be decorated in any style.
Standard table with 4 legs
Materials and tools
It is necessary to prepare the following materials:
- legs - 4 pieces (not too thin). If necessary, they can be made from beams;
- tabletop plate 3-4 centimeters thick;
- boards for the frame 2×10 centimeters thick;
- screws;
- glue.
The following tools will be required:
- sandpaper;
- screwdriver;
- level;
- Bulgarian;
- measuring tape;
- square;
- plane;
- sander
Sander
Prices for popular models of eccentric sanders
Random orbital sander
Instructions for making a classic table
Step one: making the countertop. First, you should align the boards in width, and then in length. The tabletop must be carefully processed several times with a plane to make it uniform. In this case, you will need to pay special attention to the processing of the edges, which will allow the boards to fit together without any problems. Next, you need to mark the edges of the boards and make holes using a drill. After that, the boards are joined with wood glue. When the glue dries, you can remove any remaining residue with sandpaper and thoroughly sand the countertop again.
Making a countertop
Step two: make the base of the table. To do this, you will need to connect the legs with short crossbars. A couple of holes for screws are drilled in each such cross member. In this case, you should drill carefully so as not to pierce the legs through. The crossbars are secured at a distance of 15 millimeters from the edge of the leg.
Connecting short crossbars
Step three: secure the frame with long crossbars.
Connecting long crossbars
Step four: we make holes in the long crossbars, and when the glue sets, you can begin installing the tabletop.
Tabletop installation
Step five: we attach additional bars for greater reliability of the structure.
Installation of additional bars
Step six: after completing the construction work, finishing must be done. You can choose any color of the product; in the classic version it is walnut or oak. For such purposes, stain is usually used, and then the surface is varnished.
Table processing
Video - Making tables and stools from solid wood
Choosing the shape and size of the table
When drawing up a drawing, the fundamental criteria are the shape and size of the future structure. The exact dimensions of the table will depend on the size of the kitchen and the number of residents. At the same time, it is important to ensure the correct placement of adults at the table, so usually the average height of the structure is 80-85 centimeters.
Before choosing one shape or another, it is recommended to measure the area of the kitchen
Important point! When determining the size of the tabletop, it should be taken into account that on average each person relies on about 60-65 centimeters.
The most optimal width of a kitchen table is no more than 1 meter. In the presence of a large-sized structure, difficulties arise when serving. At the same time, a table that is too small does not always allow all family members to sit at it.
Table 1. Various tabletop shapes
| Form | Description |
Square or rectangular | This table can be installed close to the wall, thereby freeing up additional space. Quite often, such models are made with rounded corners. Depending on the dimensions of the structure, from 4 to 12 people can be seated at the table at the same time. In addition, if you move it to the middle of the kitchen, you will be able to get additional seating areas. |
Round or oval | Such a table requires a spacious kitchen, because it is most often placed in the center of the room. There is no point in installing it close to the wall - this will only allow you to lose the usable area of the room. Tables of this type fit harmoniously into the interior of a classic kitchen; on average, they are designed to accommodate 4-10 people. Such models are often chosen by families with small children because of their safety. |
Semicircular | An unusual type of round table that can be mounted against a wall. The main advantage of the design is the ability to place it in a small room. This table has up to 4 seats. |
Original | If desired, you can design a table of any shape according to your own wishes. Designers bring various ideas to life, resulting in designs in the shape of a trapezoid, rhombus or polygons. |
What material is better to use?
Before you start making a kitchen table, you need to choose the right material. The choice is influenced by the following nuances: cost, durability, processing capability (availability of certain tools), room design.
It is also worth taking into account that when making a structure, craftsmen can use several materials at once, combining them with each other.
Table 2. Materials for making the table
| Material | Characteristic |
Wood | In most cases, wood is used in the manufacture of furniture, and in particular kitchen tables. The popularity is justified by the environmental friendliness, decorative appearance of the material and the lack of processing difficulties. It should be borne in mind that wood is not the most durable material, because it is quickly damaged during use - over time, various dents, cracks, and chips may appear on the surface of the table. In addition, untreated wood quickly absorbs grease, which leaves unsightly marks. Deformation of such a structure can occur due to excessive humidity in the room. In addition, as the wood dries out, it begins to shrink, which does not always have the best effect on the structure. Experts recommend choosing only durable wood for the manufacture of countertops and other elements of the product - birch, oak, ash and beech. |
Pressed materials | Such materials are usually chosen when there is a desire or need to save money. Most often, MDF and chipboard are used for such purposes, because they have a fairly affordable cost. The disadvantage of such plates is considered to be not the best strength. So, they can become deformed and sag even with a slight impact. Over time, the corners of such a table break off, so to ensure greater structural strength, a protective layer of wood or stone is placed in the upper part. Some experts prefer to cover the slabs with PVC film (you can purchase it at any hardware store). The main advantage is that there is a huge variety of such films of all shades. In this case, you can purchase ready-made laminated MDF or chipboards. Such countertops have ready-made rounded corners, but their main feature is the ability to withstand high temperatures and mechanical stress. |
Plywood | To make a tabletop, you should use only durable plywood with a thickness of at least 1.2-1.5 centimeters. The method of using such material is practically no different from the previous version, so it is necessary to provide a method of protective coating. |
Plastic | When making furniture, various plates, pipes, and PVC bars are often used. Polycarbonate is the most widespread because this material is very similar in appearance to glass. Usually it is recommended to make only the tabletop from plastic, but some craftsmen use it for other parts. Of course, this artificial material does not have the same decorative qualities as wood, but plastic can be used to make quite unusual products that will fit perfectly into the interior of a modern kitchen. |
Glass | Glass countertops have become very popular in recent years. For work, you should choose only durable glass, the thickness of which is at least 0.5 centimeters. The main advantage of the material is ease of care, but the disadvantage is excessive fragility. |
Metal | In some cases, metal is used to make the table frame, which increases the strength of the structure. For this purpose, you can purchase rectangular pipes, corners, and profiles. |
Prices for sheet plywood
Plywood sheets
We hang on drywall and other complex materials
Drywall is considered the most capricious material. It consists of sheets of cardboard, which are sandwiched with gypsum mortar. Therefore, you need to understand in more detail how the hitch is attached.
The easiest way to hang kitchen cabinets on a drywall wall is if there is a concrete wall behind it. In this case, you need to take a long fastener. A regular long hairpin will do, but it's better to use bolts, as they are made of harder steel.
If the box is hollow, you will have to install the kitchen cabinets on metal profiles onto which the drywall is attached. If you used steel “P” strips, you can take a neodymium magnet and find the profile.
Kitchen cabinets are much easier to hang on aerated concrete walls. They are strong enough to support the weight of a filled box. To do this, you need special anchors, which are designed for attaching massive structures to a wall made of foam blocks.
There are big problems with cinder blocks. It has practically no load-bearing capacity and is easily broken even by wood. Therefore, the only thing that will do is a very long fastener. Since the cinder block is hollow, it can only support the mass if the pressure is fully distributed.
A wall made of foam blocks must be treated in the same way as aerated concrete.
Wall cabinets
The top row of modules should be located 45-60 cm above the tabletop - a more accurate distance will be determined by the height of the housewife and the height of the wall cabinets themselves. Having made a mark on the wall, you need to draw a horizontal line, which will mark the border of the hanging row; it is also worth noting the upper level, since it is more convenient to focus on it. Installation, as in the case of the lower cabinets, begins with the assembly and placement of the corner module.
We will look at two possible installation methods below, but for now we will tell you what else will need to be done when all the boxes are fixed to the walls. Here again you will need clamps and ties to assemble the individual cabinets into a single structure, but this will have to be done on the top covers, knocking them together with overhead “patches” from pieces of fiberboard. Some sets may also include a decorative cornice. As a rule, it is placed on furniture nails, but for reliability it is worth using glue.
Fastening to furniture hinges
Cabinets can be hung from hooks in the wall or driven in anchors. To do this, furniture hinges are screwed to the back of each cabinet. Here it is important to accurately measure the height of the fasteners and carry out the markings correctly, constantly checking them with a level. Simple strips leave no way to adjust the position of the cabinets, and an error of even half a centimeter will be noticeable.
You should not immediately punch all the holes in the wall for anchors - each of them will have to be additionally checked by hanging the cabinet and leveling it. The process is long, and its only advantage is the minimal cost of fasteners. However, you are also provided with a load on all muscle groups during work.
Rail mounting
Another method is much simpler and more reliable - using a special tire (profile mounting strip) and attachments. The first is a metal rail with slides and holes for mounting to the wall. It is mounted horizontally, lowered 3-4 cm below the top mark for installing cabinets. The hinges are equipped with complex hooks and are attached to the inside of the side walls of the case. And the hooks themselves are inserted into the grooves of the mounting strip, for which you will have to cut small holes in the back of each module directly in the hardboard.
This method of fastening allows you to install cabinets alone with high precision and without unnecessary effort. Small errors made during marking or installation can be easily eliminated by adjusting the screws in the appropriate attachment. Also, technological fasteners will help to adjust the distance between the cabinet and the wall, for example, if the top row of furniture is covered by a thick ceramic or panel apron.
Internal shelves, drawers and other storage systems are installed last, when the set finally takes its place.