If you want to develop a detailed 3D design of your future kitchen, these instructions will help you.
This is the project you will end up with GO TO KITCHEN DESIGNER
Quick navigation:
1.Technical recommendations 2. Managing elements 3. Setting up the room 4. Specify the parameters of the set 5. Arrangement of furniture and appliances 6. Installing a sink and hob 7. Setting up the design of the set 8. Saving the project
Technical recommendations
- To use all the features of the program, visit the designer page from a desktop computer or laptop (the online design function is not available on smartphones and tablets).
- The scheduler works best in the Google Chrome browser and Internet Explorer (version 11 and higher). You can also use Firefox, Opera, Safari, etc.
Important! Don't forget to save the project to your computer regularly. To maintain your privacy, the program does not have an autosave feature. If you close the designer tab or refresh it before downloading the file, the project will not be saved.
Advice from designers for self-taught craftsmen
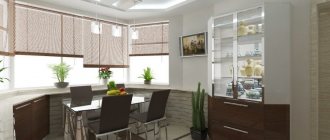
When sketching a kitchen, it is necessary to take into account the size and shape of the room. Based on these parameters, you need to decide which layout is most suitable for a comfortable pastime. Thus, a direct arrangement of furniture in one row can be used for a small kitchen or households who rarely use it for cooking and focus attention on the relaxation area or receiving guests. The corner layout is considered to be universal, because it saves space and meets all ergonomic requirements. Double-row linear, U-shaped, island and peninsular are suitable for a large kitchen, in most cases combined with a living room or dining room. Each of them is very comfortable and stylish, allowing you to make maximum use of both the work area and the relaxation area.
Many novice craftsmen try to make with their own hands not only a model, but also the furniture itself. This saves money twice and allows you to create a unique design that meets all the taste preferences of the owner. But the danger lies in the fact that it is quite difficult to make a quality product without certain skills. In this case, it is recommended to use ready-made facades that are sold on construction markets. An option may also be to partially do it yourself for those steps that are easier to handle. And professional cutting, fastening and even the consumption of materials can be entrusted to specialists who offer their services in construction companies and specialized furniture manufacturing salons.
Designers recommend that novice designers be very attentive to every measurement in the kitchen and millimeter on paper. Such seemingly insignificant errors can completely ruin the entire project and upset the balance in the environment. Having made a layout, you should carefully double-check it and in case of the slightest mistake, do not be lazy to redo it completely.
Any job requires some effort. But updating your apartment according to your own design, taking into account the wishes of your household and having a wonderful time together will significantly improve the atmosphere in the family and bring many happy moments.
Element Management
Move modules, equipment, windows, doors, etc. from the catalog to the room and across it, you can hold down the left mouse button.
The second method is to select the desired item in the catalog and click on it once with the left mouse button. He will appear in the virtual room. Grab it with your mouse and, holding down the left key, drag it to the desired location.
To visually zoom in and out of the headset, move the camera up/down, left or right, use the arrows and magnifying glass icons in the bottom menu.
Alternative options:
- hold the right mouse button and move the image in the desired direction
- Hold down the alt key and press the up/down/right/left arrow buttons on your keyboard
- roll the mouse wheel back and forth.
You can control each element individually. Select it by clicking on it with the left mouse button. A radial menu with different functions will appear. With their help, you can quickly and easily change the dimensions of the module, the type of facade and the method of opening it, the finishing material, the spatial orientation, install a sink or hob, or remove it altogether.
You can also get rid of an unnecessary element using the Delete key.
To open a front or pull out a drawer, move the mouse cursor over it and click on the middle button (wheel) of the mouse. Repeat to seal.
If you want to expand an element, use the cursor and the left mouse button to move it close to the desired wall - it will position itself as needed. Or use the buttons on the pop-up control panel for the desired module.
The top menu has a button to switch to full-screen mode - convenient for small screens.
Kitchen: drawings, pictures, sketches
You can always be inspired by examples of work from the World Wide Web. Experts suggest: on the eve of the renovation, download those photo examples that you like into a separate folder. The impressions from what you see remain, but all the features and nuances of the interior in the photo are forgotten, so be sure to save what you notice.
And some more tips to help you prepare for repairs:
- Ask for help on social networks - in thematic groups there are often guys who, for a “thank you” or a symbolic amount, will make a good sketch from a picture downloaded on the Internet, which becomes a repair diagram (as a rule, it is easier to “read”);
- Enter in the search the square footage of your kitchen, the type of construction, etc., and it is likely that you will come across a resource that describes renovations in a kitchen similar to yours;
- transform a photo example into a design project yourself by remembering a few basic concepts from the drawing course;
- When making a project, use a “top view”; it is easier to navigate.
You can draw anything, but remember - your interior should be harmonious. Often, it is at the sketch stage that a person realizes that the original idea was not so good, he sees the incompatibility of colors, interior items, etc.
Set up the room
In the first step, indicate the dimensions of your kitchen in millimeters.
If desired, install a window, door, ventilation duct, partitions, ledges and beams to bring the project as close as possible to the actual conditions of your apartment. Select the required element and, holding down the left key, move it to the desired location. After this, you can set its dimensions (to do this, click the “dimensions” button and specify the required values in the panel on the right).
If you wish, select a different wall color and floor finish from the appropriate sections of the catalog.
Kitchen project: drawing
To make your own kitchen project, you need to take proper measurements.
For measurements you will need:
- Roulette;
- Paper;
- Pencil.
And nothing more! Don't complicate your life and these items are enough. On the piece of paper you indicate the length of the walls, the width of the walls, and the height of the ceiling. Mark the location of windows and doorways, ventilation.
Measurements are strictly taken into account when creating a sketch. Remember about scaling, calculating the ratio is easy.
To draw your own kitchen design, you need to take correct measurements.
Arrange furniture and appliances
Select the lower and upper modules of the required size and configuration from the catalog. There are also cabinets and several options for bar counters.
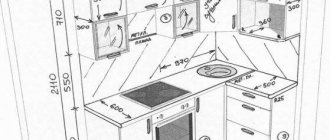
Please note: swing top modules can have different heights - 720, 920 or 960 mm. This is convenient if you want to bring the cabinets up to the ceiling (this will increase the capacity of the cabinet, and such facades look more solid).
The dark gray horizontal line that appears when you move wall cabinets inside the virtual room will help you “hang” the upper tier modules at the correct height.
In addition to standard upper cabinets, there are corner and end cabinets - both with straight and radius facades.
The catalog contains standard sizes of elements, but you can easily change them to suit your needs. This is done in two ways.
- When selecting a module in the catalog, immediately indicate the desired width by selecting from the drop-down list.
- When the module is already in the room, click on it and click the “Dimensions” button. The drop-down list at the top shows standard sizes, but you can set your own. In the panel on the right, specify the desired parameters and click the “Apply” button.
Kitchen pictures in pencil
It is advisable to consider pencil drawings as the basis. Unlike the same photos, there are no distracting or confusing elements.
Here, for example: you liked the photo, you found the similarity of the room in the photo with your kitchen, and you can already see how the interior of your apartment will change. But, having completed the renovation, you are disappointed - everything seemed to be done according to the model, but it turned out not so impressive.
But some design combinations are not so noticeable right away, and decide the whole image. Wallpaper, in harmony with the texture of the table, or floor covering, combined with some inserts in the set, made this project attractive. And, whatever one may say, you got your own design.
Try drawing a sketch with a pencil “based on” a photo you like.
To draw your sketch with a pencil:
- Apply scaling;
- Use a pencil to highlight the brightest and most significant areas of the room;
- If you can’t draw something, do it schematically, marking the object or area in letters;
- Do not use very bright colors - it is better to draw the sketch rather faded, so you will immediately see whether the design is good, pay attention to the lines and, in general, the geometry of the project.
Look through many photos of kitchens, and then try to combine the elements you like in your project.
Inspired by examples of other kitchens, you can try drawing your own sketch with a pencil
Install sink and appliances
Look for cabinets with a built-in oven among the lower modules and in the “Pencil cases” section. There you can also choose a column cabinet that hides the built-in refrigerator.
Free-standing household appliances are located in the corresponding section in the left menu. So far it is represented by single models of hoods, refrigerators, stoves and a washing machine, but the developers are constantly working to replenish the catalog.
To add a hob and sink, first drag the lower module of the desired size (from 600 mm) into the room. Select it, hover over the button with the image of a plate and select the desired element. If plans have changed and you want to remove the sink/hob, select the module again and click on the icon of the element you want to remove again.
Location of sockets
When electrical outlets are properly located in any room, living room or kitchen, it becomes more comfortable. Today, in our apartments there are a lot of different household appliances, so if you do not plan the installation of sockets in advance, a large number of extension cords will appear in the room.
The kitchen always requires a large supply of electricity, since almost all household appliances are located in its area.
Installation diagram of sockets in the kitchen
Unfortunately, when planning the ergonomic design of a corner kitchen, the development of a plan for installing sockets is ignored.
As a result, great difficulties arise when you need to connect any device. To prevent this from happening, you need to draw up a plan indicating the exact location of the equipment.
Installing kitchen outlets is not limited to just walls. They can be placed on a work apron or directly on the countertop.
When built-in household appliances are used, it is allowed to install sockets behind the walls of the furniture. In this case, the installation height from the floor plane should not exceed 60 cm. To ensure easy access to the outlet, special holes are cut in the walls of the kitchen furniture. For safety reasons, sockets for built-in household appliances should be located at a distance of less than one meter from the device.
The hood is considered a stationary appliance, so the installation of the socket for it is done above the kitchen furniture by about five centimeters. When installing sockets, the location of the ventilation corrugated outlet must be taken into account. Access to the electrical network must be free; the corrugated outlet must not interfere with this.
In order to accurately plan the kitchen design, it is necessary to develop a sketch in relation to which the entire space is built. This drawing allows you to mentally schematically carry out a complete reconstruction of the room, without exerting physical effort and without dragging furniture from corner to corner. By paying due attention to the objects placed here, you can rationally distribute the entire area of the room.
Customize the design of the headset elements
The most convenient way to customize materials is from the corresponding section in the left menu. Once you have chosen the right cabinets and built the desired layout, you can experiment with finishing - choose the material of the facades and the finishing. You can immediately “repaint” all the doors of the future set at once or choose a different material and/or coating color for the upper and lower modules.
If you want to make the upper and lower facades from different materials, click on the “Separate facades” button in the “Facade Material” menu section (after clicking it will be replaced by the “Identical facades” button).
In addition to conventional smooth panels, doors with two types of milling are available.
In this section you can choose one of four materials - MDF, plastic, chipboard and solid wood. This choice affects which decors will be available in the next “Front color” item. For example, if you click on “chipboard” in materials, Egger chipboard decors will appear in the colors. And if you left MDF, you can either “paint” the facades in your favorite shade according to the RAL palette, or choose a film coating.
The color of the facades is set in the appropriate section according to the same principle as the material: for the entire set at once or divided into tiers.
In the appropriate sections of the menu, configure the finish of the cabinet, tabletop, plinth and apron.
You can also change the type, material and color of facades only for one specific module using the pop-up menu buttons:
The accessories section presents different handle options. The presence/absence of closers should be indicated if you want to send the project for calculation and find out the cost of manufacturing the headset.
Disadvantages of working independently
There are always very few disadvantages in creative work, because... it allows you to gain additional skills and gain experience in a new business. The only thing worth paying attention to is the careful, scrupulous execution of the task of measuring every centimeter of the kitchen area and transferring it to paper, making cardboard models and other work that requires time and accuracy. Otherwise, the kitchen set will not fit in size or the door will open halfway, hitting the furniture. Therefore, when making a sketch, you should not ignore the advice on completely recreating the future small-sized kitchen on paper, then everything will work out and fall into place.
How to design a kitchen using an online designer - 10-step instructions for beginners
Our online kitchen designer is simple and intuitive, but in order to master it faster and not miss a single useful function, we recommend reading this step-by-step instructions with pictures.
The online kitchen planner itself is here.
Basic principles of constructor management
- It is more convenient to design a kitchen in full screen mode. To turn it on, click on the four arrow icon on the top control panel. To exit full screen mode, press "Esc".
- To add objects from the catalog to the plan, as well as rearrange them, select and hold the selected object with the left mouse button, then simply place it in the desired place.
- To change the size of an object, click on it, select the gear icon in the pop-up menu of icons and enter the desired values in the window that opens.
- In our designer you can open cabinets. To do this, click on the object and select the central open door icon from the pop-up menu of icons.
- Deleting an object is easy: click on the object and select the trash can icon from the pop-up menu of icons.
- By scrolling the mouse wheel, you can zoom in/out of the kitchen plan. You can twist and turn the kitchen model and change the viewing angle by holding the right mouse button and moving it as you want. To move the camera left or right, up or down, use the arrows on the bottom control panel.
- You can view your kitchen project in the designer in 3D or 2D mode in various projections (camera icon in the top menu), as a drawing with contours and transparent contours (pencil icon), with or without dimensions (double-sided arrow icon).
- If you plan to continue editing the kitchen project later, you should save it to your computer or flash drive. To do this, click on the third icon in the top menu (floppy disk icon).
- To return to editing the project, load the saved file into this designer. To do this, click on the folder icon in the top menu.
So, let's start creating a kitchen design project, following the step-by-step instructions.
Step 1. Set the dimensions of the kitchen
In the left menu, go to the “Room” section in the “Dimensions” tab and set the room parameters. For example, we designed a typical kitchen in a Khrushchev building with an area of 5.5 square meters. m.
Step 2. Install windows and doors, other architectural structures
In the “Room” section in the “Structures” tab, select windows and doors, install them on the desired walls and set the exact dimensions as follows: click on the object (for example, on a door), then select the gear icon from the icon menu that appears and, finally, enter data.
Step 3. Establishing communications
Now you can recreate the real features of the kitchen by installing radiators, sockets and ventilation grilles ("Room" - "Communications"), and then adjusting their exact dimensions and position on the walls (click on the object - the gear icon).
Step 4. Choose a finish
If desired, you can customize the kitchen finish by choosing the color of the walls and flooring (“Room”—“Walls” or “Room”—“Floor”).
Step 5. Set the kitchen parameters
If necessary, at this stage you can configure the following values:
- Tabletop thickness;
- Base height;
- Apron height.
Note:
- The base can be removed in the corresponding tab. In this case, the kitchen will stand on decorative legs.
Step 6. Making a kitchen project: arranging modules and appliances
It is best to start designing a kitchen by arranging the lower modules, or more precisely, from the cabinet with the sink, since this point is most often predetermined. To the left or right of the sink, it is logical to immediately place the module under the dishwasher. Then you should find a place for modules with a stove, oven, refrigerator, and decide on the main work area. The principle of arranging elements is still the same:
In the “Modules” section, from the corresponding tabs with drop-down lists (they are divided by size), select modules of the desired size and configuration and drag them onto the plan while holding the left mouse button. Then we adjust the dimensions of the objects, and if necessary, “build in” the stove/sink (click on the object – the “Appliances, sinks” icon).
A microwave oven, TV, washing machine and other free-standing appliances, as well as various models of sinks and hobs are presented in the “Appliances” catalog in the left menu. For example, in our kitchen project we used a two-burner mini-stove.
Note that:
- In the catalog of modules you can find cabinets, pencil cases and several options for bar counters, corner and end upper cabinets (including those with radius fronts).
- All items in the catalog are presented in standard sizes, but you can change them if necessary. To do this, click on the object, select the gear icon (“Dimensions”) in the icon menu that appears, enter the required values in the window that opens, then click the “Apply” button.
- As we have already mentioned, to add a hob and sink, you first need to install a module (from 600 mm) on the kitchen plan, then select it, in the drop-down menu of icons, hover over the “Appliances, sink” icon, and then select the stove or sink icon . If you suddenly want to remove the stove/sink, just click on the module and select the stove/sink icon. You can also add sinks and hobs from the “Appliances” section.
- Don’t forget about decorating the ends with decorative panels or end shelves - they can also be found in the “Lower/Upper Modules” tab.
- Cabinets with a built-in oven are presented in the “Lower modules” and “Pencil cases” tabs. A cabinet with a built-in refrigerator is also presented in “Pencil cases”.
- You can hang roof rails on the apron (Left menu: “Interior” - “Interior Elements”), and also install furniture lighting (the “Appliances” tab).
- In the “Decorative” tab you can select cornices, borders and balusters. For example, in our project the wall shelves are equipped with beautiful borders.
Hint: to learn the principles of arranging furniture and appliances in the kitchen, we recommend reading the following basic guides:
- 10 stages of choosing and designing a kitchen set
- 10 principles of kitchen planning and 6 types of layouts
So, here is the plan for a typical kitchen in Khrushchev.
In the project of this 5-meter kitchen we fit everything you need: a dishwasher, a TV, a microwave, a two-burner hob, an oven and a refrigerator. For greater capacity, the tallest wall cabinets were chosen (960 mm)
Step 7. Customize the design of the headset elements
Having developed a kitchen plan, you can begin to customize its design, play with colors, types of facades, and finishing materials. You can change the design of the entire set, separately the upper/lower cabinets, or the design of individual modules.
Stage 1. It is better to start customizing your kitchen design by choosing the material for finishing the facades and selecting the milling (Left menu - Materials - Types of facades). Here you can choose for your project facades made of MDF, plastic, chipboard or solid wood, as well as milling in the Modern, Classic or Country style. Depending on this choice, different options will open later in the color selection catalog.
Stage 2. Selecting a color in the “Facade Color” tab. As we have already noted, different color catalogs are available for different types of facade finishing. For example, if you have chosen facades made of MDF, then the RAL palette or film coating will be available in the “Facade Color” tab.
Note:
- To select a different type, color of facades and body for the top and bottom rows, click on the “Separate facades” button in the corresponding tabs in the “Materials” section.
- You can change the color and design of the facades of individual modules (select the roller icon or the door icon in the pop-up menu of icons).
Step 8. Set up the kitchen cabinet, countertop, plinth and splashback
Everything is simpler here: also in the “Materials” section, in the corresponding tabs, we select options for finishing the cabinet, countertop, plinth and apron.
Step 9. Select handles, fittings and components
In the “Handles” tab, you can select handles and their orientation, or completely remove them from all facades.
- If desired, in the “Accessories” and “Fittings” sections you can select the internal contents of the kitchen, as well as closers and hinges. These elements are not shown in the project, but are taken into account when calculating the cost of the kitchen.
Step 10. Save the project
If you plan to continue editing the kitchen project later, you should save it to your computer or flash drive. To do this, click on the third icon in the top menu (floppy disk icon).
To return to editing the project, load the saved file into this designer. To do this, click on the folder icon in the top menu.
Note:
- The kitchen design project can be printed (printer icon in the top menu) or saved as a screenshot (painting icon in the top menu).
- If you are ready to order a designed set, click on the “Send for calculation” button in the top menu and enter your details. Next, through the Linkmebel service you will receive offers from manufacturers (the function is available only in the Russian Federation).
Finally, we offer a visual guide to using the constructor.
Support the project - share the material with your friends on social networks:
Benefits of painting kitchen walls
Beautiful wall paintings, reminiscent of frescoes, look appropriate not only in children's institutions and public places, but also in ordinary city apartments, as well as country houses. Most often, such “frescoes” are made at home with acrylic paints. Cheerful wall colors create a cozy atmosphere at home. This is especially popular with children of any age.
Drawing an original picture in the kitchen with your child is a great idea. Typically, drawings on kitchen walls are made according to a sketch made with a pencil or ballpoint pen. Of course, you can act more traditionally by covering the kitchen with wallpaper, decorating the walls with tiles or plastic panels (on which the manufacturer can depict absolutely any design, including photo printing). However, many owners still prefer to paint at home for a number of reasons:
- Modern paints designed for walls are easy to use. They dry quickly, are resistant to any humidity and temperature, and do not harm health.
- If the kitchen is rarely ventilated, it can become very humid. In such cases, the wallpaper usually peels off quickly, so it is better to paint it instead.
- A picture on the wall will help mask any defects: stains, unevenness, roughness, which will be very visible when wallpapering.
- Any kitchen “fresco” will be exclusive, even if the artist uses stencils purchased in a specialized store. Different people may arrange these stencils differently on the wall and paint them different colors.