0
42948
Modern furniture, made from high-quality and environmentally friendly materials, is expensive, so not everyone has the opportunity to purchase it. Often a unique and original interior is created, which requires exclusive furnishings. In these cases, the owner of the premises can independently create a wardrobe as a project, according to which furniture will be manufactured in the future. The project can be created independently using specialized computer programs or with the appropriate design organization.
Deciding on the design and dimensions of the wardrobe
How best to plan a wardrobe depends on its location. Its design can be:
- Completely freestanding. The easiest option for independent design. The dimensions of the wardrobe are reduced relative to the allocated space in width and height to make assembly possible. If you plan a closet for the ceiling, it is better to allocate a separate mezzanine. It is not always possible to assemble a wardrobe standing upright. And if you assemble it lying down, then the diagonal of the sides will not allow you to lift it and move it to the designated place.
- Partially built-in. Planning a partially built-in wardrobe (for example, when installed in a corner, without a back wall or bottom) is also not difficult if you take all the measurements correctly. Shelves adjacent to the side wall may need to be filed in place if the angle is not level. When installing in a corner, it is better to leave the section adjacent to the corner for outerwear.
- Fully built-in. In this case, the sliding wardrobe is completely mounted in a niche and does not have a roof, bottom, side or rear walls. It is necessary to plan the internal content in such a way that all shelves and drawers are in the center. And leave the side sections, for example, under clothes on hangers.
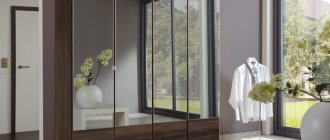
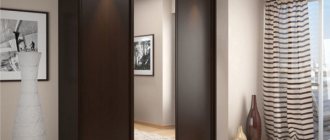
Cabinet wardrobe
Partially built-in wardrobe
Built-in wardrobe
Design and calculation of a wardrobe with your own hands
Designing a cabinet is a multi-step task.
Design your closet by thinking through all the shelves.
To prevent the finished structure from collapsing under the weight of its gravity, it is necessary to calculate in advance:
- dimensions of future furniture;
- door width;
- the length of the shelves so that they do not sag under the weight of things;
- number and sizes of drawers;
- useful depth of shelves, of which 10 cm will go to the sliding door system;
- other.
It is necessary to make a list of parts for cutting laminated chipboard.
Room measurements
Professional measurements of the room help to avoid mistakes when creating a wardrobe. To work you will need:
- roulette;
- building level;
- a square or any object with right angles (A4 paper);
- notebook and pencil.
Once you have decided where the cabinet will be, measure the space. Remember that the same measurements must be taken in several places. If, for example, the walls of the room are located at a slight slope, this may eventually distort the doors of the finished furniture. And the sliding door opening system will not be able to function.
The sliding door system, depending on the manufacturer, has a depth of 80–100 mm.
- Measure the width of the wall of the opening or room in several places.
- Record the wall height reading.
- Check that the corners where the cabinet is planned to be placed correspond to 90 degrees. If this figure deviates, take this into account in the design.
- Check the floor level. Is the wall collapsing? Furniture, regardless of the curvature of the floor, must have a horizontal position. If the floor is noticeably curved, it is necessary to make a plinth and trim the base of the furniture to level the surface.
- If there are skirting boards and you do not plan to remove them, you need to consider trimming the model to fit them.
You need to decide on the width of your wardrobe and choose a wardrobe layout.
Calculation of overall dimensions of the cabinet
You have calculated the dimensions of the room or niche and recorded the results in your notebook. It's time to calculate the material. This is the final stage to understand how to design a wardrobe yourself.
- The width of the planned furniture is calculated from personal wishes or your measurements of the room. 5 cm is always subtracted from this indicator - the so-called technological gap. This is a guarantee that during installation the cabinet will fit exactly into the space prepared for it.
- The depth of the structure comes from pre-made measurements of the room. Keep in mind that the sliding door system “eats” approximately 10 cm from the actual depth.
- For the height of the compartment, calculate the diagonal of the side wall. Then you will be sure that after installation the cabinet will not be significantly higher than planned.
Think through all the details of the closet with the whole family.
Material calculation method
You have calculated the dimensions of the room and the future closet.
A narrow cabinet will require less material.
Now you need to calculate how much material will be spent on the outdoor unit and on shelves, drawers and other small items. Sheets of chipboard, from which such cabinet furniture is made, come in 18 mm and 16 mm thickness.
Chipboard is one of the most popular materials for furniture.
Take this into account in your drawings, minus this indicator when calculating materials.
- The size of the roof matches the size of the top of the cabinet, since it is laid on top of the sides.
- The bottom is the bottom of the cabinet measurements minus the thickness of two sheets of chipboard. This is done because the bottom lies between the walls of the furniture.
- The two sides are the height and thickness of the chipboard sheet (roof).
- Sliding door systems come in different sizes. This must be taken into account during design and the values should be reduced at the stage of paper calculations.
- If a base is planned, then the length is equal to the measurement along the bottom of the compartment. And the height is usually within 10 cm.
- To correctly calculate the shelves, you need to start from the design of the cabinet. In general, this is the length of the cabinet minus two thicknesses of chipboard. If you are planning a partition inside the structure, its thickness should also be taken into account.
Assembling the cabinet yourself is not difficult.
We leave space under the doors and adjust the depth
The peculiarity of sliding wardrobes is that the sliding system immediately “eats” 100 mm from the depth of the wardrobe itself. And all shelves and partitions must be recessed relative to the compartment body. And the drawers are equipped with mortise or simply non-protruding handles so that the sliding doors do not cling to them.
If you need to plan a wardrobe inside for the hallway, with storage of bulky outerwear, it is better to immediately increase its depth to 650 mm. So that later you don’t have to adjust the sleeves, shoulders, fluffy “hems” of sheepskin coats and fur coats, which “strive” to get in the way of the compartment door when closing.
If the hallway is narrow and a wardrobe with a depth of more than 450-550 mm cannot be made, it is more correct to immediately plan the transverse arrangement of the hangers on the pull-out rods.
What options could there be for hanging and hanging rods under hangers?
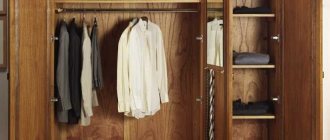
Practical wardrobe inside - features
There are much more filling options for two-door and three-door cabinets than for one-door cabinets. Items designed for storage may include bedding, seasonal clothing, tablecloths, towels, magazines, and even built-in sections for jewelry and beauty supplies.
Metal cabinets are very convenient; dirt and debris do not accumulate in them, and they are also very light, which is important for complex structures.
The width of the shelves varies from forty centimeters and more.
The arrangement of things in the closet can be done according to a very convenient scheme:
- In the middle are frequently worn items so that they are always at eye level.
- On top are rare and unnecessary items, such as hats or carnival costumes.
- The most bulky and heaviest things, such as suitcases, are stored at the bottom.
Planning the roof and base of the wardrobe
You can skip this step when planning a wardrobe if you decide to make a structure without a bottom and a roof. In this case, the roof will be the ceiling, and the base will be the floor covering.
What could be the base of a wardrobe?
As for the roof, it can be overhead (in the form of a protruding canopy). Or inset, as in ordinary cabinets.
In the first case, the fasteners (confirmations) are screwed in from above. Therefore, it is better to immediately make a removable mezzanine to facilitate assembly.
In the second case, there is a possibility that the wardrobe can be assembled “standing up”, because the fasteners will be screwed in from the sides.
Manufacturing and assembly of wardrobes
To make a coupe with your own hands, they mainly use cutting chipboard sheets. It is lightweight, moisture-resistant, fire-resistant and dense material with a long service life. It is necessary to cut out all the parts and prepare the fittings.
A sliding wardrobe is something more than just a wardrobe with shelves, almost a wardrobe.
- Attach the plinth, if present, to the bottom. Install adjustable feet.
- Place the side parts and fasten them to the bottom. To prevent the structure from falling apart, install one of the shelves at once. Also install a center post if you plan to have one.
- If there is a back wall, screw it on with self-tapping screws.
- Install the roof.
- Alternately nail drawer guides, shelf holders, and hooks.
- Attach the door guides to the self-tapping screws. Insert the doors, glue the sealing brushes and plugs.
When picking up finished parts from the workshop, be sure to check the correct dimensions.
We divide the wardrobe into sections and check the doors
Any internal filling of a wardrobe is a combination of shelves, niches and drawers in vertical sections.
Partitions determine the width of the vertical sections:
- Typically, vertical sections of 500-700 mm in length are allocated for shelving shelves.
- Sections for clothes on hangers can be longer if a longitudinal hanger is used.
- If the wardrobe is shallow and transverse pull-out rods are installed, then the optimal width of the sections for hangers is 600 mm.
When arranging partitions, match their position relative to the sliding doors of the compartment! The shelves should not overlap with them, otherwise “dead” zones will form. Doors should not interfere with the sliding of drawers, baskets, rods and other storage systems.
Layout
The ease of use of a coupe depends on the layout of its internal accessories. After listening to your wishes, the manufacturer will tell you what layout of the wardrobe inside will be suitable for different options.
For the correct layout, you need to choose the installation location of the compartment and its filling. Here are examples of basic configurations.
Hallway
The hallway closet is selected according to its shape and size. Inside such a module there should be storage compartments:
- Outerwear (barbell);
- Hats, scarves, gloves, umbrellas, accessories (drawers, shelves);
- Shoes (pull-out systems, shelves).
You can hang a mirror on the door.
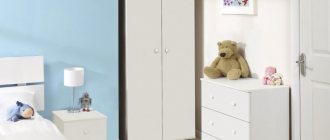
Bedroom
The wardrobe in the sleeping room contains:
- Boxes (organizers) for underwear;
- Rods for hanging casual clothes;
- Shelves for bed linen, pillows, blankets.
In the bedroom it is better to design a built-in or corner wardrobe. So that it is located along the entire length of the wall.
Wardrobe
The space inside the dressing room module can be filled with anything, the main thing is to carry out a competent layout.
You can embed into it:
- Designs where casual and outerwear will hang;
- Cabinets and drawers for accessories;
- Holders and shelves for hats;
- Shoe racks;
- Mezzanines for travel bags and suitcases;
- Compartments for storing household appliances (ironing board, vacuum cleaner).
After clarifying important details, a drawing of the furniture is created. There are services on the Internet for creating wardrobe designs. The program helps calculate their cost. Shows a photo of the designed model. Gives you the opportunity to imagine whether it will fit into the interior.
What sizes to choose
With the size of the wardrobe, everything is individual. They are calculated taking into account the layout and area of the room where it will be placed. But there are also certain standards. For example, the depth should be 60 cm. This option will be roomy and comfortable. Suitable for storing not only clothes, but also shoes, bags, and accessories. The best place for it is the hallway or bedroom.
For a system in which you plan to store only light clothing, a depth of 50-55 cm is suitable.
In cases where such options do not fit into the interior, the depth size is selected individually. But it must be at least 40 cm.
You may be interested in: 3-room apartment: layout, features and recommendations
The width depends on the features and area of the room, as well as the wishes of the homeowner. A wide wardrobe contains more sections. More spacious. A smaller product is compact and does not “eat up” space.
The planning height is chosen at the discretion of the client. For practical purposes, some install the structure in the ceiling, but the doors should be no more than 2.5 meters. In a room with a high ceiling, the uncovered part is equipped with additional doors.
How to organize space
Skillful organization and planning of the space inside a wardrobe is not possible without an idea of its filling. Typically, the system is divided into sections, inside of which shelves and a bar are placed. Drawers are installed less often.
Shelves are needed at the top and bottom. It is better to store rarely used items upstairs. Below are bags and shoes.
It is more convenient to install a bar for hangers in the upper part of the module, parallel to the door. So the things that hang on it will be clearly visible. This option is suitable for a cabinet with a depth of 60 cm. When the depth is shallower, the crossbar is placed perpendicular to the door. Then only the thing that hangs first is viewed. This is not very convenient. To solve the problem, a layout using a retractable system is used.
Drawers should be installed at waist level or below. They usually store organizers with underwear, socks, and tights.
For proper placement of different types of clothes, additional elements are used: baskets, hangers for skirts and trousers, holders for belts and ties.
The layout of the built-in wardrobe does not differ from the layout of the cabinet module.
Departments
Regardless of the configuration, size, number of sections, all models have mandatory sections.
- Shelves. Each shelf links the side parts and gives stability to the system. Their height depends on what is planned to be placed on them, and their width and depth depend on the size of the section.
- Boxes. Accommodates underwear, small items, hosiery. Increases storage convenience.
- Barbell. There are hangers on it where the main clothes hang.
If the system is designed for only two people, it is better to divide it into two parts with identical sections.
To improve ergonomics, additional fittings and accessories can be added to the design.
- A pantograph is a convenient but expensive alternative to a barbell. Accommodates hangers for shirts and blouses. To get them out you pull the handle.
- Baskets. They are a retractable mesh container. Its contents are always visible.
- Retractable platform for shoes. Placed on the lower tier of the structure. Has an inclined location.
- Organizers. A box or fabric case divided into cells. It is convenient to store socks, ties, underwear, and jewelry.
- Multi-level hangers. Accommodates many items in a small area.
- Trouser. Allows you to avoid creases and maintain the shape of trousers and jeans.
You may be interested in: House layout 6 by 6: features of space zoning
It is desirable that additional structures be built-in and modular. Then, taking into account the change of seasons, the filling of the system can be rebuilt.
Layout options
There are four types of sliding wardrobes.
- Linear (rectangular shape). Installed along the wall. Can serve as a room partition.
- Angular. Usually installed in small apartments. It completely fills the corner space. Suitable for storing a large number of items.
- Radial. Convex, round or concave shape. The model requires a lot of free space. Installed in spacious rooms. Most often placed in a corner of a room or niche. A closet layout with wavy lines makes the room appear larger.
- Built-in. Without ceiling, floor and walls. Installed in a place unsuitable for traditional furniture. Made to order.
For each option, manufacturers create individual circuits. In the hallway, part of the storage system is made open. They complement it with a seat and an area with hooks. Wardrobe layout options in children's rooms include pull-out cabinets for stationery and small items, open modules with shelves to accommodate toys and books.
A model installed on a balcony should have wide shelves. They store seasonal items, sports equipment, and tools.
To imagine what the wardrobe will look like, you can look at photos of different models online.
We develop internal content
How to plan a wardrobe inside, how to make its internal contents depends on the purpose of the wardrobe itself and its placement.
For example:
- For the wardrobe in the hallway, they plan to have more hanging space for outerwear, shelves for shoes, hats and bags, narrow drawers for mittens, gloves and other small accessories.
- For a wardrobe in the bedroom, it is better to design more shelves of different heights - for linen, things, voluminous pillows and blankets.
- In a nursery, it is more convenient for a child to use drawers and baskets, there should be more shelves, and hangers under hangers take up less space.
- In some wardrobes, it is important to allocate “household” sections designed to store a vacuum cleaner, ironing board, dryer and other household appliances.
Varieties
The main types of wardrobes include the following:
- Built-in. This is a stationary structure that allows you to use the entire useful volume of space in which it is located. Its boundaries are the floor, walls and ceiling of the room. Such cabinets can be built into any place that is rarely used, and can also be used to disguise communications. However, it cannot be moved without disassembling it.
- Semi-built. This design is characterized by the absence of some supporting parts, for example, the rear and side walls. This will allow you to mount the cabinet even if there is no niche or opening. The frame is attached to the wall, so moving such a cabinet is also problematic.
- Corpus. This type of cabinet contains all the necessary elements: a supporting frame, a back wall, four panels and sliding doors. It is usually placed along the wall.
You can place a cabinet wardrobe in the center of the room, thereby zoning the space.
A cabinet wardrobe can be used to zone a living room. Cabinet cabinets are mobile, and often transported in assembled form. They use less usable space and require more material to manufacture than their built-in counterparts.
Corner wardrobe
This design allows rational use of empty space in the corner of the room. With the right interior layout, corner cabinets can be surprisingly spacious.
Even small corner cabinets can be quite spacious.
If the corner cabinet is a cabinet, then during assembly and installation difficulties may arise due to the design features.
Rectangular wardrobe
Such models have a straight and strict façade that will be appropriate in any style direction. They are universal and have an extremely simple design, including installation. At the same time, rectangular cabinets are not original, as they are used everywhere.
Such rectangular cabinets are considered universal.
Spherical wardrobe
Sliding wardrobes with a spherical or radius façade came into use relatively recently, but have become quite popular due to their external originality and practicality. They combine the advantages of other types of cabinets, and also have a complex mechanism, which determines their high cost.
Spherical cabinets are original and practical.
Sliding wardrobe in the form of a square
This is a modular type of cabinet, consisting of several modules in the same style. They are autonomous, which allows you to freely change the configuration of the structure.
The components of such cabinets are autonomous.
Removable and rigid shelves, mezzanines
Let us repeat once again: in free-standing wardrobes under the mezzanine ceiling, it is better to make the mezzanines removable. In this case, sliding doors can be from floor to ceiling, or separate for the lower and upper parts of the cabinet. True, the design for these two options will be different.
If the wardrobe has a separate mezzanine, with its own sliding doors, its design will look like this.
If single doors from floor to ceiling are planned, then the bottom of the mezzanine is recessed to the level of the remaining shelves and partitions of the internal filling of the wardrobe.
The seam on the side of the wardrobe divided in this way will be almost invisible if the color of the chipboard is correctly selected and the texture is cut. However, it can always be “covered” with decorative side shelves or any other extension.
If we talk about the aesthetics of the sidewall, then the numerous holes from fastening the shelves do not add “beauty”.
To avoid making holes in the visible sides of the wardrobe:
- If possible, sections with shelves are placed in the central part, as was written earlier.
- They use hidden fastening in the form of furniture dowels and an eccentric tie.
- Alternate rigid fastening of shelves with removable ones.
How to plan built-in wardrobes
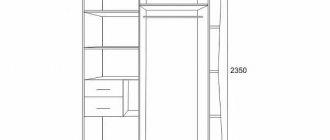
1
Planning built-in wardrobes
Make a list of features that your closet should have. The main thing is to try to formulate exactly what and how you will store (on a shelf, in drawers or mesh baskets, on hangers, etc.). Imagine about the appearance (possible colors, combinations of door leaf materials).
And now that you have an idea of what kind of closet you need, take three steps and plan it.
STEP 1. Choose a location for the cabinet
Take measurements as shown in the picture. You should measure the height, depth and width in three different places. If your height measurements are different, take the smallest size. And when determining the width, take the largest result. In order for the selected built-in wardrobe to fully perform all the necessary functions and be a harmonious part of the interior, you should carefully approach the arrangement of the location and planning of the built-in wardrobe.
Cabinet installation options
| 1. In a finished niche without structural elements. | 2. In the right corner with one side panel. | 3. In the left corner with one side panel. |
| 4. To a wall with side panels. | 5. In a niche with side panels. | 6. Into a niche with side panels and roof. |
| 7. In the right corner with the sidebar. | 8. With a false wall side panel, a false roof and a base for the bottom track. | 9. In a niche with side panels and false panel. |
This is important
When choosing a place to place the cabinet, you should take into account that in some cases you may need additional structural elements (side panels, roof, false panels, etc.).
To arrange the location of the cabinet, you can use a standard range of structural elements, which can be made in the same colors as the doors. STEP 2. Determine the internal structure of the cabinet
Use the entire (suggested) range of modules. It is important to remember that when choosing the internal modules of a built-in wardrobe, you must subtract 10 cm for sliding doors from its estimated depth. Draw a plan of the interior of the cabinet. Decide on the required number of additional shelves, drawers and other elements.
When planning, take into account the thickness of the cabinet side panels (one panel is 16 mm).
This is important
When planning the interior of the cabinet, you must first of all take into account the line of the door. For example, if you plan to install drawers or baskets inside, then you need to clearly understand whether the door, which is in the extreme position, will allow the drawer to be pulled out? Will there be “dead” zones in the designed cabinet, that is, hard-to-reach places? So, when planning a 3-door wardrobe (see figure below), you must remember that the wardrobe can only open one third.
The cabinet is completely closed
The central section is free
Right section free
STEP 3. Select doors
| Width | 604 mm | 704 mm | 804 mm | 904 mm |
| Door height (door opening), mm | ||||
| 2252 (2400) | + | + | + | + |
| 2440 (2500) | + | + | + | + |
| 2560 (2600) | + | + | + |
Sliding door guides are sold separately. Door profile options: steel (bronze – BZ, chrome – CH, beech – BE, Victory cherry – VC) Door leaf options: mirror (silver – S, bronze – BZ); Chipboard (beech – BE, victory cherry – VC). You can order the production of doors according to your sizes and taking into account your wishes for color and materials. The ordered doors use a larger number of materials and colors, including doors made from aluminum profiles. You can order the production of a cabinet or other cabinet furniture in the following colors: beech - BE, light walnut - OR, dark walnut - OE, senator oak - MO, victory cherry - VC, alder - PA, cherry - CY, pear - UP , white – WT, vanilla – DI, wenge – WE, white maple – MW, aluminum – AL, chateau oak – NO, chocolate beech – BT.
For more detailed information, please contact sales consultants.
Summary
To correctly purchase components for a wardrobe with sliding doors, use the following diagram.
1.
Decide on the place where the cabinet will stand, and on the additional structural elements that will be needed to equip the cabinet: - side panels;
— roof (side panel + 2 false walls); — false walls (including for the substrate under the lower and upper guides). 2.
Take measurements as shown on page 1. If there are side panels, the width of the internal space of the cabinet will be less than the external dimensions by their thickness (one panel - 16 mm).
If there is a roof, as well as a substrate for the lower or upper track, the height of the doors should be less than the overall dimensions of the cabinet. Thickness: roof = 16 mm; substrates = 16 mm; h = 2645 mm; l = 2200 mm. If your cabinet installation option is 1, 2, 3, 4, 5, 6 (see paragraph “Closet installation options”), then the height of the doorway is 1645 mm. But if your option is 8, then the height of the doorway is 2613 mm. If installation option 1, then the width of the internal space of the future cabinet is 2200 mm. And the width of the doors will be the same. But if option 5, then only 2168 mm. 3.
Plan the internal structure of the cabinet and select the required number of modules and additional elements (drawers, shelves, etc.).
4.
Select doors, keeping in mind that sliding doors are installed overlapping (i.e. one door overlaps the other). In this case, the amount of overlap depends on the type of door profile. That is, if your cabinet has two doors with a width of 904 mm, then the total width of the cabinet doors will be 1785 mm.
| A1 |
For sliding doors:
Don't forget: to install sliding doors you need a set of guides.
Individuality is the main advantage
When you need to create a wardrobe using the space of a free wall or corner, you can resort to the options we offer for traditional CABINET wardrobes. The list of proposed sizes allows you to rationally fill almost any living space. At the same time, the internal content of the cabinets can be completely different, fully meeting your needs. These could be cabinets in the hallway, bedroom, or children's room. The cabinets can be decorated with side terminal shelves and, if desired, a canopy with halogen lamps. These cabinets do not require fastening to the walls, and you can always move them to another place, and even move them to a new apartment without extra costs. At the same time, our cabinets retain their modularity and flexibility, and you can always make changes to the internal structure of the cabinet by adding or eliminating the necessary shelves, drawers or hangers.
Checking the rigidity of the structure
With a built-in wardrobe design, the rigidity of the shelves and partitions is ensured by fastening them to the walls at key points. Long shelves for heavy, large items are reinforced with the help of special console holders.
Everything else is fixed with ordinary plastic commander corners.
If the wardrobe is free-standing, then in the design of high and wide niches for outerwear, as well as under long shelves (longer than 700 mm), it is necessary to plan stiffening ribs.
Otherwise, the finished product will be extremely unstable and shaky. Any distortions negatively affect the movement of the sliding doors; the doors begin to jam, or even roll to one side (the side of the distortion).
Part of the function of the wardrobe's rigidity is taken over by the rear wall.
About methods of fastening the back wall of a wardrobe.
Materials and tools
To make a sliding wardrobe yourself, you need to purchase the material and make sure that you have the necessary tools:
- electric drill, screwdriver;
- screwdriver, drills for working on wood, plywood, MDF or chipboard;
- knives - blunt and stationery;
- clamp for parts, clamps, rubber mallet;
- for confirmation - a hex key, a bat;
- tape measure, awl, pencil, square;
- iron, fine-grained sandpaper for edging.
This kit is enough for you to assemble the structure. To work with the iron, also take care to protect your hands and stock up on gloves. It is better to put 2 on the controlling hand at once to avoid burns.
When assembling the housing, it is recommended to use a guide device and clamps to achieve a 90° connection. How to use the guides correctly can be seen in the training videos, which clearly demonstrate the assembly sequence.
Now let's move on to the materials. It is often tempting to make a new cabinet out of an old one. You can borrow individual parts from an old cabinet - for example, drawers or shelves for the internal structure. Remodeling a cabinet completely without purchasing new materials can be a challenge in terms of matching parts and materials. In addition, the material of the old cabinet could be deformed during operation and subsequently distort the new product.
The best option is to purchase new materials for making parts. A wooden cabinet can be made of chipboard, MDF, solid wood.
| Material | Advantages | Peculiarities |
| Chipboard, laminated chipboard | Relatively low cost, large selection of textures and colors. High strength, excellent for facades. | Suitable for simple structures, difficult to finely machined. |
| MDF | Practical, affordable material, easy to process. Large selection of shades and textures. | The cost is more expensive than laminated chipboard and chipboard. |
| Solid wood | Eco-friendly, natural material that guarantees a long service life. | High cost of the material, difficulties in processing if the material has defects on the surface. Wood is sensitive to changes in humidity, can swell and dry out without proper care. |
A wooden compartment will truly decorate your home if you have carpentry skills. Not everyone dares to make furniture out of wood with their own hands, since the material requires understanding. Most often, cabinets are made from furniture board - a specially made wood board that has undergone the necessary processing in production. It is not recommended to make a wardrobe from plywood. The material is cheap, but does not have sufficient strength and is very thin. If you have pieces of plywood with your own hands, you can cut out the back wall or bottoms for the inner drawers.
Tools
Fasteners
Chipboard
Dimensions
The smallest sliding wardrobes are made with two doors and have a width of 1-1.5 m. The maximum length of the wardrobe is limited by the number of doors. The maximum number of them is 5. It should be taken into account that a rather wide profile with five “rails” is attached to the floor, along which rollers mounted on the door roll. A similar profile is attached to the ceiling.
This is a 4 door option
If there are a lot of clothes on hangers
Small corner wardrobes are suitable even for small apartments
This is one example of a wardrobe in a hallway with 3 doors
The depth of the wardrobe can be any, but 45 cm and 60 cm are considered standard. They can be made to order from 400 mm to 700 mm. The height of the wardrobe can be right up to the ceiling. They are usually made in the range from 2000 mm to 2700 mm.