Materials and tools
To make your own jewelry, you can use the following materials:
- knitting yarn, sewing threads;
- plastic and metal covers;
- postcards;
- newspapers;
- cotton wool;
- ribbons;
- braid;
- lace;
- cords;
- buttons;
The choice of materials for making Christmas tree decorations is simply huge - it all depends on your imagination
- beads;
- beads;
- bugles;
- textile;
- felt;
- decorative mesh;
- tulle;
- foil;
- colored paper;
- cardboard;
- lamps;
- cones;
- wire;
- Styrofoam;
- plastic bottles.
The choice of materials depends on the specific type of toy and its shape.
Tools that are most often used in the process of creating New Year's toys:
- scotch;
- glue;
- hot glue;
- scissors;
- stationery knife;
- a simple pencil;
- gouache paints;
- acrylic paints;
- brushes;
- ruler;
- compass;
- figured stencils;
- hole puncher;
- stapler
The choice of tools depends on the type of material to be worked with.
General principles
It’s very easy to create Christmas tree decorations with your own hands from scrap materials. But there are still principles for making New Year’s decorations yourself.
The general principles are as follows:
| Single style | A set of toys must be designed in the same style: it can be a certain shape, color scheme or theme. A Christmas tree decorated with such toys will look original and interesting, not too colorful and old-fashioned. |
| Small size | There is no need to make New Year's decorations too large in size. Such toys will look ugly and sloppy on the Christmas tree. The optimal size is 5-12 cm, depending on the height and width of the tree itself. |
| Loop | When making jewelry yourself, you need to think about the presence and location of the loop in time. The toy must hang on the branch, hooked on a loop. Placing decorations on needles will not work: they will constantly move or fall. |
DIY New Year's wreaths: 60+ master classes of New Year's wreaths for the door
Published: October 2, 2020
An Advent wreath is a traditional New Year’s decoration. Usually it is hung on the door, but it will look no less original on the wall or above the fireplace. If the wreath is light, then it can be used to decorate a window opening or attach it to a curtain. You can make such a New Year's decoration with your own hands, using any materials that you have in your home. New Year's wreath made of tinsel Bright [...]
The toys that you made for the holiday with your own hands are the key to a cozy holiday atmosphere. Happy New Year!
Help us improve: if you notice an error, select a fragment and press Ctrl+Enter.
DIY Christmas tree toy made from lids and cards
Caps of any diameter make original round toys with pictures.
In addition to 2 caps of the same diameter and color, to make a round pendant you will need:
- pictures from postcards or books;
- a piece of tinsel;
- thin braid or decorative cord for a loop;
- a piece of lace or braid for placing on a seam;
- decorative elements for decoration;
- a simple pencil;
- scissors;
- glue.
Step-by-step description of the manufacturing process:
- Each cover should be attached to the picture you like, circle a circle on the postcard and cut it out.
- You need to apply glue along the contour of the lids and attach pictures to it, which are then framed with tinsel.
DIY Christmas tree decorations from scrap materials: lids and painted cards
- Both covers must be glued together on the back sides using hot glue or super glue. Before attaching one cover to another, you should insert a thin braid or loop cord between them.
- The place where the lids are fastened must be hidden using a piece of braid or lace and glue.
- At the end, you can decorate the toy with decorative elements: pine cones, beads, buttons and others.
Felt Christmas toys
Felt is an affordable and easy-to-process material, making it a pleasure to craft. Felt toys are bright and cozy. The main principle of making any figurine from felt is that first a pattern of all the parts is prepared, which is then transferred to felt. The cut out elements need to be sewn together, gradually adding them to the base.
The main New Year's character - Santa Claus - is made from felt very simply.
You will need the following materials and tools:
- felt in red, white and beige colors;
- cord or braid;
- black, red and white sewing threads;
To make Santa Claus from felt you will need blanks
- needle;
- scissors;
- simple pencil.
The toy is made as follows:
- To begin, the template details need to be transferred to felt and cut out. You should end up with 2 of each hat piece, 1 of the remaining pieces.
- The basis will be the face and the front of the beard: they need to be sewn together with a regular seam.
- You need to embroider the eyes on the face with black threads, and sew on the nose and mustache with beige and white threads.
- After this, you should sew the back of the beard to the base using a loop stitch over the edge, leaving the upper part of the face unsewn for stuffing.
- The details for the hat need to be divided into threes: triangle, fur and pompom. Each three should be sewn together - you get 2 halves of the hat.
- Now the character’s head needs to be stuffed with a small amount of padding polyester, and then each half of the hat must be sewn on the corresponding side using a regular seam.
- At the end, you should fill the hat with padding polyester and sew its 2 parts with a loop stitch over the edge, not forgetting to insert a loop between the two pom-poms.
A cute little deer will make good company for the felt Santa Claus on the Christmas tree. The materials and tools you need to prepare are the same as for the previous toy (only felt and threads should be taken in other colors). Additionally, you will need 2 small black beads for the eyes.
How to make a fawn:
- First you need to cut out all the parts of the template from felt in the quantity indicated in the diagram.
- Next, you should assemble each side of the figurine: sew small parts (except the tail) and beads to each part of the base - the body.
- After this, you need to sew both parts of the body with a buttonhole stitch over the edge, leaving a hole for stuffing. When sewing, it is important not to forget to insert a loop so that the toy can be hung on the Christmas tree.
- Having filled the figure with padding polyester, you need to sew up the hole with a buttonhole stitch over the edge.
The mini-tree on the large beauty of the same name - a guest of every New Year's holiday - looks original and beautiful. You can make a felt Christmas tree of any shape by choosing the desired template. Decorative elements are used at the discretion of the master: beads, figurines, buttons and others.
Making a Christmas tree is very simple and quick:
- First you need to cut out 2 parts for the Christmas tree from felt using a paper template.
- Each detail of the base must be decorated with decorative elements, sewing them on the front side.
- After this, you need to sew the base parts together with a loop stitch across the edge, leaving a hole at the top of the tree.
- The tree should be filled with filler, then sew up the hole, not forgetting to insert a loop.
New Year's toys for the Christmas tree 2020 made of felt (patterns and templates inside)
I think that many came to this article to find exactly the right felt toys, and take the necessary stencils from the site and go to cutting and sewing. Among other things, I have one wonderful post on my blog that contains many other schemes and developments, so don’t be shy, go here and choose.
I propose to consider a Christmas star, which is made of ordinary white fabric, and the cap is made of felt.
First, take a blank, print it out and apply the outline to the fabric.
Next, cut along the lines and begin assembly.
Then fill the toy with cotton wool or padding polyester. And then the fun begins, color the star with instant coffee, brew this drink in a glass, and then decorate it.
Sew the cap to the star. Glue the eyes and embroider the nose and mouth with thread.
Now take the following sample as a basis. Who does he remind you of? Yeah, of course a snowman.
It would also be an excellent solution if you cut and sew such a house. Catch his sketches.
I also came across very beautiful toys in a blue shade, and they were decorated with snowflakes and beads. Great, I thought, and decided to show them to you. Make a printout of the Christmas tree, star and circle.
Cut out the necessary parts from felt.
Then attach the snowflake and bead like this, as shown in this photo.
Carefully glue or sew on the decor, and do the same with the beads.
Another job, take note.
And here are a couple more ideas, I really liked the cedar cones and the boot that Americans give on this holiday, January 31st.
From fabric
Anyone can make their own Christmas tree decorations from scrap materials, which can include fabric and various decorative elements. It is advisable to use a sewing machine for this, but if you don’t have one, you can sew the toys by hand.
Any available fabric can be used:
- fleece;
- plush;
- cotton;
- polyester;
- lace;
- flannel;
- bike.
You can sew voluminous bells from thick fabric, such as flannel or cotton.
For production you will need:
- a piece of fabric of the required size;
- loop;
- metal ringing tambourine;
- stuffing material;
- fabric chalk;
- scissors;
- sewing machine or needle;
- sewing threads.
How to make a voluminous bell:
- Using the template, you need to cut out 6 identical parts and sew each pair together from the wrong side. When sewing, it is important to remember to leave a small hole on each edge for turning and stuffing.
- Next, all 3 resulting bases should be turned out onto the right side of the fabric and folded on top of each other. After this, you need to make a common stitch in the center, holding all 3 bases together. At this stage, it is important not to forget to sew a loop on top of the toy.
- At the end, you need to fill each of the 6 sides of the bell with filler and sew up the holes with a hidden seam, and then sew on a small tambourine.
A New Year's boot is not only a beautiful Christmas tree toy, but also a place to store little surprises.
For manufacturing you will need the following materials and tools:
- thick fabric for the outside of the toy;
- thin fabric for lining;
- loops;
- filler (thick soft fabric);
- scissors;
- fabric chalk;
- pins;
- sewing threads to match the fabric;
- sewing machine or needle.
How to sew a boot:
- First you need to make a pattern according to the template of the required size. You should get 2 parts for the outside of the toy, 2 parts for the inside and 1 part of the filler. It is important to ensure that each pair of parts is a mirror image.
- Now you need to sweep the workpieces. To do this, you should fasten the front outer part of the boot with pins and filler, then walk along the edge with large stitches.
Step-by-step making of a New Year's boot
- Next, you need to sew the front outer part of the boot with the lining piece along the top edge, departing 1 cm from the top.
- The same should be done with the back outer part of the boot and the second lining piece, after first sewing a loop to the lining.
- It is necessary to fold the blanks as follows: lining to lining, front to back with outer sides. The seam area should be secured with pins. It looks like 2 boots fastened at the top: one from lining fabric, the other from thick material.
- Now you need to make a stitch around the entire perimeter of the boot, not forgetting to leave a hole in the lining.
- The boot should be turned inside out through the hole left in the lining. After this, you need to tuck the lining inside.
- You can tuck the top of the boot and decorate the toy with various decorative elements or fabric of other colors.
From thread and glue
Floss, iris, wool and other knitting or embroidery threads are an excellent material for creating your own New Year's balls. The most important thing is to have good PVA glue on hand, because without it you won’t be able to make jewelry. Balls are made from threads of one or several colors - it depends on the personal preferences of the artist.
They can be decorated with various details:
- beads;
- rhinestones;
- lace;
- braid;
- ribbons;
- pieces of tulle;
- bows.
To make balls you will need the following tools and materials:
- threads;
- PVA glue;
- small bowl;
- inflatable ball;
- needle;
- loop;
- needle.
Stages of making a toy:
- The glue must be poured from the bottle into a bowl, then add very little water to it and mix. Threads unwound from a ball should be placed in this mixture for 5 minutes.
- The ball must be inflated to the required size and the hole must be tied. After this, you need to wrap the ball with threads. How many layers there will be is decided by the master himself. The fewer there are, the lighter the web will be, the more, the denser. The threads should be dried for 24 hours.
- When the threads soaked in glue have dried, the ball must be pierced with a needle and carefully pulled out through the threads. You need to attach a loop on top, and then decorate the toy with decorative elements.
From newspaper tubes
DIY Christmas tree decorations made from scrap materials, the simplest and most affordable of which is newspaper, are unique products that are not at all difficult to create.
For this you will need:
- cardboard base of any shape (star, Christmas tree, house and others);
- sheets of newspaper;
- paint of the desired colors;
- foam sponge;
- loop.
Manufacturing process:
- First you need to make tubes from newspapers. To do this, you need to cut newspaper sheets into strips 5 cm wide and wind each onto a knitting needle or wooden skewer at an angle of 45 degrees. Periodically coat the strip with glue so that the tube better holds its shape and does not unravel.
- Next, you need to cut out the base of the toy from very thick cardboard. The contours of the base should be rounded so that the tubes fit better on the figure. The surface of the base must be painted in the color with which the toy will be painted.
Step-by-step making of a star from newspaper tubes
- You should start wrapping the base with newspaper tubes from the narrower part. During the winding process, it is important to ensure that the tube does not lie in the same place several times, and that there are no pronounced irregularities on the figure. If one tube runs out, you need to attach another one to it using glue.
- Upon completion of the winding, the finished product should be coated with paint using a small piece of foam sponge. At the end, you should attach a loop to the toy.
Christmas tree toy made from a light bulb
Non-working light bulbs can serve as the basis for an original Christmas tree decoration. There are many options for making jewelry: from simple painting to complex decoration with volumetric elements.
You can make any figurine:
- Christmas ball;
- snowman;
- Father Frost;
- penguin;
- cone.
The choice of figurine depends on the shape of the light bulb and the imagination of the artist. The simplest version of a glass Christmas tree decoration is a penguin made from an incandescent light bulb.
To make a toy you will need the following materials and tools:
- 1 light bulb;
- gouache (can be replaced with acrylic);
- brushes of different sizes;
- cord or ribbon for loop;
- hat and scarf made of fabric or yarn;
- hot glue gun.
Penguin making process:
- The light bulb should be painted black and white to match the color of the penguin. The back area should be painted black, and the muzzle and belly area should be painted white. If desired, the coloring can be made more complex: make arcs above the eyes, and draw flippers in the middle.
- After the paint has dried, you need to draw the muzzle: eyes and nose, using a thin brush. It will be convenient to work with a light bulb if you place it on the neck of a jar or on a toilet paper spool.
- Using thermal glue, you need to attach a loop on top of the cartridge, which should then be threaded through the cap. Next, you need to secure the top of the hat with a thin ribbon or lace, tying it with a bow. The penguin's neck must be tied with a scarf and secured with glue.
Master class: Christmas ball
Christmas ball
This Christmas ball is very similar to disco. It shimmers beautifully in the light. Suitable for Christmas tree and interior decoration.
Materials and tools
Materials and tools:
- glass or plastic ball blanks of arbitrary diameter (preferably from 8 cm);
- scissors;
- CDs (1 ball 1.5 discs);
- glue gun;
- golden ribbon
Instructions
Step-by-step instruction:
Ready-made toys
- Cut CDs into small pieces of different shapes. The length of each piece is no more than 5 mm. To do this, use sharp scissors with powerful blades. The job is not the easiest
- Glue the silver side out to the ball using a gun. Maintain a distance between pieces of 34 mm. Be sure to remove excess glue immediately before it sticks firmly to the ball. Cover the entire surface in this way. For convenience, the ball can be placed in a cup with a small neck diameter
- Place a golden ribbon inside the ball. It will not only add brightness to the decoration, but will also hide drops of glue that are visible inside the ball from view.
You can hang the ball on a branch using a thin golden cord. By the way, you can put a ribbon of any suitable color inside the toy; the brighter and more festive, the better.
Christmas balls made of polystyrene foam
Foam balls of any size, decorated with various decorative elements, look very beautiful on the Christmas tree.
Decorative elements can be as follows:
- beads;
- rhinestones;
- small stones;
- sequins;
- buttons;
- flowers.
You can also combine the above options with ribbon or braid. There are two options for attaching decorative elements: using hot glue or using safety pins.
In order to make a Christmas ball from polystyrene foam and sequins, you will need the following materials and tools:
- foam blank of the desired shape;
- sequins;
- safety pins;
- loop;
- hot glue.
Manufacturing process:
- Before you start decorating the ball with sequins, you need to attach a loop to the foam blank using hot glue.
- The sequins should be placed on a safety pin and overlapped to the foam base.
- You need to start decorating from the bottom of the workpiece, moving upward in a spiral and hiding the loop.
Master class: salt dough decorations
Master class: salt dough decorations
Such decorations can be made together with children . It's simple and safe.
Materials and tools:
- 4 cups flour
- 1 cup salt
- 1.5 cups warm water
- rolling pin
- cookie cutters
- straw
- baking tray for baking in the oven
- acrylic paints
- tassels
- twine or tape
Ingredients
Step-by-step instruction
Additional decor
- Knead the flour, water and salt into a thick dough. It is good to knead it with your hands so that it is homogeneous and plastic.
- Roll out the dough to a thickness of several centimeters
- Use cookie cutters to cut out desired Christmas-themed shapes.
- Use a straw to make a hole at the top of each piece. You will need it later to hang it on the Christmas tree using ribbon or twine.
- If you want to give the shapes volume, you can apply patterns on them using a sharp knife, toothpick, or utility knife. If you have stamps for creativity, you can use them too
- Place the figures on a dry baking sheet and bake until hardened at 200°C
- Cool and paint using acrylic and brushes
- After the paint has completely dried, string the twine through the holes and begin decorating the Christmas tree.
As additional decor for the figures, you can use beads, beads, buttons, sparkles, and ribbons. They are attached using a glue gun.
Christmas tree toy made of beads
A stylish New Year's decoration will be a Christmas tree made of large beads, which is incredibly easy to make. You can use beads of green and other colors, as well as beads of different sizes.
The only strict requirement is that the wire must be dense and retain its shape well.
This is necessary so that the Christmas tree suspended by the loop does not stretch. If there is only thin wire, it must be twisted in 2 layers.
Materials and tools:
- a piece of wire of the required length;
- beads and beads of the required colors;
- a piece of satin ribbon;
- satin ribbon bow;
- a coin or some small figurine to weigh down the toy.
Manufacturing process:
- The beads must be strung on the wire from bottom to top, interspersing other colors between the green beads and periodically stringing the beads.
- The last one should be a yellow or gold colored bead instead of a star on top. A small edge of the wire should be left free - it needs to be bent and hidden by threading it through the outermost bead and making 2-3 turns between the bead and the next bead.
- The satin ribbon must be passed through the loop formed from the bend of the wire. A coin should be glued to one end of the tape, which is located below, at the base of the Christmas tree. The other end needs to be bent to the top bead and secured with glue. The joint should be hidden with a ribbon bow.
Master class: glowing jars
Glowing jars
Materials and tools:
- mini glass canning jars with lids
- mini flashlights “candles” on batteries in golden color
- metallic gold spray
- shiny gold elastic band
- screwdriver
Materials and tools
The color of the spray, ribbon and candle can be any, it doesn’t matter. A screwdriver is not needed if the covers already have holes.
Step-by-step instruction
Improvised daisies
1 Using a screwdriver and a thin drill, make holes in the cover. We made improvised daisies. You can get by with small holes in a chaotic manner.
2 Paint the lid with a spray from a distance to prevent streaking
3 Thread an elastic band through the hole to hang the jar on the tree.
Elastic tape
4 Place a candle inside the jar and close the lid.
Candle inside a jar
This glowing jar is not an easy decoration. Therefore, it is hung on the most powerful branches. It can also be used for table decoration. There will be no smoke, smell or soot from it. If you make more than 10 of these luminous decorations and hang them in a spiral, you will get an original alternative to the usual garland.
Glowing jar
From plastic bottles
DIY Christmas tree decorations made from scrap materials, which are plastic bottles, are a great idea not only for decorating a home or street Christmas tree. Such toys are made simply and quickly, because the material is easy to process. They are resistant to moisture and temperature changes, so they will not deteriorate from rain, snow, or wind.
The simplest version of New Year's decoration made from plastic bottles is a snowflake. Bottles of any size are suitable for creating them. For 1 snowflake you will need 1 plastic bottle.
For work you will need the following materials and tools:
- plastic bottles;
- acrylic paints of the desired colors (can be replaced with water-based ones);
- brushes of different sizes;
- gel or glue with glitter;
- beads, curly buttons or large rhinestones;
- loop;
- thick needle;
- Super glue;
- stationery knife.
How to make a snowflake from a plastic bottle:
- The bottle must be placed horizontally on the table, then use a utility knife to cut off its bottom. You need to cut as close to the bends as possible - this way the snowflake will turn out thin and beautiful.
- Using a thin brush, you need to draw a pattern on the front (convex) side of the workpiece. With a thick brush you can paint the back side of the snowflake.
- You need to attach a decoration - a bead or rhinestone - to the center of the snowflake using super glue. Make a small hole on top with a thick needle and pass a loop, tying it from the inside of the snowflake into a knot and securing it with glue.
Participants
"Felt boots of Santa Claus." Sorokin Artem. The boots are made of felt and decorated.
“A palace for every singer.” Sanko Artyom. The birdhouse is made of plywood, painted with gouache and watercolors.
"Snowman". Graveyard of Milan. The Christmas tree toy snowman is made using the cutting technique. Eyes and nose applique.
“Matryoshka”, “Scientist cat”. Shklyarova Angelina. Papier-mâché technique, two balls, napkins, PVA glue, paints.
"Lunar cat". Volodichev Ilya. Cardboard, thread, paper, Christmas tree toys.
"New Year's mail". Navrodskaya Anastasia. For the work you needed foil, plasticine, salt, paper, and an artificial twig.
"Rudolph the Reindeer" Arina Vasilyeva. The deer is crocheted.
"Christmas balls". Polyakov Elizar. A foam ball with a diameter of 8 cm was divided into equal slices with a thread. Then we cut shallow holes with a knife in the direction of the threads. Segments larger than 0.5 cm on the ball were cut out of the fabric. Using a nail file, carefully tuck the fabric into the cut holes according to color. Decorate with ribbon using hot glue gun. Decorate with bows and tassels.
"Beautiful Christmas tree." Starostina Elizaveta. The work was completed for a New Year's crafts competition. It was made by Elizaveta (5 years old) and her mother. Materials used in the work: paper, thread, padding polyester, plaster, fabric and New Year's decorations.
New Year's decorations from balloons - master class
"Snowman". Elena Tarasova. The toy is made of fleece + knitwear, yarn, synthetic padding, buttons.
"Christmas decorations". Oleksandra Gritsenko, 6 years old. The work is made of corrugated paper, covered with white paint, decorative ornaments and glitter. Decorated on the background.
"Magic snowflakes". Trofimov Vova, 6 years old, and Polina, 5 years old. Our snowflakes are made from the bottoms of plastic bottles. If you glue two halves together, you get a three-dimensional snowflake. We painted them with gouache and glued a loop. We decorated the Christmas tree in kindergarten with these magical snowflakes.
"Merry fluffs." Zhilitsky Savely. Double-sided snowflakes are made of chicken feathers, paper, glue, and decorated with glitter. Designed for decorating a New Year tree.
Sheep and Teddy Bear. Elena Tarasova. Made from fleece, yarn, padding polyester and laces.
The pink elephant is made of chintz and padding polyester. Bunnies are made of fleece, padding polyester and knitwear.
"Christmas trees for the Christmas tree." Serova Polina. Crochet.
"Ball for the Christmas tree." Andreev Fedor, 3 years old. We make a three-dimensional ball from an inflated balloon, thread and glue. After it dries, decorate it with rhinestones. A loop was made from shiny sequins.
"Snowman made of papier-mâché." Savelyeva Daria. Frame for the snowman: crumpled food foil. The surface of the figure is a mass of mixed toilet paper and PVA glue. The figurine is painted with gouache paints. The shine is achieved using acrylic mother-of-pearl enamel.
"Snowman made of papier-mâché." Zemskaya Sofia. The frame for the figurine is crumpled up food foil. Mom is a figurine of a snowman made from a mixture of toilet paper and PVA glue, color - gouache paints, gloss - pearlescent acrylic enamel. The hat is food foil, covered with toilet paper with PVA glue and painted with gouache. The eyes are blanks from the store.
"Forest Beauty" Penzentseva Alla. The Christmas tree is made from natural materials and decorative elements.
"Christmas wreath". Cherepanova Alena. Made of cardboard and New Year's tinsel, decorated with Christmas balls.
"Wreath in ethno style." Ignatievskaya Taisiya. The wreath is made of cardboard and fabric, decorated with pine cones, birch branches, ribbons and buttons.
"Angels and a snowflake." Izmailova Maria Anatolyevna. Christmas tree decorations are crocheted from white threads No. 10. Different combinations of double crochets and rows of chain stitches were used. The angels were knitted starting from the body, a halo was tied to it, and the wings were knitted and sewn separately.
"Toys made from ball plasticine." Prytkov Alexey. Polystyrene foam, ball plasticine, modeling compound, wire, thread.
“Christmas tree made of cotton pads.” Polyakovs Gleb and Georgy.
Cotton pads are folded in half twice and secured with a stapler. We make a cone from a landscape sheet. Using a hot-melt gun, we glue cotton pads in tiers in a circle, starting from the bottom. We glue decorations made of beads and stars onto the resulting Christmas tree. Decorate with tinsel. We glue the ribbon, and our Christmas tree toy is ready.
"Christmas ball". Zaitseva Victoria. The ball is made of: a foam ball, a satin ribbon and a small crystal.
“Snowman light bulb.” Ulyana Novikova. Light bulb, gouache, glitter, woolen threads.
"Fantasy". Apolozova Ekaterina. Cardboard, glue, thread, shiny tape.
“Santa Claus light bulb.” Alina Sysoeva. Materials used: light bulb, gouache, tinsel (blue).
"New Year's watch." Krestov Yulia and Alexandra. The New Year's clock is made from a plastic bottle of liquid soap, on one side there is a window cut out into which a double-sided picture was inserted, on one side there is a New Year's drawing, on the other - a clock. Everything is decorated with tinsel and sparkles.
"New Year's ball-clock." Krestov Yulia and Alexandra. The ball is made from a plastic bottle, thin rings were cut from it, covered with ribbons, then connected to each other using a glue gun into a ball. Then a double-sided picture was inserted into the ball, with a New Year's deer on one side and a clock on the other. Decorated with tinsel and sequins. Everything was done together with the children, they drew a picture and glued decorations.
"Christmas decorations". Fominskaya Polina. Christmas tree decorations for boys are made of felt, decorated with buttons and designs with acrylic paints.
"Christmas ball". Torosyan Vazgen. The basis of the craft is a foam ball. Small balls of woolen threads are glued onto it. Tape loop.
"New Year's circle." Kerimov Bogdan. Made of cardboard, pasta, spruce, pine cones, gift ribbon, beads are glued on.
“Keychain toys for the Christmas tree.” Kislyuk Daria. The work is made of rubber bands of different colors. Type of weaving - crochet.
House made of paper vine - master class
"Christmas tree made of pasta." Kislyuk Daria. The work is made of a cardboard cone, tinsel, pasta, painted with paints, and decorated with tinsel.
"Cockerel." Kislyuk Daria. The cockerel is crocheted from soft baby yarn. Type of knitting - amigurumi toys.
"Gingerbread." Niatbakieva Vitalina. The work was done using the amigurumi method.
"A gift for a dog." Kallaeva Anna. A dog bone made of cotton wool. Foil, cotton wool, PVA glue, paper clip, tape.
"New Year's ball". Ivanova Olesya. The New Year's ball is made using the papier-mâché technique based on a balloon, decorated using the decoupage technique, three-dimensional contour drawing.
"Christmas tree." Vetchinkina Irina, 9 years old. Coffee Christmas tree toy is made of cotton fabric, covered with aromatic soil (coffee, vanillin, cinnamon, PVA glue). Drawing with acrylic paints. Decoration with tinsel and bells.
“DIY Christmas tree decorations.” Markel Daria. Materials:
- PVA glue,
- balloon,
- "Iris" threads
- needle,
- disposable cup,
- ribbons, cones, Christmas tree legs, cotton wool,
- hot gun,
- new Year decoration.
Pour glue into the glass, then take a needle and thread and pierce the glass through just above the bottom. The glue should cover the thread. Inflate the balloon to the desired size and tie it. Then we wrap the ball with thread and glue in different directions. We leave the ball to dry for two days. When the threads are dry, we pierce the ball with a needle and take it out from the inside. You should get an openwork ball. We cut the required hole in this ball and decorate the edge of the cut with openwork ribbon. The top of the ball was decorated with pine cones and the legs of an artificial Christmas tree using a hot gun. And inside the ball was decorated with New Year's decorations.
“Volume Christmas tree toy.” Tsibina Arina. We took an old cardboard box, gouache, tinsel and began to “create”. First, we painted the box blue, drew a face - this turned out to be the basis of our Christmas tree decoration. Then we cut out ears and paws from cardboard and painted them the same blue color. Then we glued the ears and paws to the base. And now our Krosh is ready. We decorated it with tinsel and tied a ribbon so that we could hang it on the tree.
"New Year's ball for my sister." Strutskaya Valentina. 1. New Year's ball from the Fix-Price store. 2. Hot glue or “moment”. 3. Photo of your beloved sister. 4. Glitter.
"Snowman". Dmitrachkova Valeria Valerievna. Snowman made from plastic cups.
"Herringbone." Polina Revizorova. I sewed a Christmas tree from scraps. First you need to draw a Christmas tree on paper. Then cut it out and place it on the fabric, sewing the edges. Sew a bead onto each branch.
Christmas tree toy “Symbol of 2018” Author: Ksenia Ivanova, 12 years old.
"New Year's ball "Kusudama". Zhidkikh Valeria. After I made several of these balls, we gave one to a kindergarten, now we are delighted to make more multi-colored balls to decorate our New Year tree at home, and to give such balls to our loved ones for the New Year.
A toy for a street Christmas tree made from CDs and cocktail straws. Maltster Anna.
"Santa Claus, Snow Maiden and Christmas tree." Izmailova Veronika Sergeevna (7 years old). Beading: Santa Claus, Snow Maiden and Christmas tree are made of large beads and wire. “Goldfish are wish-fulfillers.” Beading: fish are made from large beads and wire. Each fish is intended as a gift for a mother and two grandmothers.
"Teddy Bear." Mishchenko Diana. Made from: a honey jar, nail polish, glitter and ribbon.
Christmas tree decorations made from salt dough. Denisova E.V.
New Year's decoration cone with a bow. Author: Malyshev Artyom, 9 years old, Serpukhov-15. To make a Christmas tree decoration we will need: a ribbon, a needle and thread, a shiny rope typical for the New Year's holiday, a pine cone (which can be covered with a white touch and varnish), snowflakes for decorating the bow.
The craft was made by Annenko Pelageya (9 years old), a 3B grade student at school No. 390, Moscow. Her mom and dad helped her. To create this craft, we saved up paper drink cups. Next, we came up with a composition and assembled our “Christmas tree without needles” using a glue gun. The result was a New Year's craft. Looking at it, everyone can understand that seemingly unnecessary things can be made into an interesting craft! Protect the environment! Happy New Year!
"Window decoration for the New Year." Eretskaya Tatyana Valerievna. Paper templates.
Natalya Yuryevna Lukinova. Teacher at MBDOU No. 116, Ryazan. The craft is made from clothespins and painted in the golden color of the coming year of the dog.
New Year's owl:
New Year's paper decorations
Paper is the most affordable material for making New Year's decorations. There are a huge number of options for toys made from various types of paper using simple and complex techniques. One of the most popular paper toys, which has an original look and a simple manufacturing method, is a lantern made of colored paper.
To create such a flashlight you will need the most accessible materials and tools:
- a sheet of colored paper of the required shade;
- ruler;
- pencil;
- scissors;
- PVA glue or pencil;
- thin lace.
Flashlight manufacturing process:
- Using a ruler and a simple pencil, you need to draw a rectangle with sides of 12 and 18 cm on a sheet of colored paper, then cut it out.
- The rectangle needs to be folded in half horizontally: it should turn into a strip. At equal intervals, draw stripes with a pencil, leaving 5 mm to the edge.
- Next, you need to use scissors to make cuts along the strips, after which the rectangle should be unfolded.
- From paper of the same or a different color, you need to cut out a smaller rectangle - with sides of 10 and 18 cm.
- The new rectangle needs to be rolled into a tube and the edges secured with glue.
- Having treated the edges of 1 part of the flashlight with glue, you need to glue it to a rectangle rolled into a tube.
- At the end, you need to cut out a thin strip of paper and secure it with glue on the inside of the flashlight to make a handle. A cord should be tied to the handle, with which the flashlight can be hung on the Christmas tree.
It is no less easy to make a snowman and a ball from strips of colored paper of any width.
To make paper toys you will need:
- sheets of colored paper in the required shades;
- glue stick;
- ruler;
- a simple pencil;
- thin cord for a loop.
A snowman is created in the following sequence of actions:
- From a sheet of blue colored paper you need to cut 3 strips: 2 identical and 1 2-4 cm longer.
- The longest strip should be rolled into a circle and the ends should be secured with glue.
- To the resulting circle you need to glue a small straight strip and the same strip folded into a smaller circle.
- The straight strip between the 2 circles is the snowman’s arms, which need to be tucked in, giving them any shape.
- Next, you should make a hat from a strip of brown colored paper by simply bending it in several places and fastening it horizontally with a small strip.
- You can make a scarf from a paper strip of green or any other color by wrapping it around the place where the 2 parts of the snowman are held together and fastening it with a small strip of the same color.
- To make a snowman's face, you need to cut a strip, the length of which should be slightly larger than its diameter. This strip should be glued to 2 opposite walls of the circle, and the eyes and triangular nose should be attached to it.
- You need to tie a thin cord to the snowman's hat, with which the toy will cling to the Christmas tree.
A ball of paper strips can be created even easier and faster:
- It is necessary to cut 4 strips from colored paper of different shades, differing in length.
- Each strip should be twisted into a circle and the edges glued together.
- The circles must be glued together at the seam, placing one in one.
- For additional fixation, you need to wrap the gluing area with a paper strip coated with glue. First you need to thread the cord for the loop between the strip and the ball.
New Year's toy made of cotton wool
Christmas tree decorations made of cotton wool are delicate and fluffy products of various shapes that will help make the Christmas tree even more cozy and elegant. Making them yourself is not as difficult as it might seem at first. In addition to cotton wool, in the process of creating figurines, craftsmen use such improvised materials as foil, napkins, salt dough and others.
To make a simple New Year's decoration from cotton wool in the shape of an apple you will need:
- cotton wool;
- 80 cm foil;
- awl;
- wet wipes;
- glue moment;
- PVA glue;
- a small piece of dry branch;
- medium volume brush;
- watercolor paints;
- loop;
- scissors;
- glass of water.
How to make an apple from cotton wool:
- A piece of food foil of the specified size must be crumpled into a dense lump, shaped like an apple.
- The surface of the resulting figure should be carefully smoothed to remove any unevenness, after which you need to pierce the middle of the ball with an awl.
- Using the handle of the brush, you need to form a fairly wide and deep hole in the hole.
- The wet napkin must be cut into 2 squares, and a foil ball must be placed in the center of one of them. Having turned up the edges, use an awl to stick them into the hole.
- The hole again needs to be formed with the handle of a brush, after which it should be filled with super glue and a piece of a dry branch inserted.
- A piece of cotton wool must be flattened into a rectangle the size of a foil ball. Then you need to apply a thick layer of PVA glue to the cotton wool and apple.
- An apple should be placed in the middle of a piece of cotton wool. You need to wrap the ball with cotton, gluing it to it and smoothing out the unevenness with your fingers. It is also necessary to coat the cotton wool with glue on top so that the figure holds its shape better.
- After gluing the cotton wool, you should firmly compact the surface of the cotton wool with your fingers.
- Now you need to moisten the brush with water and paints of the desired colors and paint the apple.
- At the end, a leaf and a loop are made. To make a leaf, you should cut a strip with a side of 1.5 cm from the remaining square of the wet napkin. It must be tightly tied to a branch of the fruit and cut into the shape of a leaf.
- Both parts of the napkin need to be glued together, not forgetting to insert a loop between them, after which the leaf turns green.
Using the same principle, you can create Christmas tree decorations of various shapes.
Submit your work
In order not to forget the page address and share with friends, add it to your social network:
More interesting:
See also:
Volumetric applique “Green Beauty”
Children's craft - 3D paper applique "Green Beauty". Yulia Ilyina made this Christmas tree...
Kettle warmer “Santa Claus”
In order for the tea to stay hot longer in the teapot, we crochet a hot water bottle in the shape of Santa Claus, ...
Snow sculptures of kindergarten No. 267, 2020
Our readers probably remember that every winter teachers at MBDOU No. 267 in Izhevsk arm themselves with shovels...
Christmas decorations using the kanzashi technique - 3 master classes and photos
If you have a hobby, you are interested in creative modeling of all kinds of jewelry, then you must...
New Year's garland "Fir trees"
New Year's garland "Christmas trees" Master class for the competition "New Year's piggy bank of ideas." Author: Timofeeva U...
Cockerel made of ribbons. Master Class
Master class in the “Golden Hands” category of our New Year’s competition “Pantry of Winter Fantasies”, how...
Disc stand - snowflake
For most of us, New Year is a special holiday, so we look forward to it with special impatience. And h...
Teddy bear with New Year's gifts
As you remember, we have master classes on knitting bear cubs (here), and now there will also be a knitting...
Potholder "Mouse"
We sew a pot holder in the shape of a mouse with our own hands. The holidays are approaching every day - it’s time to get ready...
New voluminous paper snowflakes in 2020
New voluminous paper snowflakes What is it difficult to imagine the New Year without? That's right, without a Christmas tree and so on...
New Year's hat (crocheted)
Let's continue the theme of Santa Claus :). Another New Year's master class by Yulia Brazevich, how to crochet...
Forest Snowman
THE FOREST SNOWMAN The author of the work for our competition is Natalya Ivanovna Kolmogorova, additional teacher…
Tags: DIY Christmas tree decorations, New Year's crafts
Discussion: 2 comments
- Peskova Olga Vladimirovna:
December 12, 2020 at 06:52 pmGood afternoon. How can I get a diploma for a craft? I found a photo of the craft on your page.
Answer
Larisa:
December 13, 2020 at 0:36 am
Hello! Diplomas will be sent by email to the authors of works who will take 1st, 2nd and 3rd places in the competition.
PS For the rest of the participants, diplomas will be issued upon request, write here in the comments.
Answer
Snowman made from a sock
A cute sock snowman will decorate your home for the holidays and help create a New Year's mood. In the process of creating a toy, it is necessary to take into account that the Christmas tree snowman should be small in size.
You can make it from a baby sock, and preferably fill it not with rice, but with padding polyester or holofiber. Snowmen made from large socks will look great under the Christmas tree and on the table; such toys are filled with rice, making them more stable.
Materials and tools needed to make a snowman:
- white cotton sock;
- colored terry sock;
- filler;
- scissors;
- 2-3 buttons;
- white yarn;
- a piece of black yarn for the mouth;
- beads for eyes and nose;
- strip of fabric for a scarf;
- hot glue;
- needle and white sewing thread.
Manufacturing process:
- From the white sock you need to cut off part of the foot to the heel.
- Rice should be poured into this part (or soft filler), leaving a little free space to the top.
- The top of the filled part needs to be sewn with large stitches, then pull the thread and tie a knot.
- Use a piece of white yarn to tie the sock around the middle, leaving more filling at the bottom of the snowman.
- The top of the terry sock should be cut off and set aside separately. Then the heel and toe need to be cut off from the remaining part of the foot.
- The lower part of the terry sock should be sewn with hidden stitches along the edge on both sides so that the terry does not unravel - you get a jacket for a toy.
- The top of the sock must be turned inside out and the edge opposite the elastic must be sewn using regular stitches. Then the workpiece should be turned out - you get a square hat.
- From white yarn you need to make 2 small pom-poms, which you need to decorate the hat with, sewing them to the corners.
- The blouse and hat should be put on the snowman, then buttons should be sewn to the clothes. The eyes, nose and mouth are glued to the figurine's face with hot glue.
- You can make a scarf from a strip of knitted fabric by cutting the ends of the strip on both sides. You should tie a scarf around the snowman's head, hiding the thread separating it from the body.
Decorating a Christmas tree with your own hands is a simple and very exciting creative process. From a large number of options for Christmas tree decorations, you can choose the most suitable one and create original decorations from materials that are at hand.
Article design: Natalie Podolskaya
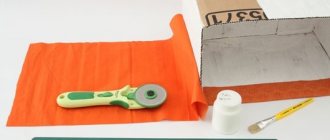
Master class: rustic toy on an embroidery hoop
Rustic toy on a hoop
This Christmas decoration requires a little more effort and time than others, but it's worth it. An almost original decoration will decorate your holiday!
Box with gifts
Materials and tools:
- wooden embroidery hoop
- paint or stain for walnut wood
- sponge or brushes
- glue gun
- artificial spruce or pine needles
- pine or fir cones, the smallest you can find
- beads
- fabric with imitation cross stitch or embroidery canvas and thread, if you are proficient in this craft
- pen, scissors
- jute twine or any other tape
Christmas tree decoration
Step-by-step instruction:
Rustic toy is ready
- Paint the hoop in walnut color using a sponge or brush and let dry completely
- Trace the fabric along the contour of the hoop, make a small allowance
- Glue the fabric to the back of the hoop, trim off the excess. If desired, you can treat the edge with a lighter to prevent it from fraying.
- Now it's time for decoration. Glue spruce or pine branches, cones, and beads to the lower edge of the hoop. Everything is pressed well to secure tightly in the desired position.
- Make a bow out of twine and glue it to the top.
- Make a loop for hanging the ornament on a branch
The rustic toy for the Christmas tree is ready!
A detailed description of the master class is in the video below.