Seed preparation
Let's start by preparing our seeds for sowing. Tomato seeds are usually small. They remain similar for up to 10 years. First of all, you need to start disinfecting the seeds. Prepare the following solution: 0.3-0.5% solution of potassium permanganate (3-5 g per liter of water). And put the seeds in a gauze cloth, wrap the gauze, and put it in the solution for 0.5 hours. This is how the seeds are disinfected and all surface infection is killed.
After this, we wash the seeds in running water, and then we can do as we please. You can germinate seeds in any growth stimulants; for this we use either aloe juice or wood ash. After that washing under running water, we can keep the seeds in wood ash for half a day. Leave until the seeds germinate, and then proceed to sowing.
We plant in containers with a depth of at least 4-5 cm, we can sow tomatoes directly in the pot. We prepare the soil for preparing and growing seedlings very carefully. It is better to put 100-120 grams per bucket of soil. dolomite flour, 50 grams of any complex fertilizer or 1 tbsp. superphosphate and 1 tbsp. potassium nitrate or potassium sulfate. Mix everything thoroughly, pour water on it so that the soil is always moist. And after that we start sowing.
Rating of the best greenhouses
| Photo | Name | Rating | Price | |||
| The best arched greenhouses | ||||||
| #1 | Volya Dacha Optima | ⭐ 99 / 100 | More details | |||
| #2 | Bastion Premium | ⭐ 98 / 100 | More details | |||
| #3 | Kremlin Suite | ⭐ 97 / 100 | More details | |||
| #4 | Will Yota | ⭐ 96 / 100 | More details | |||
| #5 | Uralochka | ⭐ 95 / 100 | More details | |||
| The best cone greenhouses | ||||||
| #1 | Hacienda-4 Standard | ⭐ 99 / 100 | More details | |||
| #2 | Orange Droplet | ⭐ 98 / 100 | More details | |||
| #3 | Innovator Droplet | ⭐ 97 / 100 1 — vote | More details | |||
| #4 | Dachna Strelka | ⭐ 96 / 100 | More details | |||
| #5 | Kremlin Arrow | ⭐ 95 / 100 | More details | |||
Which greenhouse would you choose or recommend?
Take the survey
Sowing
We take a container with drainage holes, put in the prepared soil, water it with hot water and a solution of potassium permanganate, and then make shallow grooves of 5 mm. depth at a distance of 3-4 cm, from each other. In this container we made 3 grooves, and after that we laid out the seeds. We place the seeds at a distance of 0.5 cm, without deepening them and not too close to the surface. Half a centimeter is the optimal depth for sowing tomato seeds for seedlings.
After sowing, the seeds can be covered with moist soil, but it is better to do this: add sand to the soil and cover it evenly.
Drop-shaped greenhouse
For the northern regions, a teardrop-shaped greenhouse would be an ideal option. Due to the design features (tear-drop shape of the vault), even during heavy snowfalls, the snow does not linger on the roof, but “slides” down. In turn, the condensation that accumulates inside the building does not drip onto the plants, but rolls down the walls, falling directly into the soil.
Typically, to build this greenhouse model, galvanized pipes are used (the arcs consist of two identical parts), the frame is sheathed with polycarbonate, and a door and a window for ventilation are placed at the ends.
The original appearance of the building is also important - a teardrop-shaped greenhouse will make your garden stand out from others: it looks both elegant and simple. In fact, a teardrop-shaped greenhouse is a “mix” of a gable and an arched greenhouse, their improved version.
The disadvantage of a teardrop-shaped greenhouse is its difficulty in construction. It is better to purchase such a model in a specialized store than to try to build it from scrap materials.
Microgreenhouse
The seeds are sown and after sowing the container must be placed in a warm place at a temperature of 20-25 degrees. You can make a small microgreenhouse: take a plastic bag, place a container with seedlings in it, making sure there is air in the bag. We will get such an airy micro-greenhouse, which we will place in a warm place.
After 3-4 days, if the seeds are good and the germination energy is also good, we will have seedlings. The moment the loop appears on the sprouts is the most important in growing the first seedlings. We must remove the container from the bag and place it in the brightest place, so that the loops stretch in the light, grow faster, and the temperature must be lowered, at night to 14-15 degrees, during the day to keep it at 18 degrees. After 2-3 weeks we will have good grown plants, after which we will start picking.
When we look at a plant, we do not notice and do not know that it is at this moment, when the plant has formed 2-3 true leaves, that the tubercle of the first flower raceme is formed in the growth cone itself. A very important moment comes when we are in a hurry with sowing and sow in February or early March, then it is at this moment that the plant finds itself in unfavorable conditions, this is very insufficient illumination. And this flower tubercle will not be initiated precisely because of these conditions, but the growth of leaves will be initiated. The seedlings are elongated.
Video:
How to choose a Greenhouse. Recommendations from professionals. Choosing the right greenhouse is the key to a good harvest. In order for a building to last a long time, it is necessary to take into account not only the type of soil and climatic factors, but also the technical parameters of the structure. About the features of polycarbonate greenhouses, and how to choose the best greenhouse - FORUMHOUSE story.
Vegetable garden with greenhouse and apple orchard. With my own hands. A vegetable garden that was not planned. An apple orchard with many varieties and only four trees. A greenhouse for giant tomatoes grown from home-grown seeds. Read about all this in our story.
Greenhouse with electric drive. With my own hands. In his greenhouse, our forum member Roman Kabanov organized auto-ventilation - the windows open at a certain time. But instead of the usual technology using hydraulics, Roman used a different way to implement a similar idea.
Chicken coop-greenhouse from a sea container. With my own hands. The large Bocharov family is engaged in poultry farming and raises chickens and quails. They have several chicken coops on their farm, one of which is a greenhouse chicken coop with a run. It is made from budget materials with your own hands.
DIY smart greenhouse. How to automate vegetable growing. A greenhouse that itself regulates humidity and temperature, lighting and even waters the plants, isn’t this the dream of every gardener? Our forum member Sergei will tell you how to make it so that you only need to come to the greenhouse to harvest the crops!
A barn, a greenhouse and a firewood shed - simply and inexpensively, with your own hands. Our forum member Andrei Mikhalutin made every building wisely. The first experience to test my own strength was a barn, but after that also a greenhouse and a woodshed.
About sowing dates
When should you sow seedlings? A lot of literature has been written on how long seedlings should be kept. Some people think it’s 50, others 60 days from the beginning. But there is no need to rush at all. Seedlings that are obtained later still catch up with the previously planted seedlings, and they turn out good and strong.
Good seedlings are grown in the right light and temperature, they are compact, the leaves are closely spaced, and they have a thick stem. Containers for growing seedlings can be different, plastic bags or pots, other devices, but a prerequisite is that the volume must be at least 0.5 liters. and not very high capacity.
Glass greenhouses
Glass is a durable and strong material for covering greenhouses. Its distinctive properties are high light transmittance and excellent thermal insulation.
However, glass greenhouses also have a drawback: the air inside can become very hot, which can have a very bad effect on the health of the plants. Another disadvantage is the labor intensity of glazing. A large mass of glass requires a reliable, and therefore expensive, frame. The glass must have a thickness of at least 4 mm. The larger the frame sizes, the better the greenhouse lighting will be. But this increases heating costs. And replacing large broken glass will also be more expensive.
The disadvantages of glass greenhouses also include the fragility of the material itself, which tends to break not only due to physical influences, but also due to temperature changes (a large difference in temperature inside and outside the greenhouse in severe frost).
Picking
Tomatoes take root well, so when picking, be sure to deepen them, then the plants’ root system develops well and the stem becomes thick. In the center of the picking container you need to make a depression, place the seedling vertically, deepen it down to the cotyledon leaves, pressing the soil tightly so that there is immediate contact with the root system. The soil in the container does not reach the edges, keep about 3 cm. This was done specifically so that when growing seedlings, bedding could be made.
And then comes caring for the seedlings. If the weather is cloudy outside, then it is very good to lower the temperature to 14-15 degrees, so that the seedlings do not stretch out.
Photos of polycarbonate greenhouses
leave a comment
Click to cancel reply.
You must log in to post a comment.
Feeding seedlings
If we have good soil, then fertilizing can be done only as needed. If we see that the plant is very pale, then this will tell us about a lack of nitrogen. You can use nitrogen fertilizers (urea, ammonium nitrate), but it is better to use a small concentration of fertilizer when watering, water not just with water, but with a small content of nutrients, based on a teaspoon of complex mineral fertilizer per 1 liter of water. Tomatoes are very responsive to phosphorus and potassium, so it is necessary to periodically extract superphosphate and fertilize with only phosphorus.
Heating of greenhouses
In harsh times, plants need to be provided with warmth. There are simple heating methods:
- Solar - based on the greenhouse effect created by the sun's rays. Occurs in summer with active sun.
- Biological - in the racks, a third of the container is manure or compost. The decomposition process provides heat to the roots and serves as fertilizer.
The technical heating option has several subtypes:
- Water - lay a double row of pipes under the beds and connect them to the boiler. If it is outside the room, then more uniform heating is provided. Heated with coal and wood. Sometimes a heat generator is used.
- Gas - burners or heaters. For a small area, gas cylinders are sufficient, otherwise you need to connect them to the heating system of the house. Fans are installed to distribute heat evenly.
- Stove - a chimney made of horizontal pipes (metal, brickwork). The boiler is connected to a water tank - a water furnace. For a large area you need two boilers. The pipe is raised 1.5 m above the roof, and the passage is well insulated.
- Electric – heating cable with a regulator to create the optimal temperature. Aluminum radiators or electric convectors are suitable (they do not dry the air, but force it to circulate). They are installed on brackets and the required indicators are set. You can use timers - they change the temperature depending on the time of day. The power of the devices and their number depends on the size of the greenhouse. They use infrared emitters, they not only heat, but also prevent plant diseases and create an optimal microclimate.
Pipes and heating devices are placed around the perimeter of the greenhouse.
Be sure to provide thermal insulation of the bottom. Additionally install:
- thermometers - determine the temperature of air and soil;
- thermostat – controls heating depending on readings.
Read the article about the best greenhouse heating projects.
Arrangement of seedlings
We take the seedlings and arrange them so that all the plants get the light and the leaves of the seedlings do not intertwine or even touch. This is necessary to provide light and warmth. This will be the best care.
The plant is growing and needs to be planted in time in the main soil - greenhouse soil from the container, because the stems can stretch out enough and even 2-3 fruits will form on one cluster, and the plant itself will spend entirely on the formation of these particular fruits. We constantly remove small stepsons. The upper stepson can be left; it forms a second stem located next to the flower stem.
When transporting to the dacha, so that the plants do not break and feel comfortable, try not to water the seedlings a few days before transportation; it is better to dry them, the stems will not be brittle and the plant will better tolerate a stressful situation.
From the middle or end of May, you can safely begin planting tomato seedlings in a film greenhouse or greenhouse. If you have a warm greenhouse, heated, and if you have a warm heated bed, using biofuel, based on plant residues, then you can start planting tomatoes in early May. It all depends on the specific greenhouse and weather conditions.
A prerequisite for good production and good fruiting is that soil and bed preparation must be carried out immediately before planting tomato seedlings. We dig up the ridge, loosen it, level it with a rake, then you need to add mineral fertilizers so that fruiting is abundant and good.
Which greenhouse to choose
Any form of polycarbonate greenhouses has both its disadvantages and advantages. Before purchasing a structure, it is necessary to conduct a thorough analysis of the location of the structure, the purposes for which it is intended (growing early seedlings, obtaining commercial vegetables or obtaining products in the “off-season” time of year), and weigh your own financial capabilities.
From a space point of view , the optimal design is considered to be an inclined type of structure. In such a structure, not only does the entire surface of the protected ground make maximum use, but it is also possible to install additional shelves and racks for additional use of space. Installing a vertical “house” type greenhouse is considered financially more “friendly”. An arched greenhouse is aesthetically attractive and provides maximum access to sunlight to the ground.
Greenhouse layout
The optimal width of the bed for planting tomatoes should be 80 cm, and 40 cm between the beds. And then we proceed to applying fertilizers.
- First of all: (taking into account that the soil is mostly acidic) add dolomite flour at the rate of 100-150 g. per square meter. We pour armfuls out of the bucket; you should have rubber gloves on your hands in any case. This is an additional feeding not only with calcium, but also with magnesium.
- Secondly: The next fertilizer that a tomato needs is superphosphate. They add 50-80 grams, sometimes up to 100 grams. per square meter. Superphosphate is a sparingly soluble fertilizer, but you should not be afraid that there will be a root burn of the system, because then we will mix everything and level it out. And even if the granules are visible, do not be afraid, the plant will not get burned.
- In the 3rd turn: Then we apply complex fertilizer Kemira Universal or Nitrofoska 50 g to the soil. per square meter. if you have a little fertilizer available, you can then apply it directly into the hole.
And mix the bed thoroughly. The soil must be pre-moistened so that fertilizers dissolve well, and tomatoes love a sufficient amount of moisture, especially when planting. The soil is wet not only in the bed itself, but even between the beds, the distance, more precisely 40 cm wide, in the place where you walk, should be wet. All soil in the greenhouse must be moistened.
Exterior of the greenhouse
Typically, a greenhouse is designed according to the botanical species of the plant. Factors such as the light transmission capacity of the covering material and maintaining the required temperature inside the room are taken into account.
The shape of the greenhouse is:
- with one slope. This could be a winter garden or a greenhouse. A passage is provided along the entire length, usually adjacent to the southern wall of the house;
- with two slopes. This is the most common form throughout Russia. Offers a variety of interior design options;
- in the form of a drop. A fairly stable design, but difficult to install;
- domed. It has a very impressive appearance with a modest consumption of materials;
- polygonal shape. They look great in a garden plot and can easily withstand strong winds.
Read here - Do-it-yourself chicken coop: 95 photos of the best settings and recommendations for choosing options for arranging a chicken coop
An important point is the marking of the ridge
The feeding area of tomato plants depends on the planting scheme. And the feeding area depends on the variety, low-growing standard varieties can be planted more densely, at the rate of 4-5 plants per square meter, and tall varieties and hybrids no more than 3 plants (like cucumbers) per 1 square meter.
Let's make holes: since seedlings can also be different, they can be well grown, or they can be overgrown, then first we will mark the holes for properly grown seedlings. Let's take a medium-sized tomato variety called Garant. We make holes at a distance of 25-30 cm, dig a shovel full of bayonets and you can add wood ash into the holes, take one armful per hole, tomatoes are very fond of especially the pre-sowing application of wood ash.
In addition, tomatoes also love excess good moisture when planting. We will deliver Kemira Universal. And we’ll water it very generously, just fill the holes with water. If the seedlings are weakened, pale yellow, etc., add ash fertilizer and complex fertilizer and lightly mix everything. And after that we pour water with potassium permanganate from a watering can, an intensely colored one, it’s very good if the water is hot. The soil is also disinfected and the plant immediately falls into warm soil, it takes root very well.
- Soil cultivation: everything you need to know before sowing and after harvesting (91 photos)
- Downy mildew of cucumbers: methods for identifying the disease at an early stage and processing vegetables (79 photos)
- Cladosporiosis of tomatoes - what is it and how to fight it in greenhouses? 69 photo ideas
You don’t even have to wait for all the moisture to be absorbed, we’ve already watered it beforehand, and now we’ve watered it well with a solution of potassium permanganate, we lower the seedlings into this hole, bury it, and cover it with soil. It’s not without reason that they say that tomatoes love when their feet are damp, but their heads are always dry. This rule must always be remembered, especially when watering tomatoes, so that water does not fall on the leaves when watering.
We bury the seedlings in the hole until the first true leaves are planted and compact the soil.
If you leave for a long time after planting, to avoid evaporation, you can not water after planting, but mulch with either peat or compost. It is enough to add 1 cm of compost to prevent evaporation.
But tall varieties of tomato, hybrid tomato, of course, can be planted less frequently, at the rate of 3 plants per 1 square meter. We make holes for them of the same depth, i.e. on the bayonet of a shovel, but the distances between plants are somewhat larger, essentially the same as when planting a cucumber.
We do all the other techniques and fertilizers and watering and everything else in exactly the same way. This is Kemero and wood ash. We plant elongated and overgrown plants in holes, first remove all the leaves (one day, two days before planting) and make not a hole, but a small ditch, pour ash and some kind of complex fertilizer, mix, pour water and potassium permanganate into the ditch and proceed for landing.
We plant lying down, this technique is known to many, we don’t bury it very deeply, because the soil is cold deeper, into a ditch to a depth of about 10-15 cm from the surface and fill it up to the 1st leaf that we left below. And now the seedlings are planted, they take root, and in a week they will definitely need to be tied up.
- Treatment of tomatoes (51 photos): fungus, viruses, cladosporiosis, fusarium, macrosporiosis and other diseases
- Ants in a greenhouse (65 photos): how to remove them quickly and safely? Tips, instructions and recommendations
- Treatment of cucumbers: best advice from professional farmers. Effective technique (52 photos)
Standard varieties Nevsky and Baltiysky, which form very compact plants, are planted in three rows in a bed 80cm wide. We mark the plants 15-20 cm apart.
We prepare the holes as always. When planting tall and medium-sized varieties of tomatoes, the soil is also generously shed with water or a solution of potassium permanganate. You should try to grow low-growing standard varieties in one mass, and tall varieties in another mass, so as not to interfere with others.
If it is not possible to plant in different beds, then you can do this: plant standard varieties on one edge of the massif ridge, tall-growing varieties in another array, and medium-growing varieties in the third array. It is better, of course, to do this in different beds in the same greenhouse.
If you do not have enough seedlings, then you can plant determinate varieties, such as Bely Naliv, Tambovsky Urogozny, Selskaya Rannyaya, and many varieties, less frequently, but then the formation must be carried out in three stems. This means stepsoning. We leave stepchildren who have grown up and have strength.
Scheme for planting tomato seedlings:
- – Standard varieties of tomatoes: 6-8 plants per 1 sq.m.
- – Medium-sized varieties: 4-6 plants per 1 sq.m.
- – Tall varieties: 3-4 plants per 1 sq.m.
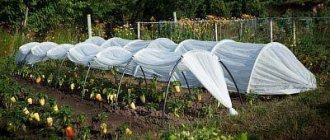
How to protect tomato plants from the first frost? Place arcs over the bushes and lay lutrasil (non-woven synthetic material made of polypropyl fiber) for insulation and protection from the May cold, and during the day when it is warm it is advisable to remove the lutrasil to avoid overheating.
Let us remind you that it is necessary to maintain a certain temperature, lighting, caring for plants, treating with fertilizers, if necessary, fertilizing, carrying out pinching correctly, not allowing the plants to freeze or overheat, observing the watering regime, etc.
Growing tomatoes, like other crops, in greenhouses with good care and constant attention brings great benefits, it is a rich harvest, the opportunity to learn all the pros and cons in specific conditions, enjoy your results, and have your work recognized by your loved ones and friends. Good results and excellent harvest!
- How to spray tomatoes to get maximum efficiency when harvesting? 71 recipe photos
- Aphids on cucumbers (68 photos): monitoring plant health in greenhouse conditions. Instructions from gardeners!
- Late blight on tomatoes: description of methods for protecting and increasing the resistance of tomatoes (102 photos)
Types of greenhouses and step-by-step instructions for their manufacture
The best projects are automatic types of buildings based on Arduino. They have an actuator (linear drive) to automatically open the door and ventilate. Of course, it could also be a simple thermal drive.
But in general, such greenhouses are equipped with everything necessary for autonomous operation. It will be very difficult to do this yourself. There are other ready-made greenhouse projects.
We offer you several homemade options with step-by-step instructions.
Arched (semicircular) greenhouse
You need to act step by step.
Drawings of arched greenhouses
Draw a drawing. Here are examples of drawings of an arched greenhouse:
Foundation
Beginning of construction - erection of the foundation. For this use:
- wooden beams - placed at a distance of 120-140cm, for a frame made of polypropylene pipes;
- tape - done if the frame is made of heavy materials.
The reinforcement frame needs supports so as not to touch the bottom of the trench
Frame
Next, build an arch from:
- masonry mesh, which is attached to the posts at the bottom and tied at the top;
- plastic pipes - welded or connected with couplings, adapters;
- steel professional pipe 2x2 cm - leave a distance of 100 cm, the arcs are fastened by welding;
- fiberglass reinforcement (diameter 8-12 mm) – easy to install.
Coating
The selected material is attached to the erected frame:
- film or spunboard - must be secured on top with twine or rope;
- polycarbonate - the cut sheet is secured using special self-tapping screws with thermal washers.
additional information
Door:
- film - made with magnets (like a mosquito net);
- wooden frame;
- metal pipe - mounted on hinges.
Windows for ventilation:
- in the film - holes are cut, any location is possible;
- wooden frame - can be opposite the door, in the roof, side walls:
- in a metal frame - a welded frame from a corner, placed opposite the door or in the roof, or in the sides, depending on the design of the greenhouse.
All these options are wind-resistant and convenient for tying up plants. It is possible to make greenhouses of any size (mini for seedlings, small, large). Film ones are a cheap option; they are used in the industrial production of vegetables and in dacha farming (it’s good to grow tomatoes and cucumbers).
The most expensive and labor-intensive option is a metal arch frame and polycarbonate, but such a greenhouse will last longer and looks more aesthetically pleasing.
Examples of creating various arched greenhouses
House-shaped greenhouse
Another very popular roof shape is gable.
Drawings of a greenhouse-house
Foundation
The need for a foundation depends on the weight of the frame. If it is light, then they do not make a capital base, but use:
- Steel corners 4x4 cm, driven into the ground - holes are first made to attach the frame posts, painted or filled with bitumen.
- Wooden blocks - the structure usually has a size of 3x6 m.
Frame
- Beam - fasten the bottom frame, sides, roof. The corners are given rigidity with additional segments. The sharp parts are rounded and wrapped in soft material.
- Galvanized profile - assembled from ribs and tied together.
- Plastic polypropylene pipe, connected with fittings and adapters.
- Profile made of plasterboard - does not require additional processing and is easy to bend.
Covering material
- Stretch film (like food film, but thicker) - wrap the frame in several layers, overlapping. They start with the gables, then the rest. Move from bottom to top to prevent rain from getting inside.
- Film or agrofibre - wrapped or glued.
- Polycarbonate - secured with special self-tapping screws with heat washers.
- Glass, as a rule, double-glazed windows are used for homemade greenhouses.
additional information
The door is on hinges in the side wall. The film is wrapped, covered with glazing bead or lath and cut through. The window is made similarly to the door. A heavy frame made of frames or metal will require a foundation. Usually they make a tape one.
Step-by-step instructions for making a greenhouse-house
- Old window frames (almost a free option) - their size determines the size of the greenhouse. Attached to frame or posts. The cracks are covered or clogged.
- The door is made using one of the frames or a balcony door is used. The windows will provide ventilation. It is better to stretch the film on the roof - the weight of the building is less. If you use frames for the roof, you need to strengthen the structure by placing supports.
- Metal frame - attached to bolts installed in the foundation before pouring. A frame is made from a channel or a double corner, racks (1.6-1.8 m) are welded to it and fastened together with segments. The roof is connected to the racks, and at the top - to the beam. A window is made in the roof or opposite the door.
The glass is inserted into frames formed by double corners. To improve thermal insulation, double-glazed windows are used.
A structure made of glass and metal is an expensive and labor-intensive option, but durable. You can build different types of greenhouses by combining the materials that are available.
Examples of creating greenhouse-houses
Dome greenhouse
It consists of triangles and hexagons. A foundation is required. This is a rather complex project - heavy assembly, high cost, labor-intensive calculations.
The advantage is strength + such a greenhouse transmits light well.
The frame is made of wood, profiles or pipes, covered with film, glass or polycarbonate is inserted.
Drawings of a domed greenhouse
They are built using the following technology:
- prepare triangles;
- fasten them with self-tapping screws, forming a dome;
- assembly starts from the bottom - you get the correct shape;
- the upper triangle is folding, provides ventilation;
- door - polygon or regular shape;
- the film is stretched after assembly, this provides an aesthetic appearance.
Examples of domed greenhouses
Greenhouse thermos
A thermos greenhouse (buried structure) will require a deep pit - about 200 cm. Its total height is 180 cm, width - 200-500 cm. A trench is dug along the edge of the bottom and walls are laid out. They provide a descent for installing stairs, pipes for air access, wall insulation, and waterproofing.