It is difficult to imagine a modern kitchen without ceramic tiles, but it is not always possible to find an option that would meet the requirements of the interior and completely suit the owners. Painting on ceramics is a fairly easy way to transform the appearance of your kitchen, making it more comfortable and homely. You can also transform the tiles using the decoupage technique, and more creative people can try making them themselves from clay or mosaic.
Features of volumetric tiles
This building material is made from reinforced concrete or ceramics. The coating of the material is opaque. Its main task is to convey volume through its own texture. Among the rich assortment of relief-type materials, you can choose tile, gypsum and wooden three-dimensional tiles.
According to its texture, 3D tiles can be decorated with the following patterns:
- honeycomb;
- convex hemispheres;
- wave-like overflows;
- plant pattern.
The range is increasing due to the variety of structure. 3D tiles come in glossy, rough and matte.
Despite the many advantages and original design, this material has a drawback. Moisture and dust accumulate on the rough surface, making it more difficult to clean than regular tiles. In addition, it should be taken into account that visually voluminous tiles conceal space.
Types of 3D tiles
There are a huge number of options for volumetric tiles today. The main emphasis when choosing should be on the original effect, as well as on the room for which you are looking for finishing material.
1. Single-color relief tiles. This type of volumetric tile is a real find for connoisseurs of minimalism. Despite the monochrome color scheme, “stylistic neutrality” does not look boring. This type of cladding material is suitable for the bathroom. In addition, it is appropriate in the design of the kitchen and any room in a modern style.
2. “Under a stone.” Current colors, repeating marble and stone structure, will fit perfectly into any design. 3D stone tiles look beautiful not only in an apartment, but also in a country house, cafe, restaurant.
3. “Under concrete.” Tiles, the texture and color of which resemble concrete, are gaining momentum in popularity. Relief tiles will be an excellent backdrop for hi-tech and loft style.
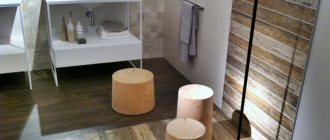
4. “Under the tree.” Such tiles in three-dimensional format look like real boards and bars. Such material attracts attention; you always want to touch it. Wood-look tiles can be used for zoning. It creates a cozy and warm atmosphere in the house. This solution is suitable for any room, the main thing is to competently develop a design project, providing for harmonious combinations of this material with others. For example, for a bathroom you can buy round tiles and highlight the accent area with a wavy pattern. Streamlined designs will help smooth out the harshness of the interior lines.
Step-by-step painting instructions
You will need:
- glass marker;
- paints for ceramics;
- thinner for ceramic paints;
- contour on glass and ceramics;
- epoxy primer;
- sandpaper;
- plain light ceramic tiles;
- art brushes;
- palette.
Ceramic paints will help you decorate your ceramic tiles.
Kitchen tiles can be successfully painted; for this you will need special paints for ceramics and a little free time. The process itself is quite interesting and exciting, but requires attention and a certain skill. Therefore, you first need to practice on some unnecessary surface and only after that you can start painting.
The first step is to purchase special paints and contours for ceramics. Before purchasing, carefully read the instructions; materials for painting can be baked or not intended for firing. In the first case, you will get a better quality moisture-proof and damage-resistant surface. When using paints and contours that do not need to be baked in the oven, the tile will need more delicate handling (it can be washed, but cannot be rubbed with a metal hedgehog).
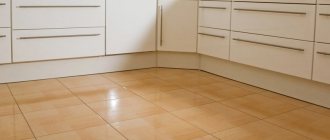
Ceramic tiles should be plain, always light colors, and smooth (without relief). First you need to sand it with sandpaper, the surface should become rough, this will ensure good adhesion of the paint. After this, you need to degrease the surface with an alcohol solution or detergent intended for cleaning the kitchen. Next, the tiles are primed with epoxy primer and left to dry (at least for a day). This completes the preparatory work.
Painting on ceramics
Contour on glass and ceramics is necessary when creating drawings in order to highlight the lines.
After the surface is prepared, it is necessary to apply the design. If you don’t know how to draw, then choose some simple geometric or abstract pattern that will easily fit into the kitchen interior. Making such a motif with your own hands is much easier than an intricate plot. Using a glass marker, draw a design onto the surface of the tile. There are special invisible markers on sale that disappear a few hours after application. Using such a marker, you don’t have to worry about the underpainting showing through the paint. But if this method seems too complicated for you, then use regular carbon paper.
Then take the outline and trace the drawing with lines. Hold the tube at an angle of 45º. Try to press evenly, then you will be able to evenly distribute the mass over the surface. Sometimes there are air pockets in the tube that form bubbles when squeezed out; you can get rid of them with a toothpick.
If you end up with a not entirely smooth path, then don’t be upset, leave it untouched until completely dry, then take a blade and trim off all the excess.
After applying the design, you need to give the paint 2-3 days to dry.
Work continues only after the contour has thoroughly dried (usually this takes a day).
You may be interested in: How to make inexpensive kitchen renovations?
Next, start drawing; use a palette to dilute the paints (easily replaced with a plastic lid). To make the color less bright, add white. Apply the paint in a thin layer, adding a special thinner if necessary. After the work is finished, let it dry thoroughly (this may take 2-3 days). If you used baked inks and outline, please read the included instructions and follow the instructions. The work is finished, the tiles can be used for their intended purpose! It will become the highlight of your kitchen interior; it’s quite easy to make a real designer piece with your own hands.
Tile design in different rooms
An unusual solution is panel tiles. It is combined with natural stone, tiles, ceramic or glass mosaics. 3D panel tiles can be used to decorate ceilings in certain areas. The color of the tiles can be any: cream, white, beige, light gray, with a metallic tint.
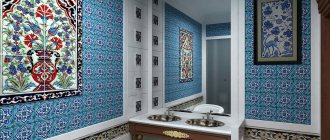
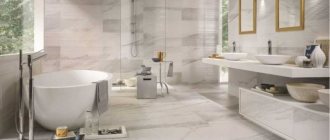
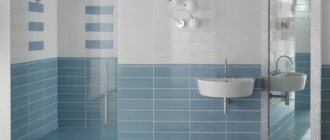
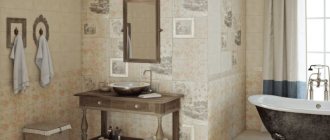
1. Bathroom. To decorate this room, designers often use materials in marine colors. Blue and turquoise 3D tiles diluted with lush greenery look especially attractive.
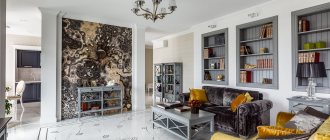
2. Living room. For this room, 3D tiles, mostly monochromatic, are best suited. The following patterns will look impressive: branches, foliage, geometry. On a plain background, the wavy texture attracts attention. An aesthetic solution is hexagons, rhombuses, circles that form a single canvas. Black and white 3D tiles fit perfectly into an interior designed in art deco and classic styles. The warm shade of wood fits harmoniously into country style, strict classics and country.
3. Bedroom. Designers advise using embossed opaque tiles for cladding. These can be bulges and roughness, wooden patterned surfaces or a white plaster wave.
4. Kitchen/dining room. The kitchen backsplash can be made from 3D tiles in the art deco style.
Making mosaic tiles for the kitchen
You will need:
- plastic tray or basin;
- cement mortar;
- stationery transparent tape;
- wire mesh;
- mosaic material (shells, smalt, broken glass and dishes).
Mosaic tiles are quite an interesting solution for the kitchen; making them yourself is not as difficult as it might seem at first glance. First you need to find a suitable template; a square or rectangular plastic tray is perfect for this purpose. If you are planning to make a round tile, then take a bucket or basin. For mosaics, you can use a variety of materials: broken bottle glass and dishes, seashells, pebbles, smalt, tile remains. When preparing material for mosaics, be extremely careful; first wrap glass and ceramics in thick cloth and only then break them.
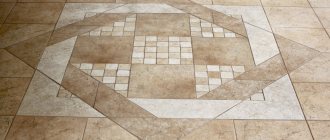
You can lay out any shapes and designs from broken tiles.
Take thick paper, place it on the bottom of the tray, then cut out the resulting shape, make a drawing, then lay out all the mosaic fragments on it. Now you need to secure the drawing with transparent tape. Cut strips of suitable length and stick them onto the mosaic so that a dense film is formed.
You may be interested in: How to glue vinyl wallpaper correctly?
Be sure to grease the mold with vegetable oil, then there will be no problems with removal. Place mosaic tape on the bottom (scotch tape down), then dilute cement powder with water (the mass should look like thick sour cream). Fill with a layer of 1 cm, lay the reinforcing mesh, cover it with mortar. Leave until completely dry, then remove the tile from the mold and remove the tape. It is very suitable for decorating a kitchen in a Mediterranean style.
Advantages of volumetric tiles
Along with the aesthetic appeal and multidimensional effect, it is worth noting other advantages of cladding with this finishing material:
- anti-slip surface - the material will be relevant for the kitchen and bathroom;
- increased wear resistance is an important criterion for flooring;
- environmental friendliness - the material does not cause an allergic reaction and does not emit harmful substances;
- durability - 3D tiles last for several decades without changing their original qualities.
A part of the wall from floor to ceiling made of tiles will look gorgeous. You can complement the wall with LED lighting or a pendant lamp.
How to make a floor clothes hanger with your own hands
You can make a hanger with your own hands, but this will require tools and materials, as well as a little patience, imagination and some skills.
What is this hanger called?
Hangers are divided into floor and wall. The latter, as a rule, consist of several rows of hooks and a pair of shelves. Floor structures are very diverse; they also include racks for clothes, suits, shirts and trousers. This could be a chair hanger or a bedside table hanger. The hanger rack for hangers is simply universal. It can be placed in the nursery, bedroom, hallway and even in the dressing room. It allows you to place a large amount of clothes and can easily replace a closet.
Hanger size and width
Based on the dimensions of the room and the specific location, the hanger size and width are determined and calculated. It should not be very bulky and fit perfectly into the space.
All materials must be durable and safe. When making a structure, the maximum load should be taken into account: the minimum will be for plastic ones, and the maximum for metal ones.
If executed correctly, it can become the “highlight” of your room.
Before starting work, it is necessary to take measurements of the part of the room where you plan to install the hanger. Then, based on the dimensions, you should draw up a drawing of the future structure indicating the dimensions of all parts. This will help you correctly determine the amount of materials needed and accurately cut them into parts.
From pipes
The easiest and most cost-effective way is to assemble a rack from PVC pipes. Plugs, elbows and connections to them - everything can be bought at regular hardware stores. To work with tools you will need a knife and glue. The pipes are easily assembled into a single product without any problems.
A DIY PVC pipe hanger is a simple and original solution for placing things.
Similar hangers have been used by designers for a long time. They are especially relevant for interiors designed in a minimalist style. They can be used in children's rooms as they have good resistance. The structure does not need to be painted; it is easy to replace a deformed element with a new one. If necessary, the pipe hanger can be easily disassembled and can be stored in the pantry.
Since modern plastic is not toxic, pipes can be used to make children's hangers.
Made of wood
You can make your own classic version of a wooden floor clothes hanger with shelves and racks. However, a fragment of a real dry trunk with several strong branches and hooks placed on them will look much more interesting and unusual. The material at hand in the form of a trunk and branches is cleaned, treated with impregnation and fixed on a stand, and then covered with several layers of varnish. Of course, you will have to tinker with such a masterpiece, but it’s worth it.
In order for the structure to last for a long time, it is necessary to use high-quality components.
Other materials
You can use a variety of materials to make a floor hanger, but you need special tools, which cost money. You can assemble a structure from metal pipes. To do this you will need: a drill, bolts, nuts, angles, several pipes (depending on the model) and a hacksaw.
When choosing pipes for a future hanger, you need to start from what kind of clothes or accessories will hang on it.
A model for a child’s room made of chipboard or MDF will look original. Palm trees cut with an electric jigsaw from a chipboard and painted with acrylic paints are used as stands. A chrome rod for hangers is placed between them. The lower part of the floor structure consists of several shelves and drawers for storing linen. The boxes can be replaced with wicker baskets or decorated with seashells.
To prevent your baby from throwing his clothes all over the room, give him a comfortable hanger.
A comfortable hanger chair can be made from an ordinary old stool. A couple of wicker drawers can be placed under the seat. The backrest is assembled from three parts with hangers located at different heights, which will allow you to hang several things at the same time. The seat will be decorated with a soft shaggy pillow.
Decor
Finished products can be decorated. The transformation will depend entirely on imagination, as well as financial capabilities. Decorative elements can be: toys, fabric, leather, shells, natural and artificial stones, glass, rhinestones, decorative painting, elements of artistic forging and wood carving.
Decorating a wooden hanger will require the designer to have a good sense of style and experience.
Photo collection of volumetric tiles
Ceramic tiles with a 3D effect can be found in the WOW, Realonda, Peronda, Equipe, Porcelanosa collections.
Now look at our photo selection. Which options do you like best?
Preparing for work
First, you should prepare the surface so that the pictures lie flat, you will need to perform the following steps:
- clean ceramic tiles from soap stains;
- wipe off the dust with a cloth;
- dry thoroughly;
- degrease the surface with alcohol or acetone;
- prime it with a mixture of PVA glue and acrylic paint in a ratio of 1:2;
- dry;
- apply acrylic paint to create a background and let it dry completely;
- Lightly smooth the surface with fine sandpaper.
Now is the time to start working on the pictures; they, like the ceramic base, need to be prepared for further work. Those who have already had to do decoupage with their own hands usually carefully tear out pictures with their hands. This is not difficult to do, because the print is applied only to the top napkin layer, which is first separated from the rest. Wet, uneven edges, oddly enough, are smoothed out better and become invisible after drying, which makes the design on the ceramic tile look like it was painted with a brush. But it is more convenient to cut out the motifs of the decoupage card with scissors to the size of the tile; in addition, before gluing, keep them in water so that the paper base softens a little.